TURTLE BEACH Windows 10-11 Velocity One Flight Deck
IMPORTANT: READ BEFORE FLIGHT
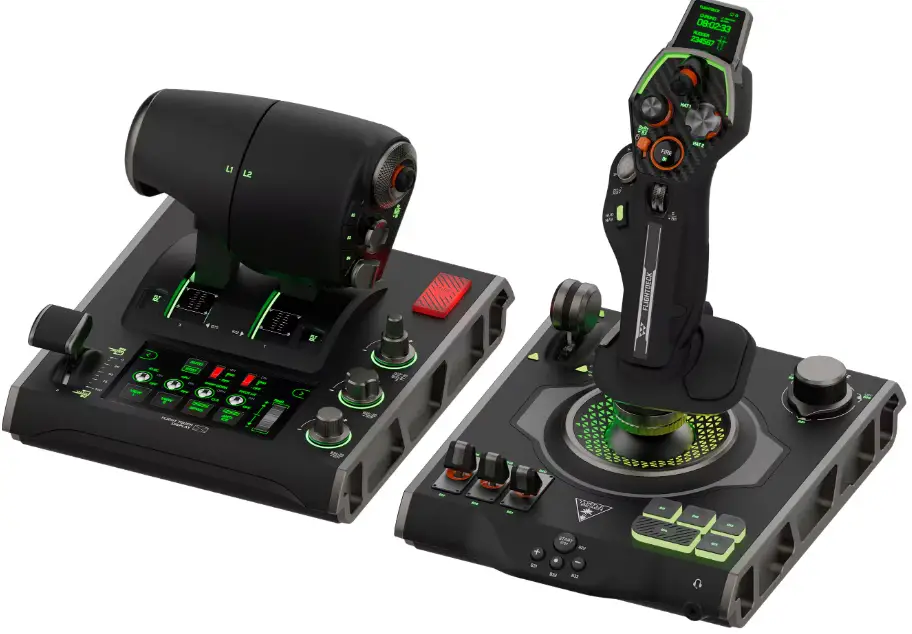
CONTENTS & PRODUCT TOUR

- A Flight Touch Display
- B Stick Handle
- C Head Up Display (HUD)
- D Throttle Module
- E Stick Base
- F M5 hard-mounting screws x3
- G 2m USB-C to USB-A cables x2
CONTROL DESCRIPTION
CONTROL DESCRIPTION – THROTTLE


CONTROL DESCRIPTION – STICK


To avoid mistakenly binding inputs when customizing/configuring controls in certain games and sims, move the Landing Gear Lever 23,24 and 3-Way Rotary Knob 25,26,27 to the middle zone between two buttons while customising.
This is necessary because in the normal state, one of the buttons registers as ‘depressed’ or ‘active’ unless the dial and lever is set in between two inputs.

SYSTEM SETUP
SYSTEM SETUP – ATTACH STICK MODULE TO STICK BASE
DO NOT ROTATE THE STICK HANDLE DURING THIS PROCESS. This may damage the device.

- Look at the gold contacts on the bottom of the stick handle, and rest them onto the matching slots on the base. Hold the stick handle in place with the right hand.
- Using the left hand, slowly rotate the stick base’s threaded ring anticlockwise (depicted in the diagram in blue) to attach the stick base and handle together, ensuring the threads are lined up and not crossed. Do not over-tighten.
SYSTEM SETUP – CONNECT TO PC

- Connect VelocityOne Flightdeck to 2x USB ports on PC by attaching the supplied USB cables as shown. If you have a headset with a standard 3.5mm connection, you can connect it to the Stick Base.
- Flightdeck connects as two separate devices and can be used independently of each other as well as a complete HOTAS flight system.
SYSTEM SETUP – ADJUST STICK HEIGHT

- To Adjust Stick height, push and hold the height adjust button inwards to release the lock.
- The stick handle can slide up or down to accommodate different sized hands.
FLIGHT TOUCH DISPLAY
FLIGHT TOUCH DISPLAY – OVERVIEW

Located on the throttle module, the Flight Touch Display (FTD) combines real-time sim status indication* with advanced customization with up to 39 extra button functions set to your configuration.
Navigation is by touch input and swipe gestures.
Default state of the screen is the settings page and a panel in combat style.
Settings available are:
- Navigation
- Home Screen defaults
- Settings
- Customisation
Customisation options using just the FTD are limited. For full customisation, use the VelocityOne Flight Hangar desktop software.
*Some features implemented post-launch
FLIGHT TOUCH DISPLAY – PANELS

Flight Touch Display (FTD) gives access to an array of virtual buttons, switches and wheels. Using the VelocityOne Flight Hangar desktop software it is possible to customize the theming of the panels and touch inputs, as well as assign different key bindings. Navigate between panels using the left and right arrows, and activate inputs with touch.
Available themes include:
- Combat (default)
- Space
- Commercial

The FTD can display up to 3 panels, each consisting of a set of virtual buttons, switches or wheels. These touch inputs are assigned to keyboard inputs Q W E R T Y etc. These can be displayed using an overlay in the settings page of the FTD (‘Key Bindings’) to determine which touch button is assigned to each virtual keyboard key.
FLIGHT TOUCH DISPLAY – SETTINGS – KEY BINDINGS

- Press the left on-screen arrow to access Flightdeck onboard settings, then select Key Bindings from the menu to access an overview of the system key bindings associated with each virtual button. Use the right and left on-screen arrows to view each panel and it’s bindings.
FLIGHT TOUCH DISPLAY – SETTINGS – HAPTIC DETENTS

- The VelocityOne Flightdeck throttle features optional virtual detent and deadzone control.
- A maximum of 5 detent zones can be enabled, with haptic feedback either through the throttle base or handles. 3 of these detent zones can be moved to any point along the travel of the throttle levers by dragging the sliders to the desired positions. When the throttle control passes through a set slider position, the corresponding button press will be momentarily activated.
- Deadzones and haptic feedback can be quickly toggled on and off.
FLIGHT TOUCH DISPLAY – SETTINGS – REAR SCROLL WHEEL MODE

- The Throttle Module rear scroll wheel response can be set to output as digital buttons or an analogue axis (D B40-41). When in digital mode, the button inputs will activate as a momentary pulse as the wheel is turned.
FLIGHT TOUCH DISPLAY – SETTINGS – AUTOPILOT DIALS

- D4 Twist Axis Response can be set to either a digital or analogue axis output.
- The autopilot dials can be configured to have multiple button presses, ranging from 1 to 3 outputs per click.
FLIGHT TOUCH DISPLAY – SETTINGS – LIGHTING

- Choose from preset lighting themes to be applied across both the throttle and stick.
- Create custom lighting settings in the VelocityOne Hangar Desktop App.
FLIGHT TOUCH DISPLAY – SETTINGS – FIRMWARE

- Check the current installed firmware version. Firmware updates are performed through the Hangar Desktop App.
HEAD UP DISPLAY
HEAD UP DISPLAY (HUD) – OVERVIEW

Located on the stick module, the full-color customizable Head Up Display (HUD) provides access to 2 chosen aircraft parameters, allowing you to effortlessly see key information on-the-fly.
By default the HUD displays Chrono timing and axis output information. The axis can be adjusted in real time using the thumb wheel ‘S’ located under the ‘B1 FIRE’ button. The Chrono function can be started, stopped and reset from within the main menu under ‘CHRONO’.
To access the HUD menu
Press and hold the ‘HUD NAV’ button 1 for 3 seconds, then use the D-PAD directions 2 to navigate the menu.
D-PAD controls are:
 Up
Up Down
Down Confirm
 Back
Back
Settings available are:
- Chrono
- Touchpad
- Pro Aim
- Rudder Lock
- Audio
- Thumb Wheel
- Haptics
- Performance
- Lighting
- Firmware
Press and hold the ‘HUD NAV’ button 1 for 3 seconds to exit the menu.
The theme of the HUD can also be changed using the VelocityOne Hangar desktop software.
The available themes are:
- Combat (default)
- Space
- Commercial
HEAD UP DISPLAY (HUD) – SETTINGS – CHRONO

Set flight time information with the Chrono feature. Once started, exiting the menu by holding the HUD NAV button for 3 seconds will display the active chrono timer on the home screen as long as the Chrono panel has been applied to the HUD via the VelocityOne Flight Hangar desktop software. To stop or reset the chrono, re-enter the menu and use the on-screen controls.
HEAD UP DISPLAY (HUD) – SETTINGS – TOUCHPAD

- Adjust touchpad (FIRE B1) sensitivity values from 0 to 10. Touchpad functionality can be changed to button functionality by flipping the orange mouse lock switch next to the touchpad.
- Clicking the touchpad will replicate the left-click of a mouse, and B2 Trigger will replicate the right-click of a mouse.
HEAD UP DISPLAY (HUD) – SETTINGS – PRO AIM

- Integrated from our range of console controllers, the Pro Aim feature helps to temporarily reduce the sensitivity of the main stick axes. This is useful for making critical in-flight adjustments or honing your aim on an enemy fighter.
- The ‘Set Button’ option enables any of the listed programmable buttons to be set to initiate the Pro Aim feature. The assigned button must be pressed and held. Note that any previously assigned functions to the button will also be output at the same time as Pro Aim.
- The ‘Set Level’ option tunes the total reduction in sensitivity, when the assigned Pro Aim button is pressed. The higher the setting the larger the reduction in sensitivity across all axes.
HEAD UP DISPLAY (HUD) – SETTINGS – RUDDER LOCK

- Rudder lock blocks the input from the twist action of the stick. This can be used in situations where yaw control is not required, or if the stick is being used in conjunction with a set of Rudder Pedals.
HEAD UP DISPLAY (HUD) – SETTINGS – AUDIO

- Adjust Game Volume, Mic Monitoring and Mic Status without pausing your flight. Enhance your experience by choosing one of 5 Turtle Beach Audio presets, including Superhuman Hearing.
HEAD UP DISPLAY (HUD) – SETTINGS – THUMB WHEEL

This feature gives you the ability get live feedback from the Thumb Wheel via the Indicator option and input preference via the Response option.
The Thumb Wheel comes in two versions:
- ANALOG AXIS – Gives precision control for aircraft that use wheel based trim controls.
- DIGITAL BUTTONS – The wheel will output a button pulse depending on what direction it is moved in. Ideal for aircraft that use button based trim controls, or for swapping between weapons and mining tools in space sims.
HEAD UP DISPLAY (HUD) – SETTINGS – HAPTICS

- Enable/disable and adjust the intensity of haptic feedback through the stick handle.
- Intensity ranges from 0% to 100%.
HEAD UP DISPLAY (HUD) – SETTINGS – PERFORMANCE

Performance gives you the ability get live feedback from the stick via the Test option, adjust axis response curves via the Profile option and set Axis deadzones via the Deadzones option.
Profiles come in three versions:
- STANDARD – Unaltered input data for true 1:1 control.
- PRECISION – Make fine adjustments with larger movements ideal for tense landings.
- FAST – Quick snappy movement ideal for arcade style control.
Deadzones can be individually set for the X, Y and Z axis.
HEAD UP DISPLAY (HUD) – SETTINGS – LIGHTING

- Customize the look of the product by selecting from a range of colour themes.
- Create custom lighting settings in the VelocityOne Flight Hangar Desktop App.
HEAD UP DISPLAY (HUD) – SETTINGS – FIRMWARE

- Check the current installed firmware version. Firmware updates are performed through the VelocityOne Flight Hangar Desktop App.
SYSTEM SETUP – VELOCITYONE FLIGHT HANGAR DESKTOP APP
Access the full feature set of VelocityOne Flightdeck with the Flight Hangar desktop software.
Available on the Microsoft Store, Hangar allows you to customize, update and change settings on the Flightdeck, such as:

- Create and swap configurations
- Customize, edit and create Flight Touch Display and HUD control panel layouts
- Adjust axis sensitivity and performance
- Assign Pro Aim functions
- Change lighting settings
- Input testing
- System calibration
- Manage firmware updates
These settings may also be accessed directly using the HUD menu on the Stick unit, and the Flight Touch Display on the Throttle unit. Firmware updates can only be performed through VelocityOne Flight Hangar Desktop Software.
MORE INFORMATION
PLATFORM COMPATIBILITY
- Windows 10/11
Scan

Any questions? Des questions? For setup videos and more, visit www.turtlebeach.com/support and look for VelocityOne Flightdeck in the Simulation category.
Warranty information
- For warranty information and service, please visit www.turtlebeach.com/international-distributors.
- Our goods come with guarantees that cannot be excluded under the Australian Consumer Law.
- For complete details please visit www.turtlebeach.com/international-distributors.
- To make a warranty claim in Australia during the Warranty Period, Purchaser should contact the VTB repair centre: Tecworks International Pty Ltd, 13 Distribution Place, Seven Hills NSW 2147, Tel: 1300 074 512
Documents / Resources
 |
TURTLE BEACH Windows 10-11 Velocity One Flight Deck [pdf] Instruction Manual Windows 10-11 Velocity One Flight Deck, Windows 10-11, Velocity One Flight Deck, One Flight Deck, Flight Deck, Deck |