TrueNAS Mini R Basic Rack
Introduction
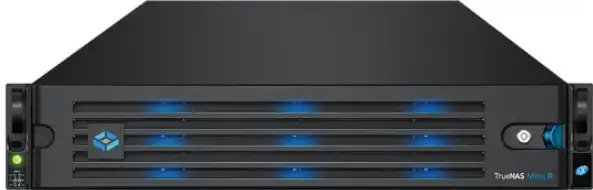
- The TrueNAS Mini R is a 2U Storage Array that has twelve (12) hot-swappable 3.5” drive bays and the option to choose between rack or desktop mounting.
- Your system comes with the TrueNAS operating system preloaded.
- Review the safety considerations and requirements before handling the Mini R or installing it into a rack.
Safety
- WARNING: The TrueNAS Mini products use a Closed Cap style CMOS battery, which is a non-consumer replaceable part due to regulatory requirements.
- Replacement should be performed by a qualified individual in a child-free environment. Contact our support services via support@truenas.com if replacement is needed.
- Remove and immediately recycle or dispose of used batteries according to local regulations and keep them away from children. Do NOT dispose of batteries in household trash or incinerate them.
- Even used batteries may cause severe injury or death.
- Call a local poison control center for treatment information.
- Compatible Battery type (CR2032).
- Nominal Voltage of 3V.
- Non-rechargeable batteries are not to be recharged.
- Do not force recharge, disassemble, heat above (Manufacturer’s specified temperature rating) or incinerate. Doing so may result in injury due to venting, leaking or explosion resulting in chemical burns.
- We recommend at least two people lift a TrueNAS system.
- Warning: Never attempt to lift a TrueNAS system loaded with drives! Install the system in a rack before adding drives. Remove drives before unracking the system.
- Hold the system from the sides or bottom whenever possible. Always be mindful of loose cabling or connectors and avoid pinching or bumping these elements whenever possible.
- This document uses “left” and “right” according to your perspective when facing the front of a system or rack.
Requirements
- We recommend these tools when installing a Mini R system in a rack.
- #2 Philips head screwdriver
- Level
System Specifications and Compliance
| Mini R Specifications | |
| Dimensions (H x W x L) | 3.43 in x 17.2 in x 25.5 in (87 mm x 438 mm x 647.7 mm) |
| Net Weight (Fully Loaded) | 50 lbs (23 kg) |
| Operating Temperature | 41°F – 95°F (5°C – 35°C) |
| Non-Operating Temperature | -40°F – 158°F (-40°C – 70°C) |
| Operating Humidity (non-condensing) | 8% – 90% |
| Supply Voltage | 100-240VAC, 10-5A 50-60 Hz |
The TrueNAS Mini R is a network storage servers intended for use in home, home‑lab, and small office environments.
The apparatus is designed to be operated:
- In indoor residential or office environments, within the specified ranges for temperature, humidity, and supply voltage
- In properly grounded electrical installations, in accordance with local electrical codes
- On a stable, well‑ventilated surface or shelf, with unobstructed airflow around the chassis
- In accordance with the TrueNAS software documentation, including configuration, operation, and maintenance instructions
This product is not designed or intended for:
- Use in professional or industrial environments with demanding environmental conditions (e.g., heavy vibration, conductive dust, or exposure to chemicals)
- Use in situations requiring specialized environmental controls (e.g., clean rooms, high-temperature, or high-humidity installations)
- Any application outside the conditions and purposes described in this manual and the TrueNAS software documentation
- For detailed configuration and operational guidance, refer to the TrueNAS software documentation provided with the product and available from TrueNAS.
The Mini R is FCC/CE-marked and complies with:
- FCC 47 CFR Part 15, Class A – Radiated and conducted emissions limits for commercial IT equipment (EMI/EMC)
- Low Voltage Directive (LVD) 2014/35/EU – Electrical safety
- Electromagnetic Compatibility (EMC) Directive 2014/30/EU – Electromagnetic interference and immunity
- RoHS Directive 2011/65/EU, as amended by (EU) 2015/863 – Restriction of hazardous substances
- WEEE Directive 2012/19/EU – Waste electrical and electronic equipment
- For regulatory or compliance-related queries, contact compliance@truenas.com.
- EU Authorized Representative: Obelis S.A. – Boulevard Général Wahis 53, B-1030 Brussels, BELGIUM
Important – Battery Information
- This product contains a lithium coin cell (CMOS battery) used to maintain system settings. Do not dispose of the battery with household waste.
- Used batteries must be collected and disposed of separately in accordance with local regulations and the EU Battery Directive 2006/66/EC.
- The crossed-out wheeled bin symbol indicates that the battery must be taken to an appropriate collection facility for recycling.
System Components
- TrueNAS units are carefully packed and shipped with trusted carriers to arrive in perfect condition.
- If there is any shipping damage or missing parts, please take photos and contact TrueNAS Support immediately at support@truenas.com, 1-855-GREP4-iX (1-855-473-7449), or 14089434100.
- Please locate and record the hardware serial numbers on the back of each chassis for quick reference.
Carefully unpack the shipping boxes and locate these components:
- Mini R Storage Array

- Mini R Bezel

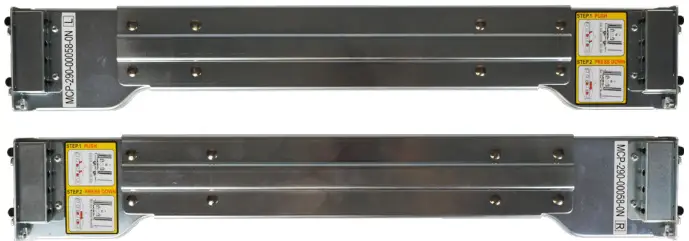
- Set of standard rack mount rails with hardware.
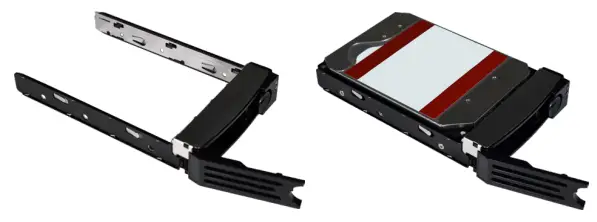
- Twelve (12) 3.5” trays with up to twelve (12) drives, depending on how many you purchased.
Accessory kit:
- One (1) C13 to 5-15P power cord
- Two (2) ethernet cables
- One (1) bag of HDD screws
- Two (2) bezel keys
- Four (4) rubber feet.
- One (1) bag of rail kit screws

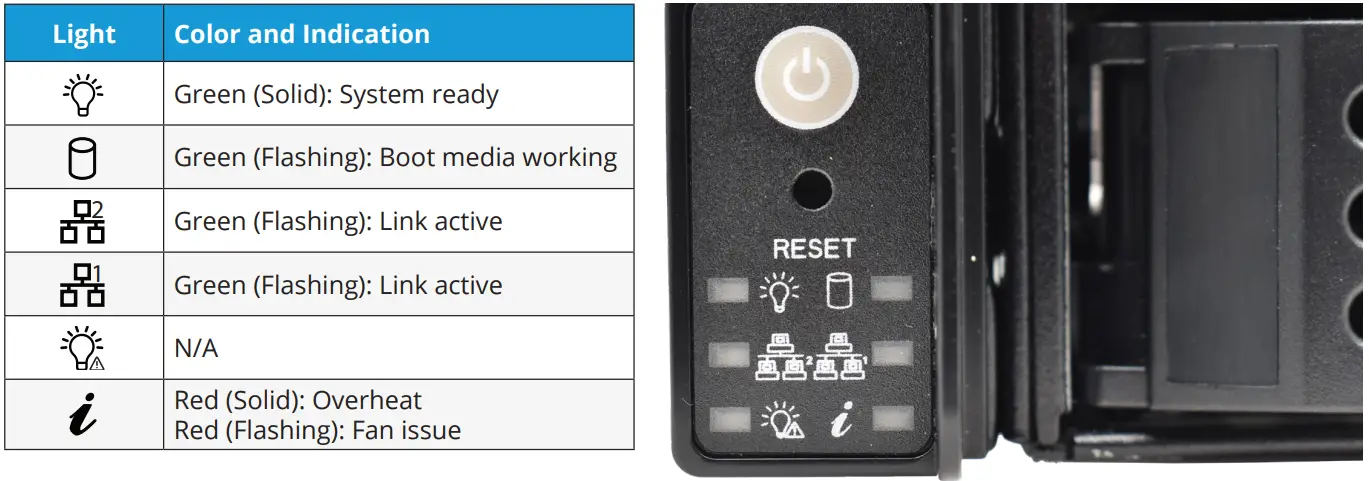
Front Indicators
- The Mini R has front panel buttons for power and system reset. It also has indicator lights for power, boot media activity, network interface activity, and system information.
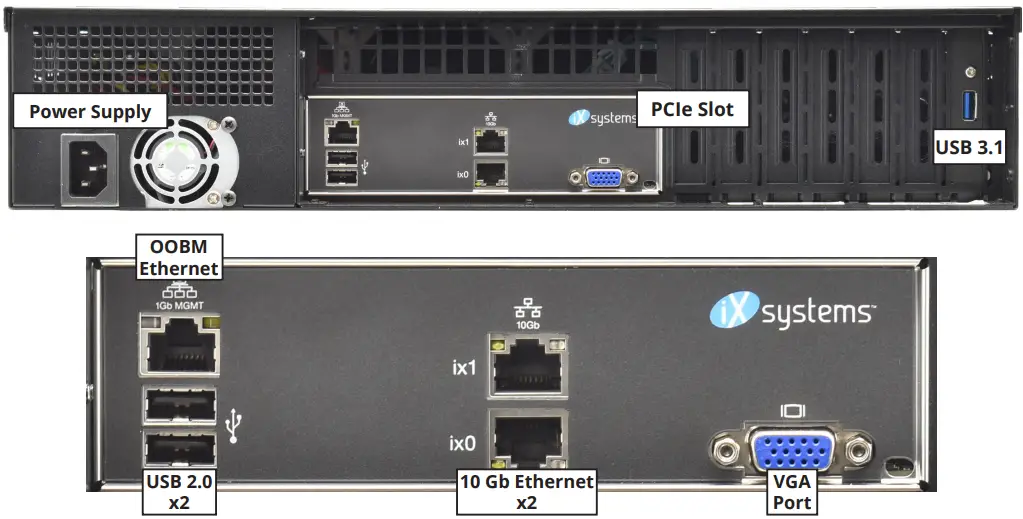
Rear Components and Ports
- The Mini R has a single power supply, one PCIe slot, and various networking and connection ports.
- If you are mounting the Mini R on a desktop instead of in a rack, skip to “4 Install Rubber Feet.
Rack the Mini R
- The Mini R requires an EIA-310 compliant rack and comes with a standard or extended rail kit based on your order.
- The standard rails support racks 19.2” – 26.6” (48.8 cm – 67.6 cm) deep.
- The extended rails support racks 26.6” – 36.5” (67.7 cm – 92.7 cm) deep.
Attach the Chassis Rails
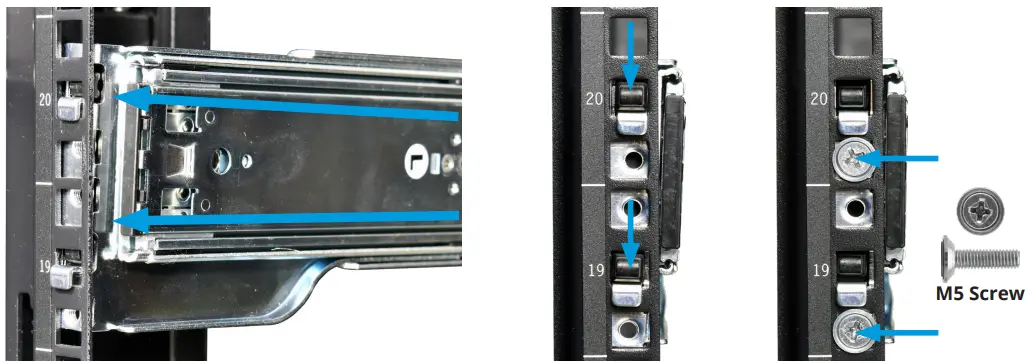
- You must remove the chassis rail from the rack rail before mounting it on the system. Slide the chassis rail out until the metal catch stops it. Push the catch-release and slide the chassis rail out of the rack rail until it is free.

- Align the chassis rail on the side of the system designated by the stickers and ensure they are right-side-up.
- Place the rail slots over the chassis tabs, then slide the rail toward the front of the system until it clicks into place. Secure the rail to the system using one of the low profile #6 rail screws. Repeat this process for the other rail.

Install the Rack Rails
- Align a rack rail with the yellow sticker toward the front of the rack. The flat side must face outside the rack, and the empty inner rail must face inside the rack.
- Place the front tabs and black retaining buttons just above the center holes of each U you are mounting the rail in. Push the tabs into them until the black buttons fully depress, then slide the tabs down.
- Place two M5 machine screws with flush washers in the top and bottom threaded holes.
- With the front of the rail installed, extend the back of the rack rail towards the equivalent attach points on the rear rack post. Make sure the rail remains level from front to back. Follow this process to install the other rack rail.
Install the Mini R in the Rack
- Warning – Pinch Point
- The Mini R can pinch or crush fingers when sliding the rail sleeves onto the rack rails.
- Team-lift the system and align the chassis rails with the rack rails. Slide the ends of the chassis rails into the rack rails and push the Mini R forward until the safety catches lock.
- Press the catch releases down and keep sliding the system forward until it is flush with the front of the rack.
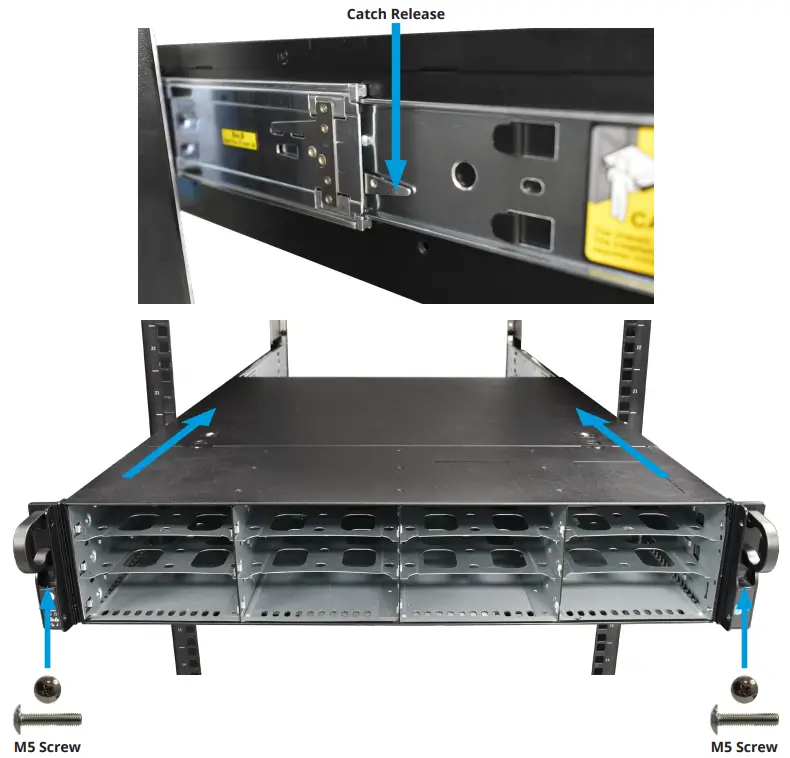
M5 Screw
- Insert a long M5 screw through the holes on each ear to secure the Mini R to the rack.
Install Rubber Feet
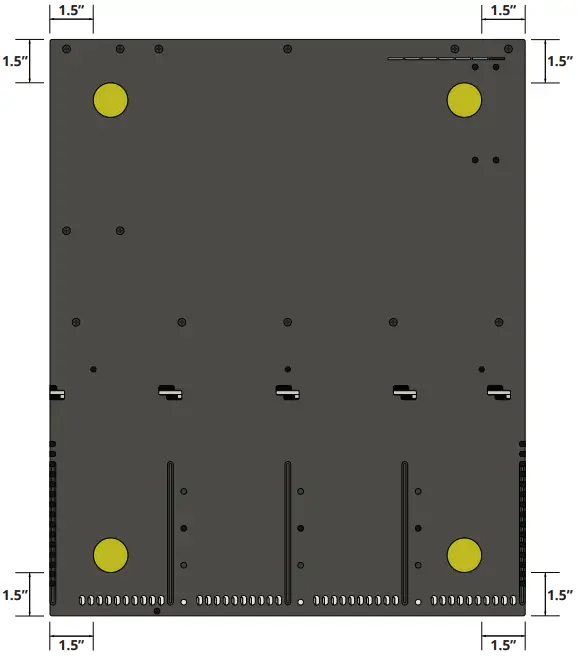
- The Mini R comes with 1¼” adhesive rubber feet for mounting the system on a desktop instead of in a rack.
- The diagram below shows the optimal foot placement on the bottom of the Mini R.
Install Hard Drives
- The Mini R supports TrueNAS‑qualified hard drives up to 18 TB. The Mini R also requires hard drives designed for Network Attached Storage (NAS). These drives run cooler and quieter than desktop drives.
- Please see the Drive Compatibility List available at https://www.truenas.com/truenas-mini1.
- When ordered without hard drives, drive trays ship with protective filler inserts. If you don’t fill all bays with hard drives, keep the fillers in the empty trays to protect them.
Remove Drive Trays
- Release the locking arm by pushing the large circular button to the right. Fully open the locking arm, then gently grip the top and bottom of the tray and remove it.

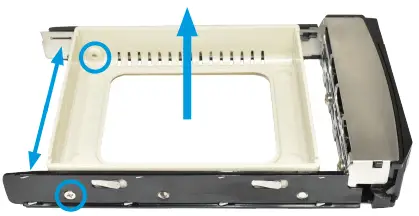
Removing Drive Fillers
- Remove the two rear screws holding the filler. Gently spread both sides of the tray away from the filler until the pins release, then remove the filler.
Place Drives in Trays
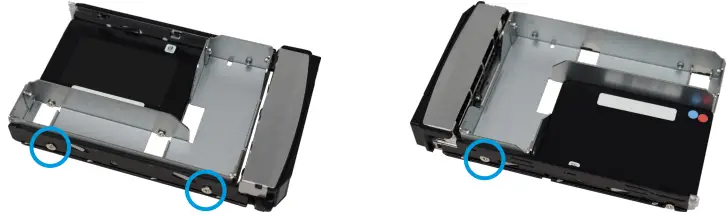
- Place the hard drive in the tray and secure it with four screws.

3.5” to 2.5” SSD Adapters
- Users can convert Mini R 3.5” HDD trays into 2.5” SSD trays with adapters.
- Attach an SSD to the adapter using two of the SSD screws that came with the adapter. Ensure the SSD connector faces outside the adapter. Place the adapter in a drive tray and use the last SSD screw to secure the SSD to the tray.
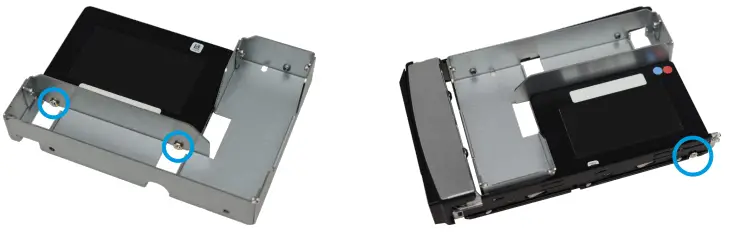
- Use three HDD screws to attach the adapter and SSD to the drive tray.
- To install the tray into the system, follow the instructions in “5.5 Installing Drive Trays” on page 10. Ensure you attached the SSD to the adapter with the connector facing toward the system.
Installing Drive Trays
- Gently insert a tray into a drive bay until it stops. Close the locking arm until it locks. Repeat for all hard drives, then load trays with fillers into the remaining empty bays.
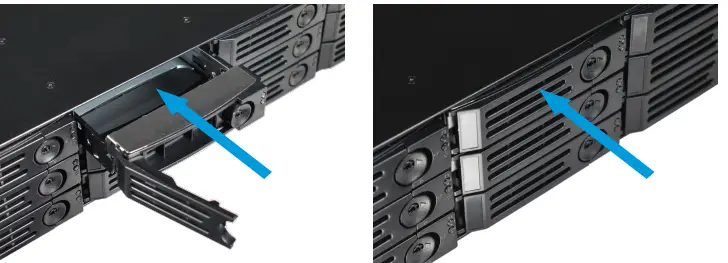
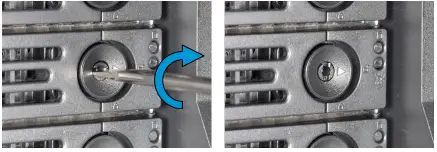
- For extra security, you can lock the drive tray into the system. The tray button is unlocked when the inner slot is horizontal and locked when the slot is vertical.
- To lock a tray, insert a flat‑head screwdriver into the center button slot and gently turn it ninety degrees clockwise until the slot is vertical.
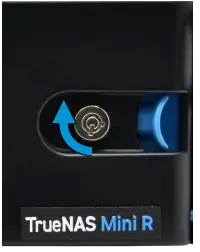
Attach the Bezel
(Optional)
- Slide the left side of the bezel into the attachment points on the left ear, then push the right side of the bezel into the right ear latch until it locks.
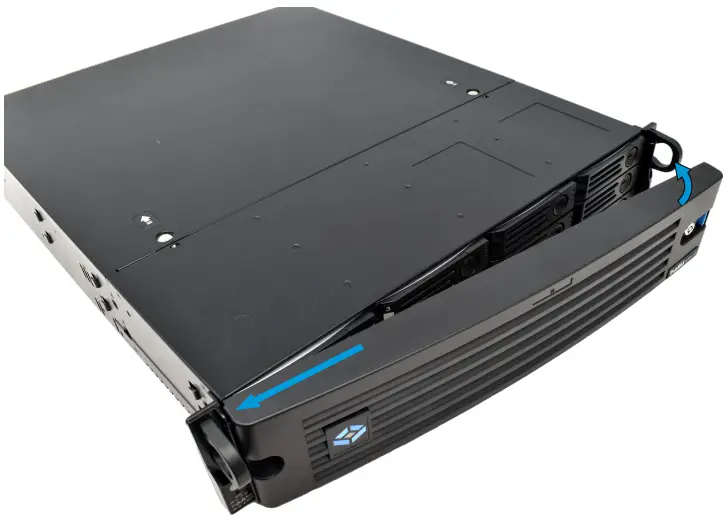
- You can lock the bezel for added security. To do so, insert a key in the lock and turn it ninety degrees clockwise.
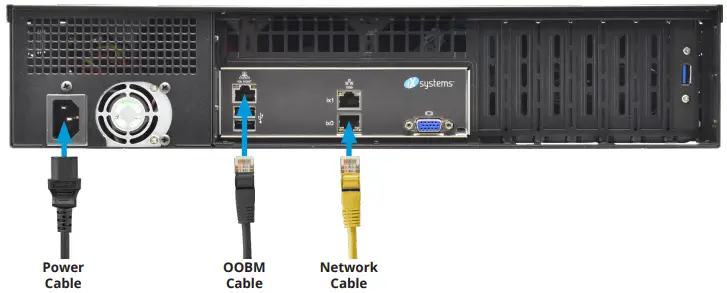
Connect Network and Power Cables
- Connect network cables from the router or switch to the gigabit networking port and the OOBM ethernet port.
- Plug the power cable into the Mini R, then a power outlet.
Powering on the TrueNAS Mini
- The Power and Reset buttons control the power state of the TrueNAS Mini. These buttons behave in the same manner as standard PC power and reset buttons. When the system is off, pressing the power button turns the system on.
- Pressing and holding the power button while the system is running performs a hard power off. The reset button reboots the system.
- By default, the Mini powers on as soon as you plug the cable into a live power source. In the event of power loss, the Mini R also powers on as soon as power restores.
Warning – Grounded Connection
- Always connect power cords to properly grounded connections.
Notice: High Draw USB Devices
- The current draw on the Mini power supply +5Vsb line can exceed specifications if you leave high‑draw USB devices attached to the rear USB ports when the Mini R is powered off.
- Unplug high‑draw devices (such as bus‑powered USB hard drives) before powering off your Mini R.
Console Setup
- You can connect a VGA monitor and USB keyboard for console access, but they are not required. If a monitor and keyboard are attached, you can see the Console Setup Menu.
- For more details about the Console options, see https://www.truenas.com/docs/scale/gettingstarted/install/consolesetupmenuscale/2.
- If you want remote out-of-band management (OOBM) via IPMI, connect a network cable to the IPMI port. See section “2.2 Rear Components and Ports” on page 4 to find your Mini IPMI port.
Warning – BIOS and IPMI Firmware
- Your system is equipped with the optimal BIOS and IPMI firmware out of the box.
- DO NOT UPGRADE your system’s BIOS and IPMI firmware.
- We recommend that IPMI be on a separate and secure network without Internet access. Please contact support if you need to upgrade your system’s BIOS or IPMI firmware.
TrueNAS Web Interface
- TrueNAS uses the Multicast DNS service, also known as Bonjour or mDNS, to make the system accessible on most networks without additional setup.
- Open a web browser on another computer on the same network. Open the TrueNAS web interface by navigating to truenas.local (or your Mini R IP address).
Connect to the TrueNAS Interface
- The TrueNAS web interface uses default credentials for first‑time logins.
- Username: admin
- Password: abcd1234
- After logging in, change the admin account password in Credentials > Local Users to increase system security.
- If you have more than one TrueNAS device connected to the network, mDNS can experience name conflicts.
- To change the hostname in the web UI, go to Network and click Settings in the Global Configuration widget.
Out-of-Band-Management
- Out-of-band logins have separate credentials from the TrueNAS web interface. The credentials are randomized and attached to the back of the TrueNAS Mini R chassis. For more details, see https://www.truenas.com/docs/sb-3273.
- For more on Mini R Out-of-band Management, see: https://www.truenas.com/docs/files/MiniX+OOBM25011.pdf4.
Change TrueNAS Versions
- If you want to upgrade or run a different version of TrueNAS, you can find new and legacy versions at https://www.truenas.com/download-truenas-community-edition5 (SCALE).
- After downloading your desired version, you must use image utility like balenaEtcher or Rufus to flash the ISO file to a USB drive.
- Plug the flashed USB drive into a USB port on your Mini and select it from the boot menu during system startup. Follow the install instructions on our Documentation Hub.

Additional Resources
- The TrueNAS Documentation Hub has complete software configuration and usage instructions. Click Guide in the TrueNAS web interface or go directly to: https://www.truenas.com/docs
- Additional hardware guides and articles are in the Documentation Hub’s Hardware section: https://www.truenas.com/docs/hardware
- The TrueNAS Forums provide opportunities to interact with other TrueNAS users and discuss their configurations: https://forums.truenas.com
Contact Us
- Having issues? Please contact TrueNAS Enterprise Support to ensure a smooth resolution.
| Contact Method | Contact Options |
| Web | https://www.truenas.com/support |
| support@truenas.com | |
| Telephone | Monday‑Friday, 6:00AM to 6:00PM Pacific Standard Time:
• US-only toll-free: 18554737449 option 2 • Local and international: 14089434100 option 2 |
| Telephone | Telephone After Hours (24×7 Gold Level Support only):
• US-only toll-free: 18554995131 • International: 1408-8783140 (International calling rates will apply) |
| Address | iXsystems, Inc. dba TrueNAS ‑ 541 Division St, Campbell, CA 95008, USA |

- Support: 8554737449 or 14089434100
- Email: support@truenas.com
Compliance
This device complies with Part 15 of the FCC rules. Operation is subject to the following two conditions:
- This device may not cause harmful interference.
- This device must accept any interference received, including interference that may cause undesired operation.
MODEL NAME:
- TrueNAS Model Mini E+:
- CAN ICES-3 (A) / NMB-3 (A)
- VOLTAGE: 100-240VAC
- Current 10-5A Max
- WARNING: To remove all hazardous voltages, disconnect all power cords.

- FREQUENCY: 50/60Hz
- CONTACT: support@iXsystems.com
- www.iXsystems.com
- 18554737449
Documents / Resources
 |
TrueNAS Mini R Basic Rack [pdf] User Guide Mini R Basic Rack, Mini R, Basic Rack, Rack |