1. Giriş
This user manual provides detailed instructions for the GKU D900JP Dual Dash Cam. Please read this manual thoroughly before using the product to ensure proper operation and to maximize its features. Keep this manual for future reference.
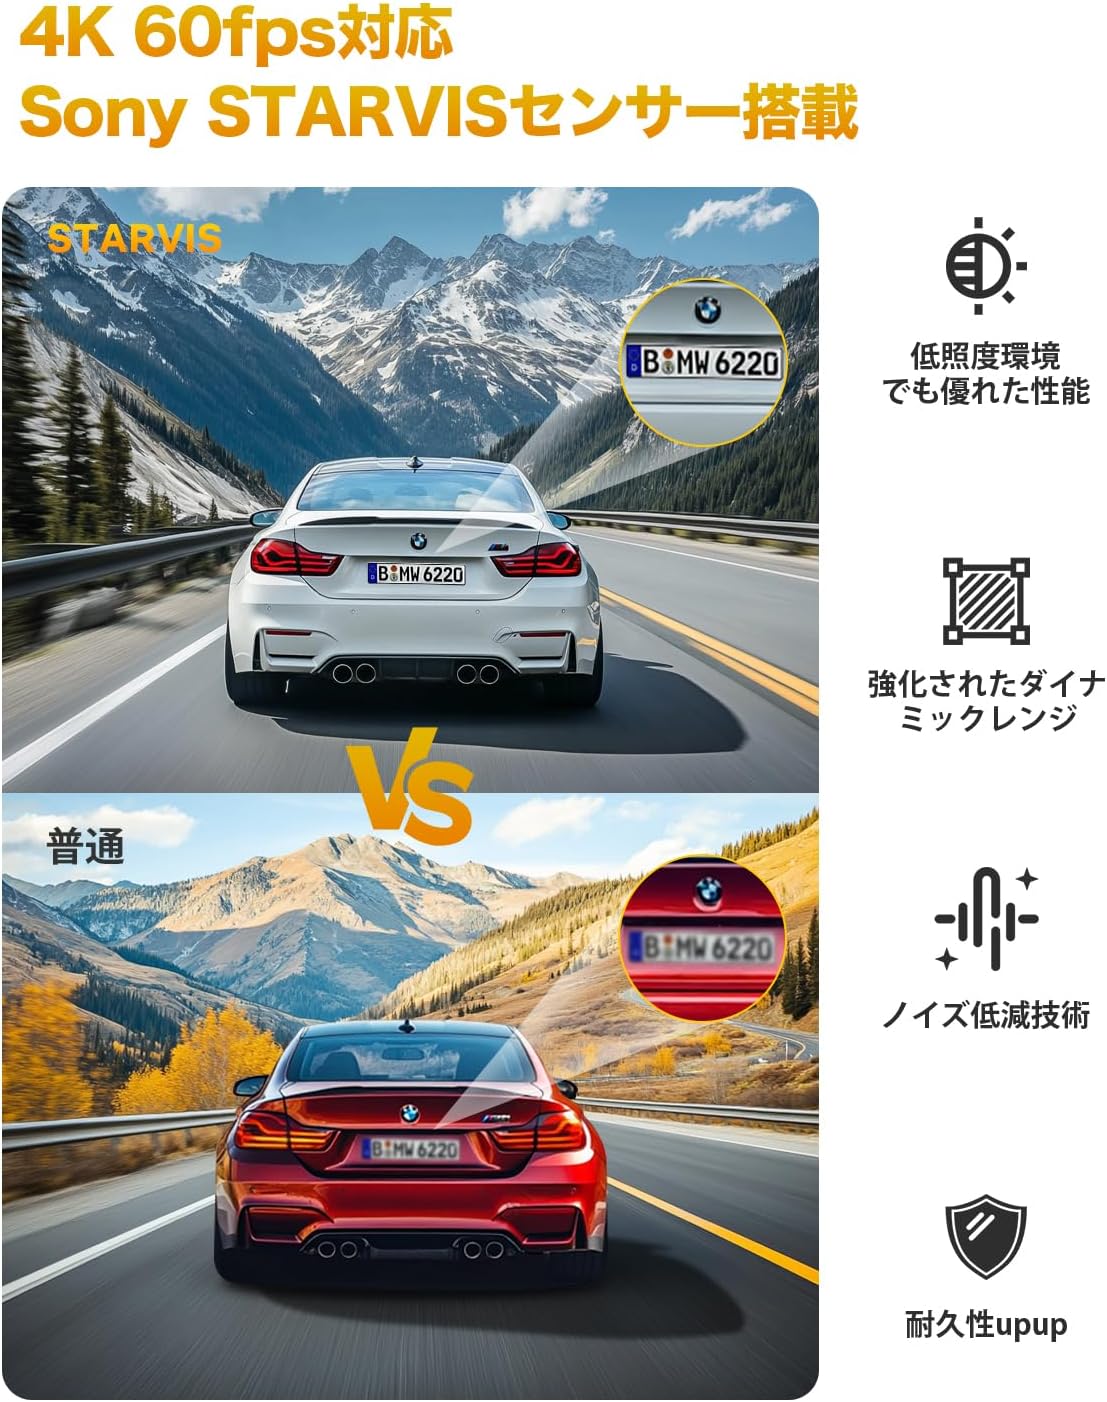
The GKU D900JP is designed to record driving footage in high definition, offering both front and rear camera views. It incorporates advanced features such as a Sony IMX335 STARVIS sensor, 5GHz WiFi connectivity, integrated GPS, High Dynamic Range (HDR) for improved image clarity, 24-hour parking monitoring, G-sensor emergency recording, and continuous loop recording.
2. Ürün Bittiview
2.1. Paket İçeriği
Aşağıda listelenen tüm öğelerin paketinizde bulunduğunu doğrulayın:
- GKU D900JP Main Unit
- Arka Kamera
- Kullanıcı Kılavuzu
- Garanti Kartı
- Charging Cable (Cigarette Lighter Power Cable)
- 64 GB SD Kart
- 3M Çift Taraflı Bant
- Electrostatic Protection Film
- Wiring Removal Tool
- Kablo Klipsleri

2.2. Ürün Özellikleri
- Yüksek Çözünürlüklü Kayıt: Front 4K (800W pixels) and Rear 2.5K Full HD simultaneous recording.
- Sony IMX335 Sensor & STARVIS Technology: Ensures clear and vivid images day and night, suppressing noise in low-light conditions.
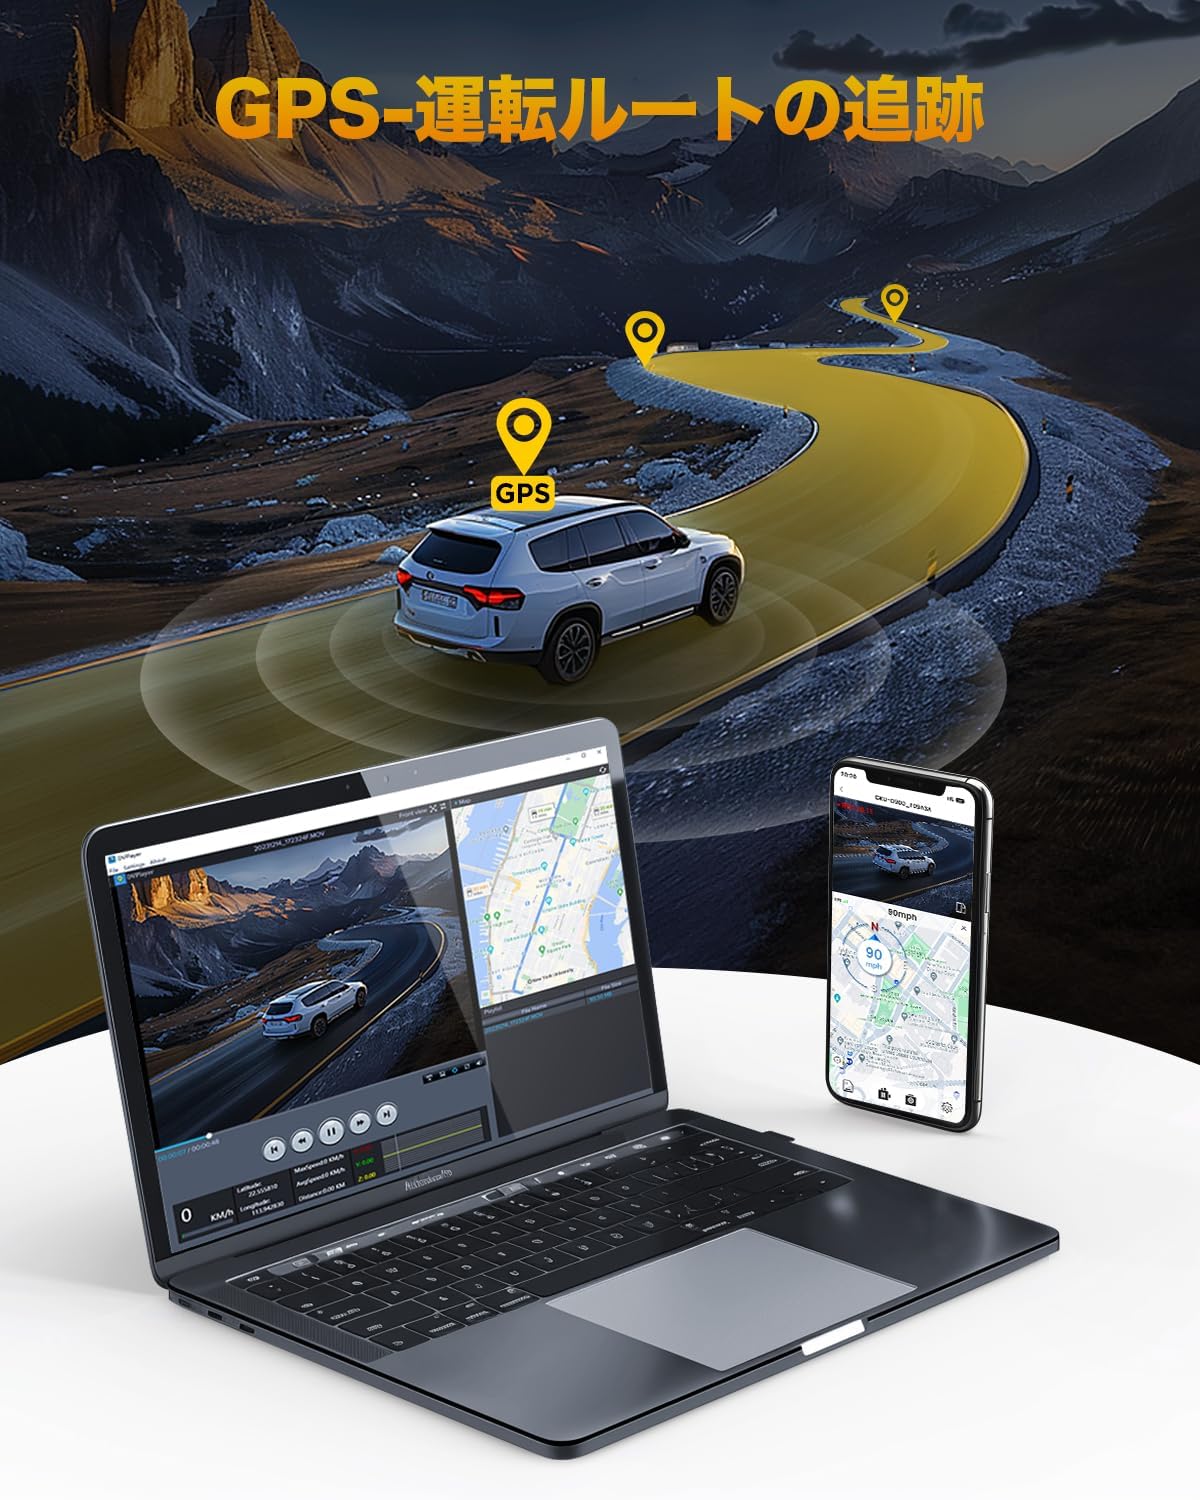
- Entegre GPS: Accurately records driving route, location, and speed data.
- 1.47 inç LCD Ekran: Gerçek zamanlı izin verir viewing of recorded footage.
- 5GHz Wi-Fi & App Control: High-speed data transfer to smartphones for viewing, downloading, and sharing videos via the GKU GO app.
- HDR Function: Optimizes images in strong backlight or high contrast scenes, preventing overexposure and underexposure.
- Rotatable Cameras: Front camera rotates 340°, rear camera rotates 360° for flexible angle adjustment.
- Süper Kapasitör: Provides stable power supply and enhanced durability in extreme temperatures (-20°C to 70°C).
- Döngü Kaydı: Eski sürümün üzerine otomatik olarak yazılır. files SD kart dolduğunda.
- G-Sensor Acil Durum Kaydı: Foo'yu otomatik olarak kilitlertage upon detecting impacts or sudden braking to prevent overwriting.
- 24 Saat Park Yeri İzleme: Utilizes G-sensor and time-lapse recording (requires dedicated ACC step-down cable, sold separately).
3. Kurulum
3.1. SD Kartın Takılması
- Araç içi kameranın kapalı olduğundan emin olun.
- Locate the SD card slot on the main unit.
- Insert the provided 64GB SD card (or a compatible U3 standard SD card up to 512GB) into the slot until it clicks into place.
- Upon first use, it is recommended to format the SD card through the dash cam's settings menu to ensure optimal performance.

4. Kurulum
4.1. Ön Kameranın Montajı
- Araç içi kameranın monte edileceği ön cam bölgesini temizleyin.
- Apply the electrostatic protection film to the chosen area on the windshield. This allows for easier removal later.
- Attach the 3M double-sided tape to the dash cam's mounting bracket.
- Press the bracket firmly onto the electrostatic film on the windshield.
- Attach the main unit to the bracket. The front camera can be rotated 340° to adjust the viewaçı.
4.2. Arka Kameranın Montajı
- Clean the rear windshield area.
- Attach the rear camera using the provided 3M double-sided tape.
- Connect the rear camera cable to the main unit. The rear camera can be rotated 360° for optimal positioning.

4.3. Güç Bağlantısı ve Kablo Yönetimi
- Connect the charging cable to the main unit and plug the other end into your car's cigarette lighter socket.
- Route the power cable and rear camera cable neatly along the edges of the windshield and interior trim using the provided wiring removal tool and clips.
- For 24-hour parking monitoring, a dedicated ACC step-down cable (sold separately) is required for direct wiring to the car's fuse box.

5. Kullanım Talimatları
5.1. Güç Açma/Kapatma
- Araç kamerası, aracınızın kontağı açıldığında otomatik olarak açılacak ve kayda başlayacaktır.
- Kontak kapatıldığında otomatik olarak kapanacaktır.
5.2. Temel Kayıt
Once powered on, the dash cam will automatically start recording. The 1.47-inch LCD screen will display the live view kameralardan.
5.3. Menü Navigasyonu
Use the physical buttons on the dash cam to navigate through the menu options. Refer to the on-screen prompts for specific functions like formatting the SD card, adjusting recording settings, or changing display modes.
6. App and Connectivity
6.1. Connecting to the GKU GO App
- Download the "GKU GO" app from the Apple App Store or Google Play Store.
- Turn on the dash cam's Wi-Fi function (refer to the dash cam's menu).
- On your smartphone, go to Wi-Fi settings and connect to the dash cam's Wi-Fi network (SSID and password can be found on the dash cam screen or in the manual).
- Open the GKU GO app. You can now view canlı footage, kaydedilmiş videoları inceleyin, indirin files, and adjust settings directly from your phone.
Note: For optimal connection, temporarily disable your phone's cellular data and Bluetooth when connecting to the dash cam's Wi-Fi.

6.2. High-Speed 5GHz Wi-Fi
The GKU D900JP supports 5GHz Wi-Fi, enabling faster data transfer speeds compared to standard 2.4GHz connections. This facilitates quick viewing and downloading of high-resolution video files akıllı telefonunuza.
7. Gelişmiş Özellikler
7.1. GPS Takibi
The integrated GPS module accurately records your vehicle's driving route, location, and speed. This data can be viewvideonuzun yanında footage using the dedicated GKU GO app or PC player, providing crucial evidence in case of an incident and enhancing your travel records.

7.2. HDR Night Vision
The High Dynamic Range (HDR) function optimizes video quality in challenging lighting conditions, such as strong backlight or low light. It captures details in both bright and dark areas simultaneously, reducing overexposure and underexposure to produce clear and balanced footage, especially during night driving.

7.3. 24 Saat Park Yeri İzleme
When connected to a dedicated ACC step-down cable (sold separately), the dash cam can monitor your vehicle for 24 hours. It supports G-sensor emergency recording and time-lapse recording modes to capture events while parked.
7.4. G-Sensor Emergency Recording
The built-in G-sensor detects sudden impacts or rapid acceleration/deceleration. When triggered, it automatically locks the current video segment, protecting it from being overwritten by loop recording. These locked videos are stored in a separate folder on the SD card.

7.5. Döngü Kaydı
The dash cam continuously records video in short segments (e.g., 1, 2, or 3 minutes). When the SD card reaches its storage limit, the oldest unlocked fileYeni kayıtlar otomatik olarak üzerine yazılır. Bu sayede manuel müdahaleye gerek kalmadan kesintisiz kayıt sağlanır.

8. Bakım
8.1. SD Kart Yönetimi
- Veri bozulmasını önlemek ve sorunsuz kayıt sağlamak için SD kartı düzenli olarak (örneğin ayda bir kez) biçimlendirin.
- Önemli videoyu yedekleyin fileBiçimlendirmeden önce dosyaları bir bilgisayara veya bulut depolama alanına kaydedin.
- Kayıt hataları veya performans düşüşü fark ederseniz SD kartı değiştirin.
8.2. Cihazın Temizlenmesi
- Use a soft, dry cloth to clean the camera lenses and the device body.
- Cihaza zarar verebilecek aşındırıcı temizleyiciler veya solventler kullanmaktan kaçının.
9. Sorun Giderme
If you encounter any issues with your GKU D900JP Dash Cam, please refer to the following common solutions:
| Sorun | Olası Neden | Çözüm |
|---|---|---|
| Araç kamerası açılmıyor. | No power supply; faulty cable; car's power outlet issue. | Check power cable connection; test with another power source; ensure car's ignition is on. |
| Kayıt duruyor veya donuyor. | SD kart hatası; uyumsuz SD kart; SD kart dolu. | Format the SD card; use a U3 standard SD card; replace the SD card. |
| Kötü video kalitesi. | Kirli lens; lensin üzerinde hala koruyucu film var; yanlış ayarlar. | Clean the lens; remove any protective film; check resolution settings in the menu. |
| Wi-Fi bağlantı sorunları. | Incorrect password; interference; phone settings. | Verify Wi-Fi password; disable cellular data/Bluetooth on phone; restart dash cam and phone. |
| GPS çalışmıyor. | Poor satellite signal; GPS module error. | Açık olduğundan emin olun view of the sky; check GPS settings in the menu; contact support if issue persists. |
If the problem persists after attempting these solutions, please contact GKU customer support for assistance.
10. Özellikler
The following table outlines the technical specifications of the GKU D900JP Dash Cam:
| Özellik | Şartname |
|---|---|
| Ekran Boyutu | 1.47 inç |
| Uyumlu Cihazlar | Smartphone, PC |
| Renk | D900JP |
| Marka Adı | GKU |
| Üretici | GKU |
| Ürün Model Numarası | D900-JP |
| Diğer Fonksiyonlar | LED Signal Light Compatible, Sony IMX335 Sensor, STARVIS, Parking Monitor, Night Vision |
| Boyut | Küçük |
| Görüntü Türü | LCD |
| Montaj Yöntemi | Ön Cam Montajı |
| Ürün Boyutları | 4.2 x 10.6 x 5.4 cm; 550 g |
| Video Yakalama Çözünürlüğü | 4K+2.5K |
| Montaj Tipi | Ön Cam Montajı |
| Alanı View | 340 derece |
| Kontrol Yöntemi | Uygulama |
11. Garanti ve Destek
11.1. Garanti Bilgileri
The GKU D900JP Dash Cam comes with a 12-month warranty from the date of purchase. This warranty covers manufacturing defects and ensures that the product meets its specified performance standards. Please retain your proof of purchase for warranty claims.
11.2. Müşteri Desteği
GKU provides dedicated customer support. If you have any questions, require technical assistance, or need to make a warranty claim, please contact our support team. Our Japanese-speaking support center and specialized customer service team are available to assist you.
Contact information can be found on the GKU official website or through the contact details provided with your product packaging.


