1. Giriş
This user manual provides comprehensive instructions for the installation, configuration, and maintenance of the Supermicro X10DRG-O+-CPU Motherboard. This motherboard is designed for high-performance computing environments, supporting dual Intel Xeon E5-2600 v3/v4 processors and extensive memory configurations.
Please read this manual thoroughly before beginning the installation process to ensure proper setup and operation.
2. Güvenlik Bilgileri
Always observe the following safety precautions when handling the motherboard and other computer components:
- Herhangi bir bileşeni takmadan veya çıkarmadan önce güç kaynağının duvar prizinden çıkarıldığından emin olun.
- Statik elektriği boşaltmak için antistatik bileklik takın veya sık sık topraklanmış metal bir nesneye dokunun.
- Hassas parçalara dokunmaktan kaçınmak için anakartı kenarlarından tutun.
- Anakartı sıvılardan ve aşırı sıcaklıklardan uzak tutun.
- Refer to the safety guidelines provided with other components (CPU, RAM, etc.) for additional precautions.
3. Paket İçeriği
Paketin içindeki tüm ürünlerin eksiksiz olduğundan emin olun. Herhangi bir ürün eksik veya hasarlıysa, derhal satıcınızla iletişime geçin.
- Supermicro X10DRG-O+-CPU Motherboard
- I / O Kalkanı
- SATA Kabloları (miktar değişebilir)
- Hızlı Başvuru Kılavuzu
- Sürücü CD/DVD'si (veya sürücüleri indirmek için bağlantı)
4. Anakart Düzeni
Aşağıda bir tane varview of the Supermicro X10DRG-O+-CPU Motherboard, highlighting key components and connectors.
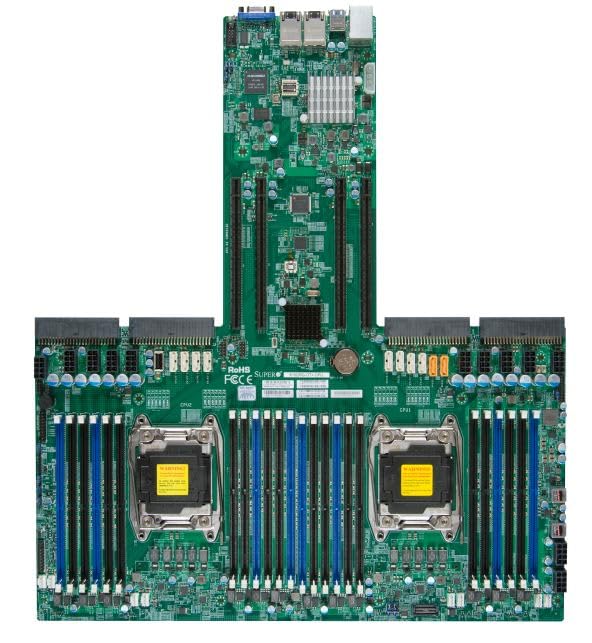
Figure 4.1: Supermicro X10DRG-O+-CPU Motherboard. This image displays the full motherboard, showing the dual CPU sockets, numerous DDR4 DIMM slots, PCIe expansion slots, and various I/O ports and connectors.
Temel Bileşenler:
- CPU Sockets (LGA 2011-3): Two sockets for Intel Xeon E5-2600 v3/v4 processors.
- DDR4 DIMM Yuvaları: Multiple slots supporting up to 3072 GB of ECC DDR4 memory.
- PCIe Genişleme Yuvaları: Various PCIe 3.0 slots for graphics cards, network cards, and other expansion devices.
- SATA Bağlantı Noktaları: Connectors for SATA 3.0 storage devices.
- USB Bağlantı Noktaları: USB 2.0 and USB 3.0 headers and rear panel ports.
- LAN Bağlantı Noktaları: Ethernet ports for network connectivity.
- Güç Konnektörleri: ATX 24-pin, 8-pin EPS, and 4-pin power connectors.
5. Kurulum
Anakartın ve bileşenlerinin doğru kurulumu için aşağıdaki adımları izleyin.
5.1 CPU Kurulumu
- CPU soketi tutma kollarını açın.
- CPU'yu soketle dikkatlice hizalayın, CPU üzerindeki üçgen işaretin soket üzerindeki işaretle eşleştiğinden emin olun.
- CPU'yu zorlamadan yavaşça sokete yerleştirin.
- CPU'yu sabitlemek için tutma kollarını kapatın.
- Apply thermal paste and install the CPU cooler according to the cooler manufacturer's instructions.
5.2 Bellek (RAM) Kurulumu
- DIMM yuvasının her iki ucundaki klipsleri açın.
- DDR4 bellek modülündeki çentiği DIMM yuvasındaki anahtarla hizalayın.
- Modülü, klipsler yerine oturana kadar sıkıca yuvaya yerleştirin.
- Repeat for all desired memory modules, following the motherboard's memory population guidelines for optimal performance.
5.3 Depolama Aygıtı Kurulumu
- SATA veri kablosunun bir ucunu anakart üzerindeki bir SATA portuna bağlayın.
- SATA veri kablosunun diğer ucunu SATA sabit diskinize veya SSD'nize bağlayın.
- Güç kaynağınızdan depolama aygıtınıza bir SATA güç kablosu bağlayın.
5.4 Genişletme Kartı Kurulumu
- Select an appropriate PCIe slot for your expansion card (e.g., GPU, network card).
- Bilgisayarınızın kasasından ilgili yuva kapağını çıkarın.
- Genişletme kartını yuvaya hizalayın ve tamamen yerine oturana kadar sıkıca bastırın.
- Secure the card with a screw or retention clip to the PC case.
5.5 Güç Bağlantıları
- Güç kaynağınızdaki 24 pinli ATX güç konektörünü anakart üzerindeki ana güç başlığına bağlayın.
- Connect the 8-pin EPS (CPU) power connector(s) to the corresponding headers near the CPU sockets.
- Tüm güç kablolarının güvenli bir şekilde bağlandığından emin olun.
5.6 Ön Panel Bağlantıları
Connect the front panel cables (Power LED, HDD LED, Power Switch, Reset Switch, USB, Audio) from your PC case to the corresponding headers on the motherboard. Refer to the motherboard's silkscreen labels for correct pin assignments.
6. Çalıştırma
6.1 BIOS/UEFI Kurulumu
Upon first boot, you may need to enter the BIOS/UEFI setup utility to configure system settings. Typically, you can access this by pressing SİL or F2 during the POST (Power-On Self-Test) sequence. Common settings to configure include boot order, date/time, and enabling/disabling specific features.
6.2 Sürücü Kurulumu
After installing your operating system, install the necessary drivers for the motherboard's chipsets, LAN, audio, and other integrated components. Drivers can be found on the included driver CD/DVD or downloaded from the Supermicro official webalan.
6.3 İşletim Sistemi Kurulumu
Insert your operating system installation media (USB drive or DVD) and follow the on-screen prompts to install the OS. Ensure the boot order in BIOS/UEFI is set to prioritize your installation media.
7. Bakım
7.1 Temizlik
Anakart ve bileşenlerdeki tozu düzenli olarak basınçlı hava kullanarak temizleyin. Temizlemeden önce sistemin kapalı ve fişinin çekilmiş olduğundan emin olun. Sıvı veya aşındırıcı malzemeler kullanmaktan kaçının.
7.2 Firmware Güncellemesi
Supermicro'yu periyodik olarak kontrol edin. website for updated BIOS/UEFI firmware. Firmware updates can improve stability, performance, and add support for new hardware. Follow the provided instructions carefully when performing a firmware update to avoid system damage.
8. Sorun Giderme
Bu bölümde karşılaşabileceğiniz yaygın sorunlara çözümler sunulmaktadır.
| Sorun | Olası Neden | Çözüm |
|---|---|---|
| Sistem açılmıyor. | Gevşek güç kabloları, arızalı güç kaynağı, yanlış ön panel bağlantıları. | Check all power connections (24-pin, 8-pin EPS). Verify front panel power switch connection. Test power supply. |
| Görüntü çıkışı yok. | Incorrectly seated GPU, faulty monitor cable, no integrated graphics. | Reseat the graphics card. Check monitor cable connections. Ensure monitor is on correct input. |
| Sistem sürekli olarak bip sesi çıkarıyor. | Memory (RAM) issue. | Reseat RAM modules. Try one module at a time. Refer to BIOS beep codes for specific diagnosis. |
| İşletim sistemi bulunamadı. | Incorrect boot order, loose SATA cable, unformatted drive. | Check BIOS/UEFI boot order. Reseat SATA cables. Ensure drive is properly formatted and OS installed. |
9. Özellikler
Detailed technical specifications for the Supermicro X10DRG-O+-CPU Motherboard.
- Model Numarası: MBD-X10DRG-O+-CPU
- Marka: Supermicro
- CPU Desteği: Dual Intel Xeon E5-2600 v3/v4 Processors (LGA 2011-3)
- RAM Bellek Maksimum Boyutu: 3072 GB DDR4 ECC
- Sistem Veri Yolu Standardı Destekleniyor: SATA 3
- S/PDIF Connector Type: Optik
- Paket Boyutları: 25 x 25 x 4 inç
- UPC: 672042176427
- İlk Mevcut Tarih: 21 Haziran 2023
10. Garanti ve Destek
For warranty information and technical support, please refer to the official Supermicro webSatın alma noktanıza başvurun veya satın alma noktanızla iletişime geçin. Garanti talepleriniz için satın alma belgenizi saklayın.
Supermicro Official Webalan: www.supermicro.com


