1. บทนำ
This manual provides detailed instructions for the setup, operation, maintenance, and troubleshooting of the RGBlink NDI PTZ Camera Controller (RGBBKT). This device is designed for professional video production environments, offering comprehensive control over various PTZ cameras using multiple protocols.
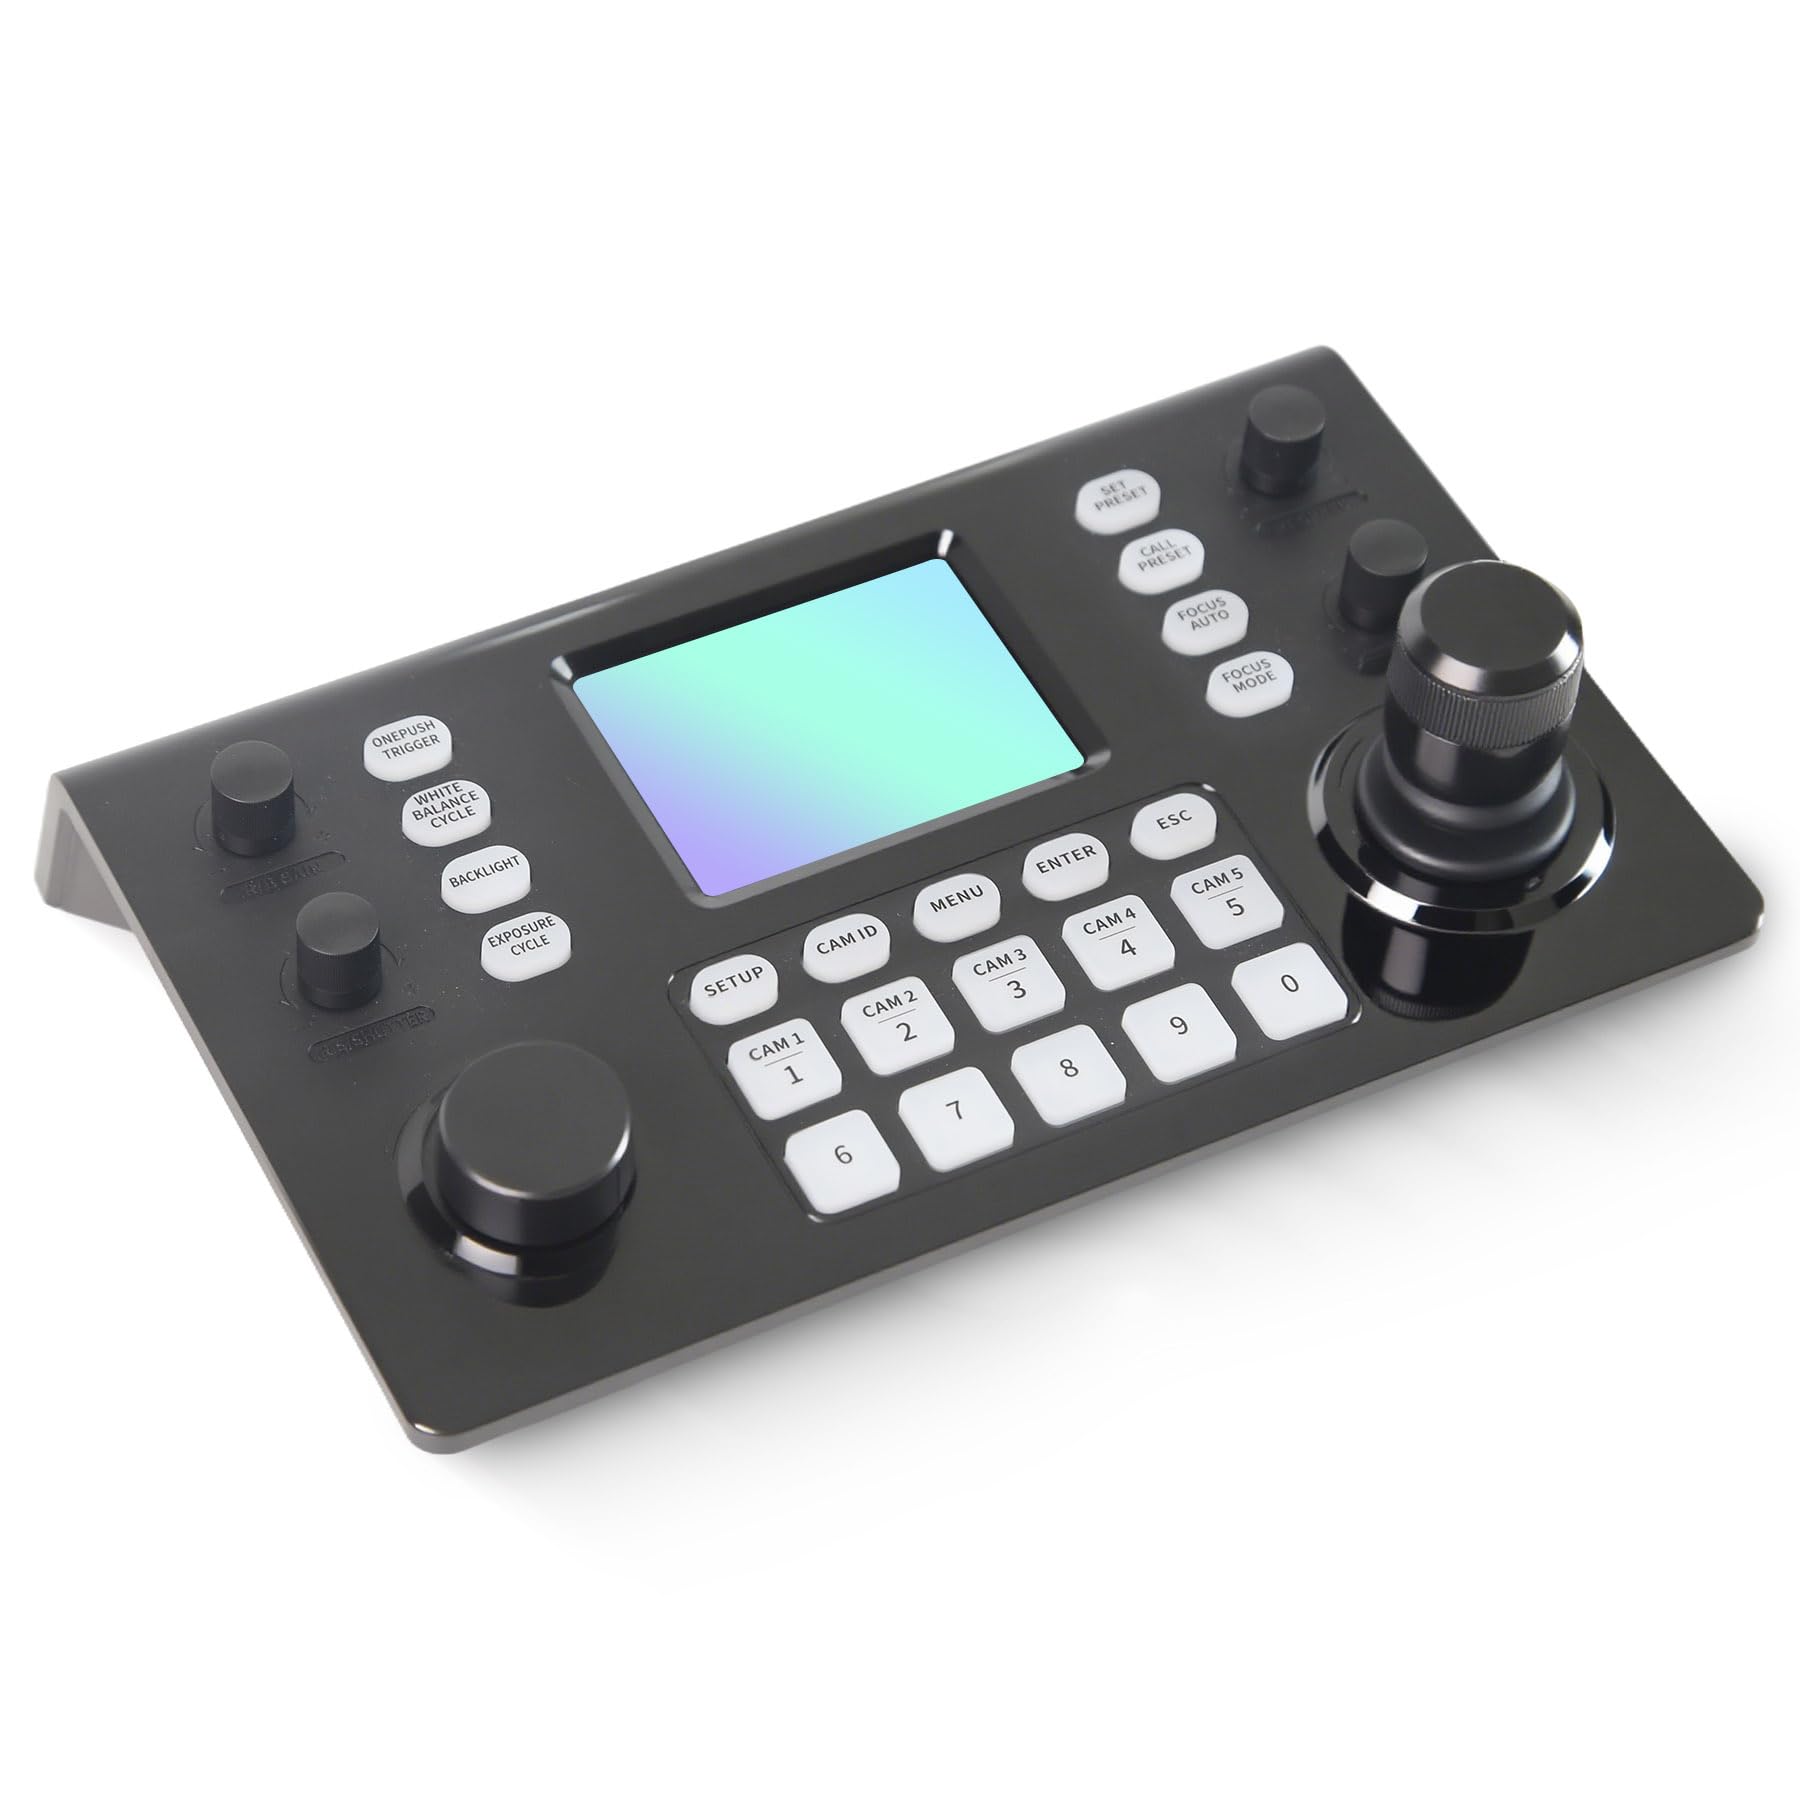
Image 1.1: RGBlink NDI PTZ Camera Controller (RGBBKT).
2. การตั้งค่า
Follow these steps to set up your RGBlink NDI PTZ Camera Controller.
2.1 การแกะกล่องและการตรวจสอบเบื้องต้น
- นำส่วนประกอบทั้งหมดออกจากบรรจุภัณฑ์อย่างระมัดระวัง
- ตรวจสอบว่ามีสิ่งของทั้งหมดที่ระบุไว้ในรายการบรรจุภัณฑ์อยู่
- Inspect the controller for any signs of physical damage. If damage is found, contact your dealer immediately.
2.2 การเชื่อมต่อคอนโทรลเลอร์
The RGBlink NDI PTZ Camera Controller supports various connection methods for power and camera control.
- จ่ายไฟผ่านอีเทอร์เน็ต (PoE): Connect a single RJ45 Ethernet cable from a PoE-enabled network switch to the controller's LAN port. This provides both power and network connectivity.
- อะแดปเตอร์ไฟภายนอก: If PoE is not available, connect the provided power adapter to the DC 12V input port and to a power outlet.
- การเชื่อมต่อกล้อง:
- Ethernet (IP Control): Connect PTZ cameras to the same network as the controller via RJ45 Ethernet cables. The controller supports VISCA over IP, ONVIF v2.42, and NDI v5.5 protocols.
- การควบคุมแบบอนุกรม: For cameras supporting serial communication, use RS232, RS422, or RS485 interfaces. Connect the appropriate cables from the controller's serial ports to the cameras.

Image 2.1: Rear panel connections including RS-232, RS-422, LAN (PoE), and Power Input.

ภาพที่ 2.2: อดีตample connection diagram showing PTZ Controller, PoE Switch, PTZ Cameras, Audio Mixer, and Computer.

Image 2.3: Diagram illustrating IP camera connections via a network switch.
2.3 การกำหนดค่าเครือข่าย
For IP-based camera control, ensure the controller and cameras are on the same network segment. The controller supports automatic detection of NDI-enabled PTZ cameras.
- Access the controller's web อินเทอร์เฟซโดยป้อนที่อยู่ IP ลงใน web browser. (Refer to the device's display or network tools to find the IP address).
- The default login credentials are typically 'admin' with a blank password. It is recommended to set a strong password immediately.
- ภายใน web interface, configure camera protocols (e.g., ONVIF, VISCA over IP) and enter camera-specific user credentials if required.

Image 2.4: NDI|HX camera search and control interface on the controller.
3. การดำเนินการ
This section details the operational functions of the RGBlink NDI PTZ Camera Controller.
3.1 เกินview ของการควบคุม
The controller features a 3.49" LCD display, a 3D joystick, various knobs, and a numeric keypad for intuitive control.

Image 3.1: The controller's 3.49-inch LCD display.

ภาพที่ 3.2: รายละเอียด view of the 3D joystick and multi-function knobs.

Image 3.3: Layout of the controller's buttons and numeric keypad area.
3.2 การเลือกกล้อง
- ปุ่มเลือกด่วน: Use the dedicated CAM 1-5 buttons for quick selection of up to 5 cameras.
- ปุ่มกดตัวเลข: For cameras beyond the quick select buttons (up to 255), press the รหัสแคม button, then enter the camera number using the numeric keypad, and press เข้า.

Image 3.4: The controller's ability to manage multiple cameras.
3.3 การควบคุม PTZ
- จอยสติ๊ก: The 3D joystick controls pan (left/right), tilt (up/down), and zoom (rotate the joystick).
- ปุ่มปรับความเร็ว PT: Adjusts the gimbal movement speed for pan and tilt.
- Zoom Knob: Provides precise zoom control, especially useful in preview โหมด.
3.4 Image Parameter Adjustment
- IRIS/SHUTTER Knob: Rotate to adjust aperture and shutter speed. Press to switch control modes.
- R/B GAIN Knob: Rotate to adjust red and blue gain. Press to switch control modes.
- FOCUS Button: กดปุ่ม โฟกัสอัตโนมัติ button to switch the camera to auto focus mode.
- EXPOSURE Button: Cycles through exposure modes (Aperture Priority, Shutter Priority, Gain Priority, Manual Exposure, Auto Exposure).
- BACKLIGHT Button: Toggles the camera's backlight mode.
- WHITE BALANCE CYCLE Button: Cycles through white balance modes (Indoor, Outdoor, Manual, Auto).
- ONE PUSH TRIGGER Button: When white balance is set to "One-Push White Balance", press this button to initiate a one-push white balance calibration.

Image 3.5: Functions of buttons and knobs on the left side of the controller.

Image 3.6: Functions of buttons and knobs on the right side of the controller, including preset controls.
3.5 ค่าที่ตั้งล่วงหน้า
- SET PRESET Button: Press to enter preset position mode. Use the numeric keys to enter the preset number (0-9) and press เข้า เพื่อบันทึก. กด เอสซีเอส ที่จะออกไป
- CALL PRESET Button: Press to enter preset recall mode. Use the numeric keys to enter the preset number (0-9) and press เข้า to recall. Press เอสซีเอส ที่จะออกไป
- The controller supports saving and recalling up to 255 presets per camera.
3.6 การนำทางเมนู
- ปุ่มเมนู: Press to open or close the camera settings menu. In menu control mode, the joystick controls navigation (up, down, left, right), เข้า confirms selections, and เอสซีเอส acts as a back button.
4. การบำรุงรักษา
Proper maintenance ensures the longevity and optimal performance of your RGBlink NDI PTZ Camera Controller.
4.1 การทำความสะอาด
- Use a soft, dry cloth to clean the exterior of the controller.
- สำหรับสิ่งสกปรกฝังแน่น ให้เช็ดออกเล็กน้อยampชุบผ้าด้วยน้ำหรือน้ำยาทำความสะอาดอ่อนๆ ที่ไม่ทำให้เกิดรอยขีดข่วน
- Avoid using harsh chemicals, solvents, or abrasive materials, as these can damage the surface and display.
- Ensure no liquids enter the device through openings or ports.
4.2 พื้นที่จัดเก็บ
- เมื่อไม่ได้ใช้งานเป็นเวลานาน ควรเก็บตัวควบคุมไว้ในที่แห้งและเย็น หลีกเลี่ยงแสงแดดโดยตรงและอุณหภูมิที่สูงหรือต่ำเกินไป
- ปกป้องอุปกรณ์จากฝุ่นละอองและความชื้น
5 การแก้ไขปัญหา
หัวข้อนี้ให้แนวทางแก้ไขปัญหาทั่วไปที่คุณอาจพบเจอ
5.1 ไม่มีไฟฟ้า
- ตรวจสอบแหล่งพลังงาน: ตรวจสอบให้แน่ใจว่าได้เสียบอะแดปเตอร์แปลงไฟเข้ากับตัวควบคุมและเต้ารับไฟฟ้าที่ใช้งานได้สนิทแล้ว
- PoE Check: If using PoE, verify that the Ethernet cable is connected to a PoE-enabled port on your network switch and that the switch is powered on.
- ความสมบูรณ์ของสายเคเบิล: Inspect the power cable and Ethernet cable for any damage.
5.2 Cannot Control Camera
- การเชื่อมต่อเครือข่าย: For IP cameras, ensure the controller and cameras are on the same network and can communicate. Check network cables and IP addresses.
- โปรโตคอลไม่ตรงกัน: Verify that the correct control protocol (e.g., VISCA over IP, ONVIF, NDI, Pelco-D/P) is selected on both the controller and the camera.
- รหัสกล้อง: Ensure the correct camera ID is selected on the controller.
- ข้อมูลการเข้าสู่ระบบ: If the camera requires authentication, confirm that the correct username and password are configured in the controller's web อินเทอร์เฟซ
- การเชื่อมต่อแบบอนุกรม: For serial control, check RS232/RS422/RS485 cable connections and ensure baud rates and addresses match between the controller and camera.
- เฟิร์มแวร์: Ensure both the controller and cameras have the latest firmware installed. Visit the RGBlink support webเว็บไซต์สำหรับการปรับปรุง
5.3 ปัญหาเกี่ยวกับจอ LCD
- ไม่มีจอแสดงผล: ตรวจสอบให้แน่ใจว่าตัวควบคุมเปิดอยู่
- จอแสดงผลสลัว: Check if there are any brightness settings on the controller that can be adjusted.
6. ข้อมูลจำเพาะ
| คุณสมบัติ | รายละเอียด |
|---|---|
| แบบอย่าง | RGBBKT |
| ขนาด (กว้าง x ยาว x สูง) | 11.4 x 7.8 x 5.9 นิ้ว (ประมาณ 290 x 200 x 150 มม.) |
| น้ำหนัก | 2.2 ปอนด์ (ประมาณ 1 กก.) |
| แสดง | จอ LCD ขนาด 3.49 นิ้ว |
| โปรโตคอลควบคุม | VISCA over IP, ONVIF v2.42, NDI v5.5, Pelco-D/P |
| อินเทอร์เฟซ | RS232, RS422, RS485, RJ45 Ethernet (PoE) |
| Camera Capacity | Up to 255 PTZ cameras |
| กำลังไฟเข้า | PoE or DC 12V (external adapter) |
| จอยสติ๊ก | High-precision Hall sensor 3D joystick |

Image 6.1: Controller dimensions and typical usage environments.

Image 6.2: Visual representation of supported protocols including RJ45, RS485, RS422, RS232, ONVIF, NDI, Pelco-D, Pelco-P, and Visca.
7. การสาธิตวิดีโอผลิตภัณฑ์
Watch the official product video for a visual demonstration of the RGBlink NDI PTZ Camera Controller's features and operation.
Video 7.1: Official demonstration of the RGBlink PTZ Camera Controller Joystick, showcasing multi-camera control and key features.
8. การรับประกันและการสนับสนุน
For warranty information, technical support, or service inquiries, please contact RGBlink customer service or visit their official webเว็บไซต์.
- ผู้ผลิต: บริษัท เซียะเหมิน อาร์บีลิงก์ ไซแอนซ์ แอนด์ เทคโนโลยี จำกัด
- เป็นทางการ Webเว็บไซต์: www.rgblink.com (หมายเหตุ: นี่เป็นเพียงตัวอย่างชั่วคราว URLโปรดดูรายละเอียดการสนับสนุนที่ถูกต้องได้จากบรรจุภัณฑ์ผลิตภัณฑ์หรือเอกสารทางการ webเว็บไซต์.)
- ข้อมูลติดต่อ: Refer to the RGBlink official website for the most current contact details for technical support and warranty claims.


