1. บทนำ
This manual provides essential information for the safe and efficient operation of your Anern 4200W Hybrid Solar Inverter. Please read this manual thoroughly before installation and use. Keep it for future reference.
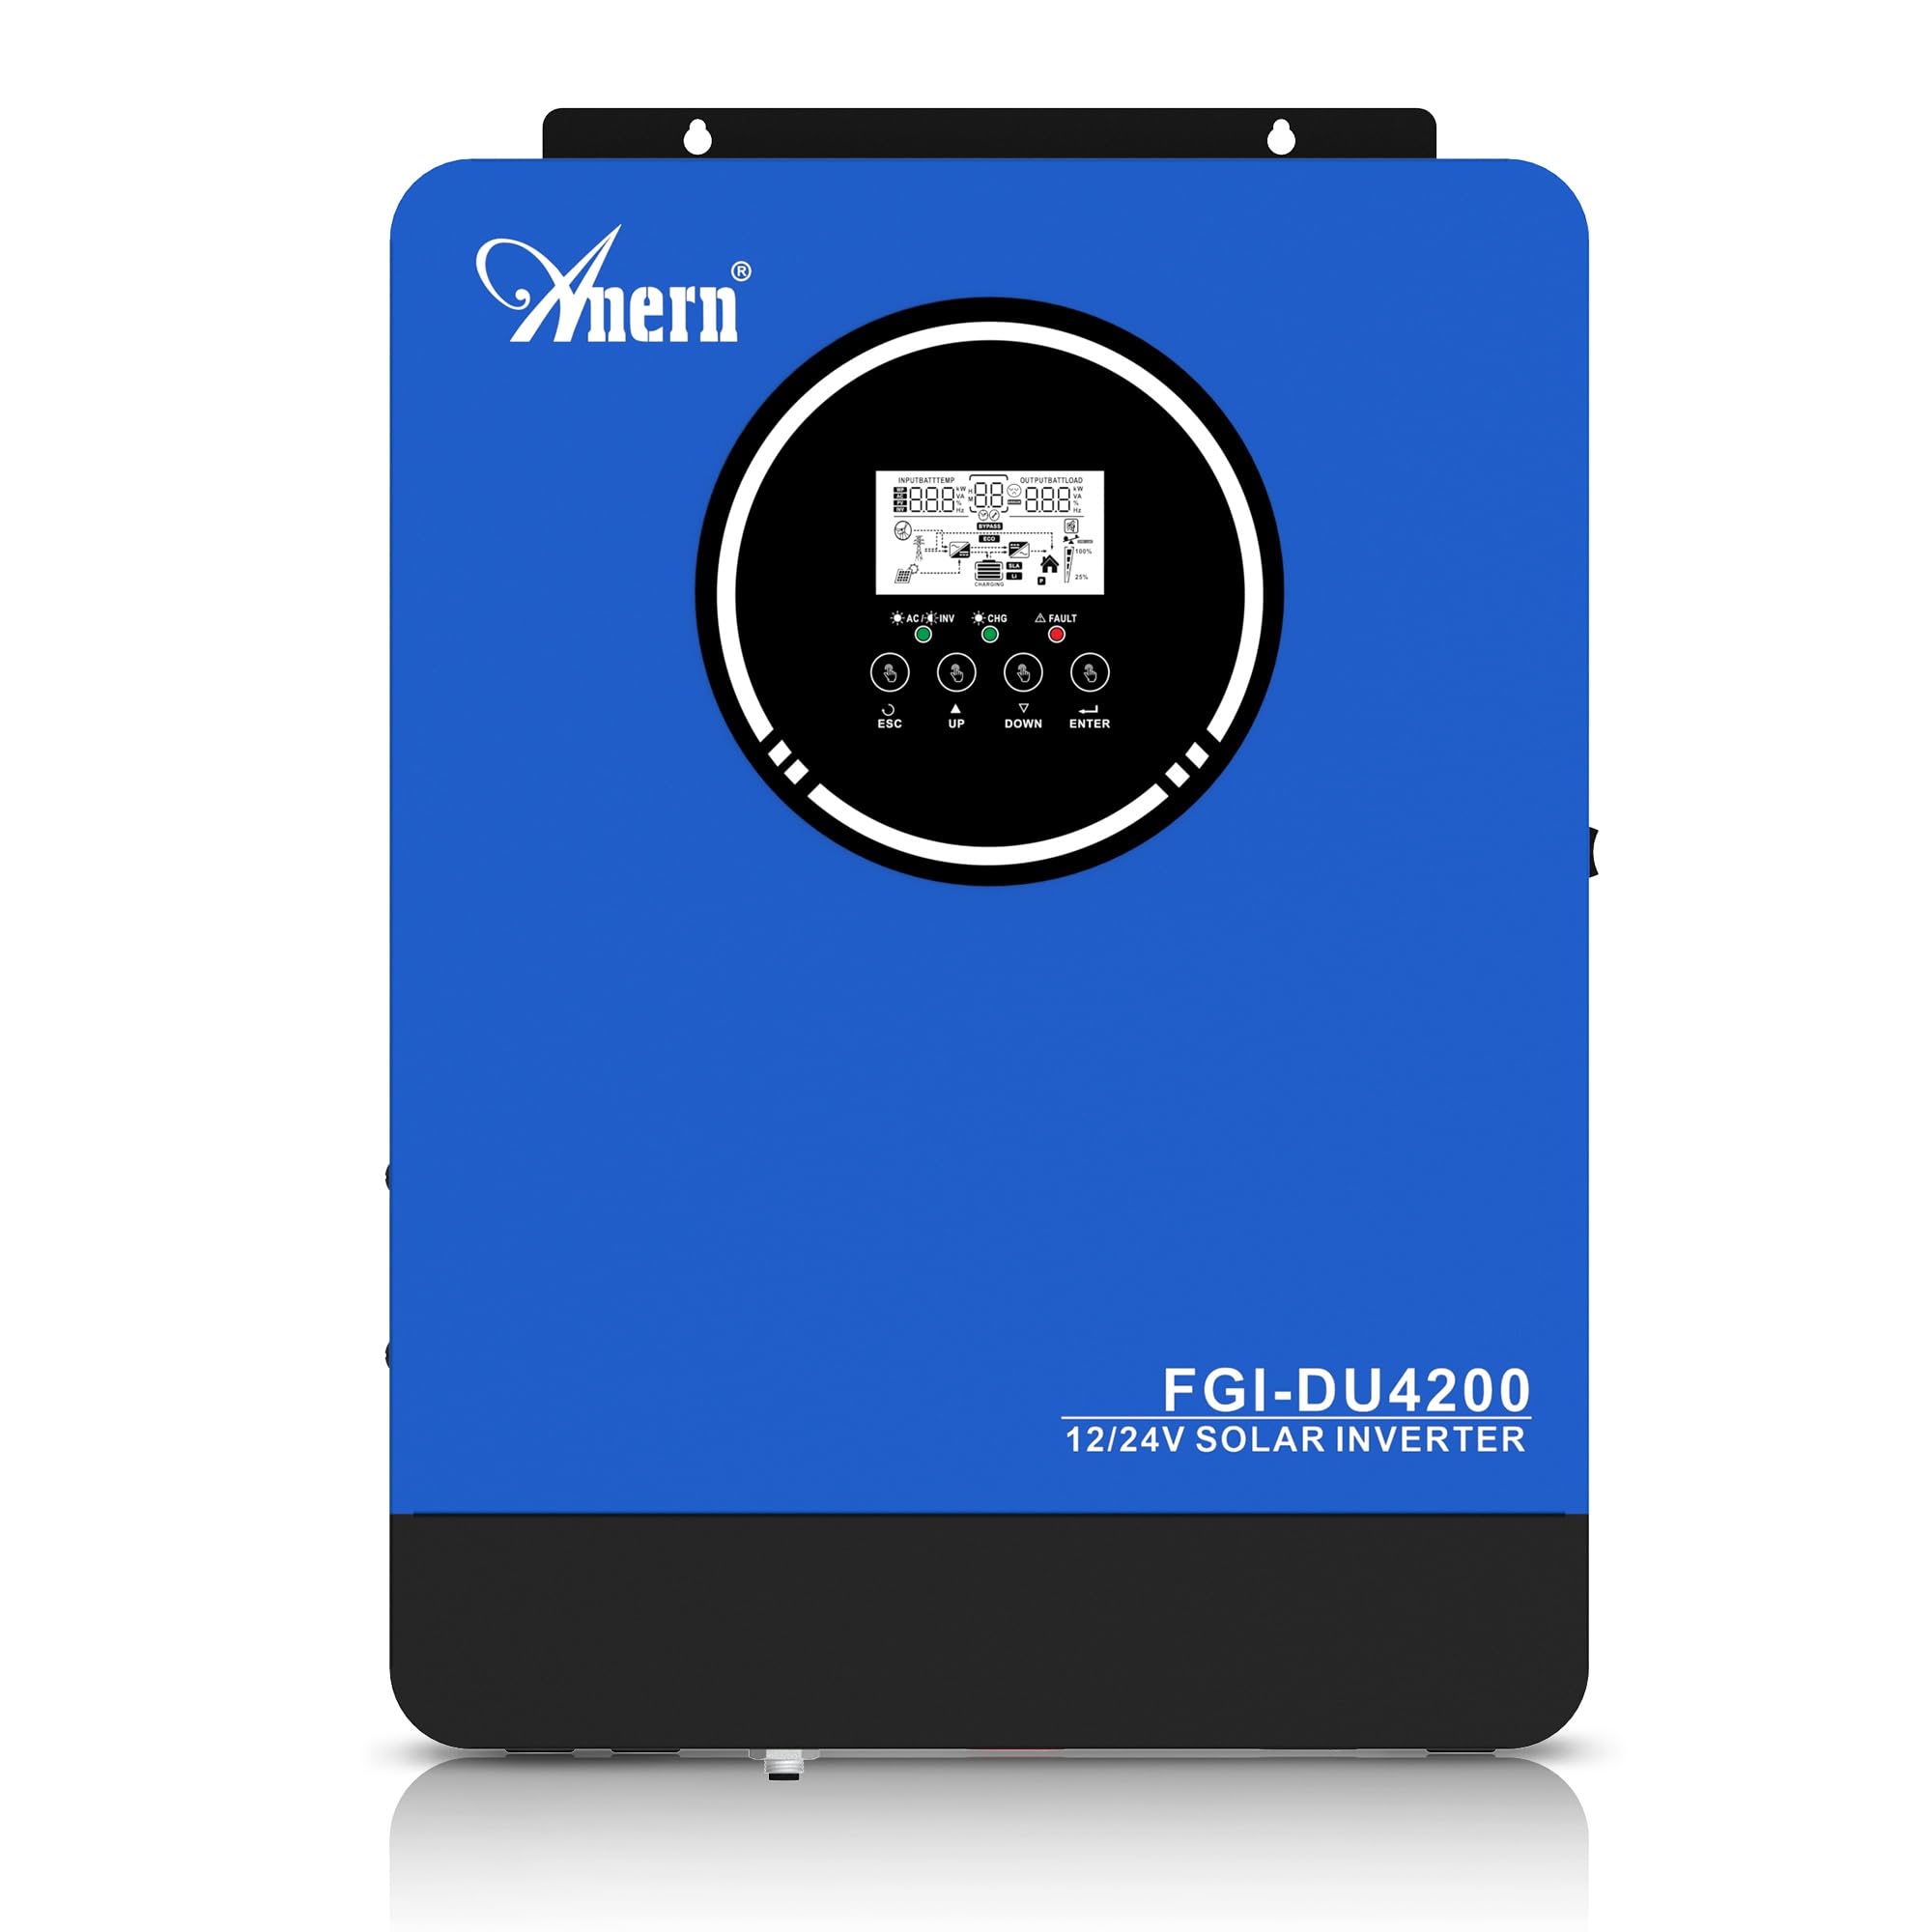
Figure 1: Anern 4200W Hybrid Solar Inverter. This image displays the main unit of the inverter, highlighting its key specifications such as 100A AC charging current, 4200W rated output power, and 500 VDC maximum PV array voltage.
2. คำแนะนำด้านความปลอดภัย
โปรดปฏิบัติตามข้อควรระวังด้านความปลอดภัยต่อไปนี้เสมอ เพื่อลดความเสี่ยงจากไฟฟ้าช็อต ไฟไหม้ หรือการบาดเจ็บ:
- การติดตั้งจะต้องดำเนินการโดยบุคลากรที่มีคุณสมบัติเหมาะสม
- Ensure all wiring is correctly connected and equipped with appropriate protective switches.
- ห้ามถอดชิ้นส่วนอินเวอร์เตอร์ เนื่องจากไม่มีชิ้นส่วนใดที่ผู้ใช้สามารถซ่อมแซมได้เอง
- ควรหลีกเลี่ยงการวางอินเวอร์เตอร์ไว้ในที่ที่มีฝน หิมะ ละอองน้ำ หรือของเหลวใดๆ
- ตรวจสอบให้แน่ใจว่ามีการระบายอากาศที่เพียงพอรอบๆ อินเวอร์เตอร์เพื่อป้องกันความร้อนสูงเกินไป
- ตัดการเชื่อมต่อแหล่งจ่ายไฟทั้งหมด (PV, แบตเตอรี่, สาธารณูปโภค) ก่อนดำเนินการบำรุงรักษาหรือเดินสายไฟใดๆ
3. สินค้าหมดview
The Anern 4200W Hybrid Solar Inverter is designed to convert DC power from solar panels and batteries into AC power for household use. It features an integrated 100A MPPT solar charge controller and supports both 12V and 24V battery systems with automatic detection.
คุณสมบัติหลัก:
- 4200W Pure Sine Wave Output: ให้พลังงานที่เสถียรและสะอาดสำหรับอุปกรณ์อิเล็กทรอนิกส์ที่ต้องการพลังงานคุณภาพสูง
- 100A MPPT Solar Charge Controller: เพิ่มประสิทธิภาพการผลิตพลังงานจากแผงโซลาร์เซลล์ให้ได้มากที่สุด
- 12V/24V Battery Auto-Detection: Automatically adjusts output based on connected battery voltage.
- BMS Interface: Supports communication with lithium batteries for enhanced monitoring and protection.
- Real-time LED Display: Shows system status, operating data, and error codes.
- Configurable Charging & Output Modes: Offers flexibility for various application needs.
- Optional WiFi/GPRS Monitoring: Remote monitoring capability (module sold separately).

Figure 2: Inverter Display and Controls. This image illustrates the inverter's LCD display, function buttons for configuration, and the optional WiFi module for remote monitoring.
4. การตั้งค่าและการติดตั้ง
4.1 แผนผังการเดินสายไฟ
Refer to the electrical schematic for proper system wiring. Ensure all connections are secure and correctly polarized.

Figure 3: Electrical Schematic. This diagram shows the complete wiring for a solar inverter system, including solar panels, combiner box, DC/AC breakers, inverter, utility grid connection, and loads.
4.2 การเชื่อมต่อแบตเตอรี่
The inverter supports 12V and 24V battery configurations. It automatically detects the battery voltage and adjusts its output accordingly (2300W for 12V, 4200W for 24V). For 24V systems, connect two 12V batteries in series. For 12V systems, connect batteries in parallel if increasinความจุกรัม

Figure 4: Battery Connection Options. This image illustrates how to connect batteries for 12V (parallel connection for 2300W output) and 24V (series connection for 4200W output) systems.
The inverter also supports lithium batteries and includes a BMS (Battery Management System) interface for monitoring and protection. Ensure the BMS is properly connected if using lithium batteries.

Figure 5: Communication Interfaces. This image highlights the dual communication interfaces for BMS (Battery Management System) and optional WiFi module, enabling remote monitoring and battery communication.
4.3 Startup and Shutdown Sequence
ลำดับการเริ่มต้น:
- เชื่อมต่อแบตเตอรี่
- เปิดอินเวอร์เตอร์
- Activate the protective switches for PV, Utility, and Loads.
ลำดับการปิดเครื่อง:
- Deactivate the protective switches for Loads, Utility, and PV.
- ปิดอินเวอร์เตอร์
- ถอดแบตเตอรี่ออก
Important Note: Inductive loads (e.g., motors, refrigerators) may require up to 3 times their rated power for startup. Ensure the inverter's capacity is sufficient to handle these surge loads. Exceeding the inverter's surge capacity can cause damage.
5. การดำเนินการ
5.1 จอแสดงผล LCD และการตั้งค่า
The inverter features an LED display that provides real-time system data and operating status. Use the function buttons below the display to navigate menus and configure settings. Settings include battery charging current, AC/solar charging priority, and charging current priority.
5.2 โหมดการชาร์จ
The inverter offers four configurable charging modes:
- ลำดับความสำคัญของพลังงานแสงอาทิตย์: พลังงานแสงอาทิตย์ได้รับการจัดลำดับความสำคัญสำหรับการชาร์จไฟ
- พลังงานแสงอาทิตย์เท่านั้น: ใช้พลังงานแสงอาทิตย์เพียงอย่างเดียวในการชาร์จ
- ลำดับความสำคัญของสาธารณูปโภค: Utility grid power is prioritized for charging.
- Solar + Utility Hybrid: ผสานพลังงานแสงอาทิตย์และพลังงานจากระบบสาธารณะเพื่อใช้ในการชาร์จ
5.3 โหมดเอาต์พุต
Three output modes are available to adapt to various application needs:
- Solar Priority (SUB): พลังงานแสงอาทิตย์ได้รับการจัดลำดับความสำคัญสำหรับการใช้งานต่างๆ
- ลำดับความสำคัญของยูทิลิตี้ (USB): Utility grid power is prioritized for loads.
- สำนักงาน ก.พ.: Solar, Battery, Utility priority.

Figure 6: Charging and Output Modes. This diagram visually explains the four available charging modes (Solar Charge, Utility Priority, Solar Priority, Hybrid Charge) and three load output modes (PV Priority, Utility Priority, SBU Priority).
5.4 การตรวจสอบระยะไกล
The inverter supports remote monitoring via an optional WiFi/GPRS module (sold separately). This allows users to monitor system performance and status from a distance.
6. การบำรุงรักษา
การบำรุงรักษาตามปกติจะช่วยให้อินเวอร์เตอร์ของคุณทำงานได้อย่างเหมาะสมและมีอายุการใช้งานยาวนาน:
- รักษาอินเวอร์เตอร์ให้สะอาดและปราศจากฝุ่น ใช้ผ้าแห้งในการทำความสะอาด
- ตรวจสอบให้แน่ใจว่าช่องระบายอากาศไม่ถูกปิดกั้น
- ตรวจสอบความแน่นหนาของการเชื่อมต่อสายไฟทั้งหมดและร่องรอยการกัดกร่อนเป็นระยะๆ
- Monitor the battery status, especially if using lithium batteries with the BMS interface, to prevent overcharge or deep discharge.
- Inspect solar panels for dirt or damage that could reduce efficiency.
7 การแก้ไขปัญหา
The LED display will show error codes if issues arise. Refer to the inverter's display for specific error codes to diagnose and resolve problems. Common issues and their potential solutions include:
- ไม่มีกำลังขับ: Check battery connections, DC/AC breakers, and inverter power switch.
- ระดับแบตเตอรี่ต่ำtage: Ensure batteries are adequately charged. Check charging sources (solar, utility).
- คำเตือนการโอเวอร์โหลด: Reduce the connected load. Inductive loads may cause temporary overloads during startup.
- ความร้อนสูงเกินไป: Ensure proper ventilation. Clean any dust from the inverter's vents.
- PV Input Error: ตรวจสอบการเชื่อมต่อแผงโซลาร์เซลล์และแรงดันไฟฟ้าtage. Ensure PV array voltage อยู่ภายในช่วงที่กำหนด (55-500V DC)
For persistent issues or error codes not listed, contact customer support.
8. ข้อมูลจำเพาะทางเทคนิค
| คุณสมบัติ | ข้อมูลจำเพาะ |
|---|---|
| ยี่ห้อ | แอน |
| หมายเลขรุ่น | AN-FGI-DU 4200 |
| พลังงานไฟฟ้า | 4200 วัตต์ |
| กำลังขับ | 4500 วัตต์ |
| Max. Output Power (Watts) | 4200 |
| รูปคลื่นเอาท์พุต | เพียวไซน์เวฟ |
| แหล่งพลังงาน | ใช้พลังงานแสงอาทิตย์ ใช้พลังงานจากแบตเตอรี่ |
| คำแนะนำการใช้งานผลิตภัณฑ์ | บ้าน |
| ส่วนประกอบที่รวมอยู่ | คู่มือการใช้งาน |
| การปฏิบัติตาม | CE |
| ขนาดสินค้า | 30 x 10 x 40 ซม. ; 8.86 กก. |
9. การรับประกันและการสนับสนุน
For warranty information and technical support, please refer to the documentation provided with your purchase or contact Anern customer service. Keep your purchase receipt as proof of purchase.


