1. บทนำ
The Machenike G3V2 Bluetooth Controller is a versatile gaming peripheral designed for multi-platform compatibility, including Switch, iOS, Android, and Windows PC. It features Hall Effect joysticks and triggers, customizable buttons, RGB lighting, and a dedicated charging station for an enhanced gaming experience.
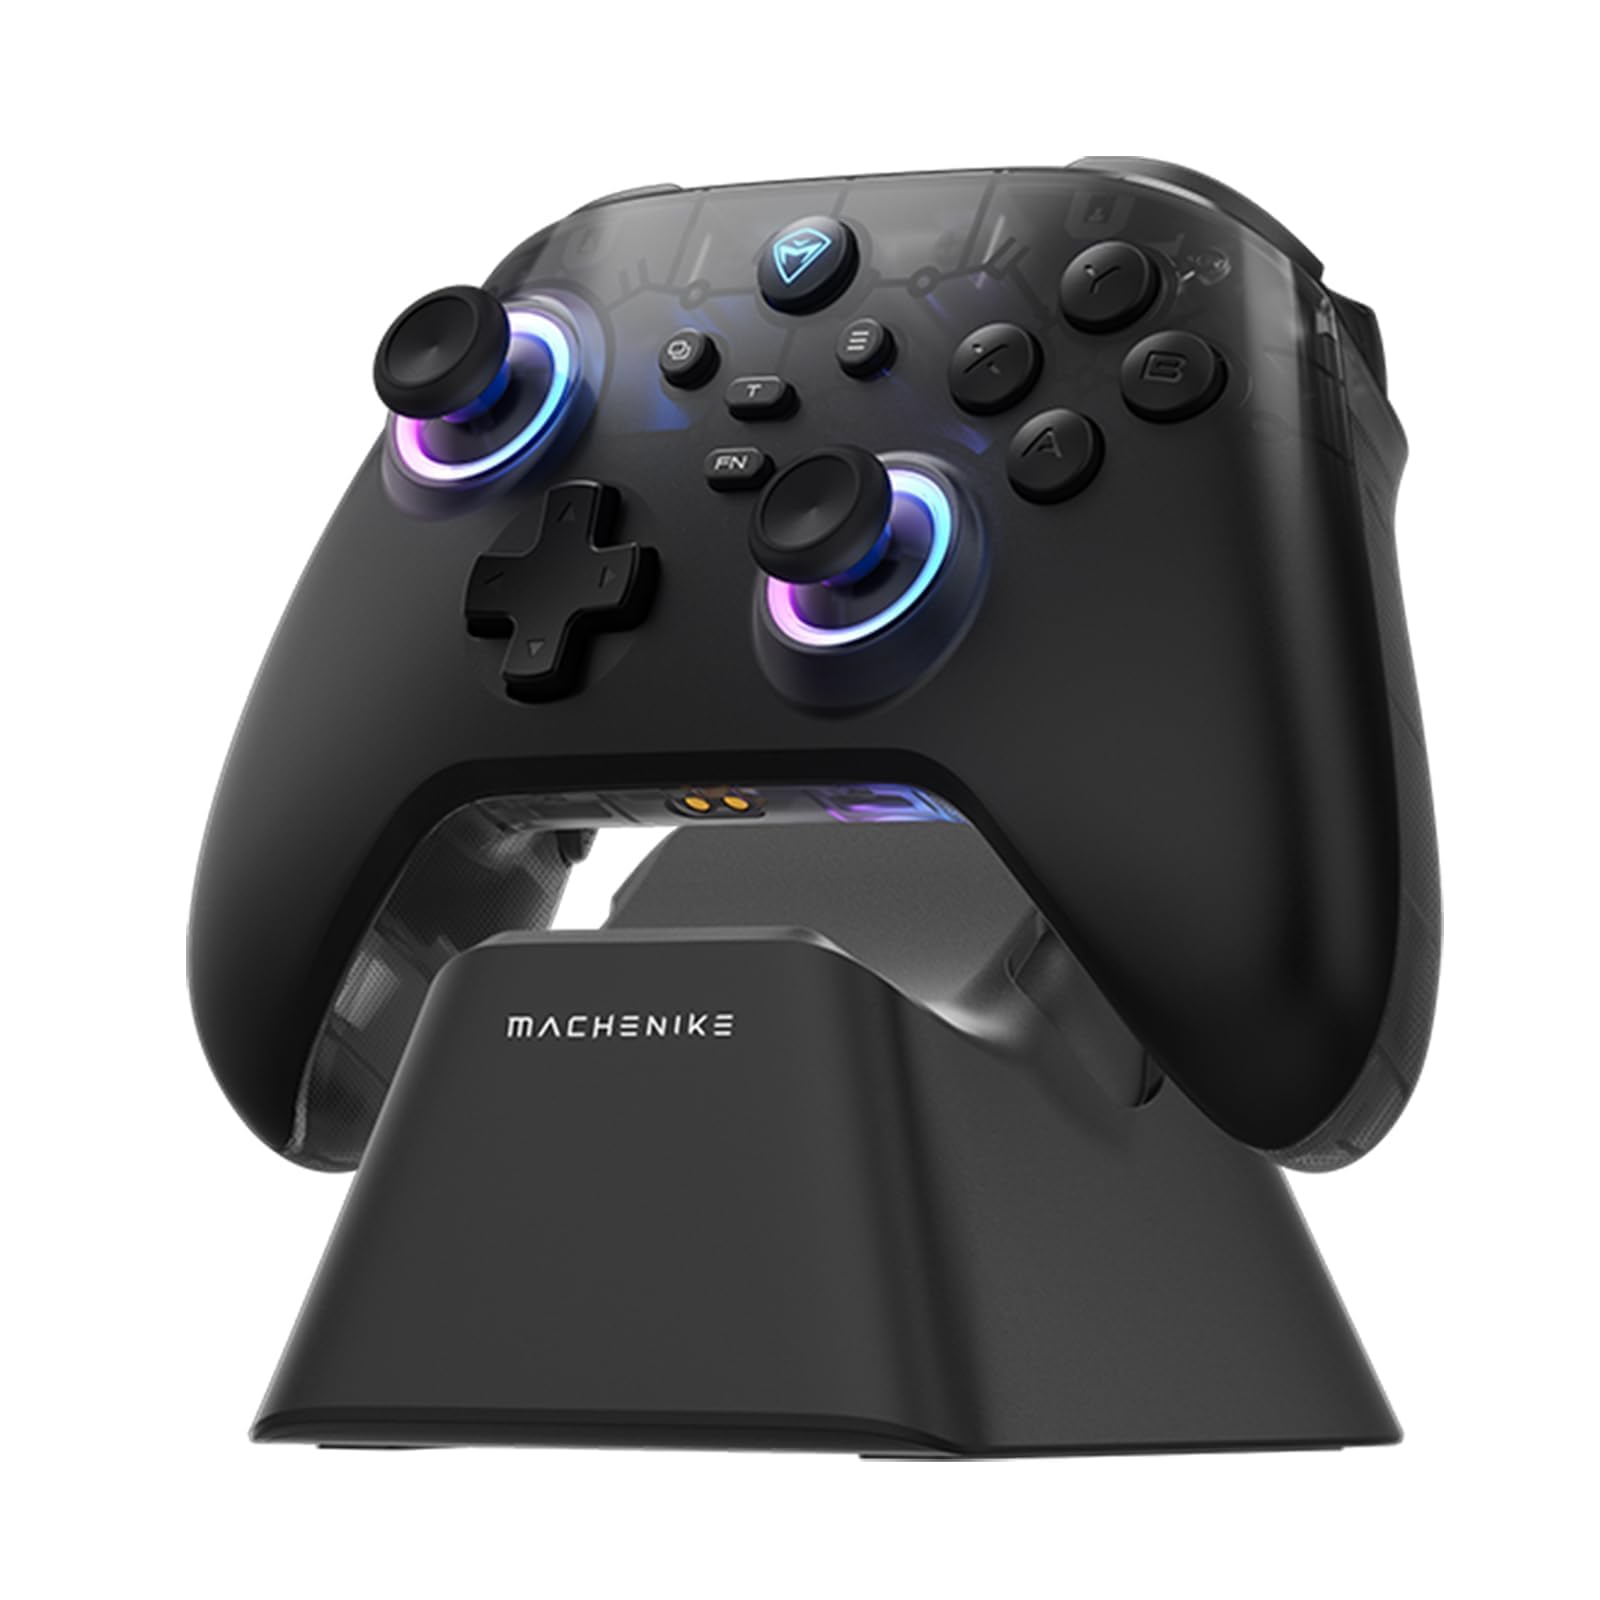
Image: The Machenike G3V2 Bluetooth Controller, showcasing its ergonomic design and vibrant RGB lighting around the joysticks.
2. คุณสมบัติหลัก
- Lightning-Fast 1000Hz Responsiveness: Equipped with ultra-high gaming responsiveness for instant command capture and millisecond-level feedback.
- แท่นชาร์จที่สะดวกสบาย: Includes a dedicated charging dock for efficient and fast recharging via USB-C, protecting the controller and ensuring optimal performance.
- Dual Hall-Effect Joysticks and Triggers: Features newly upgraded Hall-Effect sensing joysticks and high-precision trigger buttons for superior control and durability, eliminating drift.
- Customizable Force Adjustable Stick Tension: Unique force adjustment feature allows customization of joystick feedback from lightweight to precise, adapting to various game needs.
- Fast Charging & Extended Playtime: Built-in 1000mAh high-capacity battery provides extended playtime with fast-charging technology.
- รองรับหลายแพลตฟอร์ม: Compatible with Switch/Switch 2, iOS, Android, and Windows PC.
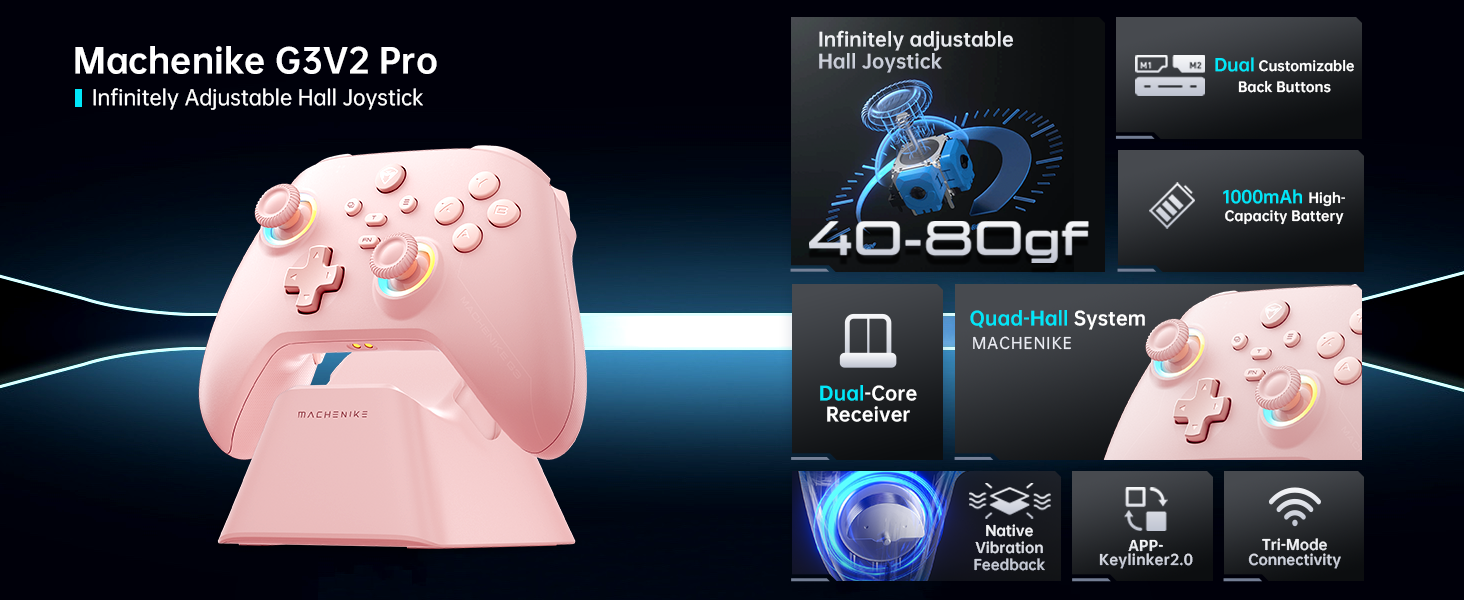
ภาพ: โอเวอร์view of the Machenike G3V2 controller's key features, including its Hall Effect joysticks, customizable back buttons, and connectivity options.
3. การตั้งค่าและการเชื่อมต่อ
3.1 Connecting to Nintendo Switch (Bluetooth Mode)
- Ensure your controller is charged.
- บนตัวควบคุม ให้กด . ค้างไว้ Y + โฮม กดปุ่มทั้งสองพร้อมกันจนกว่าไฟแสดงสถานะจะกะพริบถี่ๆ เปลี่ยนจากกะพริบช้าเป็นกะพริบเร็ว ขั้นตอนนี้จะทำให้คอนโทรลเลอร์เข้าสู่โหมดจับคู่กับสวิตช์
- บนเครื่อง Nintendo Switch ของคุณ ให้ไปที่เมนู HOME
- Select the 'Controllers' icon, then choose 'Change Grip/Order'.
- รอจนกว่าคอนโทรลเลอร์จะเชื่อมต่อโดยอัตโนมัติ เมื่อเชื่อมต่อแล้ว คอนโทรลเลอร์จะสั่น และไอคอนของคอนโทรลเลอร์จะปรากฏบนหน้าจอ Switch
- กดปุ่ม A ปุ่มบนตัวควบคุมเพื่อยืนยัน
- To toggle between Switch and Xbox button layouts (A/B, X/Y swap), press FN + ก.
Video: A tutorial demonstrating how to connect the Machenike G3V2 controller to a Nintendo Switch console via Bluetooth mode, including button presses and on-screen confirmation.
3.2 Connecting to PC/iOS/Android (Bluetooth/Wired/2.4G)
The Machenike G3V2 controller supports multiple connection modes for various platforms:
- บลูทูธ: For iOS, Android, and some PC setups. Activate Bluetooth on your device and search for 'Machenike G3V2' to pair.
- 2.4G ไร้สาย: Use the included USB dongle for PC and other compatible devices. Plug the dongle into your device, then power on the controller.
- มีสาย: Connect the controller directly to your PC or compatible device using a USB-C cable.
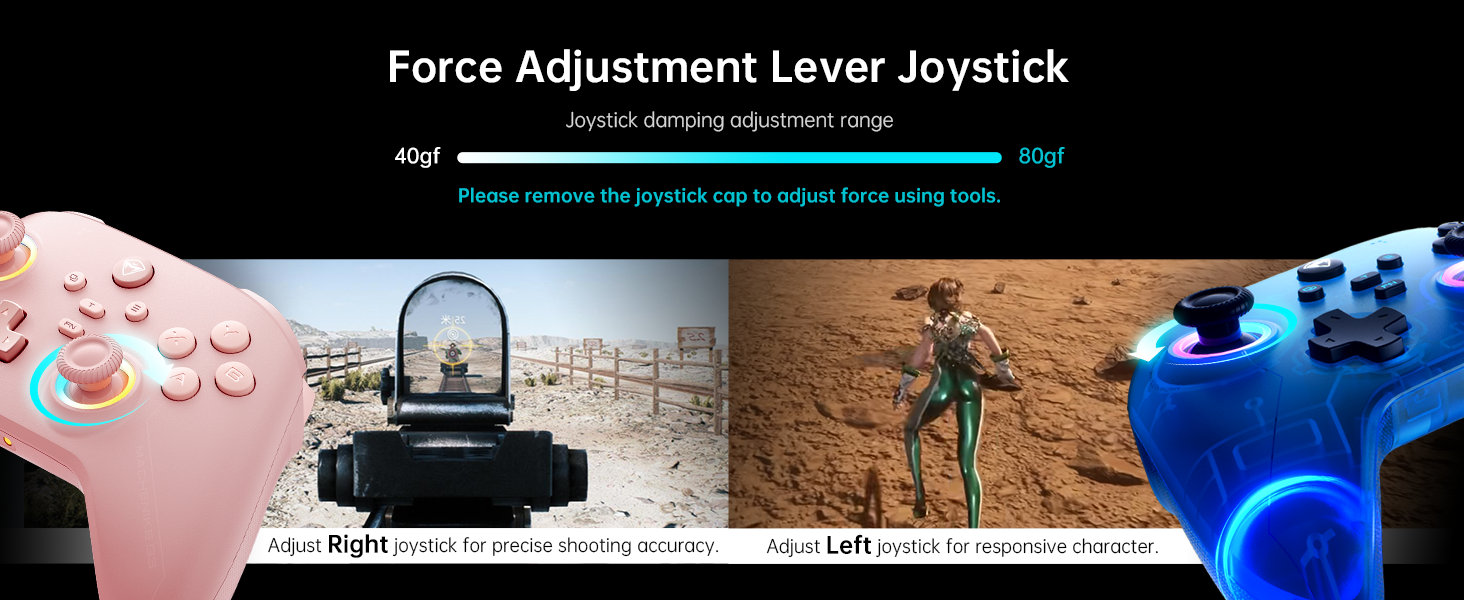
Image: The Machenike G3V2 controller highlighting its ergonomic design, anti-slip grip, and responsive triggers for comfortable and precise control.
4. การใช้งานและการปรับแต่ง
4.1 ปุ่มย้อนกลับที่ตั้งโปรแกรมได้ (M1/M2)
The controller features two customizable back buttons (M1 and M2) that can be assigned to single keys or complex macros. This is particularly useful for games requiring quick actions or combos.
- To Assign a Single Key:
NS. กดค้างไว้ FN + M1 (or M2) simultaneously until the joystick light ring glows with a soft blue breathing effect, indicating recording mode.
b. Press the desired button you wish to assign (e.g., 'A' button).
ค. กด M1 (or M2) once to save the assignment. The light ring will flash three times, confirming successful saving. - To Clear an Assignment:
NS. กดค้างไว้ FN + M1 (or M2) simultaneously to enter recording mode.
b. Without pressing any other button, press M1 (or M2) again to save a blank input. The light ring will flash three times, clearing the previous assignment. - To Record a Macro (Multiple Keys):
NS. กดค้างไว้ FN + M1 (or M2) simultaneously to enter recording mode.
b. Press the sequence of keys you want to record (e.g., A, B, X, Y, RB, LB). The timing between key presses will be recorded.
ค. กด M1 (or M2) once to save the macro. The light ring will flash three times.
Video: A detailed guide on how to set up and record keystroke macros using the programmable back buttons (M1/M2) on the Machenike G3V2 controller.
4.2 การปรับเทียบจอยสติ๊กและไกปืน
Calibration helps maintain accuracy and prevent drift in joysticks and triggers. This can be done whether the controller is off or connected.
- การสอบเทียบจอยสติ๊ก:
NS. กด ค้างไว้ B + ย้อนกลับ + หน้าแรก buttons simultaneously until the blue LED starts flashing.
b. Move both joysticks in full circles (about three rotations) slowly and steadily.
ค. กดปุ่ม เริ่ม กดปุ่มเพื่อบันทึก ตัวควบคุมจะปิดเครื่องโดยอัตโนมัติ แสดงว่าการปรับเทียบสำเร็จแล้ว - การปรับเทียบไกปืน:
NS. กด ค้างไว้ Y + ย้อนกลับ + หน้าแรก buttons simultaneously until the red LED starts flashing.
b. Press both triggers normally all the way down three times. Ensure gentle but full pressure.
ค. กดปุ่ม เริ่ม กดปุ่มเพื่อบันทึก ตัวควบคุมจะปิดเครื่องโดยอัตโนมัติ แสดงว่าการปรับเทียบสำเร็จแล้ว
After calibration, reconnect the controller to your device to test the new settings. Always use normal, gentle pressure during calibration for accurate results.
Video: A guide on how to calibrate the joysticks and triggers of the Machenike G3V2 controller to ensure optimal performance and accuracy.
4.3 แสง RGB
The controller features dynamic RGB lighting around the joysticks. Specific controls for changing lighting modes or colors can often be found in the Keylinker 2.0 mobile application or through dedicated button combinations (refer to the app for advanced customization).
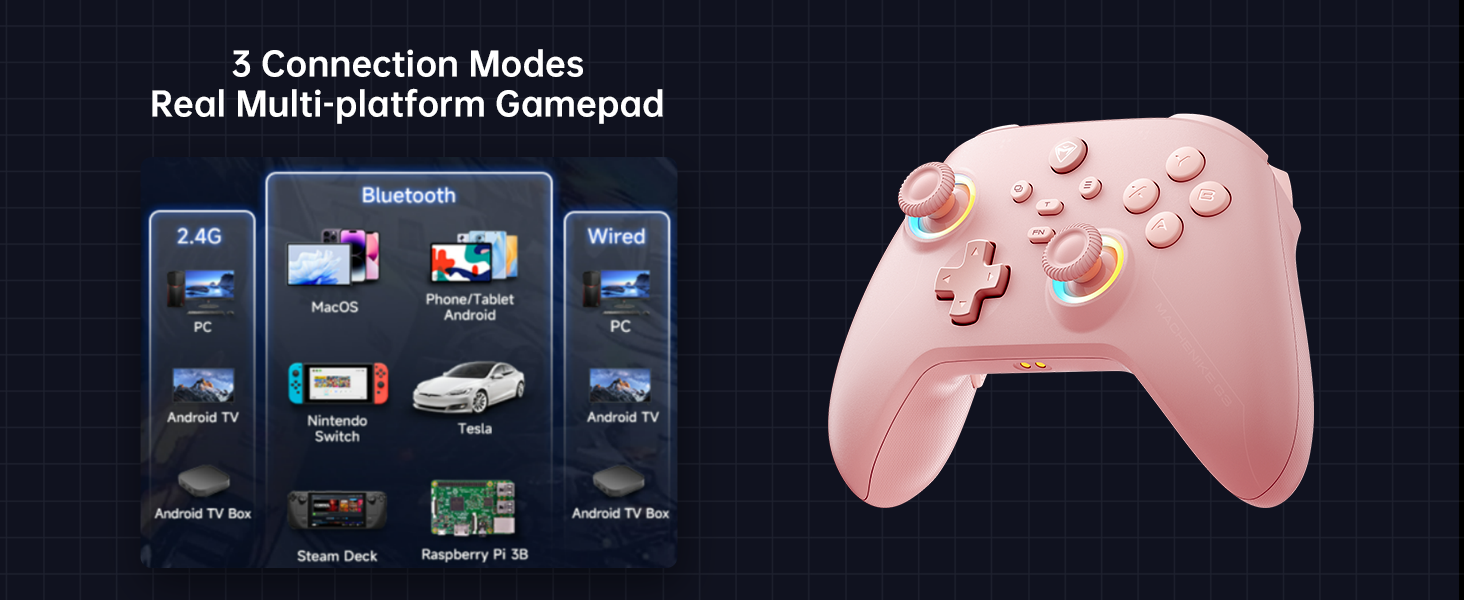
Image: The Machenike G3V2 controller illustrating its 4-level native vibration feedback, providing immersive experiences for various game genres.
5. การชาร์จไฟ
The Machenike G3V2 controller comes with a 1000mAh high-capacity battery and a dedicated charging dock.
- การใช้แท่นชาร์จ: Simply place the controller onto the dedicated charging dock. The built-in USB-C port on the dock facilitates quick recharging.
- การชาร์จ USB-C โดยตรง: You can also charge the controller directly using a USB-C cable connected to a power source.
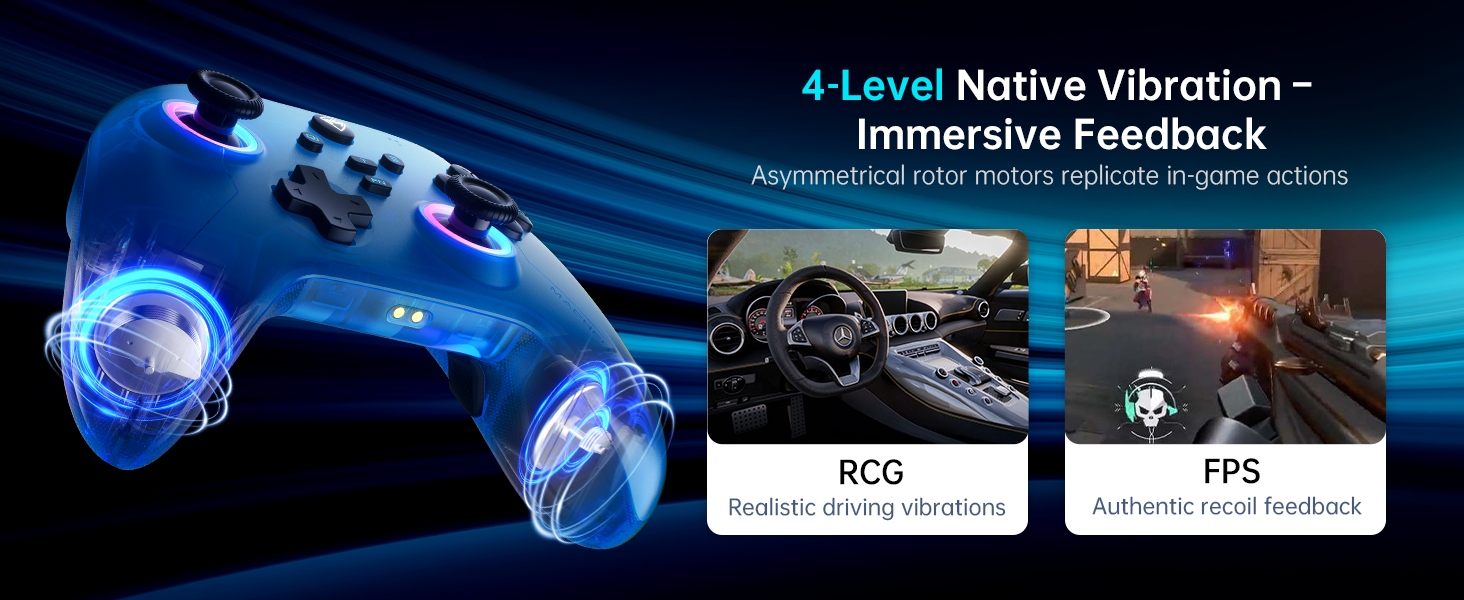
Image: The Machenike G3V2 controller resting on its dedicated charging dock, ready for an instant power boost.
6. ความเข้ากันได้
- แพลตฟอร์มที่รองรับ: Nintendo Switch, Switch 2, iOS, Android, Windows PC.
- ไม่เข้ากันได้กับ: Xbox, PlayStation, or GeForce Now.
- For other game platforms not explicitly mentioned, please consult customer service before purchase.
7. การบำรุงรักษา
- การทำความสะอาด: ใช้ผ้านุ่มและแห้งทำความสะอาดคอนโทรลเลอร์ หลีกเลี่ยงการใช้สารเคมีรุนแรงหรือวัสดุที่มีฤทธิ์กัดกร่อน
- พื้นที่จัดเก็บ: เก็บตัวควบคุมไว้ในที่แห้งและเย็น ห่างจากแสงแดดโดยตรงและอุณหภูมิที่สูงหรือต่ำมาก
- การดูแลแบตเตอรี่ เพื่อยืดอายุการใช้งานแบตเตอรี่ ควรหลีกเลี่ยงการปล่อยประจุแบตเตอรี่จนหมดบ่อยๆ ควรชาร์จเป็นประจำ แม้จะไม่ได้ใช้งานเป็นเวลานานก็ตาม
8 การแก้ไขปัญหา
- ตัวควบคุมไม่เชื่อมต่อ:
- Ensure the controller is fully charged.
- Verify the correct pairing mode is activated for your device (e.g., Y+Home for Switch).
- On your device, try forgetting the controller from Bluetooth settings and re-pairing.
- For PC, try connecting via the 2.4G dongle or wired connection. - จอยสติ๊กเลื่อนเองหรือความแม่นยำลดลง:
- Perform joystick calibration as described in Section 4.2. - ปัญหาที่อาจก่อให้เกิดความไม่เสถียร:
- Perform trigger calibration as described in Section 4.2. - ปุ่มไม่ตอบสนอง:
- Ensure the controller is properly connected.
- Check if any programmable back buttons (M1/M2) have unintended assignments (clear them if necessary).
- Reconnect the controller. - ปัญหาการชาร์จ:
- Ensure the charging dock or USB-C cable is properly connected.
- Try a different USB-C cable or power adapter.
9. ข้อมูลจำเพาะ
| คุณสมบัติ | รายละเอียด |
|---|---|
| หมายเลขรุ่น | อัปเกรด PE |
| ASIN | B0F93RPT5H |
| ผู้ผลิต | มาเชนิเก |
| น้ำหนักสินค้า | 0.529 ออนซ์ |
| ขนาดแพ็คเกจ | 6.93 x 6.46 x 3.23 นิ้ว |
| แบตเตอรี่ | แบตเตอรี่ลิเธียมโพลิเมอร์ 1 ก้อน (รวมอยู่ด้วย) |
| การเชื่อมต่อ | บลูทูธ, ไร้สาย 2.4G, แบบมีสาย (USB-C) |
| อัตราการสำรวจความคิดเห็น | 1000เฮิรตซ์ |
| จอยสติ๊ก | Hall Effect, Adjustable Tension (40-80gf) |
| ทริกเกอร์ | Hall Effect, 255 Levels, Millimeter Precision |
| ปุ่มที่สามารถตั้งโปรแกรมได้ | 2 Back Buttons (M1, M2) |
| การสั่นสะเทือน | ระบบตอบสนองการสั่นสะเทือนแบบเนทีฟ 4 ระดับ |
10. การรับประกันและการสนับสนุน
Machenike products are designed for durability and performance. For warranty information, technical support, or service inquiries, please refer to the official Machenike webหรือติดต่อฝ่ายบริการลูกค้าโดยตรง เก็บใบเสร็จรับเงินไว้เพื่อใช้ในการเคลมประกัน
นอกจากนี้ อาจมีแหล่งข้อมูลออนไลน์และคำถามที่พบบ่อย (FAQ) ให้บริการบนเว็บไซต์ด้วย ร้าน Machenike บน Amazon.