1. บทนำ
The Radiomaster XR3 Nano Multi-Frequency ExpressLRS Receiver is a compact and versatile receiver designed for remote control applications, offering robust signal stability and extended range. It supports both 2.4GHz and Sub-G 900MHz frequency bands, making it suitable for various setups. This manual provides essential information for the proper installation, operation, and maintenance of your XR3 receiver.
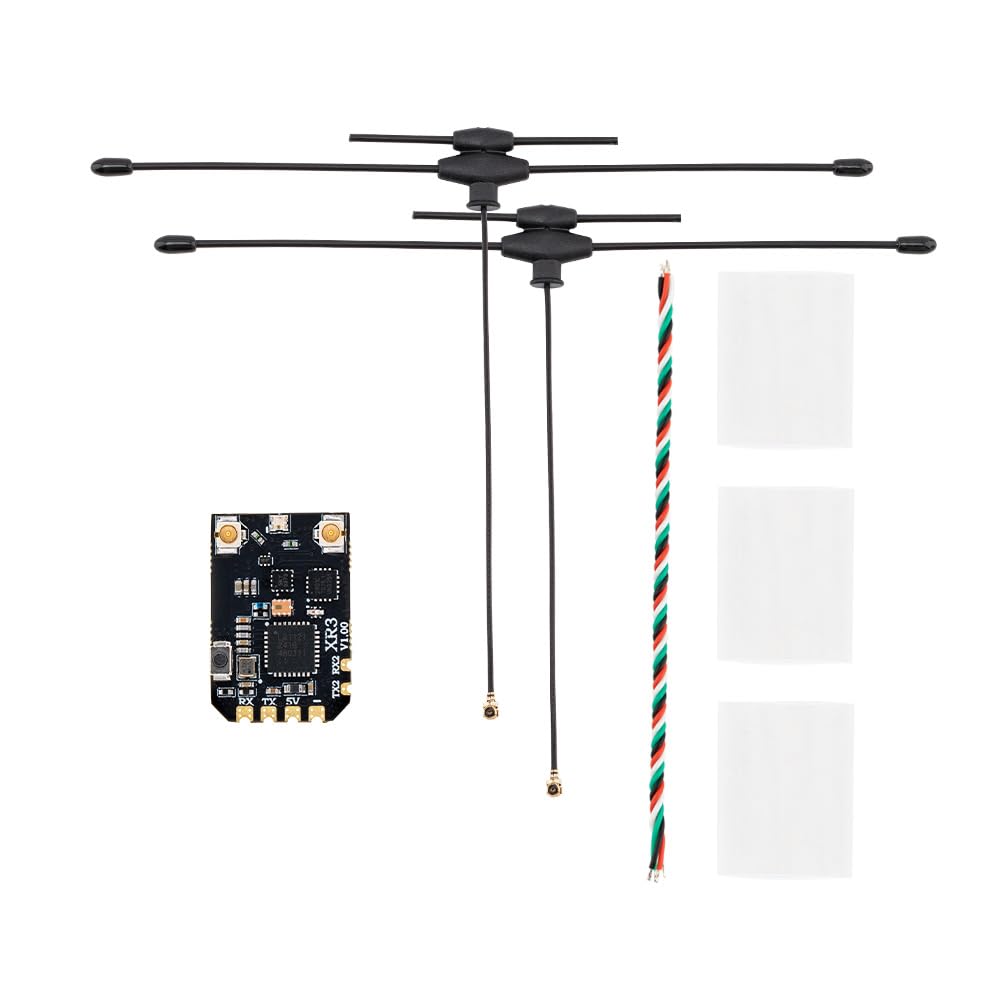
Image 1.1: Radiomaster XR3 Nano Multi-Frequency ExpressLRS Receiver with connected dual-band antennas.
2. ข้อมูลด้านความปลอดภัย
Please refer to this instruction manual before use. Improper handling or installation may lead to equipment damage or personal injury. Ensure all connections are correct and secure before powering on the device. This product is recommended for users aged 18 years and up.
3. คุณสมบัติ
- ความหลากหลายของเสาอากาศ: Utilizes two antennas for improved signal stability and extended range, featuring a Skyworks RFX2401C for enhanced receiver performance and telemetry.
- Multi-Frequency Support: Operates on both 2.4GHz and Sub-G 900MHz bands.
- ไมโครคอนโทรลเลอร์ประสิทธิภาพสูง: Equipped with an ESP32C3 microcontroller.
- Advanced Transceiver: Features a Semtech LR1121 transceiver.
- การเชื่อมต่อเพิ่มเติม: Includes an additional UART port and secondary port for advanced functionality.
- Easy Soldering: Designed with castled pads for convenient soldering.
- ระบบ WiFi ในตัว: Built-in WiFi for effortless configuration and firmware updates via an intuitive WebUI
- การออกแบบที่กะทัดรัด: Ultra-compact dimensions (22mm x 15mm x 4mm) and lightweight (1.3g without antennas).

ภาพที่ 3.1: จบแล้วview of the XR3 receiver highlighting its multi-frequency, antenna diversity, LR1121, and ExpressLRS features.
4. เนื้อหาบรรจุภัณฑ์
ตรวจสอบว่ามีรายการทั้งหมดอยู่ในแพ็คเกจของคุณ:
- 1 * เครื่องรับ XR3 Nano Diversity Antenna Diversity ExpressLRS แบบหลายความถี่
- 2 * T Antenna (Either 2.4GHz, 900Mhz, or Dual-band, depending on selected package)
- 1 * สาย CRSF
- 3 * ท่อหดความร้อน
- 1 * การ์ดคู่มือ
5. การตั้งค่า
5.1 การเชื่อมต่อทางกายภาพ
Connect the XR3 receiver to your flight controller or other compatible device using the provided CRSF wire. Ensure correct polarity and pin assignments for 5V, TX (Transmit), and RX (Receive).
- 5 โวลต์: Power input (DC 4.5-8.4V)
- เท็กซัส: Telemetry data output from receiver
- อาร์เอ็กซ์: Control data input to receiver
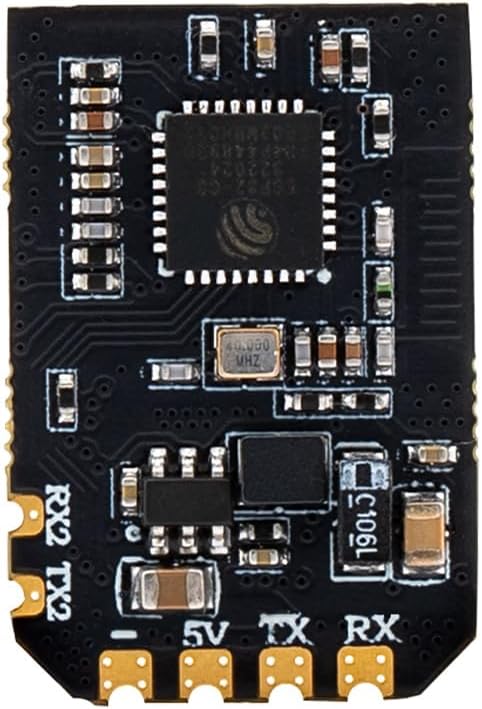
ภาพที่ 5.1: ภาพระยะใกล้ view of the XR3 receiver board, indicating the 5V, TX, and RX pads for connection.
5.2 การติดตั้งเสาอากาศ
Carefully connect the two T-antennas to the IPEX-1 connectors on the receiver board. Ensure they are securely attached. Position the antennas to maximize signal reception, typically at a 90-degree angle to each other for optimal diversity.
5.3 Binding (Pairing)
The XR3 receiver uses the ExpressLRS protocol for binding. Follow these general steps:
- Power on your receiver three times, cycling power quickly. The LED on the receiver should flash rapidly, indicating it is in bind mode.
- On your ExpressLRS compatible transmitter, initiate the binding process. Refer to your transmitter's manual for specific instructions.
- เมื่อเชื่อมต่อสำเร็จแล้ว ไฟ LED บนตัวรับสัญญาณจะสว่างค้าง แสดงว่าการเชื่อมต่อสำเร็จ
Alternatively, the XR3 features a bind button. Press and hold the bind button while powering on the receiver to enter bind mode. The receiver also supports binding via WiFi.

ภาพที่ 5.2: จากบนลงล่าง view of the XR3 receiver board, showing the location of the bind button.
การอัปเดตเฟิร์มแวร์ 5.4 รายการ
The XR3 receiver supports firmware updates via its built-in WiFi. Connect to the receiver's WiFi network using a PC or mobile device and access the WebUI to manage settings and update firmware. Ensure you are using the correct firmware target: "RadioMaster XR3 2.4/900 Diversity RX".
6. ปฏิบัติการ
6.1 การเลือกความถี่
The XR3 receiver is capable of operating on either 2.4GHz or Sub-G 900MHz frequencies. The type of antenna included with your package determines the primary operating frequency. If you have a dual-band antenna, the receiver can switch between 2.4GHz and 900MHz without requiring an antenna change. Ensure your transmitter is configured to match the receiver's operating frequency.
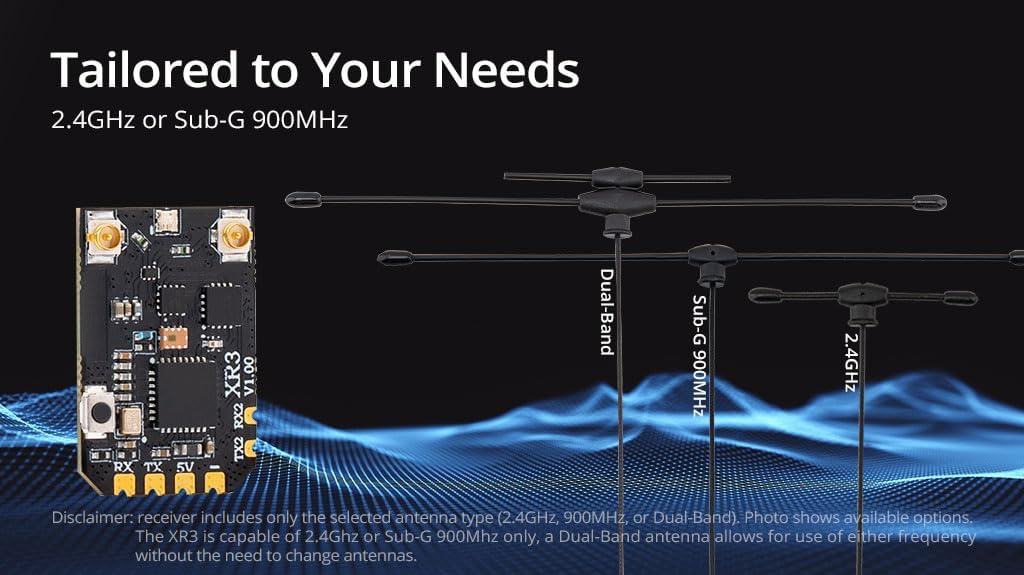
Image 6.1: The XR3 receiver supports various antenna types for 2.4GHz, Sub-G 900MHz, or Dual-Band operation.
6.2 ExpressLRS Functionality
Once bound, the XR3 receiver will communicate with your ExpressLRS transmitter, providing control and telemetry data. The antenna diversity feature automatically selects the best signal from the two antennas, enhancing link quality and range, especially in challenging RF environments. The telemetry power output is 100mW.
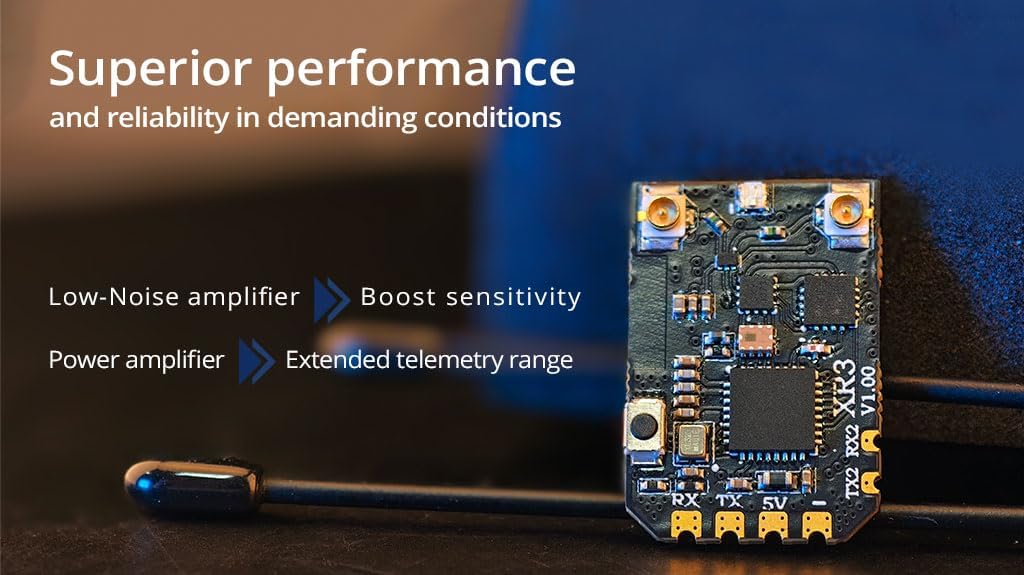
Image 6.2: The XR3 receiver incorporates a Low-Noise amplifier to boost sensitivity and a Power amplifier for extended telemetry range.
7. การบำรุงรักษา
The XR3 receiver is designed for durability, but proper care can extend its lifespan:
- รักษาเครื่องรับสัญญาณให้สะอาด ปราศจากฝุ่น สิ่งสกปรก และความชื้น
- ควรหลีกเลี่ยงการวางเครื่องรับสัญญาณไว้ในที่ที่มีอุณหภูมิสูงหรือต่ำเกินไป หรือโดนแสงแดดโดยตรงเป็นเวลานาน
- Ensure antenna connections are secure but do not overtighten.
- Regularly check for any visible damage to the board or antennas.
8 การแก้ไขปัญหา
If you encounter issues with your XR3 receiver, consider the following:
- ไม่มีการผูกมัด: Ensure the receiver is in bind mode (rapidly flashing LED) and your transmitter is attempting to bind on the correct ExpressLRS firmware version and frequency. Check power connections.
- Poor Signal/Range: Verify antenna connections and positioning. Ensure no obstructions are blocking the signal path. Check for local RF interference. Confirm the correct frequency band (2.4GHz or 900MHz) is selected on both receiver and transmitter.
- ไม่มีการวัดทางไกล: Check the TX/RX wiring between the receiver and flight controller. Ensure CRSF protocol is correctly configured in your flight controller and transmitter.
- เครื่องรับไม่เปิดเครื่อง: ตรวจสอบแหล่งจ่ายไฟ voltage (DC 4.5-8.4V) and polarity. Inspect for any short circuits or damaged components.
9. ข้อมูลจำเพาะ
| ข้อมูลจำเพาะ | รายละเอียด |
|---|---|
| รายการ | เครื่องรับ XR3 Nano Diversity Antenna Diversity หลายความถี่ ExpressLRS |
| พิมพ์ | ISM2.4, FCC915 |
| มหาเทพ | ESP32C3 |
| ชิป RF | LR1121 |
| ขั้วต่อ RF | IPEX-1X2 สูงสุด |
| เสาอากาศ | 2x T-Antenna (2.4GHz, 900Mhz, or Dual-band) |
| ช่วงความถี่ | 2.4GHz / Sub-G 900MHz |
| พลังเทเลเมทรี | 100มิลลิวัตต์ |
| อัตราการรีเฟรชการรับสูงสุด | ดีเค500เฮิรตซ์ / เค1000เฮิรตซ์ |
| อัตราการรีเฟรชตัวรับขั้นต่ำ | 25เฮิรตซ์ |
| ฉบับทำงานtage | DC 4.5-8.4V |
| น้ำหนัก | 1.3g (ไม่มีเสาอากาศ) |
| มิติ | 22มม. * 15มม. * 4มม. |
| เวอร์ชันเฟิร์มแวร์ | ExpressLRS v3.5.1 ติดตั้งไว้ล่วงหน้าแล้ว |
| เป้าหมาย FW | RadioMaster XR3 2.4/900 ความหลากหลาย RX |
| อินเทอร์เฟซบัส 1 | ซีอาร์เอสเอฟ |
| อินเทอร์เฟซบัส 2 | ยูเออาร์ที |
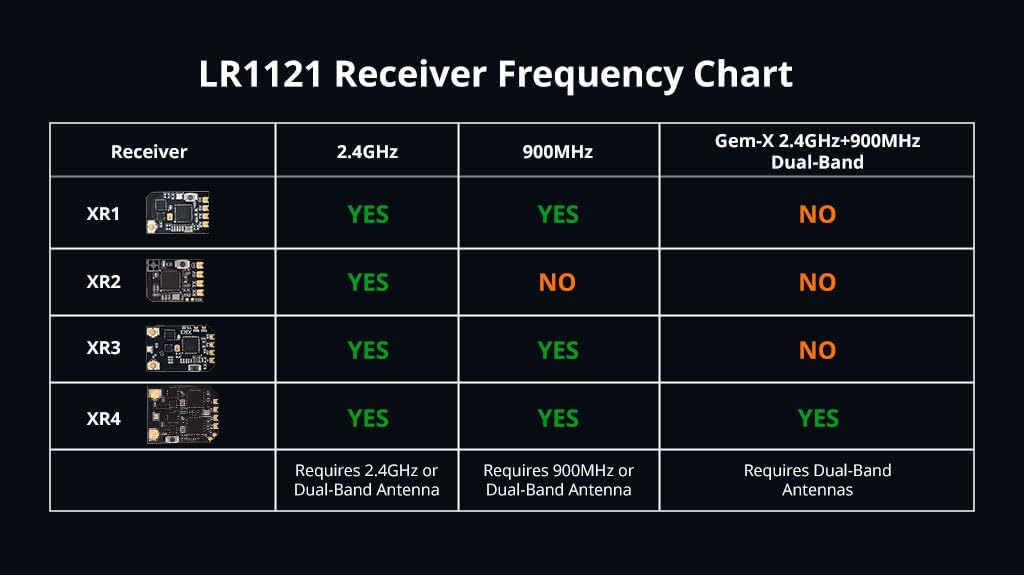
Image 9.1: LR1121 Receiver Frequency Chart, showing compatibility across different XR models.
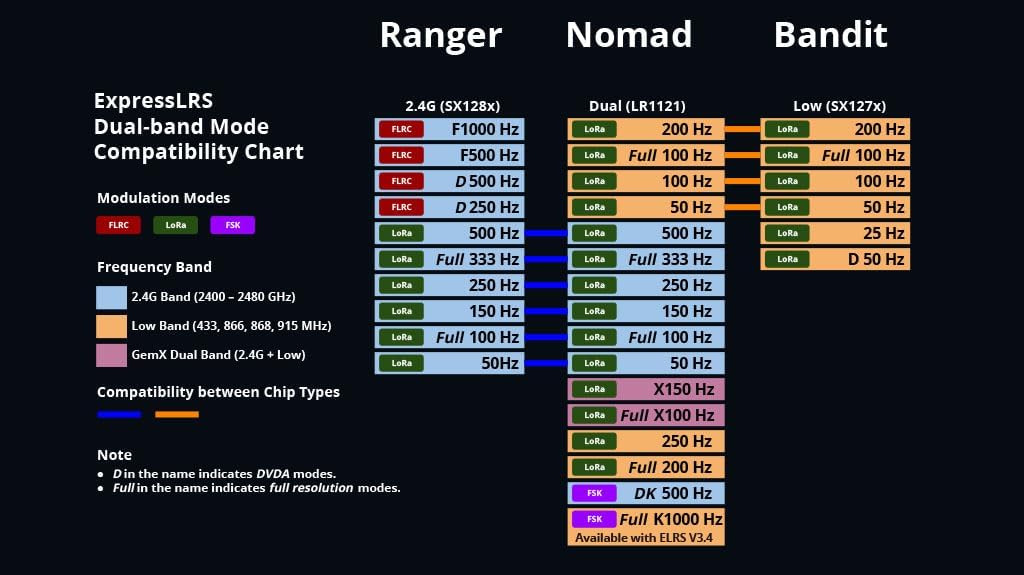
Image 9.2: ExpressLRS Dual-band Mode Compatibility Chart, detailing modulation modes and frequency bands for various modules.
10. การรับประกันและการสนับสนุน
สำหรับข้อมูลการรับประกันและการสนับสนุนทางเทคนิค โปรดดูที่ Radiomaster อย่างเป็นทางการ webหรือติดต่อตัวแทนจำหน่ายที่ได้รับอนุญาต เก็บหลักฐานการซื้อไว้เพื่อใช้ในกรณีที่ต้องการเคลมประกัน


