1. บทนำ
This manual provides detailed instructions for the safe and efficient operation of your VGKE Mini Projector, model TS-6. Please read this manual thoroughly before using the projector and retain it for future reference.
The VGKE Mini Projector TS-6 is a portable Full HD projector designed for home entertainment, offering versatile connectivity options including WiFi and Bluetooth for seamless integration with various devices.
2. สินค้าหมดview
2.1 คุณสมบัติหลัก
- Full HD 1080p Native Resolution (Supports 4K Sources)
- Built-in WiFi 6 for fast wireless connectivity
- Bluetooth 5.2 for external audio devices
- Portable design with a retractable stand
- 90-degree flip adjustment for ceiling projection
- Electric Focus and Keystone Correction (Auto Keystone 15° Vertical Only, 4-Direction, 4-Point Correction)
- 60-100% Zoom function
- Wide compatibility with Android, iOS, Laptops, TV Sticks, HDMI, and USB devices

Figure 1: VGKE Mini Projector TS-6. This image displays the compact and portable design of the projector.

Figure 2: Key features of the VGKE Mini Projector, including high brightness, Full HD resolution, 4K source support, and a retractable stand.
2.2 เนื้อหาบรรจุภัณฑ์
กรุณาตรวจสอบแพ็คเกจสำหรับรายการต่อไปนี้:
- VGKE Mini Projector TS-6
- อะแดปเตอร์แปลงไฟ
- รีโมทคอนโทรล
- คู่มือการใช้งาน
- HDMI Cable (may vary by region/package)
3. การตั้งค่า
3.1 การจัดวาง
Position the projector on a stable, flat surface. Ensure adequate ventilation around the device. The projector features a 90-degree flip adjustment, allowing for flexible placement, including ceiling projection.

Figure 3: Projector demonstrating 90-degree flip adjustment for versatile projection angles, including ceiling projection.
3.2 การเชื่อมต่อสายไฟ
- ต่ออะแดปเตอร์แปลงไฟเข้ากับพอร์ตจ่ายไฟของโปรเจ็กเตอร์
- เสียบอะแดปเตอร์ไฟฟ้าเข้ากับเต้ารับไฟฟ้าที่ผนัง
- กดปุ่มเปิด/ปิดบนโปรเจ็กเตอร์หรือรีโมทคอนโทรลเพื่อเปิดอุปกรณ์
3.3 การปรับโฟกัสเบื้องต้นและการปรับคีย์สโตน
Upon initial power-on, adjust the focus and keystone to achieve a clear, rectangular image.
- โฟกัสไฟฟ้า: Use the remote control to adjust the focus until the image is sharp.
- การแก้ไขคีย์สโตน: The projector supports auto 15° vertical keystone correction. Manual 4-direction and 4-point correction are also available via the settings menu for precise image alignment.

Figure 4: Illustration of the Electric Focus and various Keystone Correction options available on the projector.
4. คู่มือการใช้งาน
4.1 การเชื่อมต่ออุปกรณ์
โปรเจ็กเตอร์นี้มีตัวเลือกการเชื่อมต่อหลากหลายรูปแบบ:
- ช่องต่อ HDMI: Connect laptops, TV sticks, gaming consoles (Switch/PS5), or TV boxes via the HDMI ports.
- ยูเอสบี: Insert USB sticks or external storage devices into the USB ports for media playback.
- พอร์ตเสียง: เชื่อมต่อหูฟังหรือลำโพงภายนอก
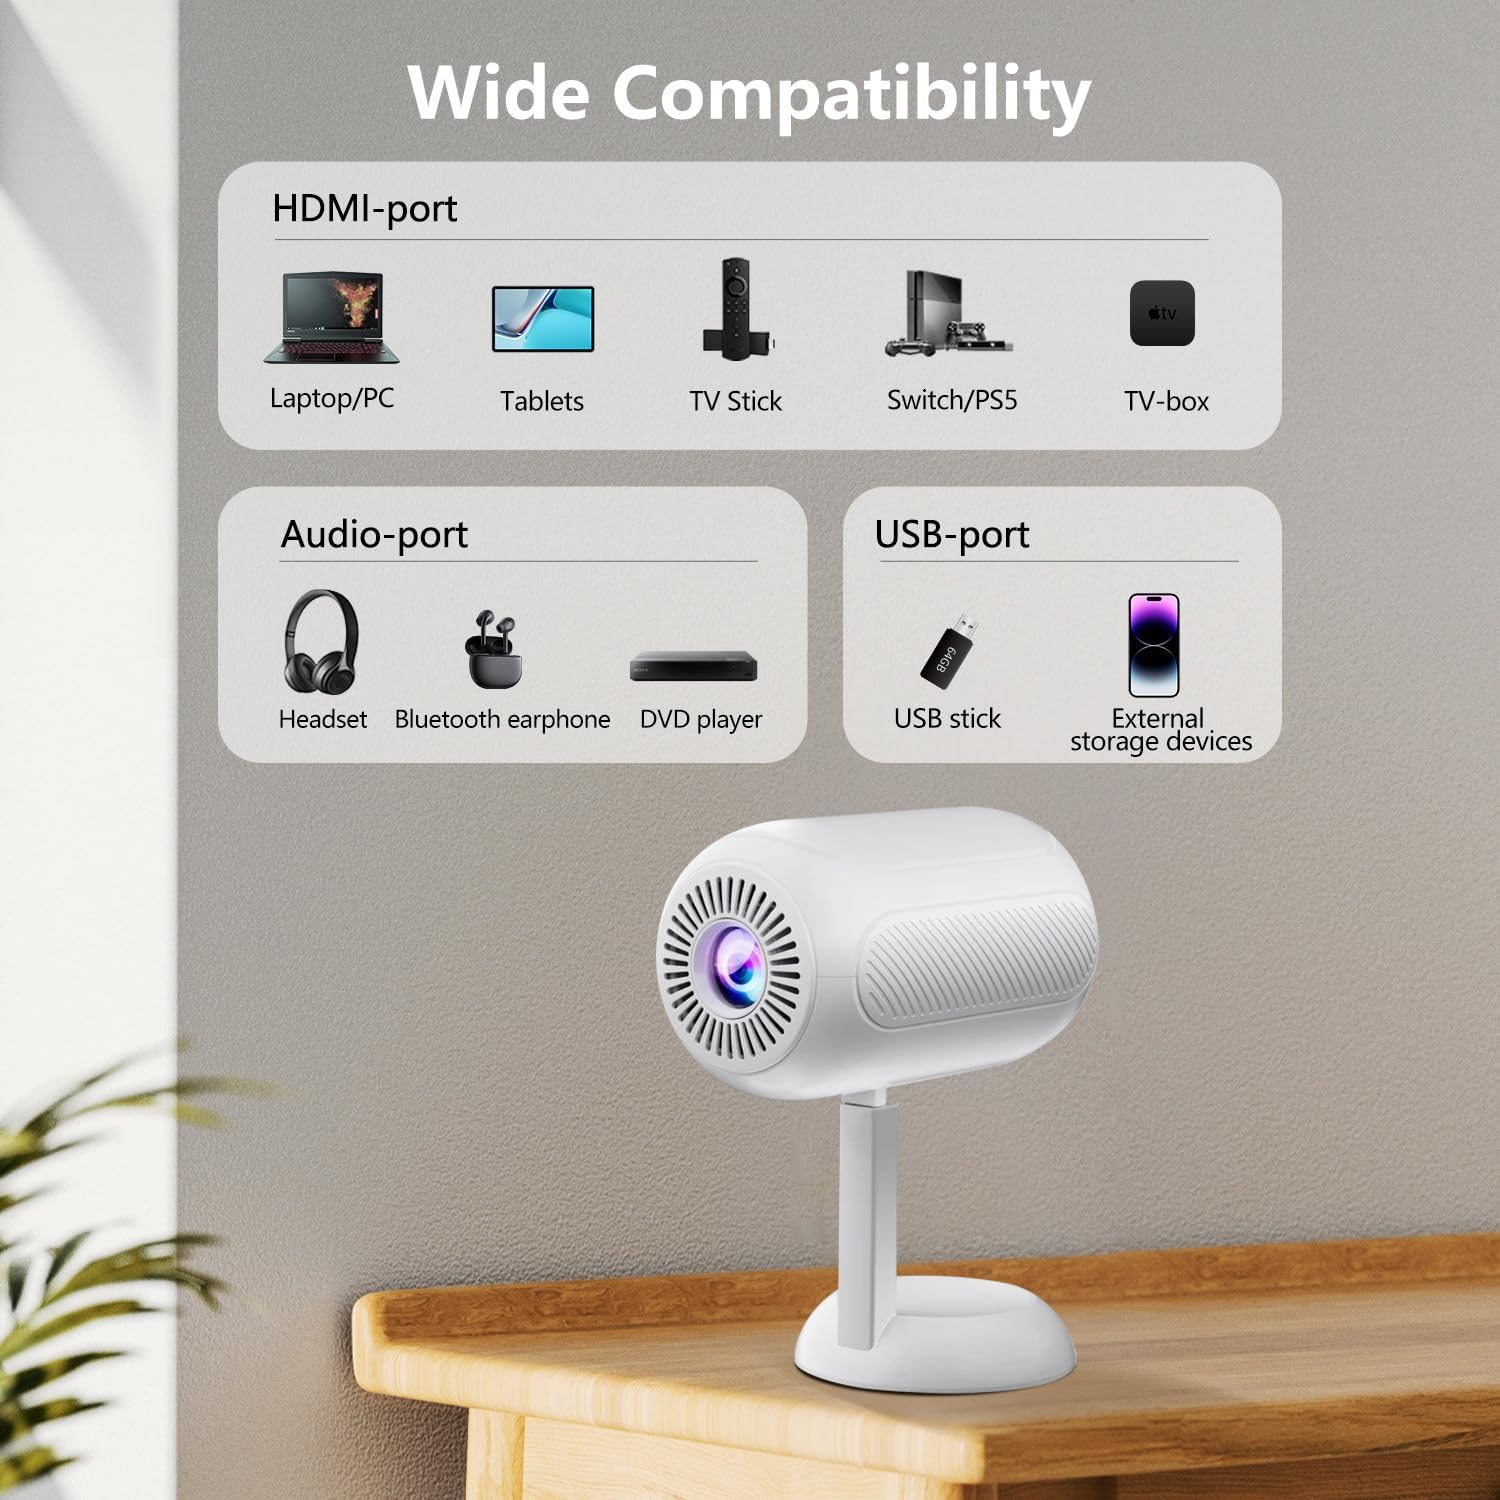
รูปที่ 5: เกินview of the projector's connectivity ports, including HDMI, USB, and Audio ports.
4.2 การเชื่อมต่อไร้สาย (WiFi และ Bluetooth)
The projector supports WiFi 6 and Bluetooth 5.2 for wireless connections.
- การเชื่อมต่อ WiFi:
- เข้าไปที่เมนูการตั้งค่าของโปรเจ็กเตอร์
- เลือก "เครือข่าย" หรือ "การตั้งค่า WiFi"
- เลือกเครือข่าย WiFi ที่ต้องการแล้วป้อนรหัสผ่าน
- Once connected, you can use screen mirroring features.
- การเชื่อมต่อบลูทู ธ :
- เข้าไปที่เมนูการตั้งค่าของโปรเจ็กเตอร์
- เลือก "การตั้งค่าบลูทูธ"
- เปิดใช้งาน Bluetooth และค้นหาอุปกรณ์ที่มีอยู่
- Select your Bluetooth speaker or headphones to pair.

Figure 6: The projector connected wirelessly via WiFi and Bluetooth, demonstrating compatibility with iOS, Android, and Windows devices.
4.3 การมิเรอร์หน้าจอ
The projector supports screen mirroring from Android, iOS, and Windows devices. Ensure your device and the projector are connected to the same WiFi network.
- สำหรับอุปกรณ์ iOS:
- On the projector, select the "iOS Cast" or "Screen Mirroring" option.
- On your iOS device, open Control Center and tap "Screen Mirroring".
- เลือกโปรเจ็กเตอร์จากรายการอุปกรณ์ที่มีอยู่
- สำหรับอุปกรณ์ Android:
- On the projector, select the "Android Cast" or "Screen Mirroring" option.
- On your Android device, enable "Wireless Display," "Smart View," or "Cast" (names may vary by device).
- เลือกโปรเจ็กเตอร์จากรายการอุปกรณ์ที่มีอยู่
บันทึก: Due to HDCP copyright protocols, certain streaming services (e.g., Netflix, Disney+, Prime Video, Hulu) may not support direct screen mirroring. For these services, it is recommended to use a TV Stick (e.g., Amazon Fire Stick, Roku) connected via HDMI.
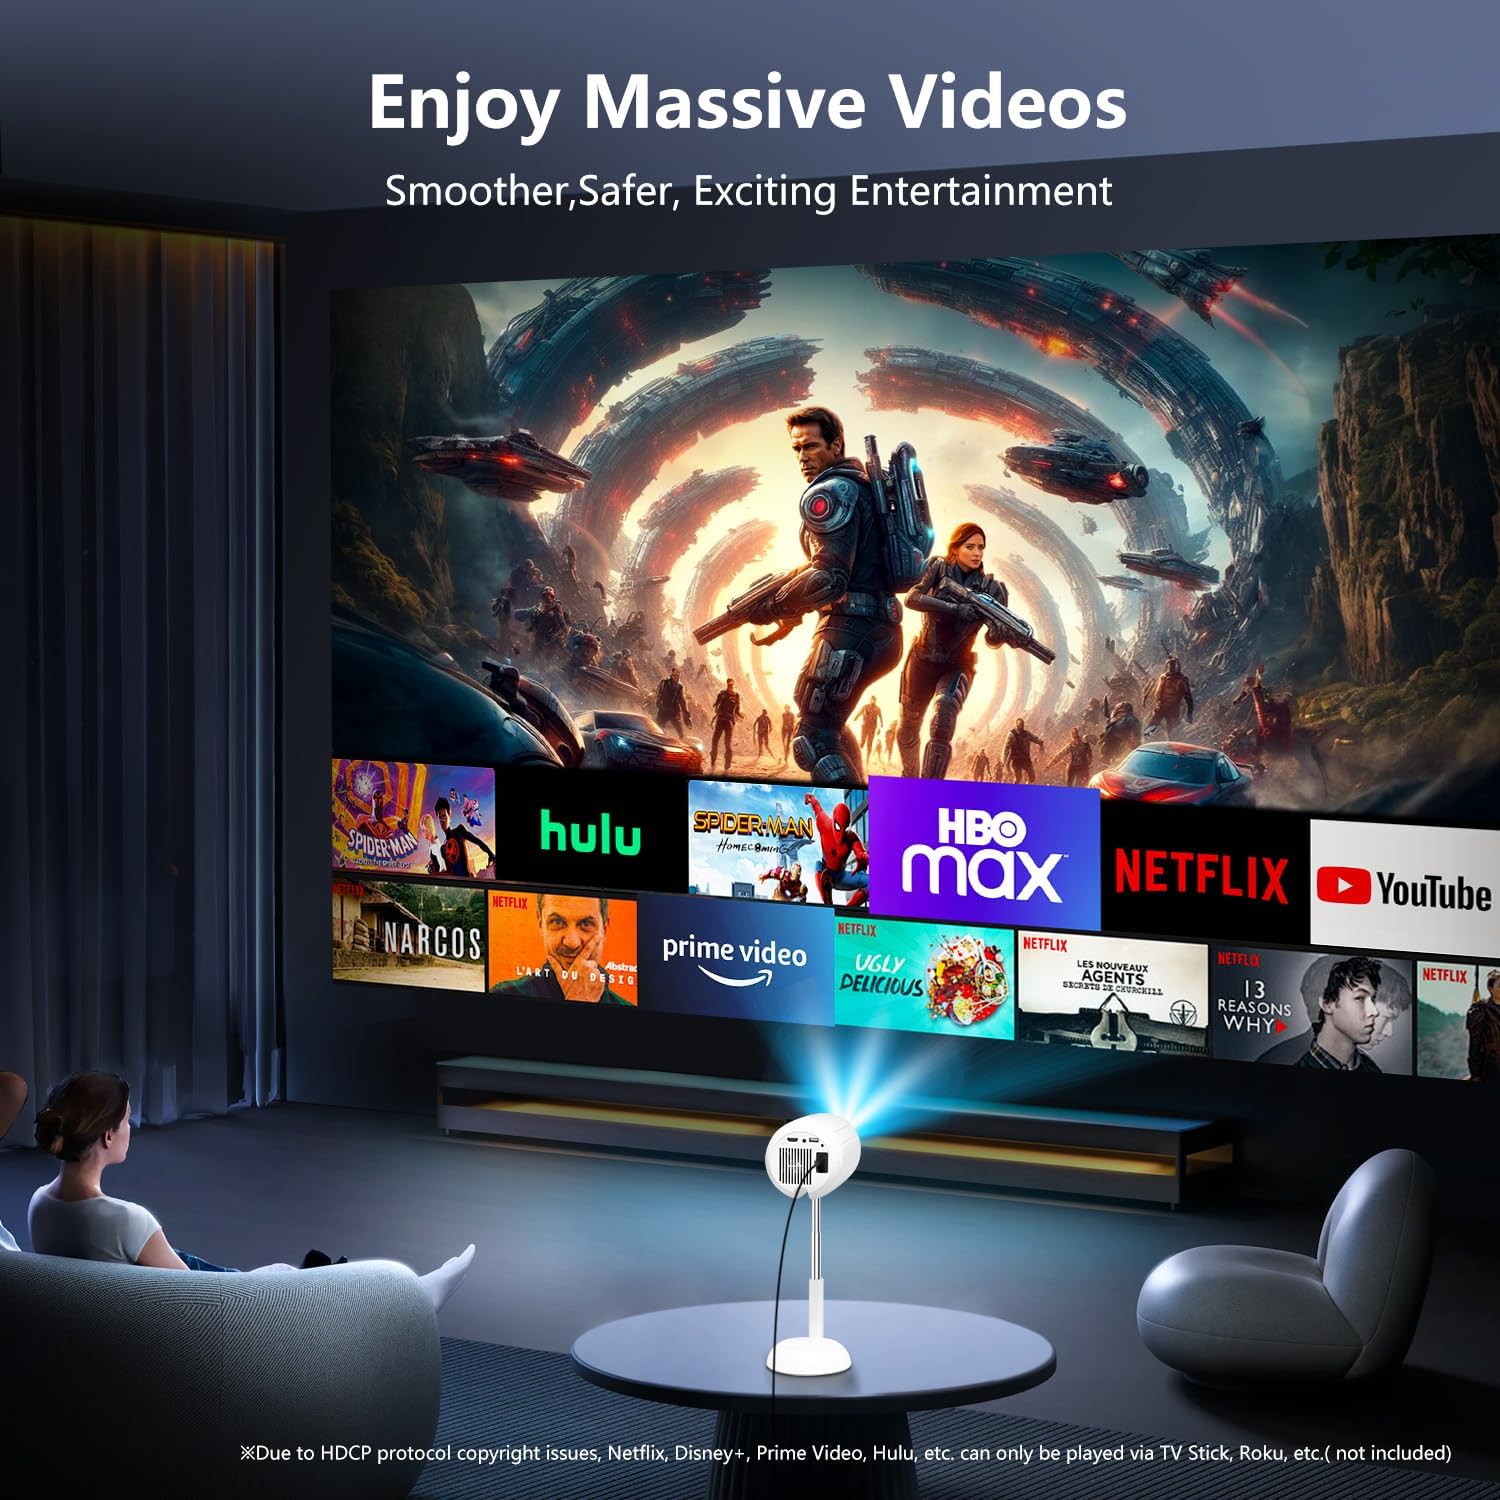
Figure 7: The projector displaying content from various streaming services, highlighting the use of external devices for copyrighted content.
5. การบำรุงรักษา
5.1 การทำความสะอาดเลนส์
ใช้ผ้านุ่มไม่เป็นขุยที่ออกแบบมาสำหรับเลนส์ออปติคอลโดยเฉพาะ เช็ดเลนส์โปรเจคเตอร์เบาๆ หลีกเลี่ยงการใช้น้ำยาทำความสะอาดที่มีฤทธิ์กัดกร่อนหรือแรงมากเกินไป เพราะอาจทำให้เลนส์เป็นรอยได้
5.2 การทำความสะอาดตัวโปรเจ็กเตอร์
Wipe the exterior of the projector with a soft, dry cloth. Do not use liquid cleaners or solvents, as they may damage the finish.
5.3 การระบายอากาศ
ตรวจสอบให้แน่ใจว่าช่องระบายอากาศปราศจากฝุ่นละอองและสิ่งกีดขวางเพื่อป้องกันความร้อนสูงเกินไป ห้ามปิดกั้นช่องระบายอากาศขณะใช้งาน
6 การแก้ไขปัญหา
| ปัญหา | สาเหตุที่เป็นไปได้ | สารละลาย |
|---|---|---|
| ไม่มีภาพแสดง | Power cable disconnected; incorrect input source; device not connected properly. | Check power connection; select correct input source (HDMI, USB, etc.); ensure cables are securely connected. |
| ภาพเบลอ | Out of focus; incorrect keystone adjustment. | Adjust electric focus using the remote; perform keystone correction. |
| ไม่มีเสียง | Volume too low; external audio device not connected/paired; projector muted. | Increase volume; connect/pair Bluetooth device; unmute projector. |
| การสะท้อนหน้าจอไม่ทำงาน | Devices not on same WiFi network; HDCP restrictions; WiFi signal weak. | Ensure both devices are on the same WiFi; use HDMI for restricted content; check WiFi signal strength. |
7. ข้อมูลจำเพาะ
| คุณสมบัติ | รายละเอียด |
|---|---|
| ยี่ห้อ | วีจีเค |
| หมายเลขรุ่น | ทีเอส-6 |
| ความละเอียดการแสดงผล | 1920 x 1080 (ฟูลเอชดี) |
| เทคโนโลยีการเชื่อมต่อ | บลูทูธ, HDMI, USB, Wi-Fi |
| คุณสมบัติพิเศษ | Built-In Wi-Fi, Bluetooth |
| ขนาดสินค้า | 4.93 x 4.93 x 8.45 นิ้ว |
| น้ำหนักสินค้า | 2.88 ปอนด์ |
| การใช้ที่แนะนำ | โฮมซีเนม่า |
8. การรับประกันและการสนับสนุน
For warranty information and technical support, please refer to the contact details provided on the VGKE official webเว็บไซต์หรือเอกสารการซื้อของคุณ โปรดเก็บหลักฐานการซื้อไว้เพื่อใช้ในการเรียกร้องการรับประกัน
For further assistance, you may contact VGKE customer service through their official channels.


