การแนะนำ
This instruction manual provides detailed guidance for the assembly, operation, and maintenance of your Whadda WSAH1803 Universal Mono Preamplifier Soldering Kit. This kit is designed to introduce users to basic electronics and soldering techniques while building a functional mono preamplifier. Please read all instructions carefully before beginning assembly.
คำแนะนำเพื่อความปลอดภัย
- ควรทำงานในบริเวณที่มีการระบายอากาศที่ดีเพื่อหลีกเลี่ยงการสูดดมควันบัดกรี
- Use appropriate eye protection (safety glasses) when soldering.
- Ensure your soldering iron is placed in a safe stand when not in use and is unplugged when finished.
- Avoid touching the hot tip of the soldering iron or freshly soldered joints.
- เก็บชิ้นส่วนและเครื่องมือทั้งหมดให้พ้นมือเด็กและสัตว์เลี้ยง
- Verify correct component orientation (e.g., electrolytic capacitors, diodes, ICs) before soldering to prevent damage.
- Use a suitable power supply (12V DC) and ensure correct polarity when connecting power to the assembled circuit.
เนื้อหาแพ็คเกจ
Carefully unpack the kit and verify that all components listed below are present. If any parts are missing or damaged, please contact Whadda customer support.
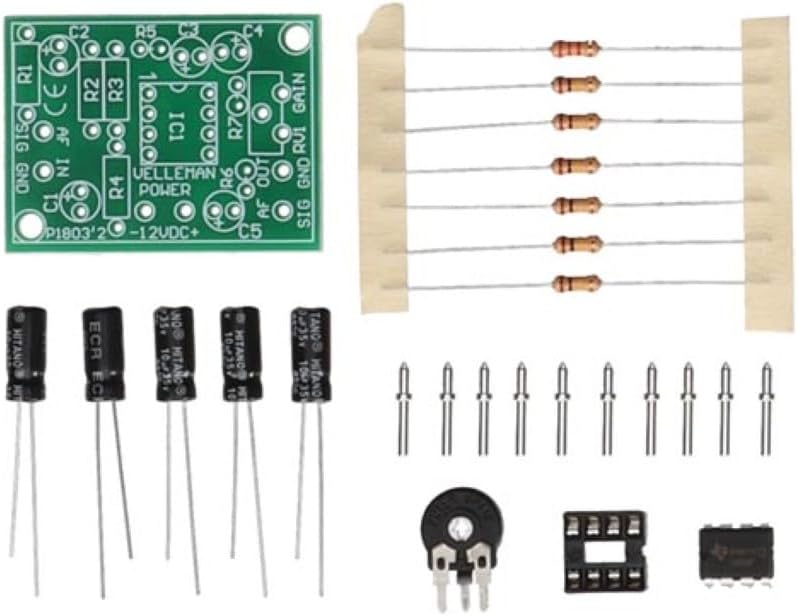
Image: All components of the Whadda WSAH1803 Universal Mono Preamplifier Soldering Kit laid out, including the PCB, resistors, capacitors, IC, IC socket, potentiometer, and pin headers.
- แผงวงจรพิมพ์ (PCB)
- ตัวต้านทาน (ค่าต่างๆ)
- ตัวเก็บประจุไฟฟ้า
- ตัวเก็บประจุเซรามิก
- วงจรรวม (IC)
- ซ็อกเก็ตไอซี
- Potentiometer (for gain control)
- Pin Headers / Connectors
การตั้งค่า: คำแนะนำในการประกอบ
Follow these steps to assemble your Whadda WSAH1803 preamplifier kit. It is recommended to solder components from smallest to largest.
- การระบุส่วนประกอบ: Before soldering, identify all components by their markings and match them to the corresponding positions on the PCB. Resistors are identified by color codes, capacitors by capacitance and voltage, and the IC socket and IC by their pin counts and notch/dot for orientation.
- ตัวต้านทานแบบบัดกรี: Insert the resistors into their designated spots on the PCB. Bend the leads slightly on the solder side to hold them in place. Solder each lead and trim the excess.
- ตัวเก็บประจุเซรามิกแบบบัดกรี: Insert the small, non-polarized ceramic capacitors. Solder and trim leads.
- บัดกรีซ็อกเก็ตไอซี: Place the IC socket onto the PCB, ensuring the notch on the socket aligns with the notch marking on the PCB silkscreen. Solder all pins.
- ตัวเก็บประจุแบบอิเล็กโทรไลต์ชนิดบัดกรี: These are polarized. Ensure the longer lead (positive) goes into the '+' marked hole or the square pad, and the shorter lead (negative) aligns with the '-' marking or round pad. Solder and trim leads.
- Solder Potentiometer and Pin Headers: Solder the potentiometer and any pin headers or connectors according to the PCB markings.
- Insert IC: Carefully insert the Integrated Circuit (IC) into its socket. Ensure the notch on the IC aligns with the notch on the socket and PCB. Apply gentle, even pressure until it is fully seated. Do not solder the IC directly unless specified; use the socket.

Image: A partially assembled Whadda WSAH1803 preamplifier circuit board, showing resistors and some capacitors already soldered in place.
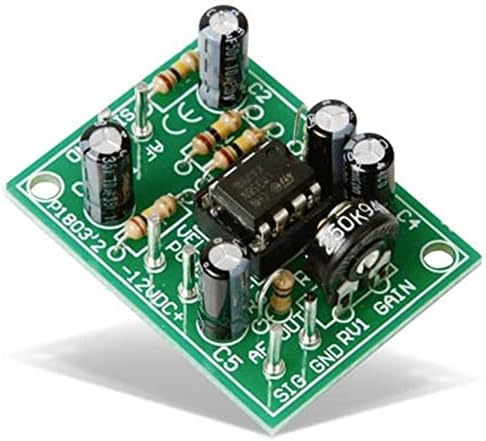
Image: A fully assembled Whadda WSAH1803 Universal Mono Preamplifier circuit board, with all components soldered and the IC inserted into its socket.
คำแนะนำการใช้งาน
Once assembled, follow these steps to operate your mono preampเครื่องฟอก:
- การเชื่อมต่อไฟฟ้า: Connect a stable 12V DC power supply to the designated power input terminals (usually marked +12V and GND). Ensure correct polarity to prevent damage to the circuit.
- อินพุตเสียง: Connect your audio source (e.g., microphone, low-level audio device) to the audio input terminals (usually marked 'AF IN' or 'SIG IN' and 'GND'). This preamplifier is designed for mono signals.
- เอาต์พุตเสียง: เชื่อมต่อก่อนamplifier's output terminals (usually marked 'AF OUT' or 'SIG OUT' and 'GND') to an ampเครื่องขยายเสียงหรือระบบลำโพงแบบแอคทีฟ
- การปรับค่าเกน: Use the onboard potentiometer (often labeled 'GAIN' or 'RV1') to adjust the amplification level of the audio signal. Start with the gain at its lowest setting and gradually increase it to avoid distortion.
- การทดสอบ: Play an audio signal through your source and listen to the output. Adjust the gain as needed for optimal sound.
การซ่อมบำรุง
The Whadda WSAH1803 preamplifier kit requires minimal maintenance. Follow these guidelines to ensure longevity:
- การทำความสะอาด: Keep the circuit board clean and free from dust and debris. Use a soft, dry brush or compressed air for cleaning. Avoid using liquids.
- พื้นที่จัดเก็บ: Store the assembled preamplifier in a dry, cool environment, away from direct sunlight and extreme temperatures.
- การตรวจสอบ: ตรวจสอบรอยเชื่อมบัดกรีเป็นระยะๆ เพื่อดูว่ามีรอยแตกหรือการกัดกร่อนหรือไม่ หากจำเป็นให้ทำการบัดกรีใหม่
- แหล่งจ่ายไฟ: Always use a regulated 12V DC power supply to prevent damage from voltagความผันผวนของอี
การแก้ไขปัญหา
If you encounter issues with your preampหากพบปัญหาเกี่ยวกับเครื่องขยายเสียง โปรดดูคำแนะนำในการแก้ไขปัญหาต่อไปนี้:
| ปัญหา | สาเหตุที่เป็นไปได้ | สารละลาย |
|---|---|---|
| ไม่มีเสียงออก |
|
|
| เสียงเพี้ยนหรือเบาเกินไป |
|
|
| เสียงฮัมหรือเสียงหวีด |
|
|
ข้อมูลจำเพาะ
- แบบอย่าง: WSAH1803
- ยี่ห้อ: วาดดา
- อินพุต Voltage: กระแสตรง 12 โวลต์
- จำนวนช่องสัญญาณ: 1 (ขาวดำ)
- ขนาด (ยาว x กว้าง x สูง): Approximately 3.8 x 7.8 x 15.5 cm (assembled board)
- น้ำหนัก: น้ำหนักประมาณ 32 กรัม
- ใบรับรอง: CE
- ส่วนประกอบที่รวมอยู่: PCB, Resistors, Capacitors, IC, IC Socket, Potentiometer, Pin Headers
การรับประกันและการสนับสนุน
Whadda products are manufactured by Velleman Group nv. For any questions, technical assistance, or warranty claims, please refer to the official Whadda or Velleman Group website for contact information and support resources. Please note that as a soldering kit, the warranty may cover components but typically not issues arising from incorrect assembly or soldering errors.
Official Whadda Webเว็บไซต์: https://www.velleman.eu/products/view/?id=461802