1. บทนำ
This manual provides detailed instructions for the setup, operation, maintenance, and troubleshooting of your Ducky One 3 Mini 60% Mechanical Keyboard. Please read this manual thoroughly to ensure proper use and to maximize your keyboard's performance and longevity.

Image: The Ducky One 3 Mini 60% Mechanical Keyboard, showcasinด้วยดีไซน์ที่กะทัดรัดและแสงไฟ RGB ที่สดใส
2. เนื้อหาบรรจุภัณฑ์
Before proceeding with the setup, please verify that all items listed below are present in your package:
- Ducky One 3 Mini 60% Mechanical Keyboard
- Detachable Braided USB-C Cable
- ตัวดึงกุญแจ
- Ducky Channel Sticker
- Accent Keycaps (additional colored keycaps for customization)
3. คู่มือการติดตั้ง
3.1 การเชื่อมต่อคีย์บอร์ด
- Locate the USB-C port on the back of your Ducky One 3 Mini keyboard.
- Connect the smaller end of the provided USB-C cable to the keyboard's USB-C port.
- ต่อปลายสายด้าน USB-A ที่มีขนาดใหญ่กว่าเข้ากับพอร์ต USB ที่ว่างอยู่บนคอมพิวเตอร์ของคุณ
- The keyboard will automatically be detected by your operating system. No additional drivers are typically required for basic functionality.

Image: The detachable braided USB-C cable being connected to the keyboard's port, illustrating the connection process.
3.2 การปรับความสูงของแป้นพิมพ์
The Ducky One 3 Mini features 3-level adjustable feet to customize the typing angle for optimal comfort.
- พลิกแป้นพิมพ์เพื่อเข้าถึงขาตั้งที่อยู่ด้านล่าง
- Extend the feet to your preferred height. There are two sets of feet for three different angles.

Image: The underside of the Ducky One 3 Mini keyboard, highlighting the adjustable feet that allow for three different typing angles.
4. คู่มือการใช้งาน
4.1 ฟังก์ชันพื้นฐานของแป้นพิมพ์
The Ducky One 3 Mini is a 60% layout keyboard, meaning some keys share functions. The Fn key is used to access secondary functions printed on the front or side of keycaps.
- Primary Keys: Standard alphanumeric keys function as labeled.
- ฟังก์ชั่นรอง: กดค้างไว้ Fn key and press the desired key to activate its secondary function (e.g., arrow keys, F-row keys, Home, End, Page Up/Down).
4.2 การควบคุมแสง RGB
The keyboard features per-key programmable RGB lighting. Specific key combinations (often involving Fn and other keys) are used to cycle through lighting modes, adjust brightness, and change colors. Refer to the Ducky official website or included quick guide for detailed RGB control commands.
4.3 การเขียนโปรแกรมมาโคร
The Ducky One 3 Mini supports macro programming, allowing you to assign complex sequences of key presses to a single key. The remapped macro layout provides flexibility for custom commands. Detailed instructions for macro recording and assignment can be found in the comprehensive Ducky software or online resources.
4.4 สวิตช์แบบ Hot-Swappable
This keyboard is equipped with hot-swappable Kailh Yellow Sockets, allowing you to change mechanical switches without soldering. This feature enables customization of typing feel and sound.
- Use the included keycap puller to remove the keycap.
- Use a switch puller (not included, but often bundled with switches) to gently remove the switch from its socket.
- Align the pins of the new switch with the holes in the socket and press firmly until it clicks into place. Ensure pins are not bent.
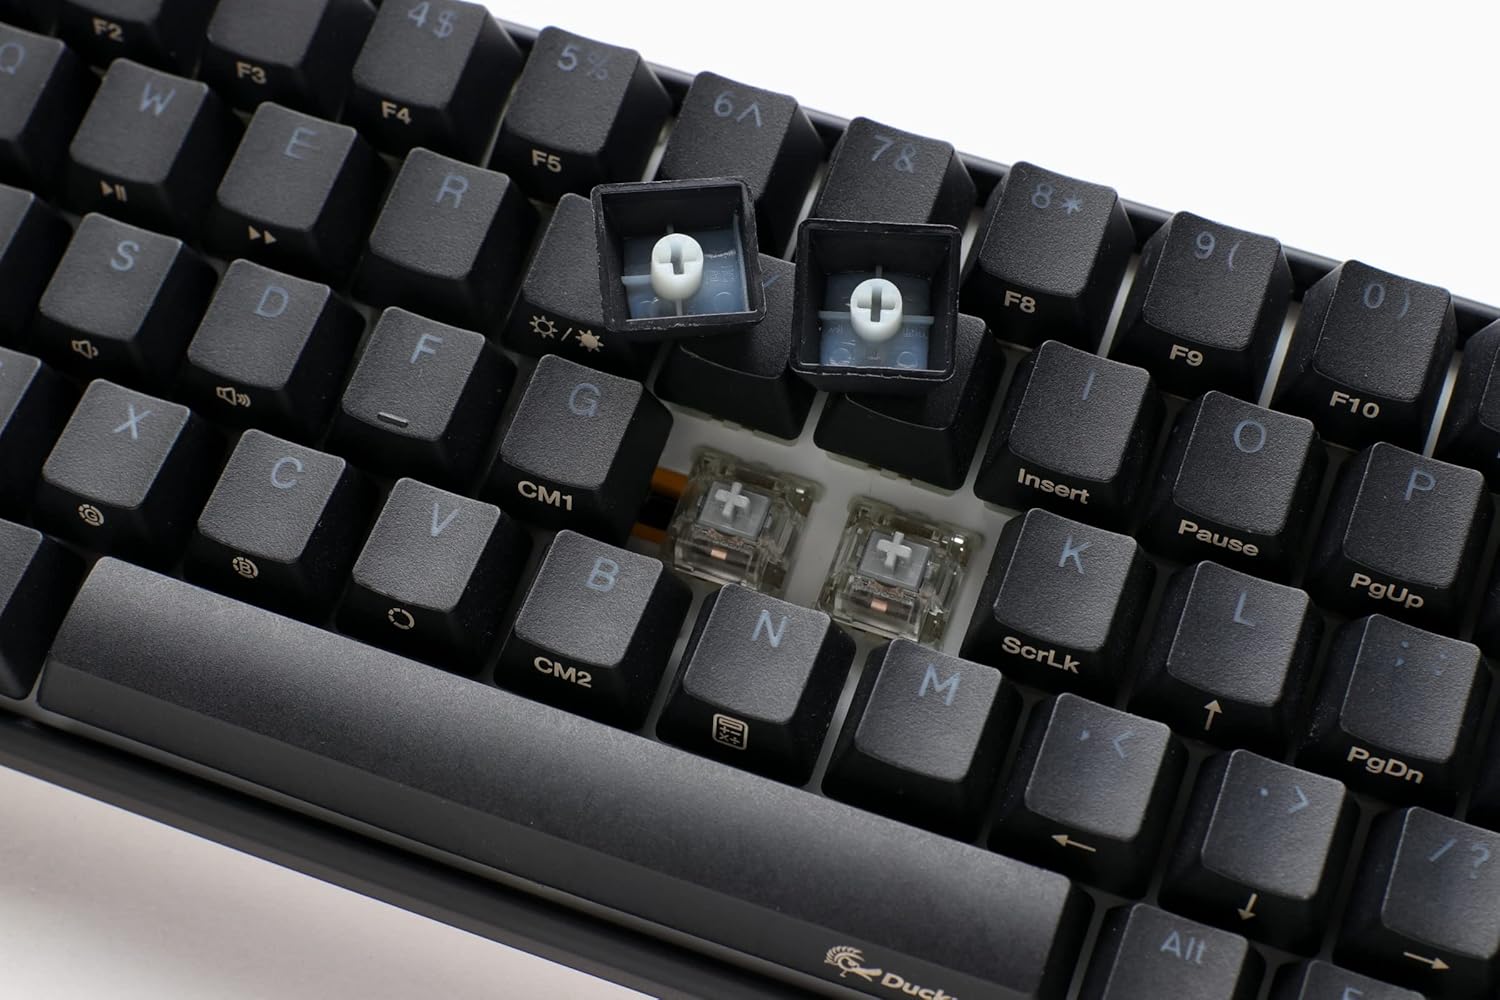
ภาพ: ภาพระยะใกล้ view of the keyboard with several keycaps removed, revealing the hot-swappable mechanical switches beneath, ready for replacement or customization.
4.5 ผลิตภัณฑ์เกินview วีดีโอ
สำหรับการมองเห็นมากกว่าview of the Ducky One 3 series features and design philosophy, please watch the official product video below.
วิดีโอ: เจ้าหน้าที่ผ่านview of the Ducky One 3 keyboard series, detailing its design, features, and the 'QUACK Mechanics' philosophy. This video provides a visual guide to the product's capabilities.
5. การบำรุงรักษา
5.1 การทำความสะอาดแป้นพิมพ์
การทำความสะอาดเป็นประจำจะช่วยรักษารูปลักษณ์และการทำงานของแป้นพิมพ์
- คีย์แคป: Use the included keycap puller to carefully remove keycaps. Clean them with a mild soap solution and a soft cloth, then ensure they are completely dry before reattaching.
- ตัวคีย์บอร์ด: ใช้ผ้านุ่มไม่เป็นขุยเช็ดเบาๆampened with water or a mild cleaning solution, to wipe down the keyboard body. Avoid excessive moisture.
- Between Switches: ใช้ลมเป่าอัดเพื่อกำจัดฝุ่นและเศษสิ่งสกปรกออกจากช่องว่างระหว่างสวิตช์

Image: The Ducky One 3 Mini keyboard featuring a custom spacebar with an intricate design, highlighting the potential for aesthetic customization and the ease of keycap removal for cleaning.
5.2 Switch and Stabilizer Care
The Ducky One 3 Mini features V2 stabilizers for improved stability and sound. While hot-swappable, proper care of switches and stabilizers can prevent issues.
- หลีกเลี่ยงการหกของเหลวบนแป้นพิมพ์
- When replacing switches, ensure they are inserted straight to prevent bending pins.
6 การแก้ไขปัญหา
If you encounter issues with your Ducky One 3 Mini keyboard, refer to the following common troubleshooting steps:
- แป้นพิมพ์ไม่ตอบสนอง:
- ตรวจสอบให้แน่ใจว่าสาย USB-C เชื่อมต่อกับคีย์บอร์ดและคอมพิวเตอร์อย่างแน่นหนา
- ลองเชื่อมต่อคีย์บอร์ดกับพอร์ต USB อื่นบนคอมพิวเตอร์ของคุณ
- หากเป็นไปได้ ให้ลองทดสอบแป้นพิมพ์กับคอมพิวเตอร์เครื่องอื่น เพื่อตัดความเป็นไปได้ว่าปัญหาเกิดจากระบบคอมพิวเตอร์เครื่องใดเครื่องหนึ่ง
- ไฟ RGB ไม่ทำงาน:
- Check the keyboard's manual or Ducky's website for the correct key combinations to activate and adjust RGB lighting.
- Ensure no software conflicts are interfering with the lighting controls.
- Keys Not Registering or Double-Typing (Chatter):
- Due to the hot-swappable design, try removing and re-inserting the affected switch to ensure proper seating.
- If the issue persists, consider replacing the switch with a new one.
- Ensure the keyboard is clean and free of debris that might obstruct switch operation.
- N-Key Rollover (NKRO) Issues:
- The Ducky One 3 Mini supports N-key rollover, meaning all key presses are registered simultaneously. If you experience issues, ensure your operating system and any gaming software are not interfering with this feature.
For further assistance, please visit the official Ducky support webเว็บไซต์หรือติดต่อฝ่ายบริการลูกค้าของพวกเขา
7. ข้อมูลจำเพาะ
| คุณสมบัติ | รายละเอียด |
|---|---|
| หมายเลขรุ่น | DKON2161ST-SUSPDCLAWSC1 |
| เค้าโครง | 60% |
| ประเภทสวิตซ์ | Cherry MX Silent Red (Hot-Swappable) |
| ปุ่มกด | High-Density PBT Double-shot Seamless Keycaps |
| การแบ็คไลท์ | Per-key Programmable RGB |
| การเชื่อมต่อ | Detachable USB-C |
| คุณสมบัติพิเศษ | QUACK Mechanics Design, Silicone Plate Dampener, EVA Foam Case Dampener, Ducky V2 Stabilizers, 3-Level Adjustable Feet, N-Key Rollover |
| ขนาดสินค้า | 12.2 x 4.33 x 1.57 นิ้ว |
| น้ำหนักสินค้า | 1.31 ปอนด์ |
8. การรับประกันและการสนับสนุน
Ducky products are manufactured to high-quality standards. This product is covered by a limited warranty against manufacturing defects. The specific terms and duration of your warranty may vary by region and retailer. Please retain your proof of purchase for warranty claims.
For technical support, warranty information, or service inquiries, please visit the official Ducky website or contact your local Ducky distributor or retailer. You can often find FAQs, driver downloads, and contact information on the official Ducky support pages.
แหล่งข้อมูลออนไลน์:
- Ducky อย่างเป็นทางการ Webเว็บไซต์: www.duckychannel.com.tw
- Ducky Store on Amazon: Visit the Ducky Store


