1. บทนำ
Welcome to the user manual for your Ulefone Armor X9 Rugged Phone. This guide provides essential information on setting up, operating, maintaining, and troubleshooting your device. The Ulefone Armor X9 is designed for durability and performance, featuring robust protection and advanced functionalities.
Key features of your Ulefone Armor X9 include:
- IP68/IP69K Grade 360 All Round Protection: สร้างขึ้นเพื่อทนต่อสภาพแวดล้อมที่รุนแรง
- ระบบปฏิบัติการ Android 11: Enjoy the latest Android experience.
- แรม 4GB + รอม 128GB: Ample memory and storage for your applications and data.
- 16MP Triple Rear Camera: ถ่ายภาพและวิดีโอคุณภาพสูง
- แบตเตอรี่ความจุสูงถึง 5580mAh: ระยะเวลาการใช้งานที่ยาวนานขึ้น
- Triple Navigation System: Enhanced positioning accuracy.
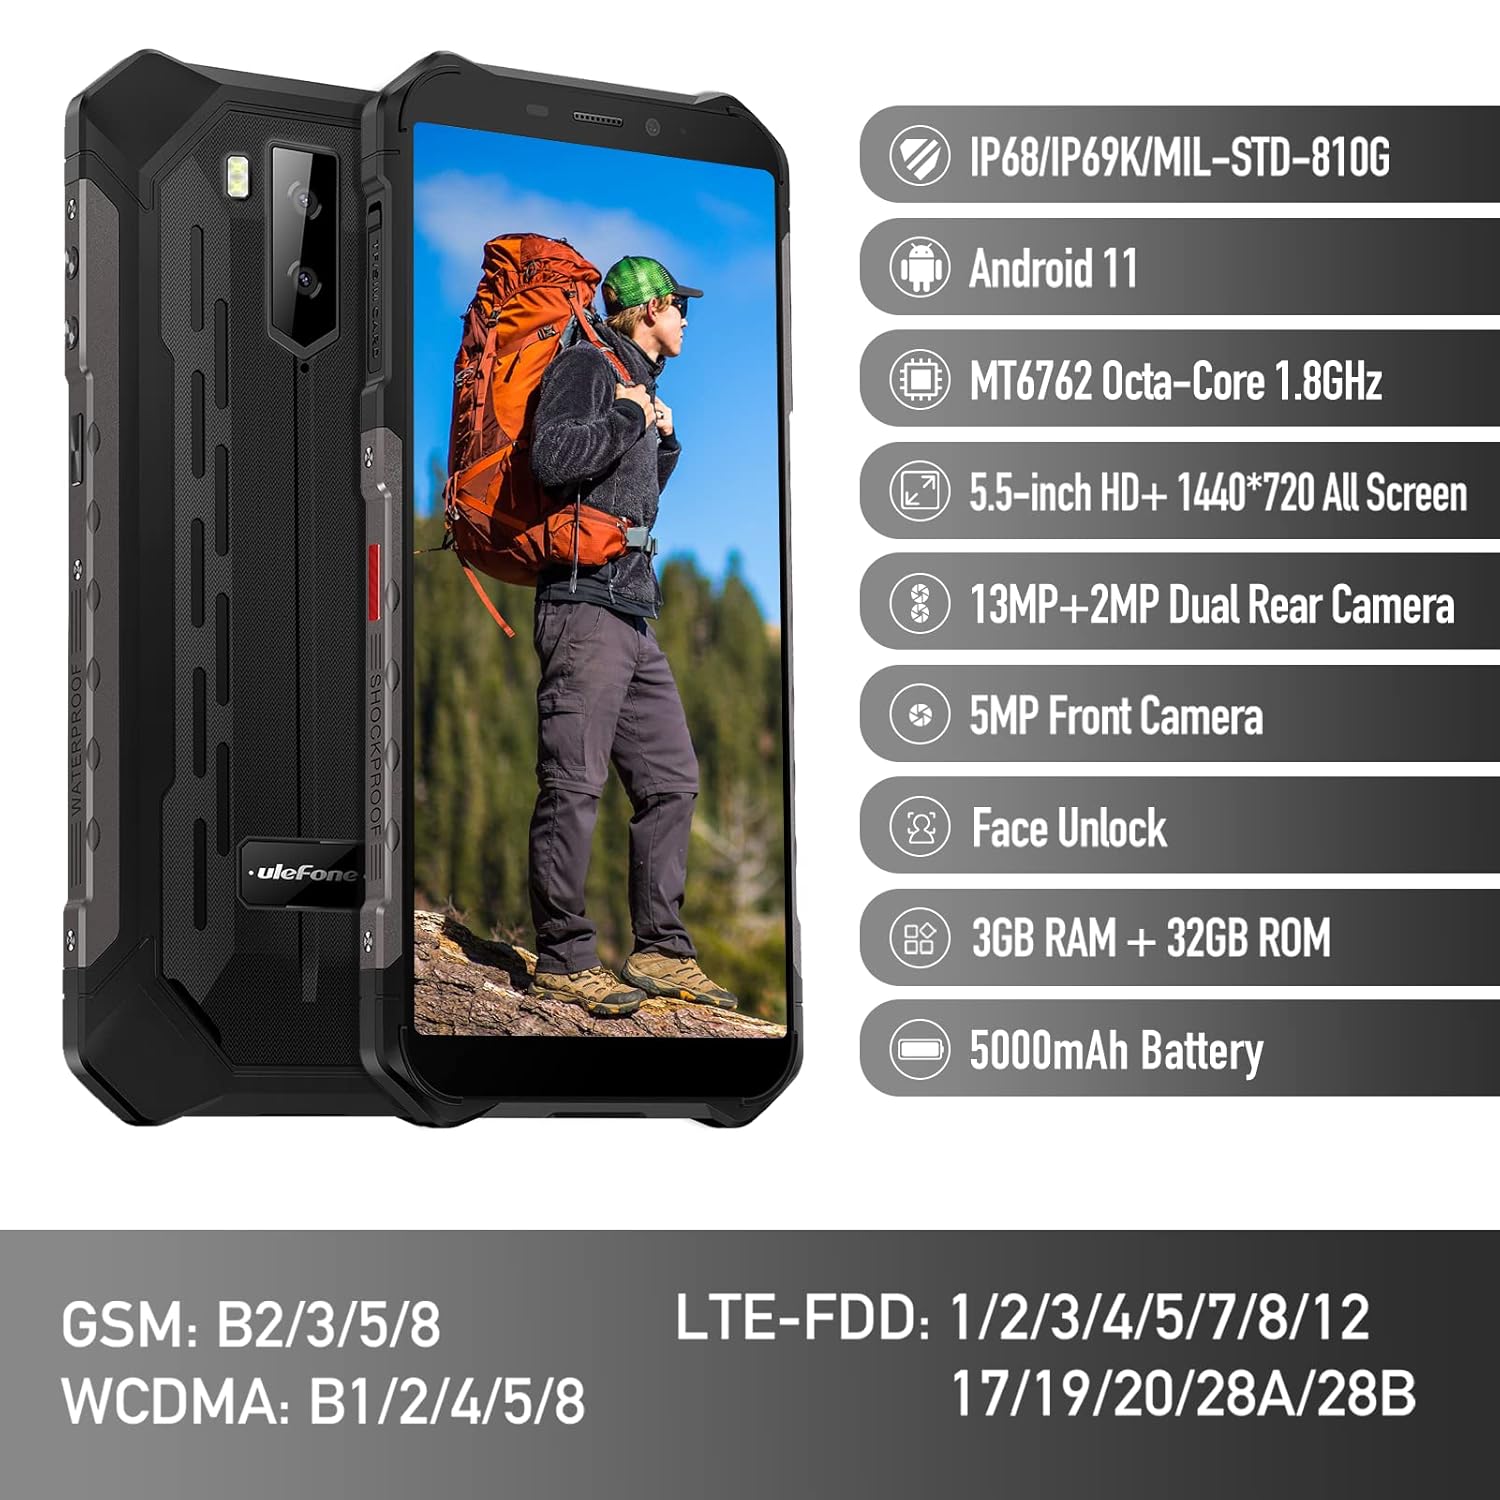
Figure 1: Ulefone Armor X9 Rugged Phone overview, highlighting its robust design and core specifications like IP68/IP69K rating, Android 11, Octa-Core processor, 5.5-inch HD+ screen, 13MP+2MP dual rear camera, 5MP front camera, Face Unlock, 3GB RAM + 32GB ROM, and 5000mAh battery.
2. การตั้งค่า
2.1. การติดตั้งซิมการ์ดและการ์ด TF
The Ulefone Armor X9 supports dual SIM cards and a TF (microSD) card for expandable storage. Follow these steps to install them:
- ค้นหาถาดใส่การ์ด SIM ที่ด้านข้างของโทรศัพท์
- ใช้เครื่องมือถอดซิมที่ให้มาเพื่อเปิดถาด
- ใส่ซิมการ์ดนาโนของคุณลงในช่องที่กำหนดอย่างระมัดระวัง (SIM1 และ SIM2)
- If using a TF card, place it into the dedicated TF card slot. Note that some configurations may share a slot between SIM2 and the TF card.
- Gently push the tray back into the phone until it is flush with the device body. Ensure the tray is properly sealed to maintain water and dust resistance.

Figure 2: Illustration of the dual SIM and TF card tray, showing how to insert SIM1, SIM2, and a TF card into the Ulefone Armor X9.
2.2. การชาร์จครั้งแรก
Before first use, it is recommended to fully charge your Ulefone Armor X9. Use the provided USB cable and power adapter.
- เชื่อมต่อสาย USB เข้ากับพอร์ตชาร์จบนโทรศัพท์ของคุณ
- เชื่อมต่อปลายอีกด้านหนึ่งของสาย USB เข้ากับอะแดปเตอร์ไฟฟ้า
- เสียบอะแดปเตอร์ไฟฟ้าเข้ากับเต้ารับไฟฟ้าที่ผนัง
- ไฟแสดงสถานะการชาร์จจะปรากฏบนหน้าจอ ปล่อยให้โทรศัพท์ชาร์จจนกว่าไอคอนแบตเตอรี่จะแสดงว่าเต็ม
2.3. การเปิด/ปิดเครื่อง
- การเปิดเครื่อง: กดปุ่มเปิด/ปิด (โดยปกติจะอยู่ด้านขวา) ค้างไว้จนกว่าโลโก้ Ulefone จะปรากฏขึ้น
- วิธีปิดเครื่อง: กดปุ่มเปิด/ปิดค้างไว้จนกว่าเมนูตัวเลือกการเปิด/ปิดจะปรากฏบนหน้าจอ เลือก "ปิดเครื่อง" แล้วยืนยัน
- ในการรีสตาร์ท: จากเมนูตัวเลือกพลังงาน เลือก "รีสตาร์ท" และยืนยัน
3. คู่มือการใช้งาน
3.1. การนำทางพื้นฐาน (Android 11)
Your Ulefone Armor X9 runs on Android 11, offering an intuitive user interface. Common gestures and navigation include:
- ปัดขึ้น: เข้าถึงลิ้นชักแอป
- เลื่อนลง: เปิดแผงการแจ้งเตือนและเมนูการตั้งค่าด่วน
- แตะ: เลือกรายการหรือเปิดแอป
- กดแบบยาว: เข้าถึงเมนูบริบทหรือย้ายไอคอน
- บีบเพื่อซูม: ซูมเข้าหรือออกจากรูปภาพและ web หน้า

Figure 3: Screenshots of the Android 11 interface on the Ulefone Armor X9, showing settings menus, quick toggles, and the sound recorder application.

Figure 4: The 5.5-inch 18:9 All Screen display of the Ulefone Armor X9, showcasing its immersive viewing experience with an image of a skier.
3.2. การใช้กล้อง
Your phone is equipped with a 16MP Triple Rear Camera and a Front Camera. To use the camera:
- เปิดแอปพลิเคชัน "กล้อง" จากหน้าจอหลักหรือลิ้นชักแอปของคุณ
- แตะปุ่มชัตเตอร์เพื่อถ่ายภาพ
- สลับระหว่างโหมดภาพถ่ายและวิดีโอตามต้องการ
- Tap the icon to switch between the front and rear cameras.
- Explore various camera modes and settings for optimal results.
3.3. การเชื่อมต่อ
The Ulefone Armor X9 supports various connectivity options:
- ไวไฟ : ไปที่การตั้งค่า > เครือข่ายและอินเทอร์เน็ต > Wi-Fi เพื่อเชื่อมต่อกับเครือข่ายที่มีอยู่
- บลูทูธ: Go to Settings > Connected devices > Bluetooth to pair with Bluetooth devices.
- จีพีเอส: The phone features AGPS for accurate location services. Ensure location services are enabled in Settings > Location.
- ยูเอสบี: เชื่อมต่อโทรศัพท์ของคุณกับคอมพิวเตอร์โดยใช้สาย USB เพื่อถ่ายโอนข้อมูลหรือชาร์จแบตเตอรี่
3.4. การปลดล็อกด้วยใบหน้า
For convenient and secure unlocking, your Ulefone Armor X9 supports Face Unlock:
- ไปที่ การตั้งค่า > ความปลอดภัย > ปลดล็อกด้วยใบหน้า
- ปฏิบัติตามคำแนะนำบนหน้าจอเพื่อลงทะเบียนใบหน้าของคุณ
- ตรวจสอบให้แน่ใจว่ามีแสงสว่างเพียงพอและถือโทรศัพท์ให้อยู่ในระดับสายตาขณะลงทะเบียน
- เมื่อลงทะเบียนแล้ว คุณสามารถปลดล็อกโทรศัพท์ได้โดยเพียงแค่สบตากับกล้องหน้า
4. การบำรุงรักษา
4.1. การทำความสะอาดและการดูแลรักษา
To maintain the performance and appearance of your rugged phone:
- เช็ดหน้าจอและตัวเครื่องด้วยผ้าที่ไม่เป็นขุยและนุ่ม
- สำหรับสิ่งสกปรกที่ฝังแน่น ให้ใช้ d เล็กน้อยamp ผ้า หลีกเลี่ยงสารเคมีรุนแรงหรือวัสดุที่มีฤทธิ์กัดกร่อน
- Ensure all port covers are securely closed to maintain water and dust resistance, especially after charging or using headphones.

Figure 5: The Ulefone Armor X9's 360° All Protection Design, showcasing its superior materials and superb durability against impacts and harsh conditions.
4.2. คุณสมบัติกันน้ำและฝุ่น (IP68/IP69K)
The Ulefone Armor X9 is rated IP68/IP69K, meaning it is resistant to dust and water immersion. However, this resistance is not permanent and may decrease over time with normal wear. To ensure optimal protection:
- Do not intentionally submerge the phone in water for extended periods or beyond specified depths.
- Avoid exposing the phone to high-pressure water or extreme temperatures.
- Ensure all port covers are tightly sealed before exposure to water or dust.
- หากโทรศัพท์เปียกน้ำ ให้เช็ดให้แห้งสนิทก่อนชาร์จหรือเปิดพอร์ตใดๆ
4.3. การดูแลแบตเตอรี่
To prolong the life of your 5580mAh Lithium Polymer battery:
- หลีกเลี่ยงอุณหภูมิที่สูงหรือต่ำเกินไป เพราะอาจทำให้ประสิทธิภาพของแบตเตอรี่ลดลง
- Use only the original charger and cable or certified compatible accessories.
- อย่าปล่อยให้แบตเตอรี่หมดบ่อยเกินไป ชาร์จก่อนที่แบตเตอรี่จะเหลือน้อยเกินไป
5 การแก้ไขปัญหา
If you encounter issues with your Ulefone Armor X9, try the following troubleshooting steps:
5.1. โทรศัพท์ไม่เปิด
- Ensure the battery is charged. Connect the phone to a charger for at least 30 minutes.
- กดปุ่มเปิด/ปิดค้างไว้ 10-15 วินาทีเพื่อบังคับให้รีสตาร์ท
5.2. ปัญหาการชาร์จไฟ
- Verify that the charging cable and adapter are working correctly. Try a different charger if available.
- ตรวจสอบให้แน่ใจว่าพอร์ตการชาร์จสะอาดและไม่มีสิ่งสกปรก
- Make sure the charging cable is fully inserted into the port. Some rugged phone ports may require a firm connection due to protective covers.
5.3. SIM/TF Card Not Detected
- Ensure the SIM/TF card is correctly inserted into the tray and the tray is fully seated.
- รีสตาร์ทโทรศัพท์
- Check if the SIM card is active with your network provider.
5.4. App Crashes or Freezing
- ปิดและเปิดแอปที่มีปัญหาอีกครั้ง
- ล้างแคชและข้อมูลของแอป (การตั้งค่า > แอป > [ชื่อแอป] > พื้นที่จัดเก็บและแคช)
- ตรวจสอบให้แน่ใจว่าแอปได้รับการอัปเดตเป็นเวอร์ชั่นล่าสุด
- รีสตาร์ทโทรศัพท์
5.5. รีเซ็ตเป็นค่าโรงงาน
หากปัญหายังคงอยู่ การรีเซ็ตเป็นค่าเริ่มต้นจากโรงงานอาจช่วยแก้ไขได้ คำเตือน: การดำเนินการนี้จะลบข้อมูลทั้งหมดในโทรศัพท์ของคุณ โปรดสำรองข้อมูลสำคัญก่อนดำเนินการต่อ
- ไปที่การตั้งค่า > ระบบ > ตัวเลือกการรีเซ็ต
- เลือก "ลบข้อมูลทั้งหมด (รีเซ็ตเป็นค่าโรงงาน)"
- ยืนยันการตัดสินใจของคุณและป้อน PIN/รหัสผ่านของคุณหากได้รับแจ้ง
6. ข้อมูลจำเพาะ
Below are the detailed specifications for the Ulefone Armor X9:

Figure 6: Details of the Ulefone Armor X9's Octa-Core Processor, highlighting its power-efficient yet powerful performance, along with 3GB RAM and 32GB ROM, and support for up to 256GB TF card extendable storage.
| คุณสมบัติ | ข้อมูลจำเพาะ |
|---|---|
| ระบบปฏิบัติการ | แอนดรอยด์ 11.0 |
| แรม | 3GB (Note: Feature bullets mention 4GB RAM, please verify actual model) |
| ความจุของหน่วยความจำ | 32GB (Expandable with TF card up to 256GB. Feature bullets mention 128GB ROM, please verify actual model) |
| รุ่นซีพียู | MT6762 คอร์ 1.8GHz (Note: Specifications list 'Snapdragon', but image indicates MT6762. Please verify actual model) |
| ขนาดสินค้า | 15.8 x 7.75 x 1.38 ซม. |
| น้ำหนักสินค้า | 472 กรัม |
| แบตเตอรี่ | แบตเตอรี่ลิเธียมโพลิเมอร์ 1 ก้อน (5580 mAh, มีมาให้ในชุด) |
| การสื่อสารแบบไร้สาย | เซลลูล่าร์, บลูทูธ, USB, Wi-Fi |
| จีพีเอส | เอจีพีเอส |
| คุณสมบัติพิเศษ | Rear Camera, Face Unlock, IP68/IP69K, MIL-STD-810G |
| แสดง | 5.5-inch HD+ 1440*720 All Screen |
| กล้องหลัง | 13MP+2MP Dual Rear Camera (Note: Feature bullets mention 16MP Triple Rear Camera, please verify actual model) |
| กล้องหน้า | กล้องหน้า 5MP |
| สี | สีดำ |
| ผู้ผลิต | ยูเลโฟน |
Note: Specifications are based on available product data and may vary slightly. Please refer to your product packaging for the most accurate information. There are discrepancies between feature bullets, specifications, and image text regarding RAM, ROM, CPU, and camera megapixels. This manual uses the most frequently cited or detailed information, with notes for clarification.
7. การรับประกันและการสนับสนุน
7.1. ข้อมูลการรับประกัน
Your Ulefone Armor X9 is covered by a manufacturer's warranty. The specific terms and duration of the warranty may vary by region and retailer. Please refer to the warranty card included in your product packaging or contact your point of purchase for detailed information regarding warranty coverage and claims.
7.2. การสนับสนุนลูกค้า
For technical assistance, troubleshooting beyond this manual, or warranty inquiries, please contact Ulefone customer support or your authorized dealer. You can typically find contact information on the official Ulefone webไซต์หรือในเอกสารผลิตภัณฑ์ของคุณ
- Visit the official Ulefone website for FAQs, software updates, and support contact details.
- เก็บใบเสร็จการซื้อและหมายเลขซีเรียลของผลิตภัณฑ์ไว้ให้พร้อมเมื่อติดต่อฝ่ายสนับสนุน


