1. పరిచయం
This manual provides essential information and instructions for the safe and efficient use of your Nokia 8 Sirocco TA-1005 smartphone. Please read this guide thoroughly before operating your device to ensure optimal performance and longevity. This device is designed for use with GSM, 3G, and 4G LTE networks. Compatibility with CDMA networks, including Verizon, Sprint, and US Cellular, is not supported. Verify network compatibility with your service provider prior to use.
2. పెట్టెలో ఏముంది
Upon unboxing your Nokia 8 Sirocco TA-1005, verify that all components are present:
- Nokia 8 Sirocco TA-1005 Device
- USB టైప్-సి కేబుల్
- పవర్ అడాప్టర్
- హెడ్సెట్
- SIM ఎజెక్టర్ సాధనం
- త్వరిత ప్రారంభ గైడ్
- భద్రత మరియు వారంటీ సమాచారం
3 పరికర లేఅవుట్
Familiarize yourself with the physical components of your Nokia 8 Sirocco TA-1005.
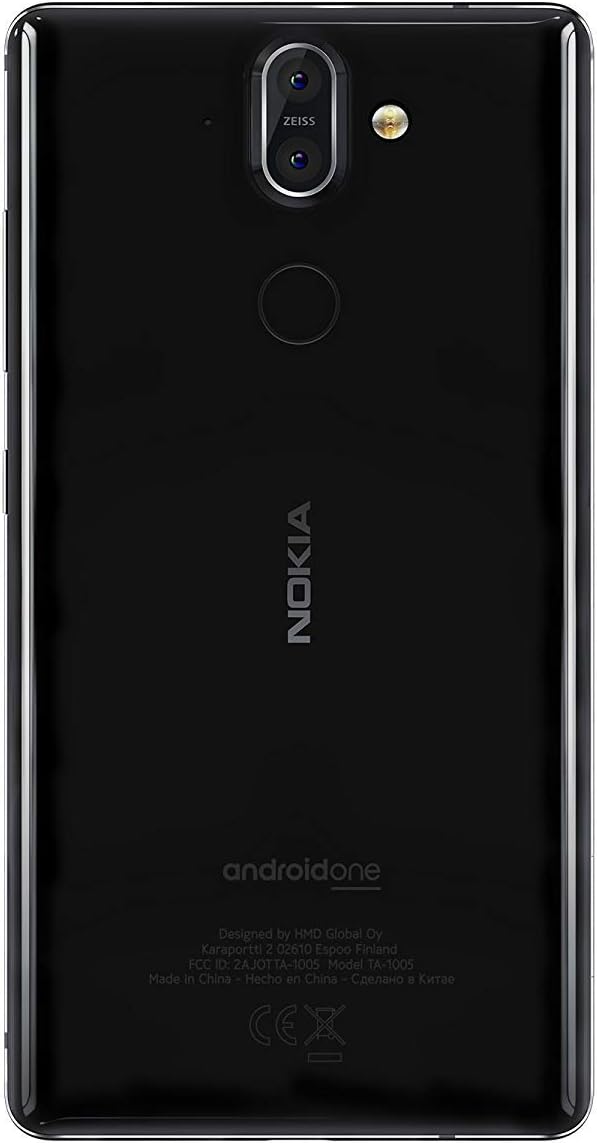
మూర్తి 3.1: వెనుక view of the Nokia 8 Sirocco TA-1005. This image displays the dual camera setup with ZEISS optics, the circular fingerprint sensor below the camera, and the Nokia logo centrally placed. The 'androidone' branding is visible towards the bottom.
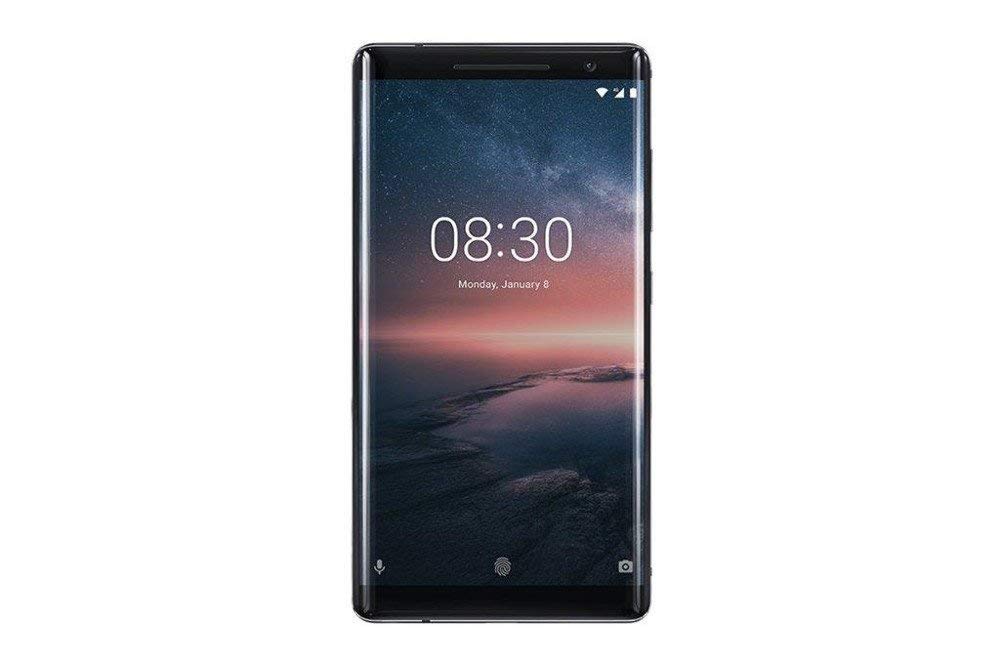
మూర్తి 3.2: ముందు view of the Nokia 8 Sirocco TA-1005. The image highlights the 5.5-inch P-OLED curved display, the front-facing camera at the top, and the on-screen navigation buttons. The device features minimal bezels.

మూర్తి 3.3: వైపు view of the Nokia 8 Sirocco TA-1005. This image illustrates the slim profile of the device, with the power button and volume rocker located on the right side for easy access.
ముఖ్య భాగాలు:
- ముందు కెమెరా: డిస్ప్లే పైభాగంలో ఉంది.
- ఇయర్పీస్: For calls, located above the display.
- ప్రదర్శన: 5.5-inch P-OLED capacitive touchscreen.
- వాల్యూమ్ బటన్లు: On the right side, to adjust audio levels.
- పవర్/లాక్ బటన్: On the right side, to power on/off or lock/unlock the screen.
- USB టైప్-సి పోర్ట్: దిగువన, ఛార్జింగ్ మరియు డేటా బదిలీ కోసం.
- మైక్రోఫోన్: Located at the bottom and top.
- స్పీకర్: దిగువన ఉంది.
- సిమ్/మెమరీ కార్డ్ ట్రే: On the side, for inserting SIM cards.
- వెనుక కెమెరాలు: Dual cameras with ZEISS optics on the back.
- ఫ్లాష్: Dual-tone flash next to the rear cameras.
- వేలిముద్ర సెన్సార్: On the back, below the rear cameras.
4. సెటప్
4.1. SIM కార్డ్ని చొప్పించడం
- మీ పరికరం వైపున SIM కార్డ్ ట్రేని గుర్తించండి.
- ట్రేలోని చిన్న రంధ్రం తెరవడానికి దానిలోకి సిమ్ ఎజెక్టర్ సాధనాన్ని చొప్పించండి.
- Place your Nano-SIM card(s) into the designated slot(s) on the tray, ensuring the gold contacts face downwards.
- పరికరం స్థానంలో క్లిక్ చేసే వరకు ట్రేని జాగ్రత్తగా తిరిగి పరికరంలోకి నెట్టండి.
గమనిక: This device does not support external memory cards.
4.2. పవర్ ఆన్ మరియు ఆఫ్
- పవర్ ఆన్ చేయడానికి: Press and hold the Power/Lock button until the Nokia logo appears.
- పవర్ ఆఫ్ చేయడానికి: Press and hold the Power/Lock button until the power options menu appears, then select "Power off".
4.3. ప్రారంభ సెటప్
Upon first power-on, the device will guide you through the initial setup process. This includes selecting your language, connecting to a Wi-Fi network, setting up your Google account, and configuring security features like fingerprint unlock or a PIN/pattern.
5. ఆపరేటింగ్ సూచనలు
5.1. కాల్స్ చేయడం
- Open the "Phone" application.
- డయల్ ప్యాడ్ ఉపయోగించి ఫోన్ నంబర్ను నమోదు చేయండి లేదా మీ చిరునామా పుస్తకం నుండి పరిచయాన్ని ఎంచుకోండి.
- కాల్ను ప్రారంభించడానికి కాల్ చిహ్నాన్ని నొక్కండి.
5.2. సందేశాలు పంపడం
- Open the "Messages" application.
- "చాట్ ప్రారంభించు" లేదా "కొత్త సందేశం" చిహ్నాన్ని నొక్కండి.
- గ్రహీత నంబర్ను నమోదు చేయండి లేదా పరిచయాల నుండి ఎంచుకోండి.
- టెక్స్ట్ ఫీల్డ్లో మీ సందేశాన్ని టైప్ చేయండి.
- Tap the send icon.
5.3. కెమెరాను ఉపయోగించడం
- Open the "Camera" application.
- మీ విషయాన్ని తెరపై ఫ్రేమ్ చేయండి.
- ఫోటో తీయడానికి షట్టర్ బటన్ను నొక్కండి.
- Switch between photo and video modes, or access advanced settings like portrait mode or panorama, as desired.
5.4. ఇంటర్నెట్ కనెక్టివిటీ
- Wi-Fi: వెళ్ళండి సెట్టింగ్లు > నెట్వర్క్ & ఇంటర్నెట్ > Wi-Fi. Turn Wi-Fi on and select an available network. Enter the password if required.
- మొబైల్ డేటా: వెళ్ళండి సెట్టింగ్లు > నెట్వర్క్ & ఇంటర్నెట్ > మొబైల్ నెట్వర్క్. Ensure "Mobile data" is enabled.
5.5. భద్రతా లక్షణాలు
Your Nokia 8 Sirocco TA-1005 offers various security options:
- వేలిముద్ర అన్లాక్: మీ వేలిముద్రలను దీని ద్వారా నమోదు చేసుకోండి Settings > Security & Location > Fingerprint.
- స్క్రీన్ లాక్: Set a PIN, pattern, or password via Settings > Security & Location > Screen lock.
6. నిర్వహణ
6.1. పరికరాన్ని శుభ్రపరచడం
Use a soft, lint-free cloth to clean your device. Avoid using harsh chemicals or abrasive materials, which can damage the screen or finish.
6.2. బ్యాటరీ సంరక్షణ
- Charge your device using only Nokia-approved chargers and cables.
- పరికరాన్ని తీవ్రమైన ఉష్ణోగ్రతలకు బహిర్గతం చేయకుండా ఉండండి.
- బ్యాటరీ తరచుగా పూర్తిగా డిశ్చార్జ్ అవ్వనివ్వకండి.
6.3. సాఫ్ట్వేర్ నవీకరణలు
మీ పరికరం తాజా ఫీచర్లు, భద్రతా ప్యాచ్లు మరియు పనితీరు మెరుగుదలలను కలిగి ఉందని నిర్ధారించుకోవడానికి సాఫ్ట్వేర్ నవీకరణల కోసం క్రమం తప్పకుండా తనిఖీ చేసి, ఇన్స్టాల్ చేయండి. వెళ్ళండి సెట్టింగ్లు > సిస్టమ్ > సిస్టమ్ అప్డేట్.
7. ట్రబుల్షూటింగ్
If you encounter issues with your device, refer to the following common solutions:
| సమస్య | పరిష్కారం |
|---|---|
| పరికరం ఆన్ చేయబడలేదు | Ensure the battery is charged. Connect to a charger for at least 30 minutes. If unresponsive, perform a force restart by holding the Power button for 10-15 seconds. |
| పేలవమైన నెట్వర్క్ సిగ్నల్ | Check SIM card insertion. Move to an area with better network coverage. Restart the device. Verify network settings in సెట్టింగ్లు > నెట్వర్క్ & ఇంటర్నెట్ > మొబైల్ నెట్వర్క్. |
| Applications are crashing | యాప్ కాష్ను క్లియర్ చేయండి (Settings > Apps & notifications > [App Name] > Storage & cache > Clear cache). Google Play Store నుండి యాప్ను అప్డేట్ చేయండి. సమస్య కొనసాగితే, యాప్ను అన్ఇన్స్టాల్ చేసి, మళ్లీ ఇన్స్టాల్ చేయండి. |
| బ్యాటరీ త్వరగా అయిపోతుంది | Reduce screen brightness. Close unused background apps. Disable Wi-Fi, Bluetooth, and GPS when not in use. Check battery usage in సెట్టింగ్లు > బ్యాటరీ విద్యుత్తును వినియోగించే యాప్లను గుర్తించడానికి. |
| పరికరం స్పందించడం లేదు | Perform a force restart by holding the Power button for 10-15 seconds. If the issue continues, consider a factory reset (సెట్టింగ్లు > సిస్టమ్ > రీసెట్ ఎంపికలు > మొత్తం డేటాను తొలగించండి (ఫ్యాక్టరీ రీసెట్)). హెచ్చరిక: ఫ్యాక్టరీ రీసెట్ చేయడం వలన మీ పరికరంలోని మొత్తం డేటా తొలగించబడుతుంది. కొనసాగే ముందు ముఖ్యమైన డేటాను బ్యాకప్ చేయండి. |
8. స్పెసిఫికేషన్లు
Detailed technical specifications for the Nokia 8 Sirocco TA-1005:
| ఫీచర్ | వివరాలు |
|---|---|
| మోడల్ పేరు | 8 Sirocco |
| మోడల్ సంఖ్య | TA-1005 |
| ఆపరేటింగ్ సిస్టమ్ | ఆండ్రాయిడ్ 8.0 (ఓరియో) |
| ప్రాసెసర్ | Qualcomm MSM8998 Snapdragon 835, Octa-core (4x2.5 GHz Kryo & 4x1.8 GHz Kryo) |
| GPU | అడ్రినో 540 |
| RAM | 6 GB |
| అంతర్గత నిల్వ | 128 GB |
| ప్రదర్శించు | 5.5 inches, P-OLED capacitive touchscreen, 1440 x 2560 pixels, Corning Gorilla Glass 5 |
| వెనుక కెమెరా | 12MP Wide (f/1.7) + 13 MP Tele (f/2.6), dual-tone flash |
| ఫ్రంట్ కెమెరా | 5MP |
| బ్యాటరీ కెపాసిటీ | 3250 mAh |
| ఛార్జింగ్ | ఫాస్ట్ ఛార్జింగ్ సపోర్ట్ |
| కనెక్టివిటీ | Wi-Fi 802.11a/b/g/n, Bluetooth, USB Type-C |
| కొలతలు | 43.36 x 43.17 x 0.75 సెం.మీ |
| బరువు | 181 గ్రా |
| SIM రకం | నానో-సిమ్ |
| నెట్వర్క్ మద్దతు | 2G GSM, 3G, 4G LTE (Note: Not compatible with CDMA networks) |
9. Safety and Warranty Information
9.1. భద్రతా మార్గదర్శకాలు
- Do not use the device in prohibited areas, such as aircraft or hospitals.
- పరికరాన్ని నీరు లేదా అధిక తేమకు గురిచేయకుండా ఉండండి.
- అసలు లేదా ఆమోదించబడిన ఉపకరణాలను మాత్రమే ఉపయోగించండి.
- పరికరాన్ని విడదీయడానికి లేదా మరమ్మతు చేయడానికి ప్రయత్నించవద్దు.
- స్థానిక నిబంధనల ప్రకారం పరికరాన్ని మరియు దాని బ్యాటరీని బాధ్యతాయుతంగా పారవేయండి.
9.2. వారంటీ సమాచారం
Your Nokia 8 Sirocco TA-1005 is covered by a limited manufacturer's warranty. Please refer to the separate warranty document included in your product packaging or visit the official Nokia support webవివరణాత్మక నిబంధనలు మరియు షరతుల కోసం సైట్. వారంటీ క్లెయిమ్ల కోసం మీ కొనుగోలు రుజువును ఉంచండి.


