TBProAudio Impress3 Compressor Effect Plugin User Manual
Introduction
Welcome to Impress, a wideband stereo compressor including side-chain and various prefilter options. The goal of the design was to cover a broad range of compression applications in today’s mixing and mastering situations with strong focus on low aliasing. So, Impress could be used to subtly shape a snare sound, glue different tracks on the instrument bus and even do complex tasks like de-essing or voice overs.
New in version 3
We at TBProAudio have decided to design Impress3 from scratch for modern compression tasks, used either with individual track, bus or master track.
- We gave Impress3 a new look with large meters and a peak level view. The GUI is freely sizeable and scalable to be used on different screen sizes without any problems.
- Impress3 provides deep control over the gain transfer function. So Impress3 can sound very clean or like classic compressor gear.
- Impress3 offers an extensive control over the detector path including several processing modes, a four band EQ and a spectrum view.
- Impress3 includes a flexible look-ahead system, covering application with up to 5000 ms pre delay.
- Finally Impress3 includes a loudness target matching system, ABLM, a look-ahead limiter, a clipper, saturation module, detector/delta signal monitoring and an extensive set of presets.
Features
Impress offers following features:
– zero latency click-free 64-bit internal processing
– low aliasing compressor design
– “real” over-sampling, up to 8x
– stereo/left/right/mid/side processing
– 5 compressor modes: classic, source/target, vari, advanced and feedback
– non-linear and linear attack/release time shapes
– gain reduction dependent saturation
– 4 level detection modes: peak, RMS, EBU ML and EBU SL
– external side-chain
– detector pre-filter
– flexible look ahead
– low aliasing soft knee
– gain reduction limit
– dry/wet
– peak/RMS/EBU R128 measurement
– detector/delta listen mode
– target loudness matching based on EBU R128
– look-ahead limiter (Peak or True Peak)
– clipper
– perceptual A/B loudness matching (ABLM)
– preset management
– parameter A/B
– large and accurate live meters
– peak control view
– gain transfer view
– loudness distribution view
– detector spectrum view
– free GUI size and scale
– different GUI layouts
– various GUI themes
Design

Impress3 supports you in mastering the extensive tasks in the field of compression in modern music productions. Impress3 is therefore more than just a compressor. It supports all loudness adjustment tasks, from compression and loudness matching to limiting and clipping.
Various options are offered for displaying both the plug-in’s mode of operation and measurement results directly and comprehensively.
The deep compression module is followed by the loudness matching module, which can be used to easily adjust the target loudness of the audio signal. This is followed by a look-ahead limiter and a clipper. Finally the ABLM module allows the processed signal to be monitored at the loudness level of the input signal (perceptual A/B loudness matching).

The input signal is modified by the ‘Gain reduction’ module and fed out of the compressor module as the output signal. The gain level and pan position can be set in the stereo field. It is also possible to determine whether the entire stereo signal or parts of it are compressed. The processed signal can be mixed with the dry signal (determinable in gain level and pan position). Adding the dry signal is called ‘parallel’ compression.
The result of the ‘Gain reduction’ module is set by level of the detector signal in combination with the threshold parameter. You can choose whether the detector signal is derived from the input signal or the side-chain signal.
The ‘Detector’ module determines which parts of the stereo signal are used for the level detection. To do this, the signal can first be pre-filtered with an extensive and flexible filter bank. You can then choose how Impress3 recognizes whether compression needs to be initiated. Measurement options such as Peak, RMS, EBU R128 ML and EBU R128 SL are available for this purpose.
This is followed by the Look-ahead module, which allows the compressor to ‘look into the future’ and thus enables an earlier reaction. The envelope follower generates the final detector signal. The Xfer module uses this to determine the gain reduction. The temporal change of the gain reduction is controlled by the attack, hold and release parameters. The Attack parameter, for example, controls how quickly the determined gain reduction becomes active. Depending on the audio material, you want to preserve or reduce the transients.
The ‘Gain reduction limit’ module can be used to finally limit the strength of the gain reduction.
Overview
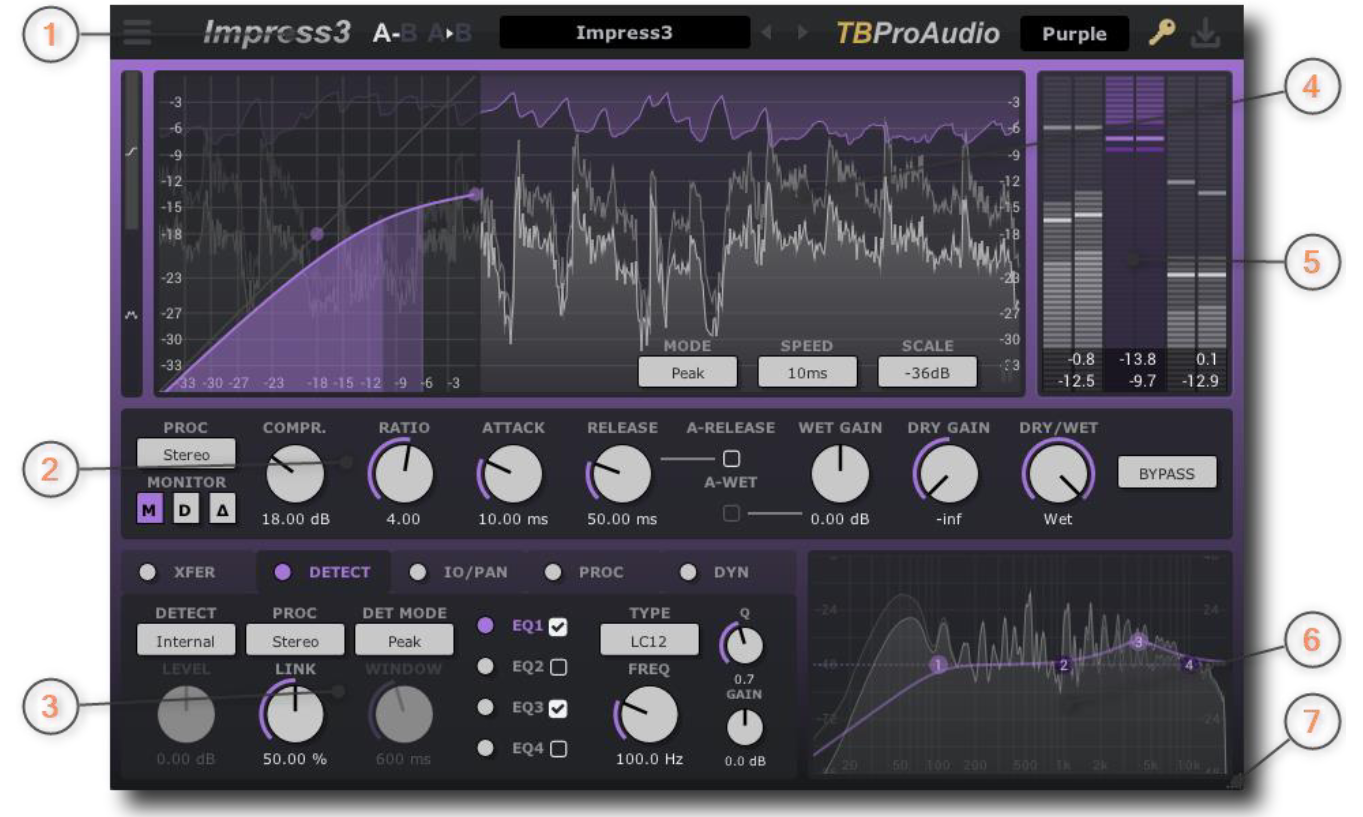
1) Top area: The top area provides access to the plugin menu, parameter A/B, presets, theme selector, plugin activation status and plugin update check.
2) Main controls: This area provides access to the main compressor controls like threshold/compression, ratio, attack and release.
3) Advanced controls: The advanced control area shows further controls like controls of Xfer input/output, look-ahead, over-sampling, detector, saturation, loudness matching, limiter, clipper and ABLM.
4) Level display: The level display shows the incoming and processed audio signal together with the gain reduction level. It helps to determine the correct compressor settings. Additionally it shows the Xfer display or loudness level/gain reduction distribution over time.
5) Meter display: The input/output/gain reduction meters and readouts show an immediate overview of the current and max levels. The input/output meter show both peak and loudness level based on ML (EBU R128).
6) Spectrum analyzer: The spectrum analyzer shows the detector (internal or external sidechain signal) pre and post filter signal and the filter response.
7) GUI size/scale handle: The GUI size is changed by dragging the resize handle with the mouse. Double click recalls the last GUI size.
Dragging while holding the ctrl key scales the GUI. Double click sets the GUI size to default scale. Current GUI settings can be stored to the default settings (preset menu->save to default).
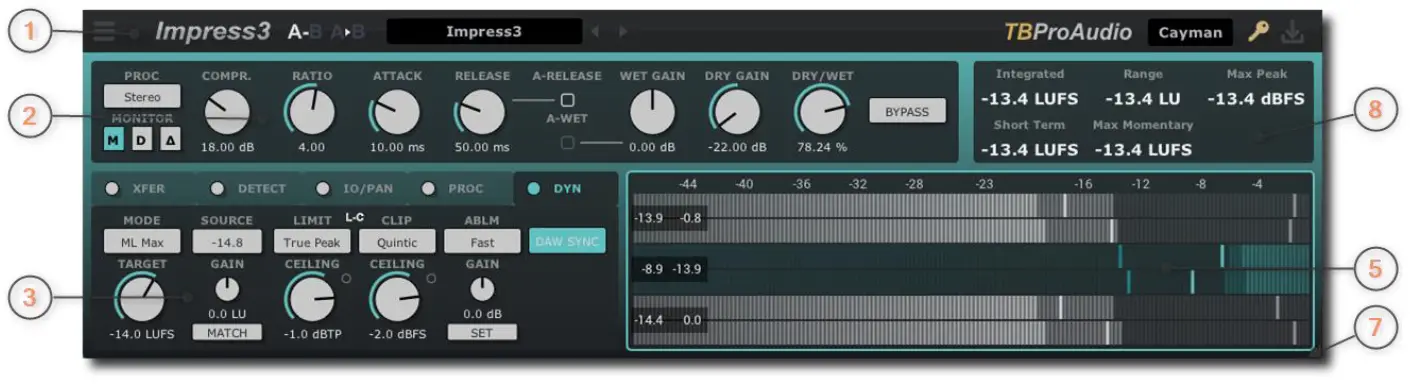
8) Measurement info: The display shows various measurement values like Integrated Loudness, Short Term Loudness, Momentary Loudness and LRA (EBU R128) and peak.
Minimum System Requirements
- Windows 7, OpenGL 2 GFX card
- Mac OS X 10.11, Metal GFX card
- SSE2 CPU
- Win: 32/64 Bit VST, 32/64 Bit VST3, 32/64 Bit AAX, 32/64 Bit CLAP
- OS X: 64 Bit VST, 64 Bit VST3, 64 Bit AU, 64 Bit AAX, 64 Bit CLAP
- Tested with: Cockos Reaper, Steinberg Cubase/Nuendo/Wavelab 6+, FL Studio 12+, PT2018+, Reason 9.5+, Studio One, Ableton Live
- For latest information please visit www.tbproaudio.de
GUI controls
 Knob: Click on the center of the knob and drag up/down to rotate it. Shift slows the parameter change down. Double click resets to default value. You can change the control value also by using the mouse wheel. Click on the value below to enter an exact value using the keyboard.
![]() Slider: Click on the center of the slider and drag left/right. Shift slows the parameter change down. Double click resets to default value. The control value can also be changed by using the mouse wheel. Click on the value below to enter an exact value using the keyboard.
Slider: Click on the center of the slider and drag left/right. Shift slows the parameter change down. Double click resets to default value. The control value can also be changed by using the mouse wheel. Click on the value below to enter an exact value using the keyboard.
![]() Menu: Either click on the menu filed to select the desired value or use the mouse wheel to scroll through all available values.
Menu: Either click on the menu filed to select the desired value or use the mouse wheel to scroll through all available values.
Impress3 controls
Top area

1) Plugin menu
About: Displays various plugin information like build date, current format, host name, channel configuration, PDC, sample rate.
Open manual: opens this manual.
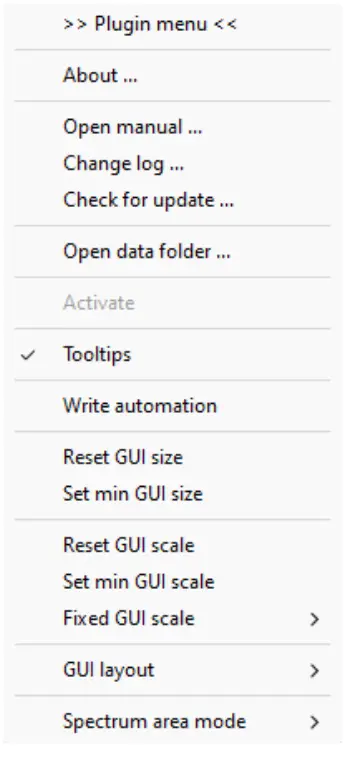 Change log: open the web site with the change log information.
Check for update: checks if there is a newer version of this plugin is available.
Open data folder: Open the local data folder.
Activate: Activates the plugin with license key information.
Tooltips: enables/disable display of tool tips if the mouse is moved over a GUI control.
Reset GUI size: resets the GUI size to default.
Set min GUI size: sets the GUI size to default.
Reset GUI scale: resets the GUI scale to default.
Set min GUI scale: sets the GUI scale to default.
Fixed GUI scale: sets the GUI to various scale factors.
GUI layout : sets the GUI to alternative layouts.
Spectrum area mode: stets the GUI to spectrum, meter or off.
2) The A/B button switches between the two plugin states the A and B. Compare two different plugin states without having to save a preset.
3) The button copies the A plugin status in B or vice versa.
4) Preset menu
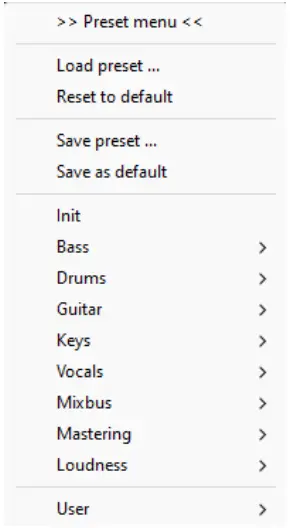 Load preset: load a preset from disk.
Reset to default: set plugin state to default.
Save preset: save current state as preset to disk.
Save as default: saves the current plugin state as plugin default.
Factor presets: select from the various preset categories.
User presets: this section lists all user created presets.
5) Previous/next preset: activates previous or next preset.
6) Company logo: click to rearm demo timer (see chapter 9 of this manual).
7) Theme selector: the menu provides various color themes of the Impress3 GUI.
8) Plugin activation status: icon indicates the plugin activation status.
9) Check for plugin update: click to check for plugin updates.
Main controls
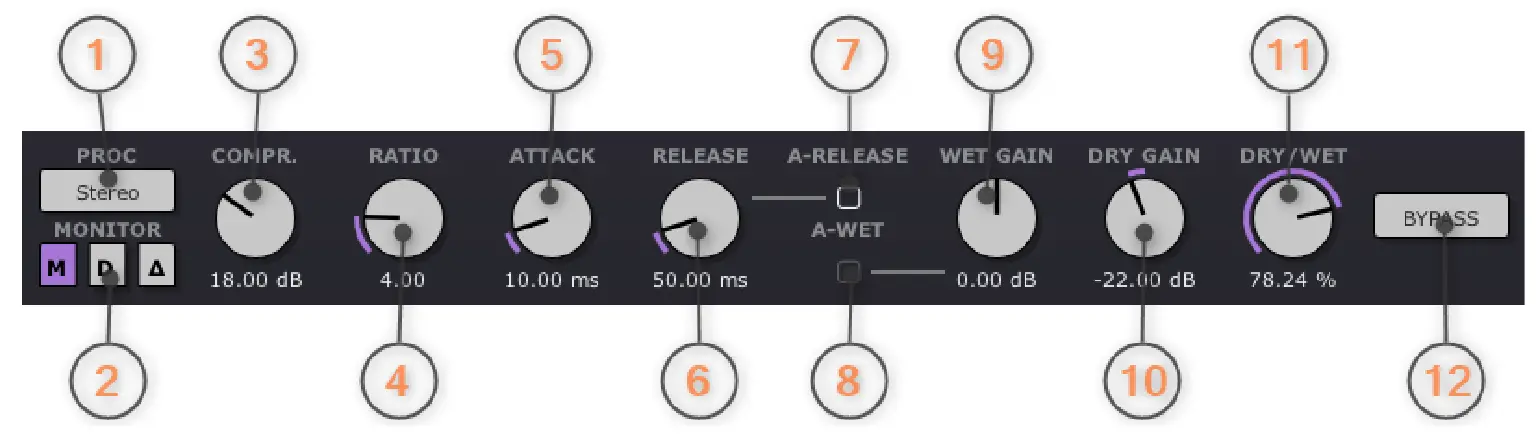
This panel gives you access to the main compressor controls. More controls are found in the multiple tabs panels below.
1) The Processing mode selects which part of the signal should be processed. Either stereo, left, right, mid or side signal.
2) The Monitor mode selects which signal comes out of the compressor: the main signal, the detector signal or the delta signal of compressor input minus output. The delta mode lets you monitor which part of the signal is modified.
3) The Threshold knob determines the level from which the gain reduction begins.
3) The Compression knob sets the amount of compression (in vari mode only).
4) The Ratio knob sets the proportional compression amount for signals above threshold. Higher values compress the signals more.
5) The Attack knob determines how fast the compression starts. Lower values start the compression earlier.
6) The Release knob determines how fast the compression ends. Lower values stop the compression earlier.
7) The Auto Release checkbox enables the adjustment of the release time depending on the current amount of gain reduction.
8) The Auto Wet Gain checkbox enables the automatic adjustment of the wet gain, depending on the ratio settings.
9) The Wet gain (aka Makeup Gain) knob adjusts the gain of the signal after it has been compressed.
10) The Dry Gain knob controls the amount of dry (uncompressed) input signal that is added to the output. This is called parallel compression.
11) The Mix knob controls the mix between the dry and processed signal. This is called parallel compression.
12) The Bypass button disables the compressor function.
Advanced controls
Xfer

The Xfer page provides extensive settings to configure the compressor transfer curve.
Together with the detector mode Impress3 covers all classic compressor designs like Tube, Optical, FET and VCA.
Tube: XFER mode ‘vari’, detector mode ‘RMS’, large RMS window, good choice for instrument or mix buses.
Optical: XFER mode ‘vari’ or ‘classic’, detector mode ‘RMS’, small RMS window, good choice for vocals, ‘glueing’ tracks together.
FET: XFER mode ‘classic’, detector mode ‘Peak’, good choice for vocals, guitars, kick drum, snare.
VCA: XFER mode ‘classic’ or ‘feedback’, detector mode ‘Peak’, good choice for drums or mix bus.
1) The Mode menu selects the compressor mode including transfer curve like classic, source/target, vari, advanced or feedback.
2) The Max GR knob limits the maximum amount of applied gain reduction.
Classic
The Classic mode provides the classic feed-forward design with controls for threshold, ratio, wet gain and soft knee.

1) The Knee knob sets the ’roundness’ of the compression around the threshold, which can vary from hard to soft knee.

1) The handle adjusts the compressor ratio by clicking and dragging with the mouse.
2) The handle adjusts the compressor threshold and wet gain by clicking and dragging with the mouse or the knee by using the mouse wheel.
Source/Target
The Source/Target mode defines the main compressor parameters by setting the source and target range of the audio signal (instead of setting threshold, ratio and wet gain). This mode is useful while working with EBU MSL/SL detector modes. It defines more precisely the loudness range of the source material and the desired target loudness range.
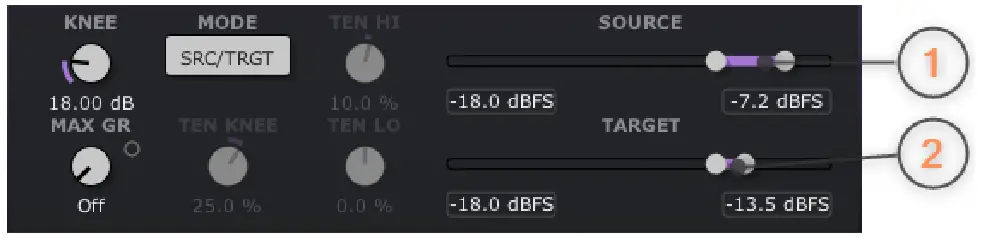
1) The combi-slider determines the min and max values of the source range.
2) The combi-slider determines the min and max values of the target range.

1) The various handles modify the target min, max and range values by clicking and dragging with the mouse.
2) The various handles modify the source min, max and range values by clicking and dragging with the mouse.
Vari
The Vari mode emulates the compressor transfer curve of classic variable tube compressors. Classic gear operates with ratios of 2:1, 4:1 or 8:1. The compression control adjusts the amount of compression.
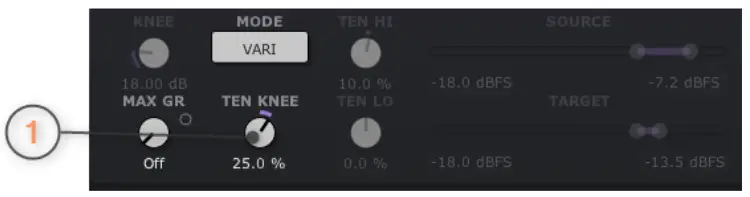
1) The Tension Knee knob adjusts additional the ’roundness’ of the knee part of the transfer curve.

1) The handle modifies the ratio by clicking and dragging with the mouse.
2) The handle modifies the Vari compression by clicking and dragging with the mouse or the knee tension by using the mouse wheel.
Advanced
The Advanced mode provides even more control over the curvature of the classic compressor.
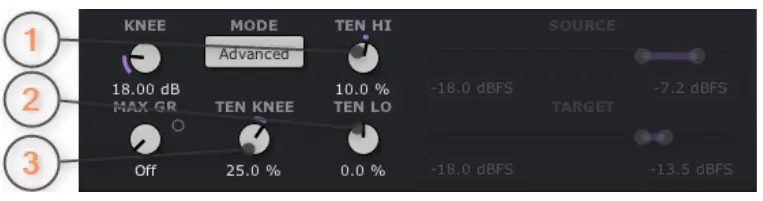
1) The Tension High knob determines the ’roundness’ of the part above threshold of the transfer curve.
2) The Tension Knee knob determines the ’roundness’ of the knee part of the transfer.
3) The Tension Low knob determines the ’roundness’ of the part below threshold of the transfer curve.

1) The handle modifies the ratio by clicking and dragging with the mouse.
2) The handle modifies the threshold and wet gain by clicking and dragging with the mouse or the knee by using the mouse wheel
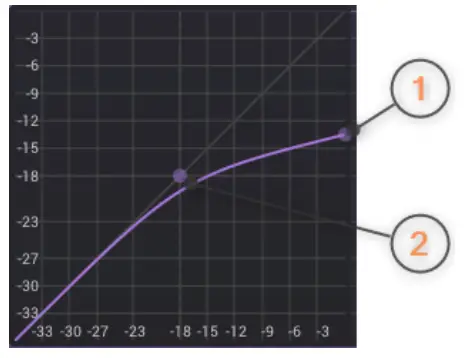
The picture below shows extreme settings of the Advanced mode:

1) Tension high
2) Tension knee
3) Tension low
Together with the Knee parameter you can design even exotic, but still musical compressor transfer curves.
Feedback
The Feedback mode provides classic feedback compressor style. The main advantage is that the detector spends most of its time reacting to a signal that’s already been compressed, leading to smoother compression.
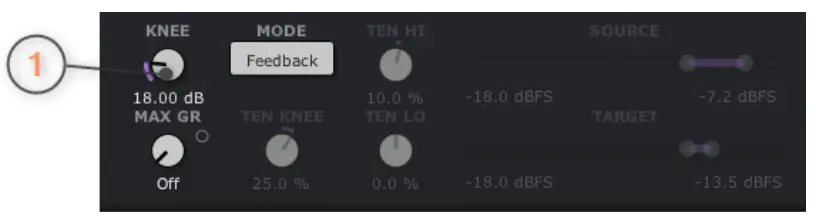
1) The Knee knob sets the ’roundness’ of the compression around the threshold, which can vary from hard to soft knee.
1) The handle adjusts the compressor ratio by clicking and dragging with the mouse.
2) The handle adjusts the compressor threshold and wet gain by clicking and dragging with the mouse or the knee by using the mouse wheel
Detect
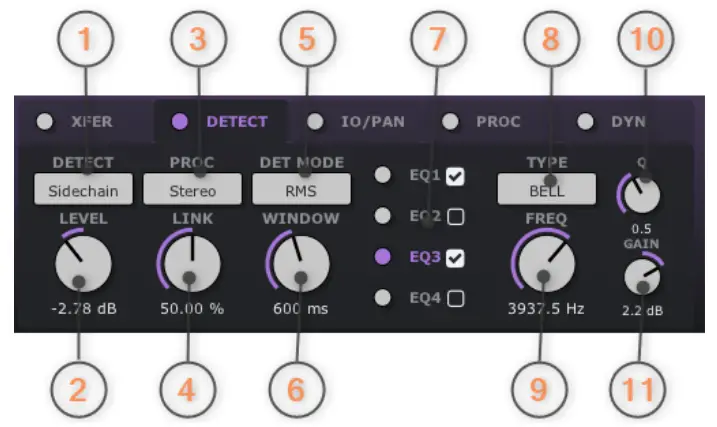
The Detect page provides various controls to adjust the detector signal processing in depth. For example, one wants the compressor only react to a specific part of the spectrum as with ‘de-essing’. To do this, activate one of the four filters and set the type to ‘Bandpass’ and the desired frequency.
Or you want the compressor to only react when the side signal crosses the threshold. To do this, put the ‘Processing Mode’ on ‘Side’.
1) The Detector menu selects either the main (internal) or side-chain signal as detector signal. (Note: VST2 uses channel 3+4 for side-chain processing. For VST3, AU, AAX and CLAP please consult the DAW manual.)
2) The Level knob sets the gain of the side-chain signal.
3) The Processing Mode menu selects which part of the signal is used for further processing in the detector path: either stereo, mid/side, left, right, mid or side signal.
4) The Link knob sets how much the stereo or mid/side signal is linked together for the calculation of the gain reduction of the compressor.
5) The Detector Mode menu selects how the detector level is calculated: either Peak, RMS, EBU R128 ML or EBU R128 SL.
6) The Windows knob sets the timing of the RMS calculation (RMS Detector Mode).
7) By clicking on the text ‘EQ1 to EQ4’ the corresponding EQ area is displayed. The EQ checkbox activates the corresponding EQ.
8) The Type menu selects from different filter types like LC, HC, Bell, Shelf or Tilt filter.
9) The Frequency knob sets the center frequency of the filter.
10) The Q knob sets the Q factor of the filter.
11) The Gain knob sets the gain of the filter.
IO/Pan

The IO/Pan page provides more controls over the compression process like input/output gain and pan control, control of hold timing and wet/dry gain pan.
For example, it is possible to lower the mid part of the dry signal and the side part of the wet signal during the ‘parallel compression.
1) The Input knob determines the input gain of the compressor.
2) The Input Pan slider sets the position of the compressor input signal in the stereo field.
3) The Output knob determines the output gain of the compressor.
4) The Output Pan slider sets the position of the compressor output signal in the stereo field.
5) The Attack Delay knob is used to set the time at which the peak values of the gain reduction are delayed. Increasing the attack delay saves transients from the compression..
6) The Hold knob is used to set the time at which the peak values of the gain reduction are extended. Increasing the hold time could improve transparency of the compression.
7) The Wet Gain Pan slider determines the balance between mid and side signal.
8) The Dry Gain Pan slider determines the balance between mid and side signal.
9) The Attack Shape knob determines the curvature of the attack time shape (0 = linear).
10) The Release Shape knob determines the curvature of the release time shape (0 = linear).
11) The checkbox Custom Attack Shape enables the control of the attack time shape.
12) The checkbox Custom Release Shape enables the control of the release time shape.
Custom Attack/Release time shape
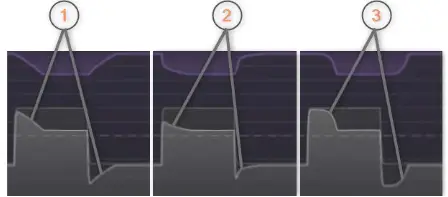
1) linear shape (0%)
2) non-linear shape (-50%)
3) non-linear shape (+50%)
Proc

The Proc page provides controls for look-ahead, over sampling and saturation.
The concept of look-ahead budget avoids crackling and stuttering while setting the right look- ahead timing. Large look-ahead budget are used if the compressor works with detector mode RMS, ML or SL. E.G. if the delay of SL measurement should be compensated a look-ahead time of 3000 ms is needed. The ‘free’ mode sets pre-delay and PDC directly.
The use of over-sampling can suppress aliasing effects very well. Please note that this can significantly increase the processor load.
The saturation module adds extra analog vibe to the compression process.
1) The Look-Ahead Budget menu sets maximum look-ahead timing of the compressor.
2) The Look-Ahead Time knob sets current look-ahead timing of the compressor.
3) The Look-Ahead Release Time checkbox enables the adjustment of the release time of the compressor according current look-ahead timing.
4) The Over-Sampling menu sets how many times the internal process is over-sampled. It covers all sub-modules of the plugin. Over-sampling can reduce aliasing artifacts.
5) The Saturation Mode menu enables various styles of the compressor. The effect of the saturation is dependent on the amount of gain reduction.
6) The Stages knob sets the number (tube) modules in a row. A higher number of stages increases the saturation effect.
7) The Od knob controls the amount of od harmonics of the saturation.
8) The Even knob controls the amount of even harmonics of the saturation.
Dyn

The Dyn page provides various functions to give the compressed signal the final touch.
Loudness matching
In modern audio production, there is always the task of achieving certain loudness values after audio processing. Impress3 supports this task with a dedicated and flexible processor.
Set the desired measuring method and the target value. Then run the entire audio signal or parts of it through the processor. After completion, Impress3 displays the current measurement result in the ‘Source’ field. After pressing the ‘Match’ button, the gain value is set so that the ‘Source’ field matches the target value when the signal is run through again. The audio signal now has the loudness that was specified as the target
Limiter
There are enough tasks in modern audio production where the audio signal is not only compressed, but also finally limited.
The Impress3 look-ahead limiter is designed to limit the audio signal to a defined peak level without creating unwanted distortion due to clipping. Impress3 uses the algorithms of TBProAudio’s high quality limiter LAxLimit, with a simplified GUI to speed up the workflow.
Clipper
The clipper is an audio processor that is used to cut off the peaks of an audio signal as soon as they exceed a certain threshold value. Both hard clipping and soft clipping can be set. Impress3 uses the algorithms of TBProAudio’s popular channel strip CS-5501, with a simplified GUI to speed up the workflow. Please to note that audio clipping introduces distortion.
Limiter and clipper are often used together by setting the limiter ceiling to -1.0 dBFS and the clipper ceiling to -2.0 dBFS. So the audio signal is gently limited to the ceiling value and the clipper “removes” additionally 1 dB, which could give the audio signal some extra punch.
Clip modes:
Hard clip: simple cut of samples above the ceiling. Adds a lot of harmonic and disharmonic content.
Tanh: soft clipping based on the tanh function, nice and symmetric clipping. Similar harmonic content as hard clip, but less disharmonic content.
Sin: soft clipping based on the sin function, nice and symmetric clipping. Similar harmonic content to hard clip, but stronger harmonic content.
Quintic: soft clipping based on the polynomial function. Only harmonic content. Most pleasant clipping (3rd and 5th harmonics).
The order of limiter and clipper in the process chain can be changed as desired.
ABLM
ABLM is a perceptual A/B loudness matching algorithm to help you avoid the pitfall of ‘louder is better’, so you can evaluate the impact of the plugin on your incoming and outgoing audio signal at equal loudness.
When you engage ABLM, the algorithm analyzes the incoming signal and compares it to the outgoing signal via its RMS values and applies an automatic gain adjustment so you can focus on the plugin settings and what they are actually doing to your audio, without being distracted by loudness differences.
Please to note that ABLM limits the gain adjustment to +/- 24dB to avoid gain overshoots. ABLM lets you automatically minimize the loudness either quickly (mode fast) or gently (mode slow).
The Set button freezes the last ABLM gain and switches ABLM off. This function prints the last ABLM gain settings to the gain structure.
Impress3 uses the algorithms of TBProAudio’s dedicated plugin called ABLM, with a simplified GUI to speed up the workflow.
1) The Mode menu selects the measurement method of loudness matching: either ML (EBU Momentary Loudness) Max, SL (EBU Short-Term Loudness) MAX or IL (EBU Integrated Loudness).
2) The Target knob sets the target loudness level.
3) The Source button shows the current loudness level. Click to reset the display.
4) The Gain knob determines the gain to meet the target loudness. It is automatically set by the Match button below.
5) The Match button calculates gain to meet the target loudness by clicking on it.
6) The Limit menu enables the built-in limiter and sets the limiter mode: either peak or True Peak.
7) The Ceiling knob determines the peak or True Peak ceiling level.
8) The L-C/C-L button sets the order of limiter and clipper (L-C = limiter->clipper).
9) The Clip menu enables the built-in clipper and sets clip mode: either Hard, Tanh, Sin or Quintic.
10) The Ceiling knob determines the peak level.
11) The ABLM menu enables the built-in perceptual A/B loudness matching. It matches the output signal level to the input level.
12) The Gain knob determines the static ABLM gain.
13) The Set button sets the Gain knob to the current internal ABLM gain and disables the continuous loudness matching (aka ABLM gain ‘freezing’)
14) The DAW Sync button enables the synchronization of the measurement reset with DAW start.
Level display
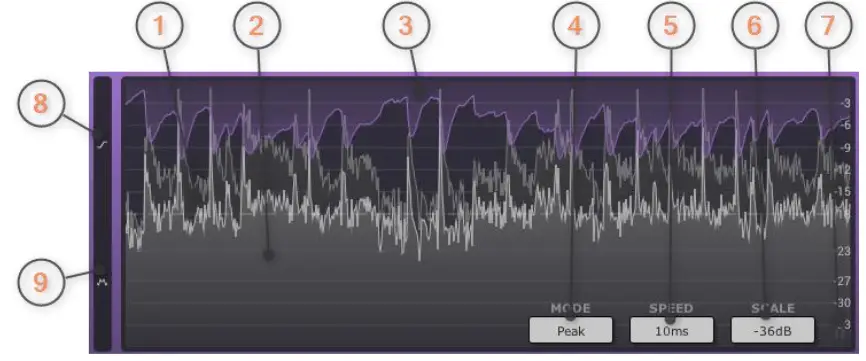
The level display shows the history of the input, output and gain reduction levels. It makes it easy to follow the processing on the input signal.
1) The Input signal is represented by the dark gray curve.
2) The Output signal is represented by the light gray curve.
3) The Gain reduction is represented by the purple curve.
4) The Level Display menu sets the level display: either based on peak, ML (EBU R128) or SL (EBU R128). Use the mouse wheel to scroll through all options.
5) The Speed menu sets the display update speed: either every 5/10/20/100ms or infinite display.
6) The Scale menu sets the level display and meter magnitude range: either – 12/18/24/36/48/72/96dB. Use the mouse wheel to scroll through all options.
7) The Pause button pauses the update of the level display.
8) The Xfer display shows the compressor transfer curve (detector signal), input level (horizontal) against output (vertical).
9) The Loudness Distribution Display shows how the input, output and gain reduction values, distributed over time.
Click into display shows magnitude and time info under the mouse pointer.
Xfer display
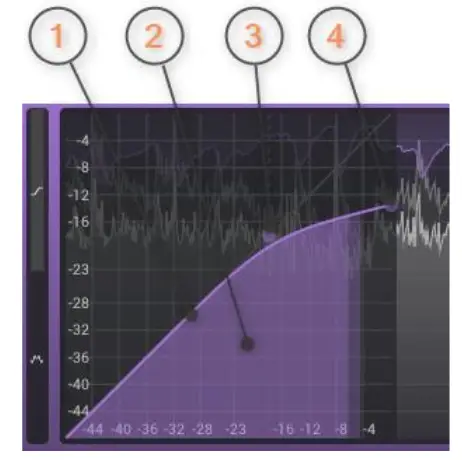
The Xfer display shows the compressor transfer curve (detector signal), input level (horizontal) against output (vertical). It also draws the current input level against the current output level. Depending on the Xfer mode it provides handles to manipulate some parameters by mouse (e.g. threshold, ratio, wet gain).
1) The purple curve represents the compressor transfer curve
2) The light purple filled curve represents the current detector signal.
3) The handle adjusts the compressor threshold and wet gain by clicking and dragging with the mouse. Mouse wheel is also supported.
4) The handle adjusts the compressor ratio by clicking and dragging with the mouse.
Level distribution
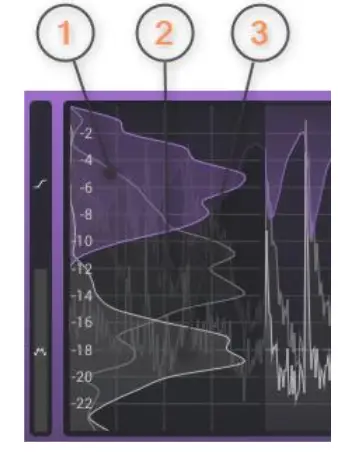
The loudness distribution display shows how the input, output and gain reduction values are distributed over selected time range. It can be used to evaluate easily the dynamics of the audio signal.
1) The purple curve represents the distribution of the gain reduction within the displayed time frame.
2) The dark gray curve represents the distribution of the input signal within the displayed time frame.
3) The light gray curve represents the distribution of the output signal within the displayed time frame.
Meter display

The three meters (light gray) display the current peak input (left), output (right) and gain reduction levels (middle), each in stereo, left/right channel. The meters behind (dark gray) display the current loudness level based on ML (EBU R128). The readouts show the highest measured peak and loudness level. Use the mouse wheel change meter scale. Click on the meter to reset the readouts.
1) Input peak hold level
2) Input ML hold level
3) Current input peak level
4) Current input ML level
5) Input peak/ML max level
6) Gain reduction
7) Output peak level
8) Output ML level
9) Output peak/ML max level
Spectrum analyzer
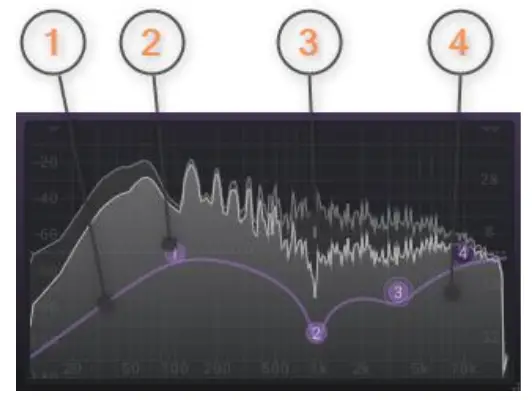
The spectrum analyzer shows the spectrum of the compressor detector signal (pre and post filter) and the filter response curve. The display provides handles to manipulate an individual filter by mouse.
1) The purple curve represents the filter response curve of all four filters.
2) The handle adjusts the filter center frequency and gain by clicking and dragging with the mouse. The mouse wheel adjusts the EQ Q factor. Mouse double click activates or deactivates the filter.
3) The dark gray curve represents the detector signal before the filter bank.
4) The light gray curve represents the detector signal after the filter bank.
Demo mode versus Registered Mode
In demo mode (without activation) the plug-in mutes audio every 90 seconds for a short period. This could be circumvented by clicking on the “TBProAudio” logo within 90 seconds.
Plugin activation
 The plugins needs to be activated to remove demo restrictions. Please go to www.tbproaudio.de to purchase the activation key. After purchase you will receive an email from TBProAudio with either the (zipped) activation key file or the activation key in text form. Go to the plugin menu->Activate plugin. Please follow the steps described here: https://www.tbproaudio.de/support/productactivation. After successful activation the key symbol shown in the GUI appears in golden color.
Conclusion
So if you have any questions or suggestions, please let us know. And have fun with our tools.
Your team from TBProAudio 🙂
Documents / Resources
 |
TBProAudio Impress3 Compressor Effect Plugin [pdf] User Manual Impress3 Compressor Effect Plugin, Impress3, Compressor Effect Plugin, Effect Plugin, Plugin |