1. அறிமுகம்
The FRANKEVER 23-Gauge Hidden Super Flat Audio Cable is designed for discreet and efficient electrical connections in various low-voltage applications. Its ultra-thin, adhesive, and paintable design allows for seamless integration into any environment, making it ideal for audio systems, LED lighting, and other low-voltage appliances. This manual provides detailed instructions for proper installation and usage to ensure optimal performance and safety.

Figure 1: FRANKEVER 23-Gauge Hidden Super Flat Audio Cable Kit
2. பாதுகாப்பு தகவல்
- Ensure power is disconnected from any devices before installation or maintenance.
- This cable is designed for low-voltage applications only. Do not use with high-voltagமின் அமைப்புகள்.
- Avoid installing the cable in areas where it may be subject to excessive heat, moisture, or physical damage.
- குழந்தைகளுக்கு எட்டாத இடத்தில் வைக்கவும்.
- If you are unsure about any installation steps, consult a qualified electrician.
3. தயாரிப்பு அம்சங்கள்
- Ultra-Thin and Flat Design: With a thickness of only 0.5mm, the cable lies flat against surfaces, making it virtually invisible once installed.
- பிசின் ஆதரவு: Equipped with strong adhesive tape for easy and secure attachment to walls, ceilings, or other surfaces.
- Paintable Surface: The cable's surface can be painted to match your wall color, ensuring complete concealment.
- High-Quality Conductors: Made from 100% Oxygen-Free Copper, providing high conductivity, anti-oxidation properties, low signal loss, and strong current load capacity.
- பல்துறை பயன்பாடு: Suitable for various low-voltage uses, including audio speaker connections, LED lighting, and other small appliance wiring.

Figure 2: Cable Construction Diagram
4. தொகுப்பு உள்ளடக்கங்கள்
உங்கள் தொகுப்பில் அனைத்து பொருட்களும் உள்ளதா என்பதை சரிபார்க்கவும்:
- 1 x FRANKEVER 23-Gauge Hidden Super Flat Audio Cable (25 ft)
- 2 x Quick Connectors
5. விவரக்குறிப்புகள்
| பண்பு | மதிப்பு |
|---|---|
| அளவீடு | 23 AWG |
| நீளம் | 25 அடி |
| அகலம் | 0.63 அங்குலம் (1.6 செமீ) |
| தடிமன் | 0.02 அங்குலம் (0.5 மிமீ) |
| பொருள் | 100% Oxygen-Free Copper |
| சிறப்பு அம்சங்கள் | Adhesive backing, paintable, low voltage |

Figure 3: Cable Dimensions
6. அமைவு மற்றும் நிறுவல்
6.1. தேவையான கருவிகள்
- கத்தரிக்கோல்
- Utility Knife (or similar cutting tool)
- Small Flathead Screwdriver (if connecting to traditional wires)
6.2. நிறுவல் படிகள்
- Prepare the Cable End:
Carefully peel back approximately 1 inch (2-3 cm) of the white backing from the end of the flat cable to expose the copper conductors. Use a utility knife to gently trim any remaining white backing between the two copper strips, ensuring they are fully separated and clean. Fold the exposed copper conductors back onto the adhesive side of the cable to create a thicker, more robust contact point for the connector.

Figure 4: Preparing the Cable End
- Attach the Quick Connector:
Open the quick connector. Insert the prepared end of the flat cable into the connector, ensuring that each folded copper conductor aligns precisely with a metal contact point inside the connector. Close the connector firmly until it snaps shut, securing the cable in place. The metal teeth inside the connector will pierce the copper to establish an electrical connection.
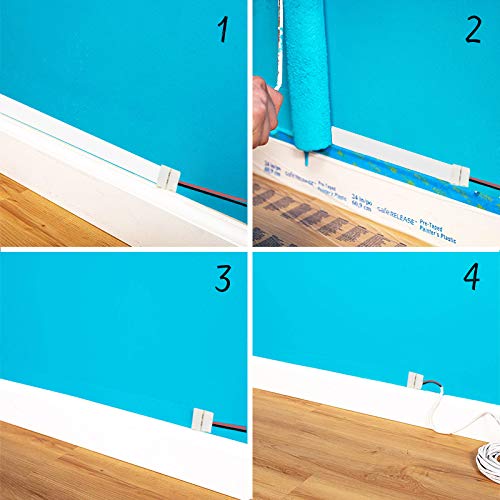
Figure 5: Attaching the Quick Connector
Video 1: Quick Connector Installation Demonstration
- Connect to Device/Power Source:
If connecting to traditional round speaker wires or other devices, strip the ends of the round wires. Open the other side of the quick connector (if applicable) or use a separate connector designed for round wires. Insert the stripped round wires into the designated terminals and tighten the screws with a small flathead screwdriver to secure the connection.
Video 2: Full Installation Guide for Flat Speaker Wires
- Apply Cable to Surface:
Clean the desired surface thoroughly with a mild cleaner and ensure it is completely dry before application. This ensures optimal adhesion. Peel off the remaining white backing from the cable. Carefully press the adhesive side of the cable onto the surface, smoothing out any air bubbles as you go. The cable can then be painted over to match the wall color for complete concealment.

Figure 6: Cable Application and Concealment
7. இயக்க வழிமுறைகள்
Once the FRANKEVER 23-Gauge Hidden Super Flat Audio Cable is correctly installed and connected to your audio system or low-voltage appliance, it functions as a standard electrical conductor. Ensure all connections are secure before applying power or audio signals to prevent interruptions or damage.
8. பராமரிப்பு
- உடல் ஒருமைப்பாடு: Avoid subjecting the cable to sharp bends, excessive pulling, or physical impacts after installation, as this may damage the conductors or adhesive.
- சுத்தம்: If the cable is not painted, gently wipe its surface with a dry, soft cloth to remove dust. Do not use harsh chemicals or abrasive materials.
- ஓவியம்: If you choose to paint the cable, ensure the paint is suitable for the surface material and allow adequate drying time.
9. சரிசெய்தல்
- No Audio Signal or Power:
- Verify all connections at both ends of the flat cable and connectors are secure and properly seated.
- Ensure the copper conductors are fully exposed and making proper electrical contact within the quick connectors.
- Check that the audio source or power supply is functioning correctly and is turned on.
- Poor Audio Quality or Intermittent Connection:
- Inspect the cable for any visible damage, kinks, or sharp bends that might affect conductivity.
- Ensure the cable length is appropriate for the 23 AWG gauge. For very long runs or high-power applications, signal degradation may occur.
- Re-check connector integrity; ensure no loose connections or corrosion.
- Cable Not Adhering to Surface:
- Confirm the installation surface was clean, dry, and free of dust, grease, or debris before application.
- Apply firm, even pressure across the entire length of the cable during installation.
- Avoid repositioning the cable multiple times, as this can reduce the adhesive's effectiveness.
10. உத்தரவாதம் மற்றும் ஆதரவு
FRANKEVER products are manufactured with a commitment to quality and reliability. For specific warranty details, return policies, or technical assistance, please refer to the product packaging or visit the official FRANKEVER website. Our customer support team is available to assist you with any questions or concerns regarding your product.


