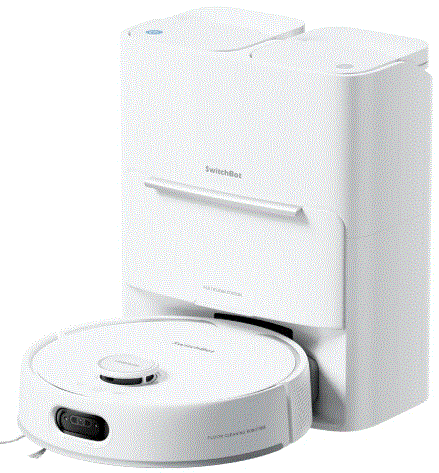
S20 Switch Bot Cleaning Robot
Thank you for choosing Switch Bot!
- This manual will guide you through a comprehensive understanding and quick installation of this product, and provide important information on product usage and maintenance to help you achieve the best product experience.
- If you have any questions during use, please call the service hotline or contact the official email. Switch Bot technical support experts will answer your questions.
- Setup and Troubleshooting: support.switch-bot.com
- Customer Support: support@switch-bot.com
https://www.switch-bot.com/pages/switchbot-user-manual
Scan the QR code to get started using your product. 
Product Overview
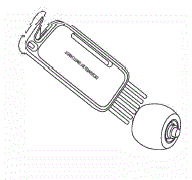
List of Components 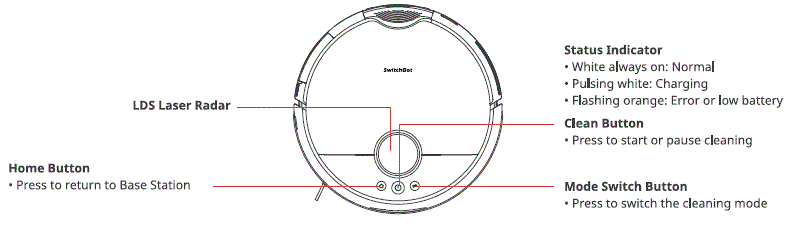
Robot Top View 
Robot Bottom View 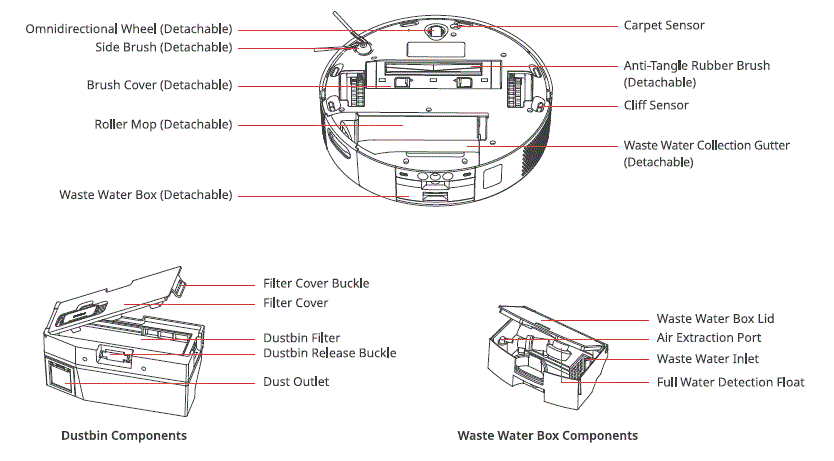
Base Station 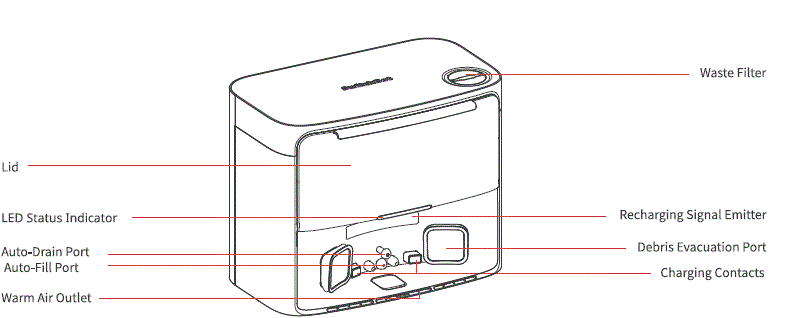
Rear View 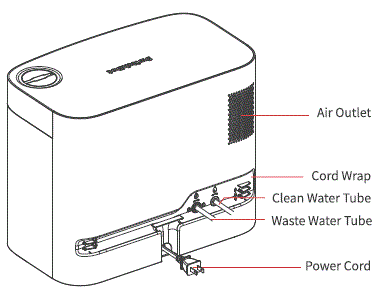
Dust Bag Compartment

LED Indicator Light

Preparing for Use
Setting Up the Base Station and Robot
Unpack and check package contents.
Ensure you have everything listed on our manual.
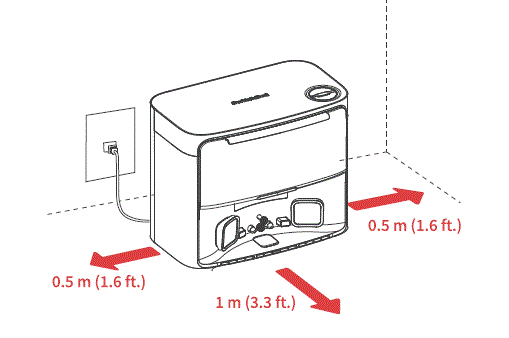
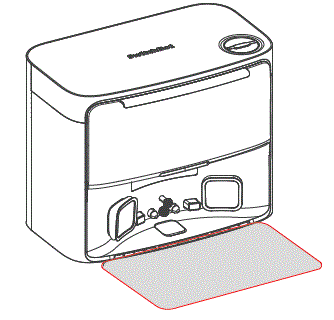
Place your Base Station at a proper position.
- Choose a suitable location for your station with a strong Wi-Fi signal.
- Plug the station’s power cord into an outlet.
- Locate the included Moisture-proof Pad, remove the tape liner, and attach it to the ground in front of the station.
- Connect the Base Station to your home’s plumbing system. 0 Scan the QR code to watch the installation video. Follow the step-by-step instructions to select the appropriate installation method and accessories, then connect the station to your home’s plumbing system.
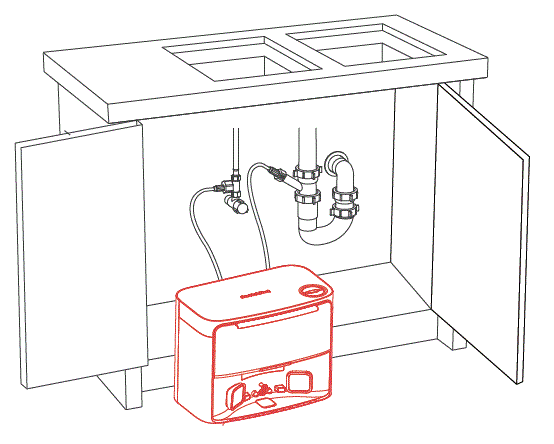
- Once connected, open the water valve to check the tube connections. When using the water exchange function for the first time, carefully inspect for any leaks to ensure proper installation.?1At¥M4,H*
PLEAE NOTE
- Organize the power cord. If left on the ground, it may be dragged by the robot, causing the station to move or disconnect from power.
- Place the station on a level indoor surface, away from open flames, heat sources, water, narrow spaces, or areas where the robot may fall.
- Placing the station on non-hard surfaces (such as carpets, mats, etc.) poses a risk of tipping over, and the robot may not be able to leave its station properly.
- Do not place the station under direct sunlight or block its signal emitter area with any objects, as this may prevent the robot from returning automatically.
- Please follow the maintenance instructions for the station and avoid using wet cloths or rinsing it with water.
Set up your robot.
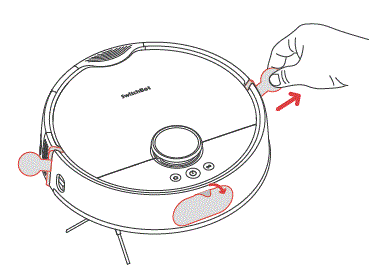
- Remove the foam strips on both sides of your robot. Install the Side Brush, then power on.
 TIPS
TIPS
When you hear a clicking sound, it means the Side Brush has been properly installed. - Remove the faceplate and turn on the Power Switch. “I” means powering on, and “O” means powering off.
- Dock your robot to the station. You will hear a sound prompt when docked successfully.
Tips: Dock your robot for 30 minutes of charging before initial use.
Add your robot to the SwitchBot app.
- Scan the QR code to download our app. Register an account or directly log in if you already have one.
- Tap the”+” icon located at the right-hand corner of the home page, select Add Device.
- Follow the instructions to add your robot.
You will need:
- A smartphone or tablet using Bluetooth 4.2 or later.
- The latest version of our app, downloadable via the Apple App Store or Google Play Store.
- A Switch Bot account, you can register via our app or sign in to your account directly if you already have one.

iOS and Android system requirements:
https://support.switch-bot.com/hc/en-us/articles/12567397397271
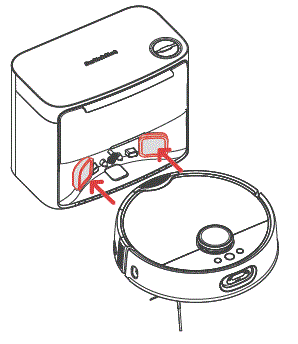
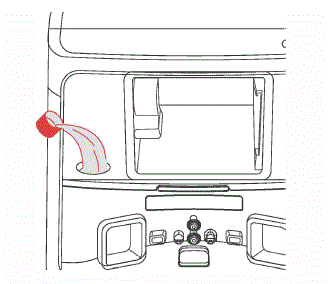
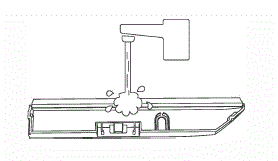
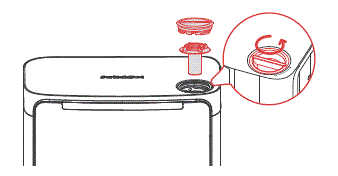
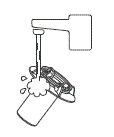
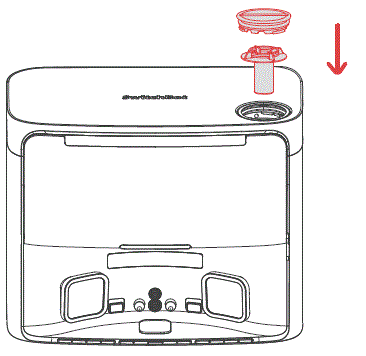
Add Floor Cleaning Solution.
- Open the dust compartment and locate the rubber seal on the left side.
- Pour 150 ml (5 fl oz) of Switch Bot Floor Cleaning Solution into the station.
PLEASE NOTE
- Please use the official Switch Bot cleaning solution, with each bottle containing 150 ml (5 fl oz.) and a cap volume of 6 ml (0.2 fl oz).
- Do not use non-official cleaning agents, as they may cause corrosion and device damage.
- When using with a SwitchBot Humidifier, do not add cleaning solution, as it may damage the device.
Deel uttering
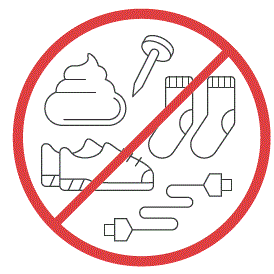
- Before starting the robot, please check the floor and clean up any scattered items such as wires, socks, slippers, children’s toys, etc. to improve the efficiency of the robot.
- Clear the floor of hard or sharp objects (e.g., nails, glass), and move away items that are fragile, valuable, or potentially dangerous to avoid being caught, tangled, or knocked over by the robot, causing personal or property damage.
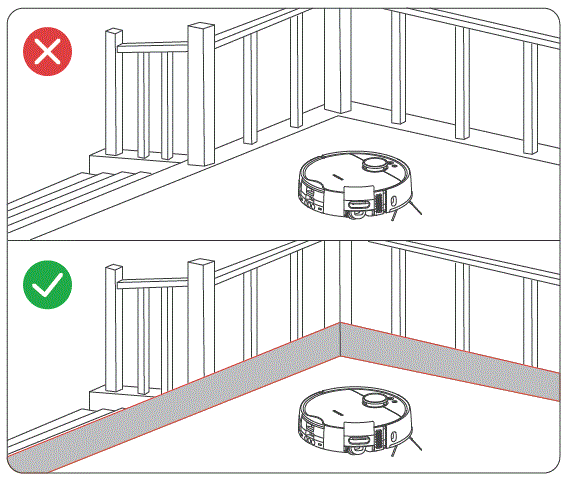
- Before cleaning, please use a physical barrier to avoid areas that are hanging in the air or low, ensuring the safety and smooth operation of your robot.
- Open the doors of the rooms to be cleaned, arrange the furniture neatly, and try to clear the largest cleaning space.
- Please avoid standing in front of your robot, doorways, or narrow passages in case your robot cannot detect the area to be cleaned.
Instructions for Use
Mapping
- Before starting mapping, ensure your robot is docked and charged. Follow the in-app instructions to begin fast mapping. Once mapping is complete, the robot will automatically return to the station and save the map.
- Tip: When using for the first-time, short press the
 button, and your robot will start mapping while cleaning.
Starting Your Robot
Control your robot via our app or press the![]() button on the robot to start. Your robot will plan cleaning routes based on saved maps. For first-time use, your robot will automatically work on the Vacuum mode.
button on the robot to start. Your robot will plan cleaning routes based on saved maps. For first-time use, your robot will automatically work on the Vacuum mode.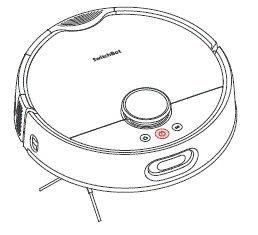
PLEASE NOTE
- To facilitate the normal water exchange of the robot, please do not move the Base Station during the cleaning and mopping process. If there is a door hiding the station, please keep the door open.
- If the battery is low, please charge it before starting the cleaning task.
- If the battery is insufficient during the cleaning process, the robot will automatically dock to charge.
- When set to clean carpets, the robot will automatically lift the Roller Mop. You can also choose to skip carpet vacuuming in the app.
Switching Mode
You can adjust the cleaning suction power and mopping water volume in the app based on the floor’s dirt level. Or short press the  button on your robot to switch between default cleaning modes.
PLEASE NOTE
In Vacuum mode, the Roller Mop will automatically raise and stop rolling.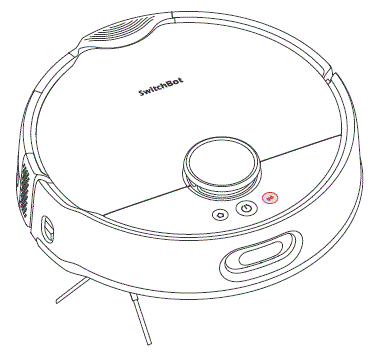
Pausing Your Robot
Stop your robot via the app or by press any button on the robot. When paused, resume the previous cleaning task via the app or by pressing the ![]() button.
button.
Recharging
- After finishing a cleaning task, your robot will automatically dock to the Base Station to charge.
- When in standby mode, your robot will dock and charge after pressing the
 button.
 - By default, your robot will automatically resume interrupted cleaning tasks (e.g., due to low battery or new commands). If the battery level drops during a task, the robot will dock to recharge and resume the task once the battery reaches above 80%.
PLEASE NOTE
If the robot does not find the Base Station, it will automatically return to the starting position. Please manually dock it for charging.
Exchanging Water
- During a mopping task, your robot will automatically dock to drain waste water and clean water.
- After completing a mopping or cleaning task, your robot will dock to empty dust, exchange water, deep clean and dry its Roller Mop, then start a recharging session.
Hibernation
If your robot is not operated for more than 10 minutes, it will automatically enter hibernation. Press any button to wake it up.
PLEASE NOTE
The robot will not enter hibernation while charging.
Do Not Disturb Mode
- The default setting for this mode is from 22:00 to 08:00, and you can modify or disable this feature via our app.
- During the Do Not Disturb period, device button lights will stay off, and your robot will not automatically resume cleaning or play voice prompts.
Child Lock
You can use the Child Lock function in our app to lock the robot buttons. You can unlock it via our app.
Restoring to Factory Settings
Press and hold the ![]() +
+![]() +
+ ![]() Switch buttons simultaneously for 6 seconds to restore the robot to factory settings.
Switch buttons simultaneously for 6 seconds to restore the robot to factory settings.
Upgrading Firmware
- In order to improve user experience, we will regularly release firmware updates to introduce new functions and solve any software defects that may occur during usage. When a new firmware version is available, we will send an upgrade notification to your account via our app. When upgrading, please make sure your product has sufficient battery or stay powered on and make sure your smartphone is within range to prevent interference.
- You’re advised to enable Automatic Upgrades via the Firmware & Battery page of our app.
Care and Maintenance
Daily Maintenance (Robot)
To keep your robot and station running at peak performance, perform the procedures on the following pages.
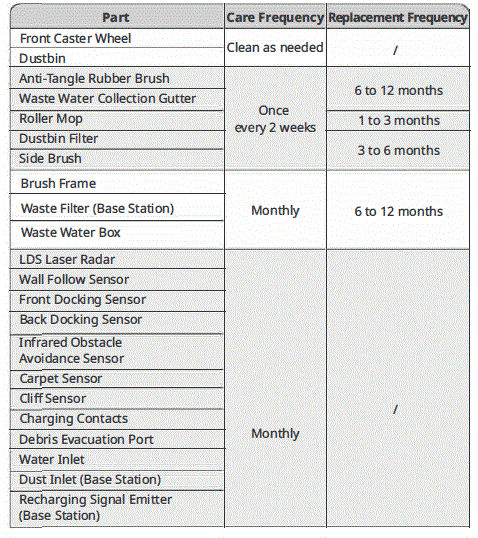
| Charging Contacts (Base Station) | ||
| Auto-Fill Port & Auto-Drain Port | ||
| Moisture-proof Pad | ||
| Diatom Mud Mat | 3 to 6 months | |
| Floor Cleaning Solution | Add once every 1 to 3 months | |
| Dust Bag | Replace every 1 to 3 months |
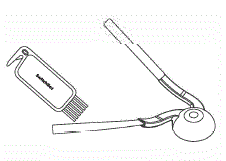
Cleaning tools needed 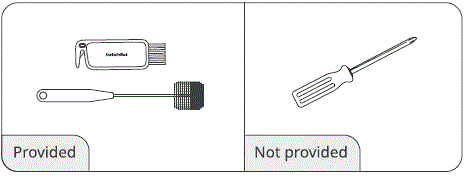
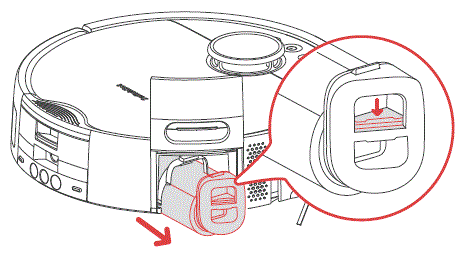
Waste Water Box
- Remove the Waste Water Box from the robot and open the lid.
- Clean the sediment inside the Waste Water Box.
 PLEASE NOTE
Avoid getting water into the Air Extraction Port during the cleaning process. - Install the Waste Water Box back to the robot.
PLEASE NOTE
Before flipping the robot over to clean, empty the Waste Water Box first to prevent waste water spillage.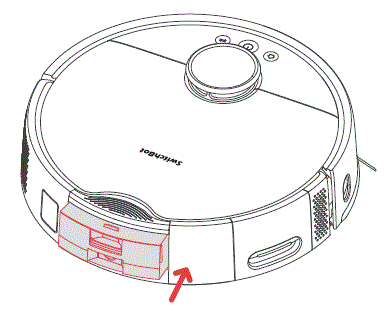
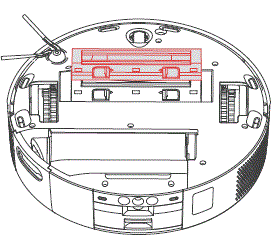
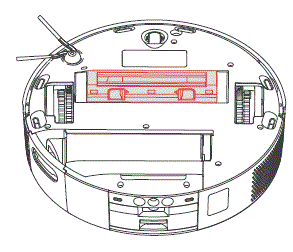
Waste Water Collection Gutter
- Remove the Roller Mop from the robot.
- Filp the robot over, and lift the Waste Water Collection Gutter from its left end to remove.
- Clean the sediment inside the Waste Water Collection Gutter.
- Install the Waste Water Collection Gutter back into the robot by putting its right end into the robot first, then press its left end into the robot to secure. You will hear a clicking sound once it is correctly installed.
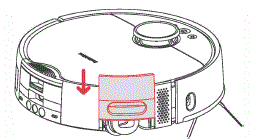
- Install the Roller Mop back to the robot.
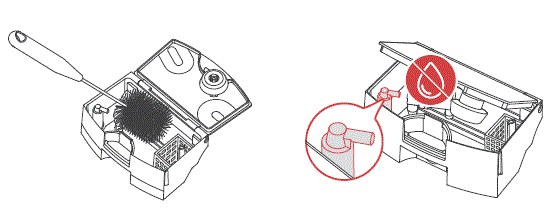
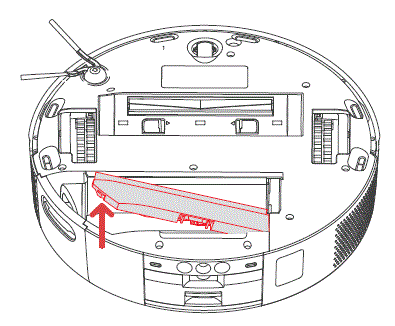
Anti-Tangle Rubber Brush
- Flip the robot over, press the latch, and remove the brush cover.
- Remove the Anti-Tangle Rubber Brush, pull out the bearings at both ends, and clean any hair or dirt wrapped around the brush. You can use the provided small cleaning tool for this.
- Install the Anti-Tangle Rubber Brush back to the robot. You will hear a clicking sound once it is correctly installed. Make sure both ends of the brush are inserted into the robot’s pegs, and then cover it with the brush cover.
PLEASE NOTE
- Wipe off the dirt on the Anti-Tangle Rubber Brush with a damp cloth. If the brush is soaked, dry it thoroughly and avoid direct sunlight.
- Do not use corrosive cleaning liquids or disinfectants to clean the Anti-Tangle Rubber Brush.
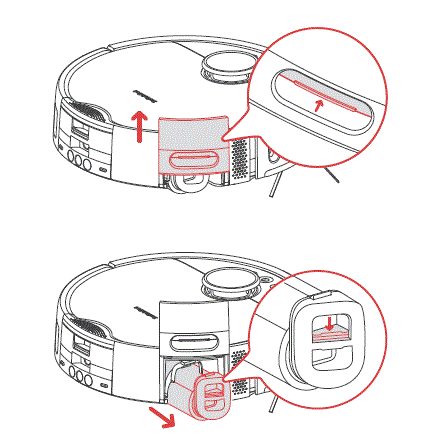
Side Brush
- Remove the Side Brush.
- Clean the Side Brush and its mounting shaft, then reinstall it.
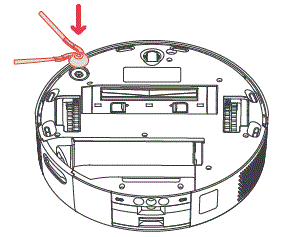
Front Caster Wheel
- Use a small screwdriver or similar tool to pry out the wheel and clean it.
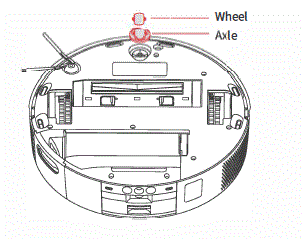
- Rinse the wheel and axle to remove hair or dirt. Dry it and reattach the wheel, pressing it firmly into place.
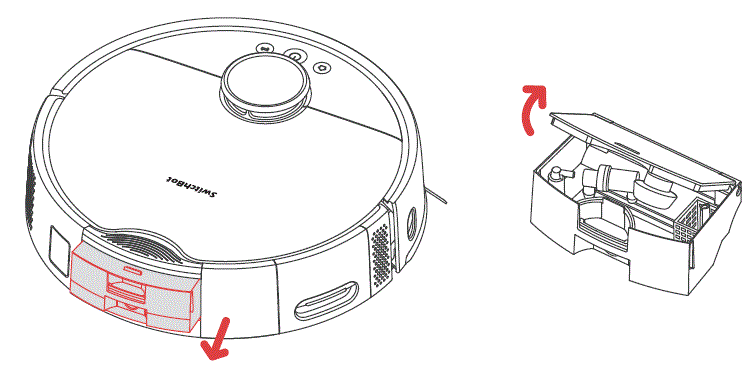
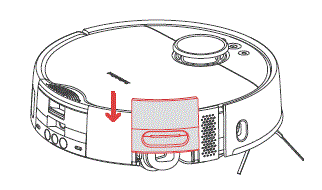
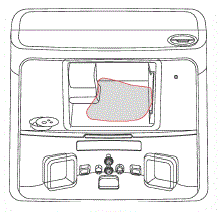
Dustbin
- Open the robot’s faceplate and remove the dustbin.
- Open the dustbin lid and empty the trash. Use the provided cleaning tool to deep clean the box.
- Reinstall the dustbin.
IMPORTANT
If washing, do not add any detergent, as it may cause filter clogging. Make sure to dry the dustbin and the filter thoroughly before installing them back.
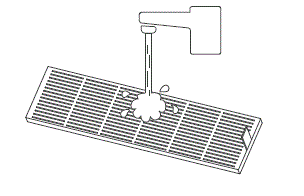
Dustbin Filter
- Open the dustbin cover and remove the filter.
- Rinse the filter repeatedly and gently tap the dirt out until it is clean.
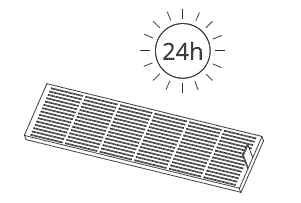
 Important
Do not touch the filter surface with hands, brushes, or sharp objects to avoid damaging the filter. - Air dry the filter for at least 24 hours before reuse. For optimal Performance, alternate between two filters.
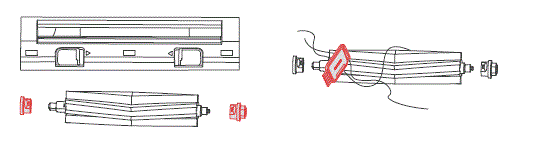
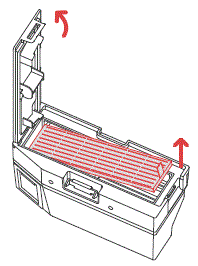
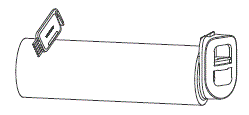
 Roller Mop
- As shown in the picture, lift the Roller Mop Cover and pull out the Roller Mop.
- Use the small cleaning tool provided to remove hair or debris wrapped around the Roller Mop.
- Rinse the Roller Mop surface with clean water and drain excess water.
- Reinstall the Roller Mop and press the Roller Mop Cover back into place. Make sure there is no water or stains inside the Roller Mop to avoid damaging the motor.
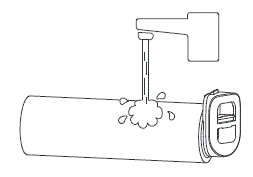
Important
Do not rinse the roller motor directly With water, as it may cause damage to the motor and the robot.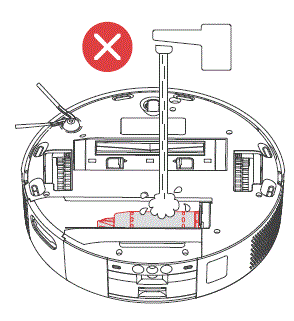
Robot Sensors
Clean the various sensors on the robot with a soft, dry cloth, including: LDS Laser Radar, Docking Sensors, Obstacle Avoidance Sensor; Wall Follow Sensor; Carpet Sensor; Cliff Sensor; and Charging Contacts. 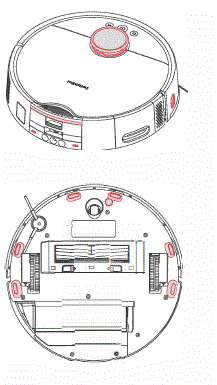
Daily Maintenance (Base Station)
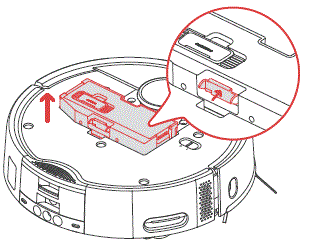
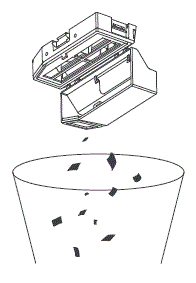
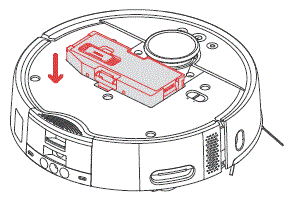
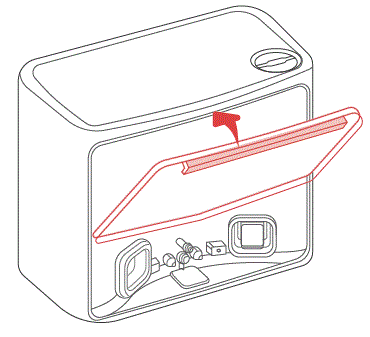
Dust Bag
You will receive app prompts when the Dust Bag is full. In this case, replace the Dust bag in time.
- Open the canister lid, remove and discard the used dust bag.
 Tip:
Tip:
When removing the Dust Bag, its handle will seal the bag to effectively prevent dust leakage. - Install a new dust bag and close the canister lid.
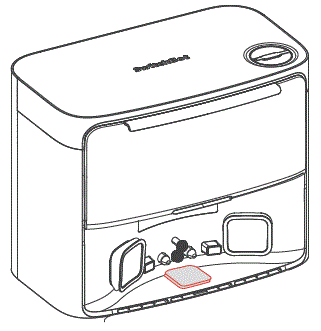
Diatom Mud Mat
Diatom Mud Mat absorbs water drops and air dries by itself. Clean or replace as prompted by the app.
- Remove the Diatom Mud Mat from the Base Station.
- Install a new Diatom Mud Mat.
Charging Area
use a soft, dry doth to Clean the Base Station’s charging contacts and the Recharging Signal Emitter area.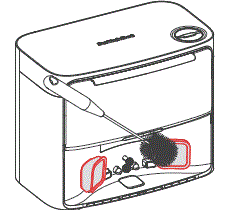
Waste Filter
- Follow the mark beside the Waste Filter Cover to turn it open.
- Remove the Waste Filter inside, and rinse it under a tap.
- Put the filter back into the station and tighten the Waste Filter Cover.
Specifications
- Robot
- Material: ABS Size: 365 x 365 x 115 mm (14.3 x 14.3 x 4.5 in.)
- Weight: 5.5 kg (12 lb) Power Supply: 21.6 V/4000 mAh lithium-ion battery
- Rated Power: 85 W
- Operating Temperature: 0 °C to 40 °((32 °F to 104 °F)
- Operating Humidity:< 90% RH
- Charging Time: 3 to 4 h
- Connectivity: 2.4 GHz Wi-Fi, Bluetooth 4.2 or later 4.2
- Base Sation
- Size: 380 x 223 x 300 mm (14.9 x 8.7 x 11 in.) Weight: 5.2 kg (11 lb)
- Rated Input 220-240 V- 50/60 Hz
- Rated Power (Charging): 36 W
- Rated Power (Emptying Dust): 900 W
- Rated Power (Drying Mop and Charging): 150 W
- Rated Output Max 24 V – 1.5 A
Troubleshooting
Common Issues
If you encounter any issues, start by updating the firmware or restarting the device, as these steps often resolve common problems. If the issue persists, consult the troubleshooting guide or contact customer support for further assistance.
Unable to power on
- The battery level is low. Put the robot on the Base Station and charge it before use.
- The ambient temperature is too low or too high. Only use the robot within the range of CC to 400c to 10400.
Unable to charge
- Check the poWer cord for any damage and make sure it’s securely plugged in. Ensure the station is powered on and its indicator light tums on in white.
- Poor contact, please clean the charging contacts on the Base Station and the robot.
- Make sure the firm wares of your robot and Base Station are up to date.
Network connection failure
- Incorrect Wi-Fi password, please enter the correct Wi-Fi password.
- Switch to a 2.4GHz network for pairing, as 5GHz networks and enterprise routers are not supported.
- Keep the robot within a range with good Wi-Fi signal strength.
- The robot may not be in the ready-to-configure state, exit the app and re-enter, then follow the pairing steps to try again.
Abnormal task termination
- Your robot’s battery is exhausted.
- Your robot has been stuck or tangled and cannot dock to charge. Set No-GO Zone or virtual wall in such areas.
Unable to identify Base Station
- Ensure that your station is powered on, with the white light turns on. Keep the power cord organized to avoid wear and entanglement.
- Check the Bluetooth connection between your robot and the station. If your product has undergone a warranty or replacement process, manually pair them after powering on.
Package contents inconsistency
- We’re continuously upgrading our package contents based on customer feedback, but documentation updates may lag behind. We apologize for any inconvenience.
- If this inconsistency affects the normal use of your product, please contact us.
Abnormal behavior
- Make sure to declutter your room before initiating a cleaning task.
- Check and remave any hair or debris tangled on the Main Wheels or Caster Wheel.
- Check if the floor is slippery or uneven.
- Please turn off and restart the robot.
The Side Brush fell off
- Please reinstall the Side Brush, making sure to hear a “click” to indicate it is in place.
- The Side Brush may have fallen off due to tangled wires. Please clear wires on the floor before use.
Ground not cleaned up
- The dustbin is full. Please empty it.
- The filter may be clogged with dust. Please check and clean as necessary.
- If the filter is not dry after cleaning. Please let it air dry before using.
Water leaked while mopping
- Remove the Roller Mop and Collection Gutter, and clear any debris.
- Ensure the firmware versions of all parts are up to date.
Dust leaked while working
- Remove the Anti-Tangle Rubber Brush and dustbin, and clear any debris near the Anti-Tangle Rubber Brush.
- Your Dustbin is full. Please dock your robot and empty dust.
Loud operating noise
- The dustbin is full. Please empty it.
- Hard objects may be tangled in the Anti-Tangle Rubber Brush and dustbin. Please check and clean as necessary.
- The Side Brush and Anti-Tangle Rubber Brush may be tangled with debris. Please check and clean as necessary.
- You can lower the suction power of the robot to Quiet or Low if necessary.
Failed to upgrade firmware
- Exit the firmware upgrade page and try again later.
- Make sure the network connection is stable.
Roller Mop dry/Mopping effect not satisfied
- Set your robot to an appropriate Mopping Water Level via our app.
- Wash your mop prior a mopping task to get the optimal mopping effect.
Stopped due to being stuck
- The robot may be stuck under furniture of a similar height. Consider raising the furniture, manually blocking or using our app to set a virtual wall to avoid the area.
- Check the corresponding area for any wires, curtains, or carpet edges that may be tangled with or obstructing the robot. Manually remove any obstructions for smooth operation.
Water refilling/draining errors
- Check if the tubes are properly connected and if the water valve is open.
- Check if the tube connectors are in normal state.
Missed cleaning some rooms
- Please ensure all room doors are fully opened.
- Check if there is a doorstep higher than 1.8 cm at the entrance of the room, as this product cannot overcome higher doorsteps.
- If the entrance is slippery, causing the robot to skid and malfunction, it is recommended to manually clean up the water on the floor.
- Check if there is a small mat or carpet at the entrance of the room. When in Mop mode, the robot will avoid carpets. You can disable the carpet detection feature in the app settings page.
Robot indicator light on or flashes in orange
- Your robot is trying to free it from being stuck. Please check if your robot is getting stuck.
- Your robot’s battery is low. The indicator light will turn off after it is docked and charged.
- Your robot is abnormal. Please troubleshoot based on the app prompts. If the fault persists, please contact the customer support.
Water droplets found after refilling/draining denly
- During refilling or draining, water droplets may occur. Check if the Diatom Mud Mat is dry.
- Check if the silicone joints on your station are intact.
Didn’t resume cleaning after being fully charged
- Make sure the robot is not in Do Not Disturb mode, as it will not resume cleaning in this mode.
- If the robot is docked manually or by pressing the Home button, it will not resume cleaning after being fully charged.
Purchasing Cleaning Solution
Visit our website or contact Switch Bot customer support to purchase the official SwitchBot Floor Cleaning Solution.
Scheduled cleaning not effective
The cleaning will only start when the remaining battery is more than 1 S%.
Tubes cannot be installed
- Refer to the installation video for guidance and select the appropriate installation methods and accessories.
- Ensure all components (gaskets, screws, clamps, etc.) are correctly installed and securely fitted.
- If the provided accessories are not suitable, measure the size of the tubes in your home and contact our support team. We will provide customized accessories tailored to your specific requirements.
The LED Status Indicator on the Base Station stays orange
- The dust bag is not in position. Please check and install it correctly.
- The dust bag is full. Please check and replace with a new dust bag.
- The canister lid of the Base Station is not closed. Please check and close it tightly.
Robot indicator light on or flashes in orange
- Your robot is trying to free it from being stuck. Please check if your robot is getting stuck.
- Your robot’s battery is low. The indicator light will turn off after it is docked and charged.
- Your robot is abnormal. Please troubleshoot based on the app prompts. If the fault persists, please contact the customer support.
How often to replace cleaning solution
Enable the automatic cleaning solution refill feature in our app. You will be prompted when the cleaning solution level is low. Check and refill as needed.
NOTE
If returning the product for repair, please empty any water and use its original packaging to prevent damage during transportation.
Please visit our website or scan the QR code below for more information. https://support.switch-bot.com/hc/en-us/categories/29440818503831
Warranty & Support
Warranty
We warrant to the original owner of the product that the product will be free from defects in materials and workmanship. Please note that this limited warranty does not cover:
- Products submitted beyond the original limited warranty period.
- Products on which repairs or modifying have been attempted.
- Products subjected to falls, extreme temperatures, water, or other operating conditions outside the product specifications.
- Damage due to natural disaster (including but not limited to lightning, flood, tornado, earthquake, or hurricane, etc.).
- Damage due to misuse, abuse, negligence or casualty (e.g. fire).
- Other damage that is not attributable to defects in the manufacture of product materials.
- Products purchased from unauthorized resellers.
- Consumable parts (including but not limited to batteries).
- Natural wear of the product.
Disclaimers
- We are not responsible for any damages caused by natural disasters such as earthquakes, lightning, wind and water damage, fires that are not caused by the product, third party actions, intentional or negligent misuse by the customer, or other abnormal usage conditions.
- We are not responsible for any incidental damages arising from the use or inability to use this product (such as changes or loss of recorded content, loss of business profits, business interruption).
- We are not liable for damages arising from non-compliance with the contents in this manual.
- We assume no responsibility for damages caused by improper actions or use with devices not controlled by us.
Contact & Support
- Feedback: If you have any concerns or problems when using our products, please send feedback via our app through the Profile> Support page.
- Setup and Troubleshooting: support.switch-bot.com
- Support Email: support@switch-bot.com
Documents / Resources
 | Switch Bot S20 Switch Bot Cleaning Robot [pdf] User Manual S20 Switch Bot Cleaning Robot, S20, Switch Bot Cleaning Robot, Cleaning Robot, Robot |