STOLTZEN SA-6100E,SA-6100D HDMI Over IP Encoder and Decoder User Manual
Important Safety Information
- Read, follow, and keep these instructions.
- Heed all warnings.
- Do not use this product near water. Keep away from wet places, such as: spas, pools, sinks, laundries, wet basements, etc.
- When cleaning, unplug the unit and wipe with a dry cloth. Do not use damp cloths, cleaning fluids, or aerosols which may result in electric shock, fire, or unit damage.
- Operate this product using only the included power supply and/or power cable. Use of an unapproved power implement may impair performance, damage the product, or cause fires.
- Do not block any ventilation openings. Install in accordance with the manufacturer’s instructions.
- Do not install or place this product near any heat sources such as radiators, heat registers, stoves, or other apparatus (including amplifiers) that produce heat.
- Protect the power cord from being walked on or pinched particularly at plugs, convenience receptacles, and the point where they exit from the product.
- Only use attachments/accessories specified by Stoltzen to avoid fire, shock, or other hazards.
- To reduce the risk of electric shock and/or damage to this product, never handle or touch this unit or power cord if your hands are wet or damp. Do not expose this product to rain or moisture.
- Unplug this product during lightning storms or when unused for long periods of time.
- Never open, remove unit panels, or make any adjustments not described in this manual. Attempting to do so could result in electric shock, damage to the unit, or other hazards.


The lightning flash with arrowhead symbol, within an equilateral triangle, is intended to alert the user to the presence of uninsulated dangerous voltage within the product’s enclosure that may be of sufficient magnitude to constitute a risk of electric shock to persons.
 The exclamation point within an equilateral triangle is intended to alert the user to the presence of important operating and maintenance (servicing) instructions in the literature accompanying the appliance.
Introduction
Overview
SA-6100E encoders and SA-6100D decoders provide the flexible, powerful, and scalable solution at resolutions up to 3840 x 2160@60Hz 4:4:4. They allow 4K UHD media to be switched and distributed over standard gigabit Ethernet networks, providing complete end-to-end streaming systems. Audio, video together with IR, and USB signals can be routed separately or as a whole throughout the matrix system. Encoders can be used with decoders to function video wall up to the dimensions of 16 x 16. Both of them have the capacity to handle and output up to 7.1 channel audio, allowing you to enjoy the finest sound.
HDCP 2.2/2.3 specifications are employed. A local area network is covered with a range up to 330ft (100m) over a single Cat 5e cable or above. Standard features like, bi-directional serial, bi-directional IR, and independent analog audio input/output are included. The codecs allow roaming/USB extension to take place to control a keyboard and a mouse. Flexible control options are offered — Windows Apollo Configurator, Apollo Visual Composer Touch and IP controller SA-C. They are the perfect solution for any low latency and signal routing applications. Common applications include homes, classrooms, conference rooms and broadcasts.
Features
- Selects between either the 1G Optical port or 1G BASE-T port automatically for stable IP stream transmission.
- Distributes and switches 4K UHD AV signals via standard gigabit Ethernet networks, providing complete end-to-end streaming systems.
- Supports HDMI input and output resolutions up to 3840 x 2160@60Hz 4:4:4.
- Supports streaming resolutions up to 3840 x 2160@60Hz 4:4:4.
- Features video wall up to the dimensions of 16 x 16
- Supports HDR10 and Dolby Vision.
- Supports CEC one-touch-play and standby commands to power on and off the display, as well as CEC Frame.
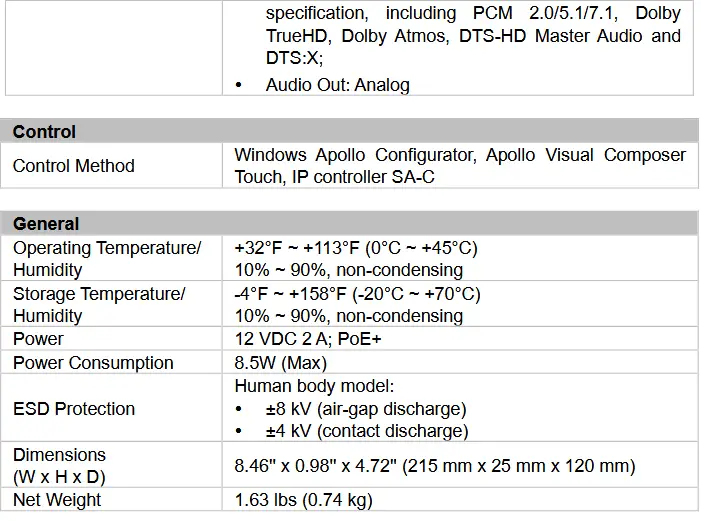
- Supports multi-channel audio up to PCM 7.1, Dolby Atmos, DTS HD Master and DTS:X.
- Analog audio embedding and de-embedding.
- S/PDIF audio return from decoder to encoder.
- HDMI ARC audio return (FW Will be ready for Q2E).
- HDCP 2.2/2.3 compliant.
- Flexible routing policies, allowing audio, video, USB, IR and RS232 signals to be routed separately or as a whole throughout the matrix system.
- Allows AV, USB, IR, RS232 and power signals to be delivered up to 328ft/100m over a single Cat 5e cable or above.
- 1 frame latency.
- Supports bi-directional serial communication, allowing control of remote RS232 devices between encoders/decoders and IP controller SA-C, or between encoders and decoders.
- Supports bi-directional IR pass-through, allowing control of remote source and display devices between encoders and decoders.
- Supports IR generation – send IR codes through API.
- USB Device ports for KM over IP seamless switching and roaming.
- Supports point-to-point, point-to-multipoint, multipoint-to-point, multipoint-to-multipoint applications.
- Supports PoE to be remotely powered by compatible power source equipment such as a PoE-enabled Ethernet switch, eliminating the need for a nearby power outlet.
- Supports user-selectable output HDCP configuration via Apollo Configurator or IP Controller SA-C.
- Fit in/stretch out video wall, and rotate video management — Decoded video can fill a video wall, maintain aspect ratio in a video wall, or can be rotated 180°and 270°clockwise, presenting imagery that meets customer expectations.
- Supports DHCP by default, and will fall back to AutoIP if there’s no DHCP server in the system.
- Flexible control options — Apollo Visual Composer Touch app on iPad and IP controller SA-C.
- Supports communications protocols of Telnet, SSH, HTTP, HTTPS.
Package Contents
Encoder
- 1 x SA-6100E Unit
- 1 x DC 12V Power Adapter with EU Pins
- 1 x 3.5mm 3-Pin Phoenix Male Connector
- 1 x IR Emitter (1.2m)
- 1 x Broadband IR Receiver (1m, 30 kHz ~ 50 kHz)
- 4 x Mounting Brackets (with 4 x M3*L5 Screws)
- 1 x User Manual
Decoder
- 1 x SA-6100D Unit
- 1 x DC 12V Power Adapter with EU Pins
- 1 x 3.5mm 3-Pin Phoenix Male Connector
- 1 x IR Emitter (1.2m)
- 1 x Broadband IR Receiver (1m, 30 kHz ~ 50 kHz)
- 4 x Mounting Brackets (with 4 x M3*L5 Screws)
- 1 x User Manual
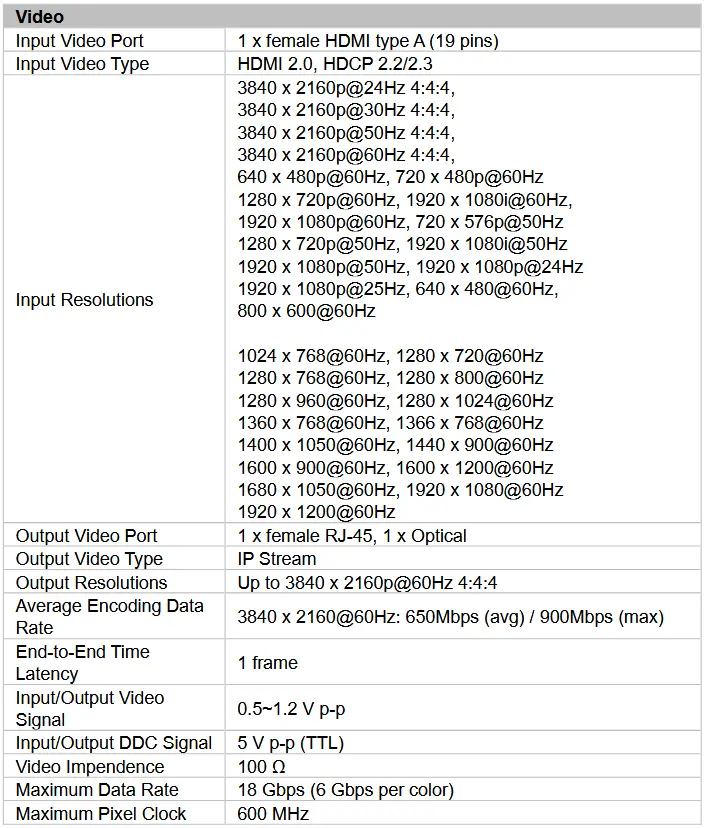
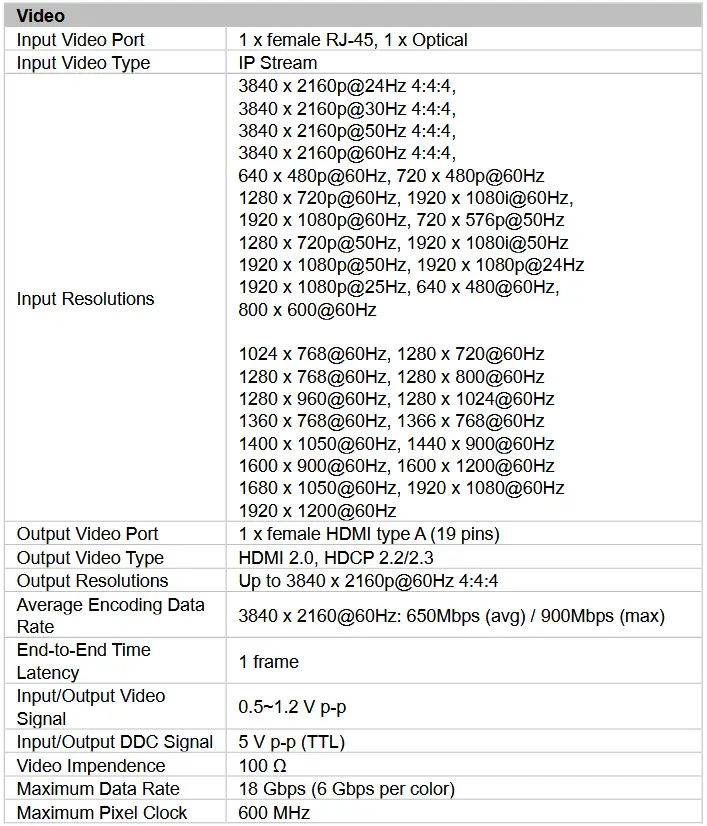
Specifications
Encoder

Decoder

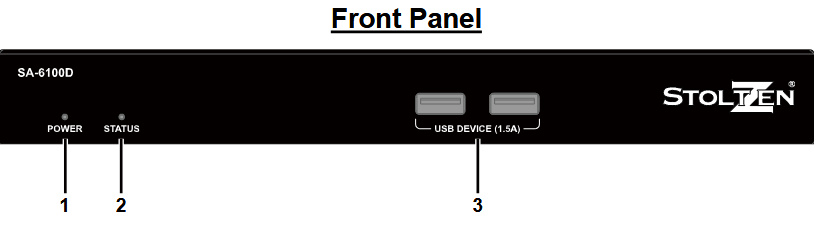
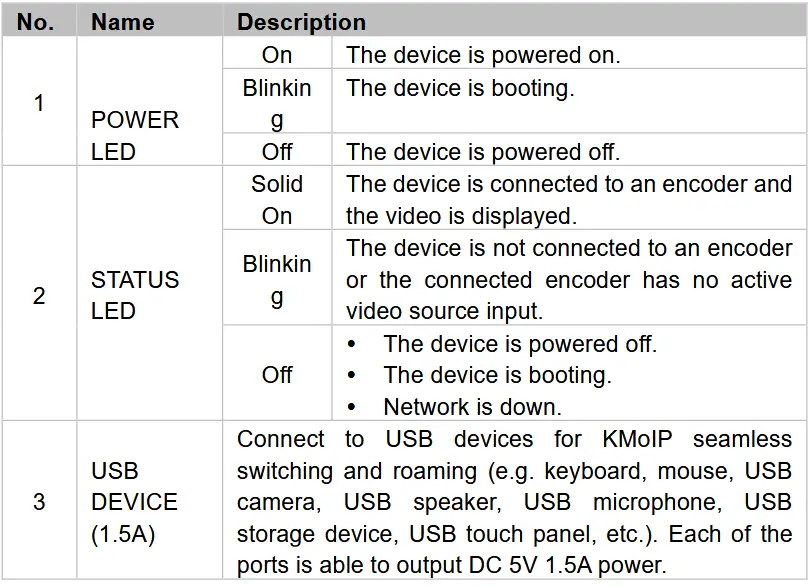
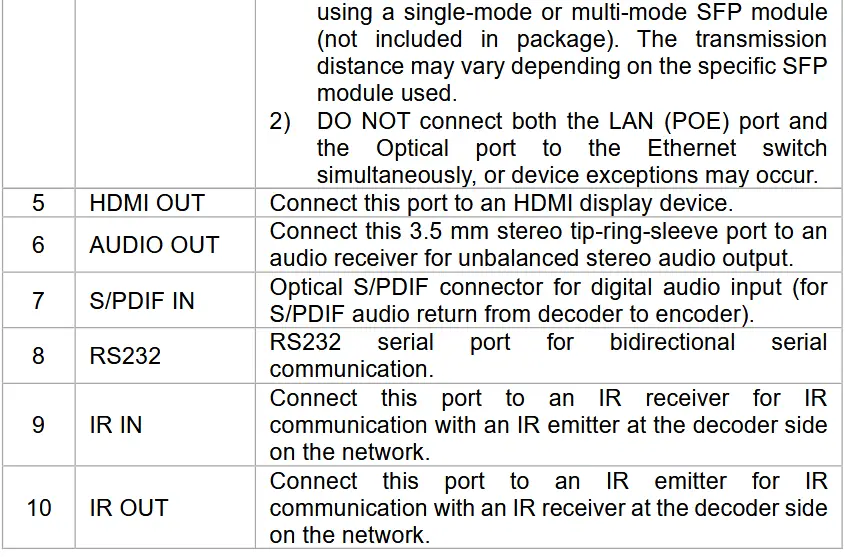
Panel Description
Encoder

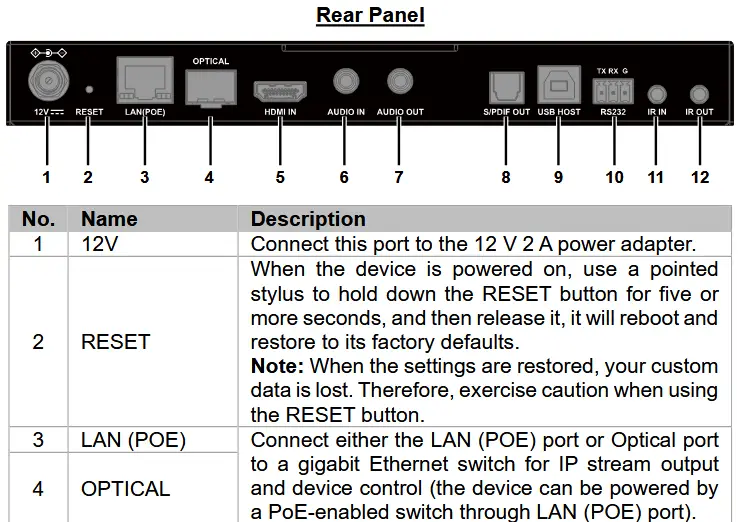
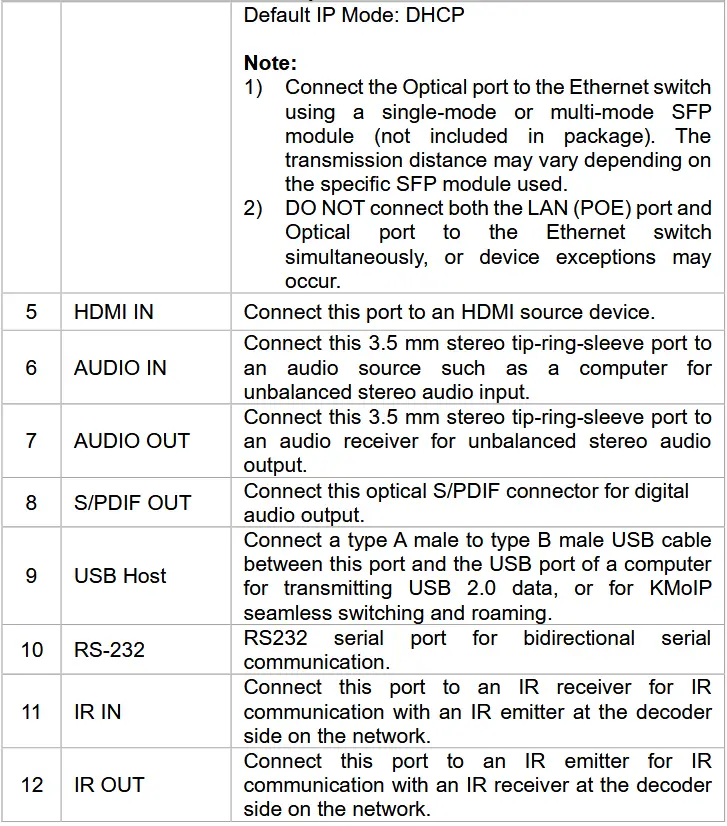
Decoder

Bracket Installation
Note: Before installation, ensure all devices are disconnected from the power source.
Steps to install the device on a suitable location:
- Attach the mounting brackets to the panels of both sides using the screws (two on each side) provided in the package.
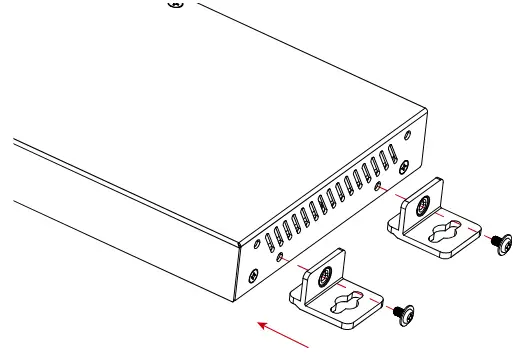
- Install the brackets onto the position as desired using the screws (not included).
Note: The installation of encoders and decoders is similar.
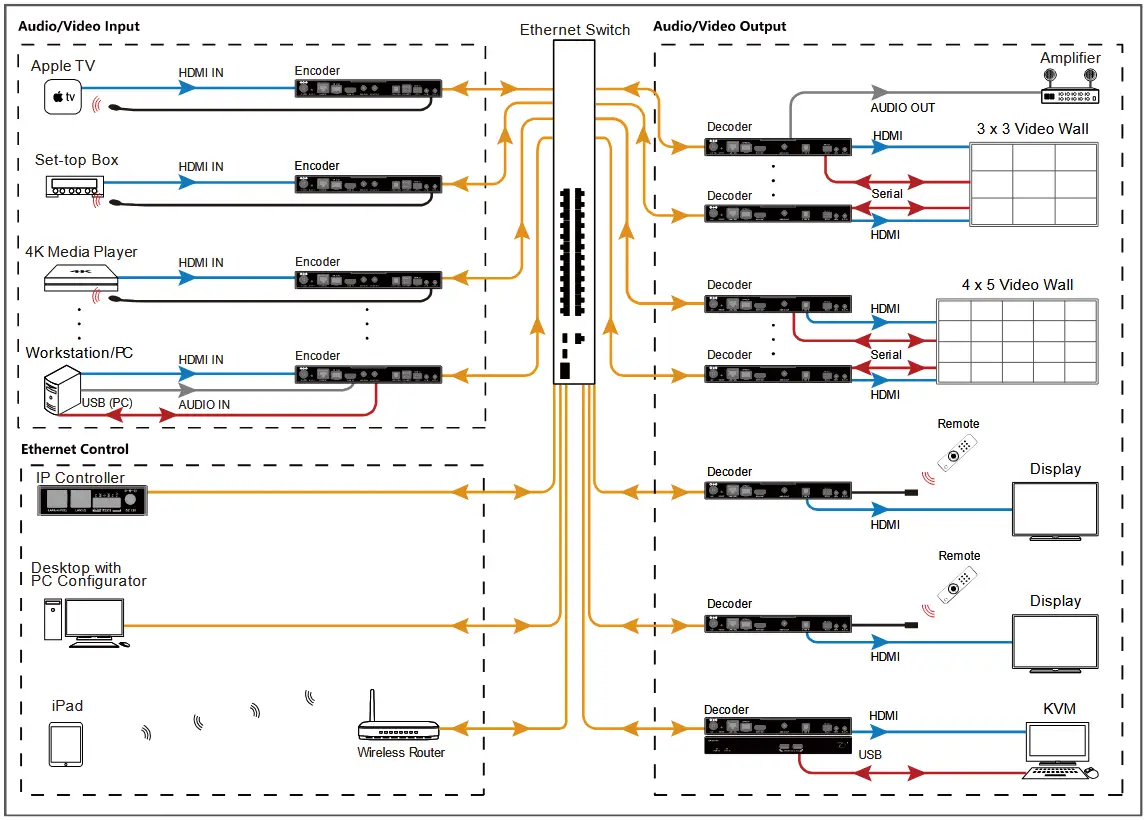
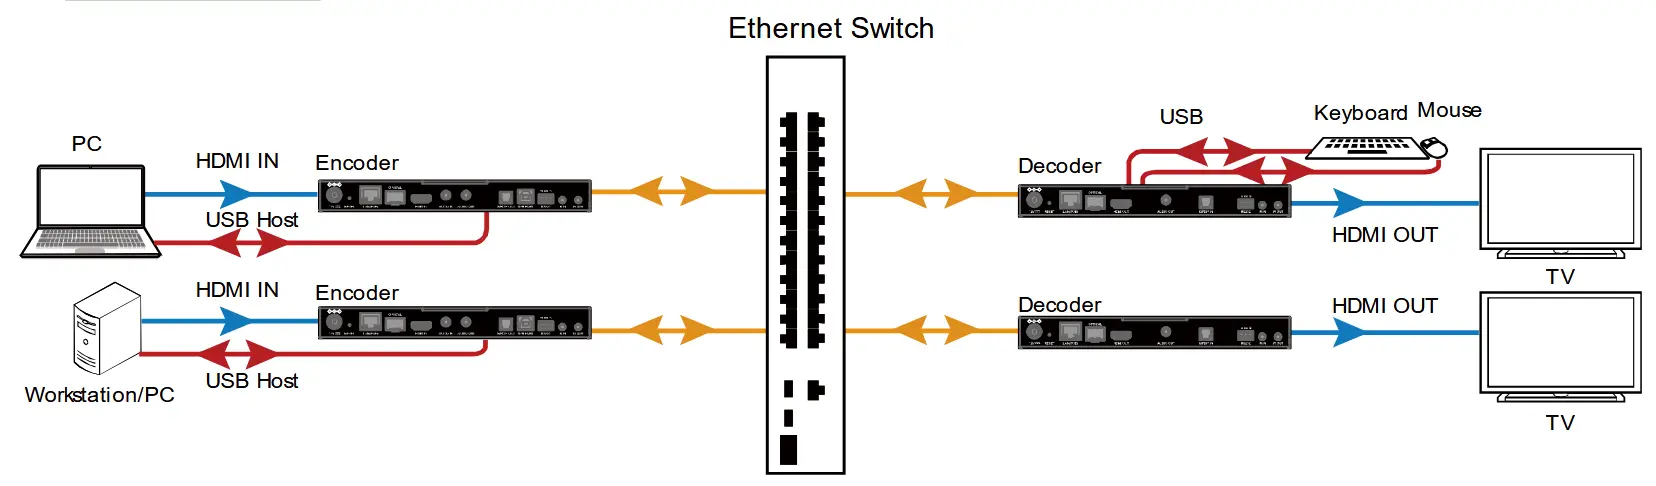
Typical Applications
Scenario 1
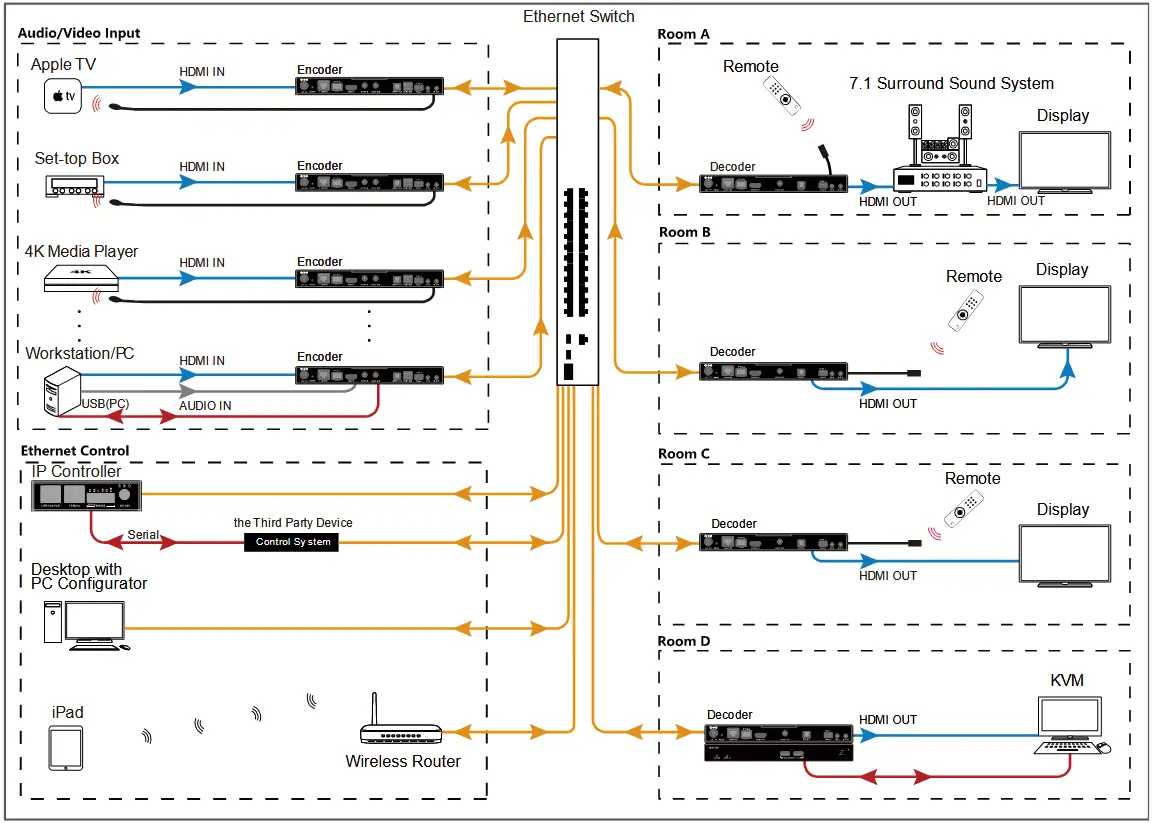
Scenario 2
Hardware Installation
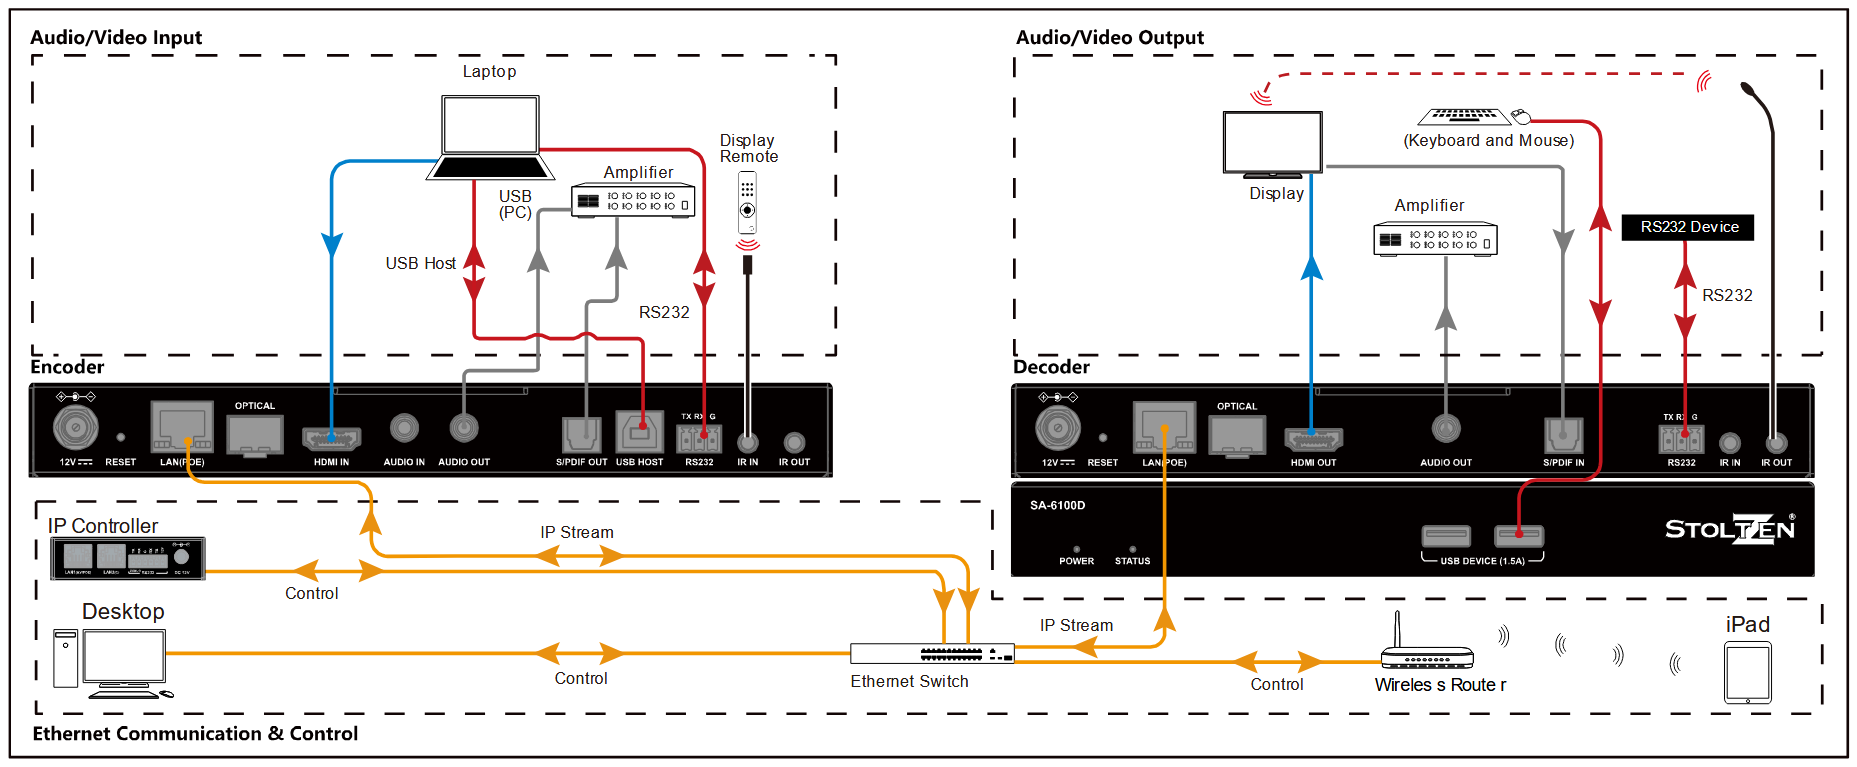
Note:
If the Ethernet switch doesn’t support PoE, connect encoders and decoders to their power adapters.
Operating the Devices
Introduction to Different Operation Tools
The SA-6100E encoders and SA-6100D decoders allow you to use Apollo Configurator, Apollo Visual Composer Touch and IP controller SA- C to manage and control them. This section briefly introduces how to route the video from source to the display using these tools. By default, audio, video together with IR, and USB signals are routed as a whole. For more information, see their guides.
The following tables describes how audio, video together with IR, and USB signals are routed using all the different tools.
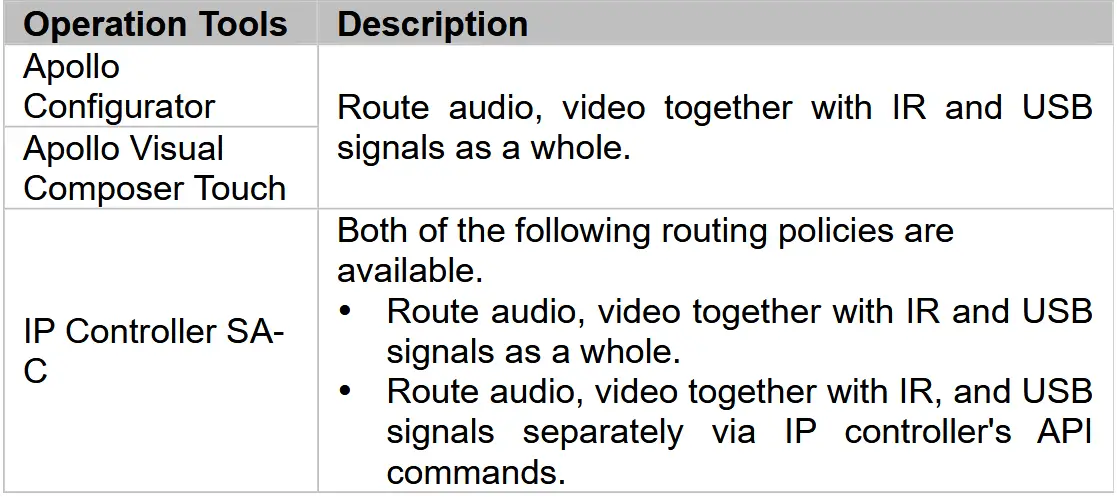
Note:
When audio, video together with IR, and USB signals are routed separately via IP controller’s API commands, they can be routed as a whole using other operation tools.
Performing Fast Switching
The fast video switching function is that when a source change is implemented the switch occurs very quickly and appears seamless to the human eye with the latency of one second only. However, users shall meet several requirements prior to realize fast switching, otherwise video switching may take longer (approx. 5~7 seconds), and black out screen would arise.
Before You Start
Complete the following requirements before performing fast video switching:
- Verify you have the firmware version of 1.3.x or higher for the decoders and all of which use the same version.
- Verify that the latest video source to be input MUST has the same video timing as current video source, including:
a. Same resolution and refresh rate (e.g. all with 1080p@60Hz).
b. Switching from HDMI to DVI timing is also available. (DVI to HDMI will cause black screen issue.)
c. Same scanning mode (interlace/progressive).
d. Same HDMI info frame (e.g. switch between 2D and 2D, or 3D and 3D).
e. Same color space.
f. Same color depth.
g. Decoders that are set for forced scaler output are exempt from the requirement:
set astparam “v_output_timing_convert” as expected output. For more information, refer to the separate document “API”. - Verify that the same HDCP mode is applied on all sources. Switching between HDCP and non-HDCP will cause black screen issue.
a. Decoders that are set for forced HDCP output are exempt from the requirement: set astparam ‘hdcp_always_on’ and ‘hdcp_always_on_22’ as expected output. For more information, refer to the separate document “API”. - Verify that all sources are with support of SDR instead of HDR; switching between SDR and HDR (including HDR10 / HDR10+ / Dolby Vision) will result in black screen.
e.g.
SDR → SDR: ✔ (fast switching)
SDR → HDR10 / HDR10+ / Dolby Vision: ×(black screen occur)
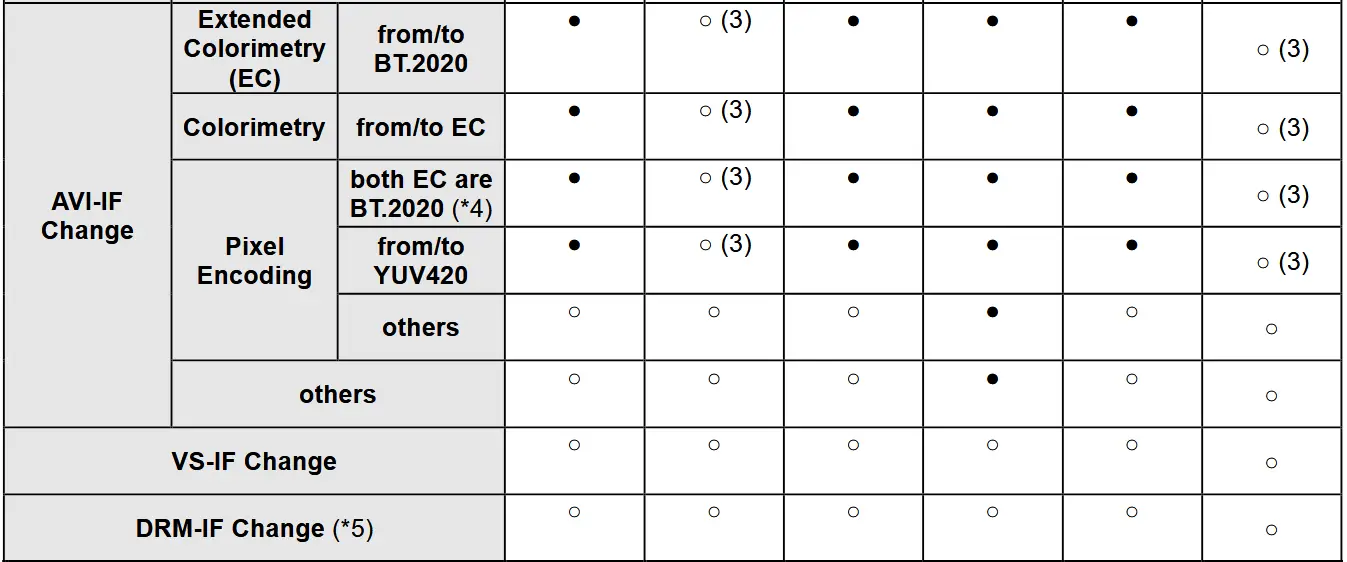
The following table lists different cases in which whether black screen encounters or not.
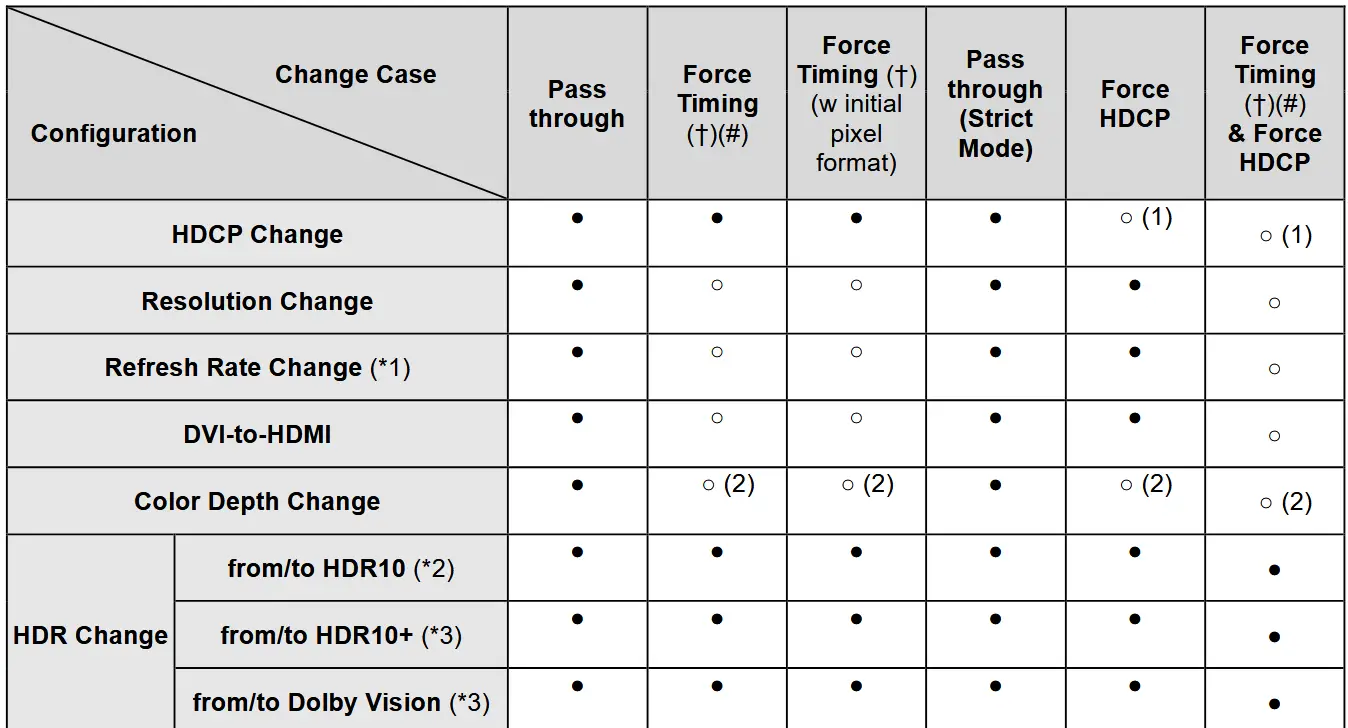
Note:
Pixel Encoding: RGB/YUV444/YUV422/YUV420
Colorimetry: BT709/BT.601
● – Do re-configure whole Video Output, black screen occurs.
○ – Do not re-configure whole Video Output, black screen doesn’t occur.
*1 – NTSC/non-NTSC case (i.e., 59.94/60Hz, 29.97/30Hz …etc.) is not included.
*2 – Need to re-configure whole Video Output to avoid incorrect brightness issue.
*3 – Need to re-configure whole Video Output to avoid video sink (TV) compatibility issue.
*4 – Need to re-configure whole Video Output to solve incorrect HDR display with specific player.
*5 – YouTube HDR switching behavior; a few monitors always display black screen during video change even if that monitor directly connects to the video source.
† – video output will keep in the specified video resolution and refresh rate defined in forced-timing configuration when whole Video Output is re-configured.
# – default pixel encoding is RGB 8 bits. Can be configured to YUV444/YUV422 by setting astparam,
v_output_timing_convert, BIT [29] and BIT [22:21]. Please refer to document “API” for details.
(1) HDCP level stays in what user defined.
(2) Keep the same color depth as what it was set on previous “whole Video Output configuration”.
(3) Users may see something a little bit different if compared to the output from original source.
Configuring Mouse Roaming
SA-6100E encoders and SA-6100D decoders support Mouse Roaming. With configuration on Apollo Configurator, you can move the mouse to the edge of the screen to control different computers in a system. They support one set of mouse and keyboard to control up to 16 host computers.
Here takes the 2 x 1 video wall for example.
To configure Mouse Roaming, perform the following
- Connect one computer to the HDMI IN and USB Host ports of each TX; and one set of mouse and keyboard to the USB Device1 ports of one RX.
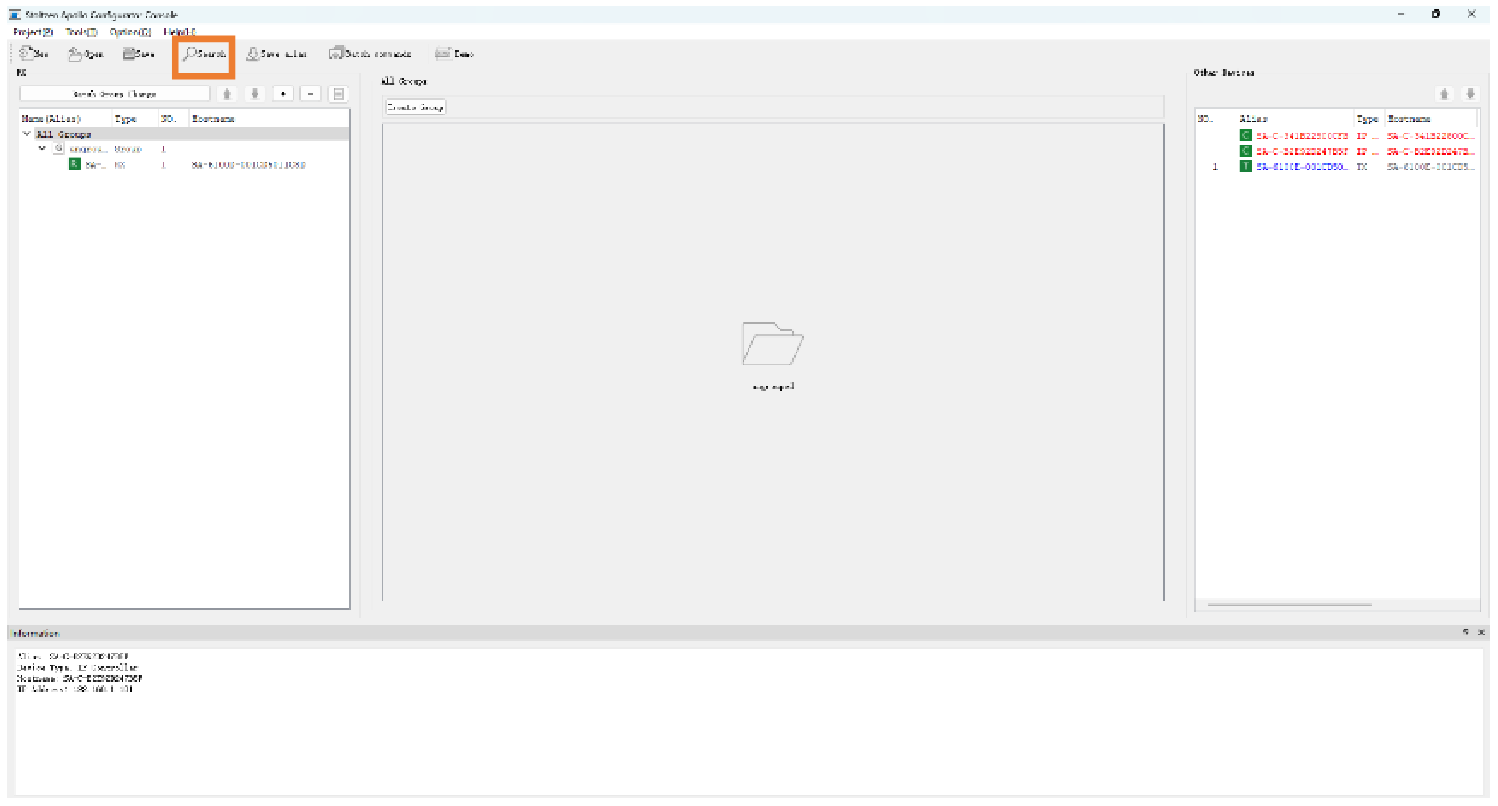
- Launch the Apollo Configurator.exe on your computer to open its main page. (Ensure your PC, TX and RX are on the same subnet.) Click Search to search for online devices.
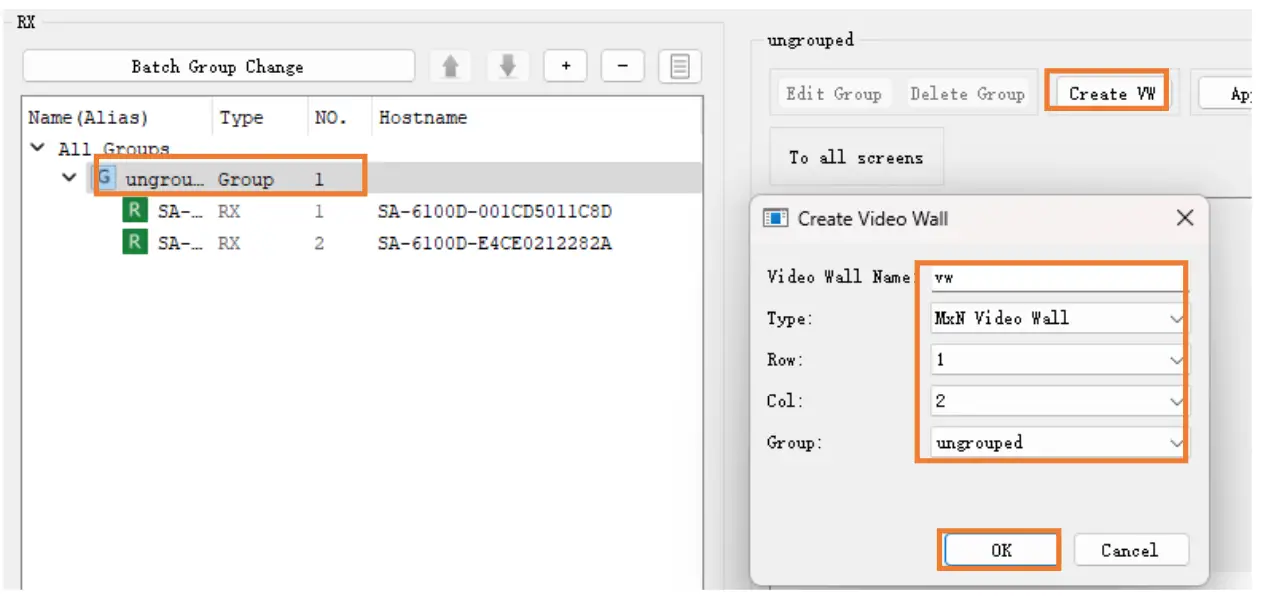
- Create a video wall.
Click ungrouped in the RX list > Create VW > enter the video wall name and specify rows and columns > OK.
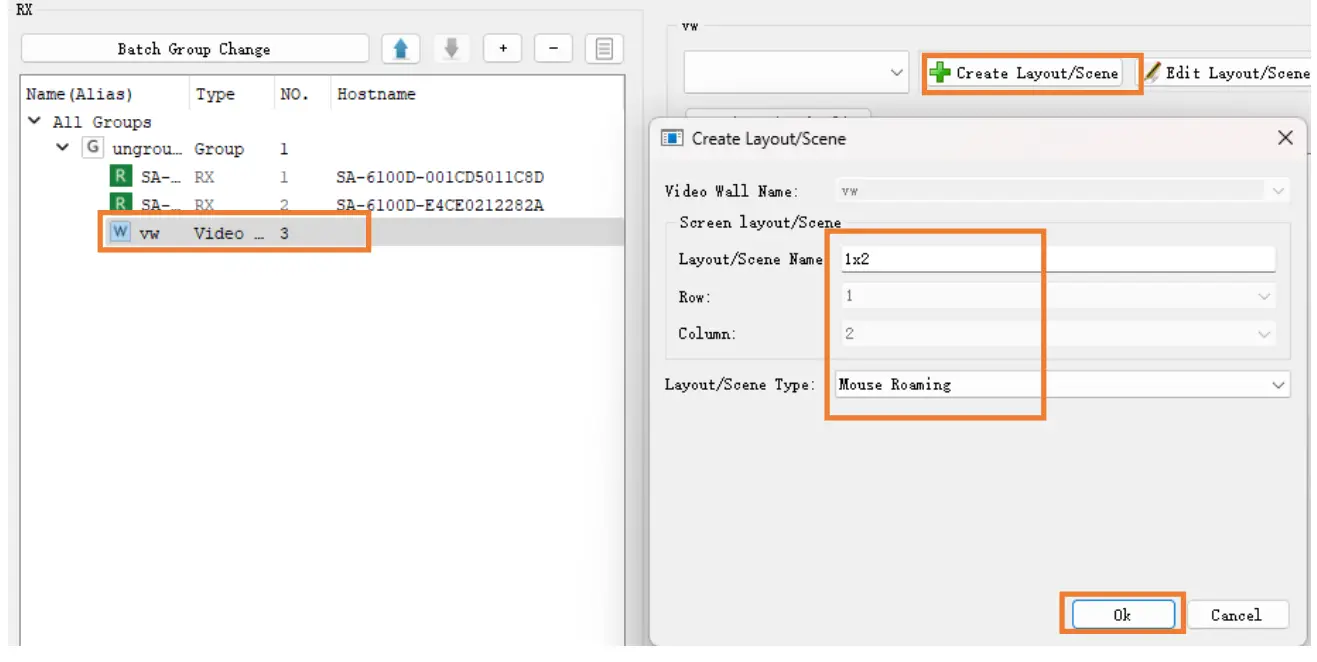
- Create a layout for the video wall.
Click VW in the RX list > Create Layout/Scene in the working area > specify a name for this layout and choose Mouse Roaming > OK.
- Configure RX and TX for the created layout.
Drag RXs from the RX list and TXs from Other Devices area to display tiles in the working area. - Configure Master and Slave.
Right click the RX to which the mouse and keyboard are connected and choose Select Master > right click the other RX and choose Select Slave > Click Apply > OK.
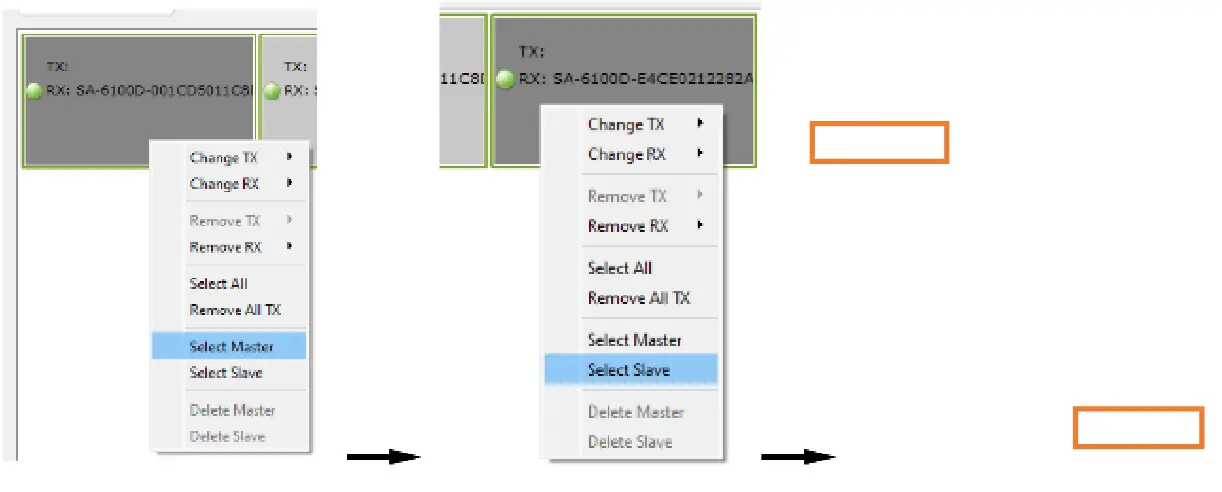
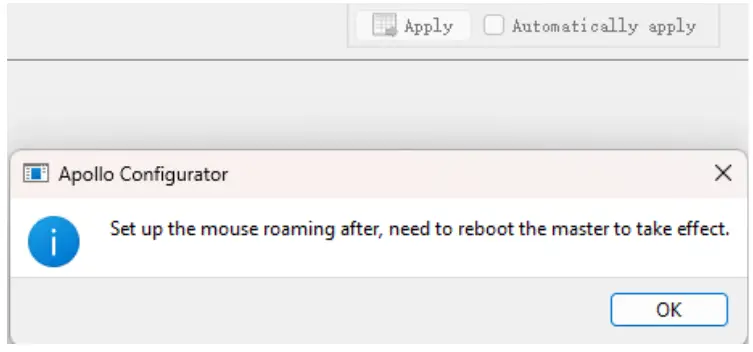
Note: To cancel Select Master (or Select Slave) setting, right click on the RX and choose Delete Master (or Delete Slave). - Reboot the RX for the Mouse Roaming configuration to take effect. Select Batch Commands > Others > select RX device > Reboot > Apply.
Please wait for a few seconds for the RX device to reboot.
Now you can use the Master Roaming mouse to control both computers.
Configuring before HDR10/Dolby Vision Signal Input
SA-6100E and SA-6100D support HDR10 and Dolby Vision only if the device’s HDMI Timing Hybrid is set to “Pass-through” mode (default setting).
Before you input HDR10/Dolby Vision video, ensure the source and all displays support HDR10/Dolby Vision, and follow the steps below to configure the decoder(s) through Apollo Configurator:
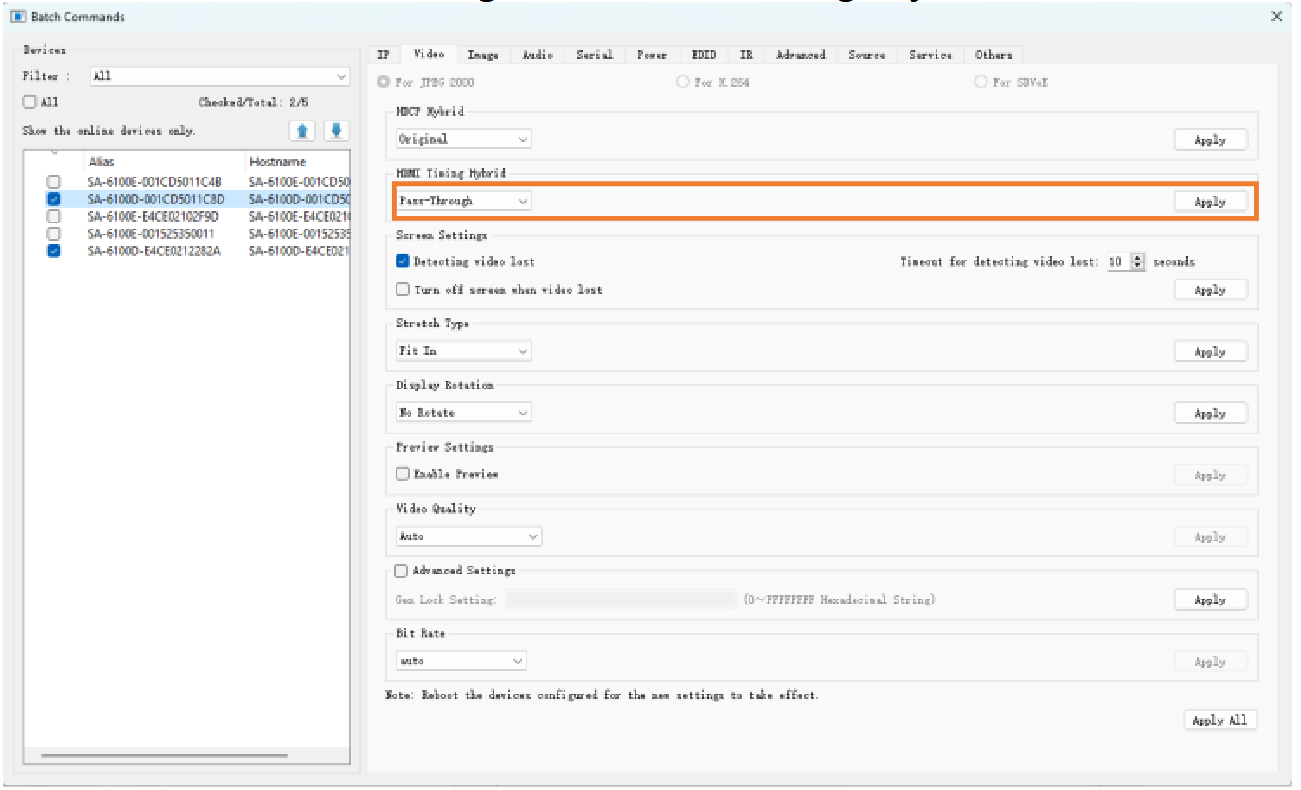
- On the Apollo Configurator, click Batch Commands to open Batch Commands window:
Click Video Tab > Choose SA-6100D devices in the Devices list > Click Pass-Through from the dropdown list in HDMI Timing Hybrid region > click Apply.
Note: The default setting for HDMI Timing Hybrid is Pass-Through.
- Reboot the above devices for new settings to take effect.
- Upload an EDID file of HDR10 or Dolby Vision to specific encoder. Limitation: The video preview’s color in Dolby Vision Standard mode may go wrong.
Firmware Upgrade
You can use Apollo Maintenance Tool to update the encoders and decoders to their latest versions to obtain new features. For more information, see the user guide of Apollo Maintenance Tool.
![]()
Tel: +47 22 90 37 00 | http://www.stoltzen.eu
Sales: sales@stoltzen.eu | Technical: support@stoltzen.eu
Address: Dronning Mauds Gate 15, 0250 OSLO, Norway
Documents / Resources
 |
STOLTZEN SA-6100E,SA-6100D HDMI Over IP Encoder and Decoder [pdf] User Manual SA-6100E, SA-6100D, SA-6100E SA-6100D HDMI Over IP Encoder and Decoder, SA-6100E SA-6100D, HDMI Over IP Encoder and Decoder, IP Encoder and Decoder, Encoder and Decoder, and Decoder |