
step2bed mini
Assembly Instructions
www.step2health.com
www.facebook.com/step2bed
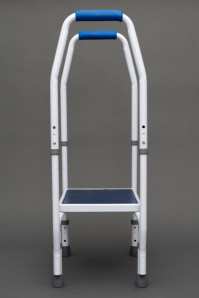
1. Place all parts on a flat working surface. Remove all plastic wrap, corner step protectors and foam wrapping before assembly.
2. Slide the legs into the base of the step stool making sure the brass tension tabs lock into place.
3. Repeat the process with all the four legs and set the step stool upright.
4. Insert the two handles into the legs making sure the handles are the same height by pushing in the brass tab adjustments.
Note: Make sure these are locked in place before using. The legs are adjustable to three positions by 1″ increments.
5. To adjust height, press in each brass tab on each leg to adjust the height of the leg making sure all four legs are the same height.
WARNING: Never use the step2bed mini unless the brass tabs are securely locked in place to avoid serious injury.
Always check the brass tabs prior to using the step stool.
6. Customize height of the step stool in increments of 1″ and the handle by 1/2“.
Thank you again for purchasing the step2bed mini! We hope it helps you and your loved ones like it has so many other families.
(1) Velcro
![]()
As a courtesy, we have also included velcro in this unit in order to make the step2bed mini even more stable.
SAFETY FIRST!
Please note that the velcro should not impede the use of the step2bed mini or cause any tripping hazard.

1. The velcro should be wrapped beneath the step-on and around the back legs closest to the bed.

2. Next, wrap the other end around the bed frame, securely fastening the velcro ensuring a firm grip.

step2 healthTM
Documents / Resources
 | step2bed mini |
References
- User Manualmanual.tools