StarTech com PR22GIP-NETWORK-CARD 2-Port PCIe 2.5GBase-T Ethernet PoE Network Adapter Card
Product Information
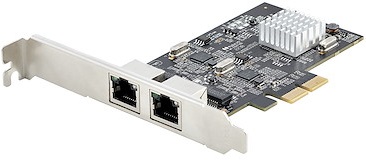
- Product Name: 2-Port PCIe 2.5GBase-T Ethernet PoE Network Adapter Card – Intel
- Product ID: PR22GIP-NETWORK-CARD
- Connectivity: 2 Ethernet Ports
- Power Connector: PCIe Power Connector, LP4 Power Connector
- Power Over Ethernet (PoE) LED Indicator
Product Usage Instructions
Installation
- Turn off the Host Computer and any Peripheral Devices.
- Unplug the Power Cable from the Host Computer.
- Remove the Cover from the Host Computer Case.
- Locate an open PCI Express Slot and remove the corresponding Slot Cover Plate.
- Gently insert the PCI Express Card into the Slot and fasten the Bracket.
- Connect 8-Pin PCIe or LP4 Power from the Host Computer’s Power Supply to the corresponding Power Connector on the Network Card.
- Reinstall the Cover on the Host Computer Case.
- Reconnect the Power Cable and all Peripheral Devices.
- Power on the Host Computer and connected Peripheral Devices.
- Connect an Ethernet Cable to the Ethernet Port on the Network Card.
Driver Download and Installation:
- Navigate to www.StarTech.com/PR22GIP-NETWORK-CARD.
- Click on the Drivers & Downloads tab.
- Download the Driver Package for Windows under Driver(s).
- Extract the downloaded Driver Package and follow the on-screen instructions.
- Refer to Intel_Windows_DIG file for further Installation Instructions.
Verify Driver Installation:
For Windows
- Navigate to Device Manager.
- Under Network Adapters, confirm proper installation of Intel Ethernet Controller I225-V.
For Linux:
Note: Ensure that kernel 5.8 or higher is being used. Execute ‘uname -r’ from the terminal prompt to check the kernel version.
product overview
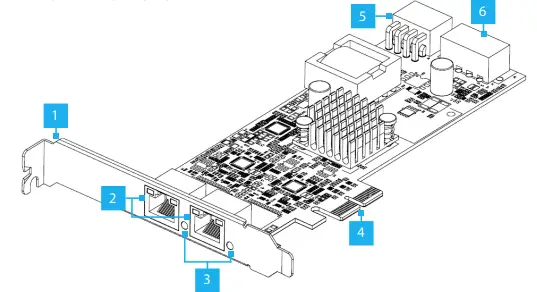
| Port/LED/Connector | Function | |
| 1 | Bracket | • Secures the card to the Host Computer Case
• The Full Profile Bracket comes pre-installed • The Low Profile Bracket is included |
| 2 | Ethernet Ports | • Connect an Ethernet Cable to the Network Card
• Supports 2.5Gbps, 1Gbps, 100Mbps, and 10Mbps • Supports IEEE 802.3at and IEEE 802.3af • Right LED Indicator is Link Speed • Solid Green: 2.5 Gbps • Solid Amber: 1 Gbps • Off: 10/100Mbps • Left LED Indicator is Link Status • Solid Green: Active link • Flashing Green: Activity |
| 3 | Power Over Ethernet (PoE) LED Indicator | • Solid Green: PoE has been negotiated and power is being supplied to the Powered Device
• Off: No power output has been negotiated |
| 4 | PCIe 2.0 x2 Connector | • Insert into a PCI Express Slot on the Host Computer |
| 5 | PCIe Power Connector | • Connect 8-Pin PCIe Power from the Host Computer’s Power Supply |
| 6 | LP4 Power Connector | • Connect LP4 Power from the Host Computer’s Power Supply |
Package Contents
- Network Card x 1
- Low Profile Bracket x 1
- Quick-Start Guide x 1
Requirements
- For the latest requirements, please visit www.StarTech.com/PR22GIP-NETWORK-CARD
- Host Computer with an available PCI Express 2.0 or greater slot (x2, x4, x8, or x16)
Installation
- Install the PCI Express Card
WARNING! Static Electricity can severely damage PCI Express Cards. Ensure that you are adequately grounded before you open your Host Computer Case or touch the PCI Express Card. You should wear an Anti-Static Strap or use an Anti-Static Mat when installing any Host Computer component. If an Anti-Static Strap isn’t available, discharge any built-up static electricity by touching a large Grounded
Metal Surface for several seconds. Only handle the PCI Express Card by its edges, and don’t touch the gold connectors.
- Turn off the Host Computer and any Peripheral Devices that are connected to it (e.g. printers, external hard drives, etc.).
- Unplug the Power Cable from the back of the Host Computer.
- Disconnect any Peripheral Devices that are connected to the Host Computer.
- Remove the Cover from the Host Computer Case.
- Note: Consult the documentation that came with the Host Computer for details about doing this safely.
- Locate an open PCI Express Slot and remove the corresponding Slot Cover Plate from the back of the Host Computer Case.
- Gently insert the PCI Express Card into the open PCI Express Slot and fasten the Bracket to the back of the Host Computer Case.
- Note: If installing the PCI Express Card into a Small Form Factor or a Low Profile
- Desktop System, it may be necessary to replace the pre-installed standard Full Profile Bracket with the included Low Profile Bracket.
- Connect 8-Pin PCIe or LP4 Power from the Host Computer’s Power Supply to the corresponding Power Connector on the rear of the Network Card.
- Note: If 8-Pin PCIe or LP4 Power is not connected to the Network Card, Power over Ethernet (PoE) will be unavailable, but a data connection will still be established.
- Reinstall the Cover on the Host Computer Case.
- Reconnect the Power Cable to the Host Computer.
- . Reconnect all of the Peripheral Devices disconnected in Step 3.
- Power on the Host Computer and connected Peripheral Devices.
- Connect an Ethernet Cable to the Ethernet Port on the Network Card.
Download the Driver
- Navigate to: www.StarTech.com/PR22GIP-NETWORK-CARD
- Click the Drivers & Downloads tab.
- Under Driver(s), download the Driver Package for Windows.
- Note: Windows usually saves the files to the Downloads folder associated with the user account (e.g. C:\Users\useraccount\Downloads).
- Right-click the zipped Driver Package that was downloaded. Click Extract All.
- Follow the on-screen instructions to extract the files.
- Note: Be sure to make a note of the location where the drivers were extracted. That location will be used in later steps.
- Follow the instructions on the accompanying Intel_Windows_DIG file for further Installation Instructions.
Verify the Driver Installation
Windows
- Navigate to the Device Manager.
- Under Network Adapters, right-click Intel Ethernet Controller I225-V and click the Properties option.
- Confirm that the Driver is installed and working as expected. Linux
Note: Ensure that kernel 5.8 or higher is being used. Execute the following command from the terminal prompt to check the kernel version: uname -r.
- Open a Terminal Window and type the command sudo dmesg | grep Intel to check the Intel Driver Integration.
- If the drivers are present, the following entry should be present: Intel(R) 2.5G Ethernet Linux Driver
FCC
This equipment has been tested and found to comply with the limits for a Class B digital device, under Part 15 of the FCC Rules. These limits are designed to provide reasonable protection against harmful interference in a residential installation. This equipment generates, uses, and can radiate radio frequency energy and, if not installed and used by the instructions, may cause harmful interference to radio communications. However, there is no guarantee that interference will not occur in a particular installation. If this equipment does cause harmful interference to radio or television reception, which can be determined by turning the equipment off and on, the user is encouraged to try to correct the interference by one or more of the following measures:
- Reorient or relocate the receiving antenna.
- Increase the separation between the equipment and receiver.
- Connect the equipment to an outlet on a different circuit than the receiver.
- Consult the dealer or an experienced radio/TV technician for help.
Any changes or modifications not expressly approved by the party responsible for compliance could void the user’s authority to operate the device. If shielded interface cables are included with the product or if additional components or accessories are designated for use with the installation, they must be used to ensure compliance with FCC regulations.
This Class B digital apparatus complies with Canadian ICES-003.
This device complies with ISED Canada licence-exempt RSS standard(s). Operation is subject to the following two conditions:
- This device may not cause interference, and
- This device must accept any interference, including interference that may cause undesired operation of the device.
Warranty Information
This product is backed by a two-year warranty.
For further information on product warranty terms and conditions, please refer to www.startech.com/warranty.
More Info
- StarTech.com Ltd.
- 45 Artisans Crescent London, Ontario N5V 5E9
Canada
- StarTech.com Ltd.
- Unit B, Pinnacle 15 Gowerton Road Brackmills, Northampton NN4 7BW
United Kingdom
- StarTech.com LLP
- 4490 South Hamilton Road Groveport, Ohio 43125
U.S.A.
- StarTech.com Ltd.
- Siriusdreef 17-27 2132 WT Hoofddorp
Frequently Asked Questions
- Q: What should I do if Power over Ethernet (PoE) is not available after installation?
- A: Ensure that the 8-Pin PCIe or LP4 Power is connected from the Host Computer’s Power Supply to the corresponding Power Connector on the Network Card. PoE requires this connection for operation.
- Q: Where can I find additional support resources for the product?
- A: Visit www.startech.com/support for manuals, FAQs, videos, drivers, downloads, and technical drawings related to the product.
Documents / Resources
 |
StarTech com PR22GIP-NETWORK-CARD 2-Port PCIe 2.5GBase-T Ethernet PoE Network Adapter Card [pdf] User Guide PR22GIP-NETWORK-CARD 2-Port PCIe 2.5GBase-T Ethernet PoE Network Adapter Card, PR22GIP-NETWORK-CARD, 2-Port PCIe 2.5GBase-T Ethernet PoE Network Adapter Card, Ethernet PoE Network Adapter Card, PoE Network Adapter Card, Network Adapter Card, Adapter Card |