StarTech com I16T2 4-Way Privacy Screen for iPhone

Specifications
- Product Name: iPhone Privacy Filters – Tempered Glass
- Components: 1 Applicator Frame, 2 Pressure Window, 3 Application Tab
- Function: Privacy filter for iPhone screens
Installation Instructions
- Ensure that the screen is thoroughly cleaned with the included Screen Cleaning Kit prior to installation.
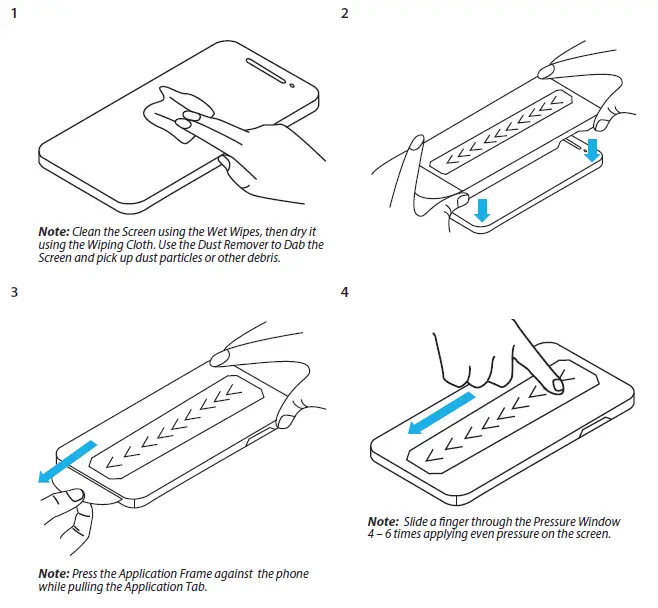
- Clean the screen using the Wet Wipes, then dry it using the Wiping Cloth. Use the Dust Remover to dab the screen and pick up dust particles or other debris.
- Press the Application Frame against the phone while pulling the Application Tab.
- Lift the Application Frame slowly to remove the top protective film.
- If bubbles are present, wait 15 seconds before using the Squeegee to push them toward the edges for removal.
Installation Instructions for iPhone Privacy Filters – Tempered Glass
Top View
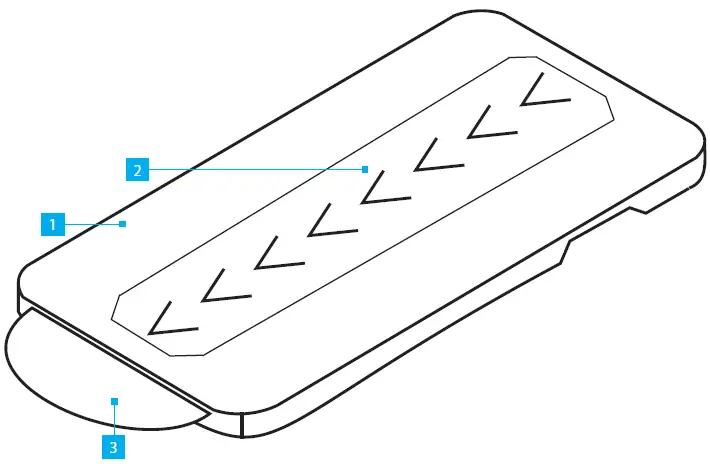
| Components | Function | |
| 1 | Applicator Frame | • Exact fit to the specific phone model
• Place on top of the phone before installation |
| 2 | Pressure Window | • Use to apply pressure onto the Privacy Filter during installation for even adhesion onto the screen |
| 3 | Application Tab | • Chevrons along the Pressure Window indicate the pulling direction of the Application Tab |
Requirements
For the latest manuals, product information, technical specifications, and declarations of conformance, please visit: www.StarTech.com/support
Compatible phone
Package Contents
- Filter Applicator x 1
- Screen Cleaning Kit x 1
- Squeegee (included with some models) x 1
- Quick-Start Guide x 1
Installation
Note: Ensure that the Screen is thoroughly cleaned with the included Screen Cleaning Kit before installation.
Dust, lint, or debris trapped between the screen and the privacy filter may cause bubbles or visual distractions, which can be more noticeable depending on the displayed content.
- Note: Clean the Screen using the Wet Wipes, then dry it using the Wiping Cloth. Use the Dust Remover to Dab the Screen and pick up dust particles or other debris.
- Note: Press the Application Frame against the phone while pulling the Application Tab.
- Note: Slide a finger through the Pressure Window 4 – 6 times, applying even pressure on the screen.
- Note: Lift the Application Frame slowly to remove the top protective film.
- Note: If bubbles are present, wait 15 seconds before using the Squeegee to push them toward the edges for removal.

HQ Contact:
- StarTech.com Ltd.
- 45 Artisans Crescent, London, ON N5V 5E9, Canada
US Contact:
- StarTech.com USA LLP
- 4490 South Hamilton Rd, Groveport, OH 43125, United States
UK Contact:
- StarTech.com Ltd.
- 15 Gowerton Rd, Northampton, NN4 7BW, United Kingdom
FAQs
- Q: What should I do if bubbles appear after installation?
A: If bubbles are present, wait 15 seconds before using the Squeegee to push them toward the edges for removal. - Q: How can I get additional support?
A: For additional self-service support options and community forums, please visit: www.StarTech.com/support
Documents / Resources
 |
StarTech com I16T2 4 Way Privacy Screen For iPhone [pdf] Installation Guide I16T2-PRIVACY-SCREEN, I16T3-PRIVACY-SCREEN, I16T1-PRIVACY-SCREEN, I16T2 4 Way Privacy Screen For iPhone, I16T2, 4 Way Privacy Screen For iPhone, Privacy Screen For iPhone, Screen For iPhone |