1. Selelekela
This manual provides essential information for the installation, operation, and maintenance of your ASUS ROG Strix RX Vega 64 graphics card. Please read this manual thoroughly before using the product to ensure proper setup and to maximize its performance and longevity. This graphics card is designed for high-performance computing and gaming, leveraging AMD's Vega architecture and 8GB of HBM2 memory.
2. Boitsebiso ba Tšireletseho
Observe the following safety precautions to prevent damage to the graphics card or injury to yourself:
- Kamehla hakolla phepelo ea motlakase komporong ea hau pele o kenya kapa o tlosa lisebelisoa life kapa life.
- Tšoara karete ea litšoantšo ka mathōko a eona ho qoba ho ama likarolo tse bonolo.
- Netefatsa hore mobu o tsitsitse hantle ho thibela tshenyo ya ho ntsha metsi ka motlakase (ESD).
- Do not twist or bend the graphics card during installation or removal.
- Ensure the PCI Express card socket locking mechanism on the motherboard is open before inserting or removing the graphics card.
- Avoid shaking and excessive movement of the PC system when the graphics card is installed. If bundled, the support bracket should be removed when the PC system is being moved.
- Install the card in a well-ventilated computer case to prevent overheating.
3. Likahare tsa Sephutheloana
Netefatsa hore lintho tsohle li teng ka har'a sephutheloana sa sehlahisoa sa hau:
- ASUS ROG Strix RX Vega 64 Graphics Card (Model: ROG-STRIX-RXVEGA64-O8G-GAMING)
- Karete ea Tiisetso
- Support DVD (containing drivers and utilities)
- Bukana ea Mosebelisi

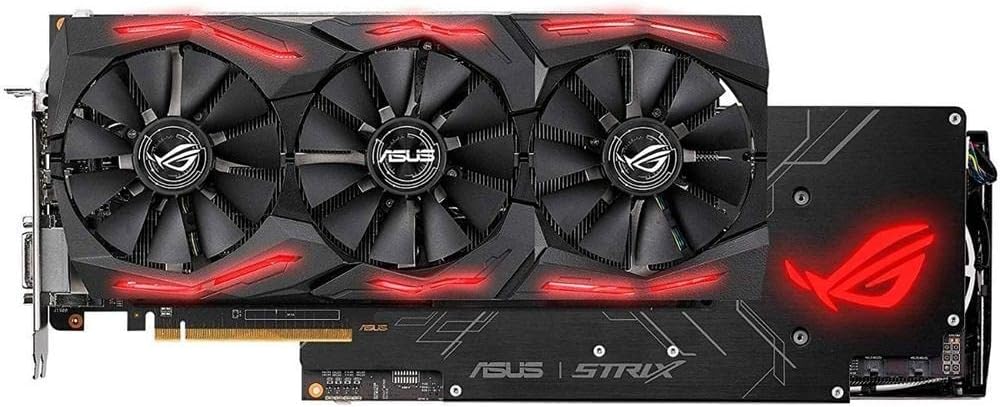
Figure 3.1: The ASUS ROG Strix RX Vega 64 graphics card shown alongside its retail packaging.
4. Ho seta le ho kenya
4.1. Ho Kena ka 'Meleng
- Lokisetsa sistimi ea hau: Turn off your computer and disconnect the power cable. Open the computer case.
- Locate the PCI Express slot: Identify an available PCI Express x16 slot on your motherboard.
- Remove slot covers: Remove the necessary slot covers from the back of your computer case corresponding to the graphics card's size.
- Kenya karete ea litšoantšo: Carefully align the graphics card with the PCI Express slot and press it down firmly until it is securely seated. The locking mechanism on the motherboard should click into place.
- Sireletsa karete: Fasten the graphics card to the computer case with screws.

Setšoantšo sa 4.1: E nang le angled view of the graphics card, highlighting its triple-fan cooling system and overall design.
4.2. Khokelo ea Matla
The ASUS ROG Strix RX Vega 64 requires two 8-pin PCI Express power connectors from your power supply. Ensure your power supply has sufficient wattage and available connectors.
- Locate the two 8-pin PCI Express power cables from your power supply.
- Connect these cables firmly into the corresponding power sockets on the graphics card.
Setšoantšo sa 4.2: Holimo view of the graphics card, showing the triple fans and the location of the power connectors.
4.3. Khokahano ea Pontšo
Connect your display monitor(s) to the appropriate output ports on the graphics card. This model features DisplayPort and HDMI outputs.

Figure 4.3: The I/O panel of the graphics card, displaying the DisplayPort and HDMI output options.
4.4. Ho kenya Software
After physical installation, power on your computer and install the necessary drivers and utilities.
- Kenya Drivers: Insert the provided Support DVD or download the latest drivers from the ASUS official website. Follow the on-screen instructions to complete the driver installation.
- Install GPU Tweak II: This utility allows for intuitive performance monitoring and control, including overclocking and fan speed adjustments.
- Install ASUS Aura Sync: For customizing the RGB lighting effects on your graphics card and synchronizing them with other Aura Sync compatible components.
5. Operating Your Graphics Card
5.1. Ts'ebetso ea Motheo
Once drivers are installed, your graphics card will automatically handle graphics processing for your system. For optimal performance in games and applications, ensure your operating system and game settings are configured to utilize the dedicated graphics card.
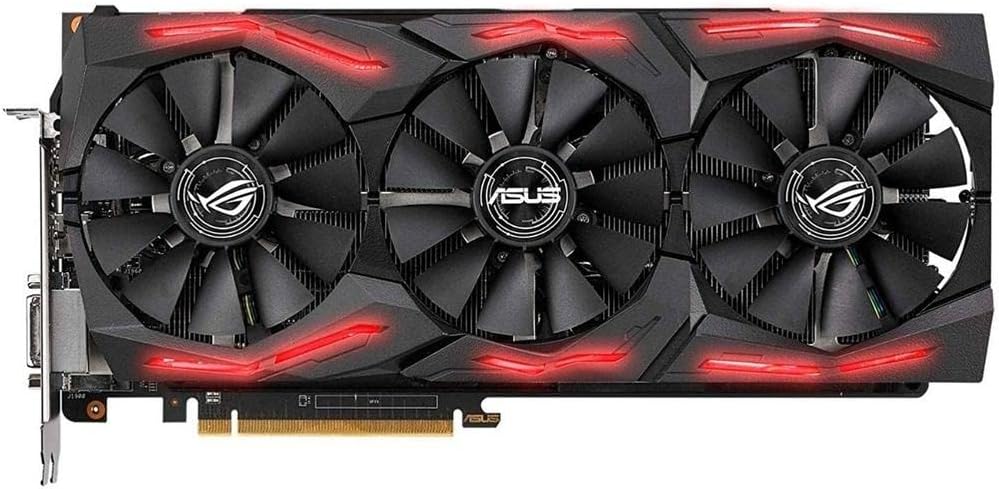
Setšoantšo sa 5.1: Pele view ea karete ea litšoantšo, pontšoasing the three fans and the customizable RGB lighting elements.
5.2. ASUS Aura Sync RGB Lighting
The graphics card features ASUS Aura Sync RGB lighting, allowing for personalized aesthetic customization. Use the ASUS Aura Sync software to choose from a spectrum of colors and various lighting effects. You can also synchronize these effects with other ASUS Aura Sync compatible devices in your system.
5.3. GPU Tweak II
GPU Tweak II is a powerful utility for advanced users to fine-tune their graphics card. It provides features such as:
- Overclocking: Adjust GPU clock speed and memory clock for increased performance.
- Taolo ea Balateli: Customize fan curves to balance cooling efficiency and noise levels.
- Tlhokomelo: Real-time display of GPU temperature, usage, and clock speeds.
- Papali ea Booster: Optimize system resources for gaming.
5.4. BIOS Switch Setting
The graphics card may feature a dual BIOS switch, offering different performance profiles. Refer to the quick installation guide or the support DVD for specific instructions on how to use this switch. Typically, these modes allow you to prioritize either maximum performance or quieter operation.

Figure 5.2: The backplate of the graphics card, featuring the ROG logo and providing structural support and heat dissipation.
6. Tlhokomelo
6.1. Ho hloekisa
Regular cleaning helps maintain optimal cooling performance and extends the lifespan of your graphics card.
- Netefatsa hore khomphutha e timme ebile e ntšitsoe pele e hlwekiswa.
- Use compressed air to gently remove dust from the fans and heatsink fins.
- Avoid using liquid cleaners directly on the card. If necessary, use a slightly damp, lint-free cloth for external surfaces.
6.2. Lintlafatso tsa Bakhanni
Periodically check the ASUS official website for the latest graphics drivers. Keeping your drivers updated ensures compatibility with new games and applications, and often provides performance improvements and bug fixes.
7. Ho rarolla mathata
If you encounter issues with your graphics card, consider the following common troubleshooting steps:
- Ha ho Pontšo:
- Netefatsa hore thapo ea monitor e hokahantsoe ka mokhoa o sireletsehileng le karete ea litšoantšo le monitor.
- Verify that the graphics card is fully seated in the PCI Express slot.
- Check that all necessary power connectors are securely attached to the graphics card.
- Lekola ka thapo e fapaneng ea ponts'o kapa sehlahlo ha ho khoneha.
- Ho se tsitse ha Sisteme/Ho robeha:
- Netefatsa hore phepelo ea hau ea motlakase e fihlela bonyane ba watttage requirements for the graphics card.
- Ntlafatsa li-driver tsa hau tsa litšoantšo hore e be mofuta oa morao-rao.
- Monitor GPU temperatures using GPU Tweak II to ensure it's not overheating. Improve case airflow if temperatures are high.
- Haeba li-overclocking li feta, khutlela ho li-setting tsa kamehla ho hlahloba botsitso.
- Tshebetso e Fosahetseng Lipapaling:
- Netefatsa hore bakhanni ba hau ba litšoantšo ba nakong.
- Check in-game graphics settings; reduce settings if performance is unsatisfactory.
- Verify that the graphics card is operating at its expected clock speeds using GPU Tweak II.
8. Litlhaloso
| Sebopeho | Lintlha |
|---|---|
| Brand | ASUS |
| Nomoro ea Mohlala | ROG-STRIX-RXVEGA64-O8G-GAMING |
| Coprocessor ea Graphics | Radeon Pro Duo |
| Chepe ea Chipset | AMD |
| Tlhaloso ea Karete | RADEON RX VEGA64 |
| Graphics RAM Size | 8GB HBM2 |
| Lebelo la memori | 945 MHz (Base), 1590 MHz (Boost) |
| Qeto ea Max Screen | 8192 x 8192 |
| Sebopeho sa Video Output | DisplayPort, HDMI |
| Boima ba Ntho | 3.5 liponto |
| Litekanyo tsa Sehlahisoa (LxWxH) | 11.73 x 2.07 x 5.47 lisenthimithara |
| Compatible OS Platforms | Windows 10 (32/64 bit), Windows 8.1 (32/64 bit), Windows 8 (32/64 bit), Windows 7 (32/64 bit) |
9. Tiisetso le Tšehetso
Your ASUS ROG Strix RX Vega 64 graphics card comes with a manufacturer's warranty. Please refer to the included Warranty Card in your package for detailed terms and conditions, including warranty period and coverage.
Bakeng sa tšehetso ea tekheniki, ho jarolla bakhanni, le tlhaiso-leseling e eketsehileng ea sehlahisoa, ka kopo etela tšehetso ea semmuso ea ASUS website. You may also find helpful resources and FAQs there.
ASUS Tšehetso Websebaka: www.asus.com/support/


