1. Важне информације о безбедности
Please read this manual carefully before using the Midea M9 Robot Vacuum Cleaner and retain it for future reference. Adhere to all safety warnings and instructions to prevent injury or damage.
- Овај уређај могу да користе деца узраста од 8 година и више и особе са смањеним физичким, сензорним или менталним способностима или недостатком искуства и знања ако су под надзором или инструкције у вези са употребом уређаја на безбедан начин и разумеју опасности које су укључене. .
- Деца треба да буду под надзором како би се осигурало да се не играју са уређајем.
- Чишћење и корисничко одржавање не смеју да врше деца без надзора.
- Користите само оригинални адаптер за напајање који је испоручио произвођач.
- Не користите роботски усисивач у влажним срединама или близу воде.
- Ensure the charging base is placed on a level surface against a wall, with clear space around it.
- Пре почетка рада уклоните све лабаве каблове, мале предмете или ломљиве предмете из подручја чишћења.
2. Садржај пакета
Verify that all items are present in the package. If any components are missing or damaged, contact customer support.
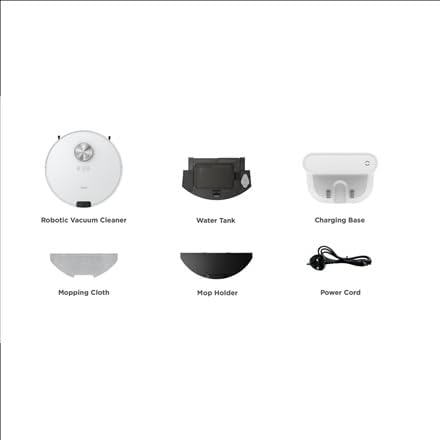
слика: Готовоview of the Midea M9 Robot Vacuum Cleaner's package contents. This image displays the main robotic vacuum cleaner unit, a water tank, a charging base, a mopping cloth, a mop holder, and a power cord.
- Роботски усисивач
- Резервоар за воду
- База за пуњење
- Моппинг Цлотх
- Држач мопа
- Повер Цорд
3. Производ је готовview
3.1 Врх View
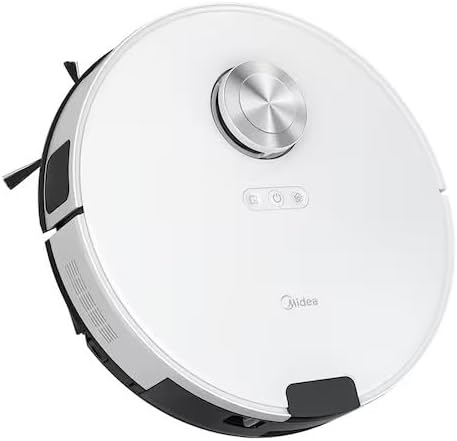
слика: Врх view of the Midea M9 Robot Vacuum Cleaner. This image shows the circular design of the robot, with a central LiDAR navigation sensor tower, power button, and other control indicators on its surface.
The top of the Midea M9 features the LiDAR navigation sensor, which allows the robot to map your home and navigate efficiently. It also includes control buttons for starting/pausing cleaning and returning to the charging base.
3.2 Дно View

слика: Дно view of the Midea M9 Robot Vacuum Cleaner. This image displays the two side brushes, the main rolling brush, the driving wheels, and the mopping pad attachment area.
The underside of the robot houses the main rolling brush, two side brushes for edge cleaning, driving wheels, and cliff sensors to prevent falls. The mopping pad attachment area is also visible.
4. Подешавање
4.1 Постављање базе за пуњење
- Place the charging base against a wall on a hard, level surface.
- Ensure there is at least 0.5 meters (1.6 feet) of clear space on both sides of the charging base and 1.5 meters (4.9 feet) in front of it.
- Connect the power cord to the charging base and plug it into a power outlet.
4.2 Почетно пуњење
- Place the robot vacuum onto the charging base, ensuring the charging contacts align.
- Allow the robot to charge completely before its first use. This typically takes 4-6 hours. The indicator light on the robot will change to indicate a full charge.
4.3 Повезивање са апликацијом (опционо)
- Download the Midea Smart app from your mobile device's app store.
- Follow the in-app instructions to connect your Midea M9 Robot Vacuum Cleaner to your home Wi-Fi network. This enables advanced features like remote control, scheduling, and cleaning mode selection.
5. Упутство за употребу
5.1 Покретање/заустављање чишћења
- Почети: Press the power button on the robot or use the Midea Smart app. The robot will begin cleaning in Auto mode.
- За паузирање: Press the power button again during cleaning.
- Заустављање/Повратак у базу: Press and hold the power button for a few seconds, or use the 'Return to Base' function in the app.
5.2 Режими чишћења
The Midea M9 offers various cleaning modes:
- Аутоматски режим: Робот интелигентно навигира и чисти цео ваш дом.
- Спот режим: Cleans a specific area more intensely. Place the robot in the center of the dirty area and activate Spot mode via the app.
- Едге Моде: The robot cleans along walls and furniture edges. Activate via the app.
5.3 Функција брисања
- Fill the water tank with clean water. Do not use detergents or cleaning solutions not approved by Midea.
- Attach the mopping cloth to the mop holder, then slide the mop holder with the cloth onto the water tank.
- Insert the assembled water tank and mop holder into the robot.
- The robot will automatically switch to mopping mode or combined vacuuming and mopping.
6. Одржавање
Редовно одржавање обезбеђује оптималне перформансе и продужава век трајања вашег роботског усисивача.
6.1 Dustbin and Water Tank Cleaning
- Испразните канту за отпатке након сваке употребе.
- Rinse the dustbin and filter with water as needed, ensuring they are completely dry before reinstallation.
- Empty and clean the water tank after each mopping session to prevent mold and odors.
6.2 Чишћење четкица
- Главна четка: Remove the main brush cover and lift out the brush. Use the cleaning tool to remove hair and debris. Clean weekly.
- Бочне четке: Check for tangled hair or debris. Remove and clean as needed. Replace if worn or damaged. Clean monthly.
6.3 Чишћење сензора
- Wipe the cliff sensors, wall sensors, and charging contacts with a clean, dry cloth monthly to ensure proper function.
КСНУМКС. Решавање проблема
Ако наиђете на проблеме, погледајте следеће уобичајене проблеме и решења:
| Проблем | Могући узрок | Решење |
|---|---|---|
| Робот не пуни | Charging contacts are dirty; Power adapter not connected; Robot not properly aligned with base. | Очистите контакте за пуњење; Уверите се да је адаптер за напајање прикључен; Поново поравнајте робота на бази за пуњење. |
| Робот се често заглављује | Loose cables or small objects on the floor; Robot stuck on high thresholds. | Clear obstacles from cleaning path; Use virtual walls or no-go zones in the app. |
| Лоше перформансе чишћења | Канта за прашину пуна; Четке замршене; Филтер зачепљен. | Испразните канту за прашину; Очистите главну и бочне четке; Очистите или замените филтер. |
| Робот не може да се повеже на Ви-Фи | Incorrect Wi-Fi password; Router too far; Only supports 2.4GHz Wi-Fi. | Verify password; Move robot closer to router; Ensure router is set to 2.4GHz. |
8. Спецификације
| Феатуре | Детаљ |
|---|---|
| Бранд | Мидеа |
| Назив модела | Мидеа М9 |
| Димензије (Д к Ш к В) | 32 к 32 к 10 цм |
| Тежина | 4 килограма |
| Посебне карактеристике | Smart mapping, Portable |
| Препорука за површину | Тепих |
9. Гаранција и подршка
За информације о гаранцији и техничку подршку, погледајте гарантни лист који је приложен уз ваш производ или посетите званичну веб страницу Midea. webсајт. Сачувајте рачун као доказ о куповини.


