1. Увод
This manual provides detailed instructions for the setup, operation, and maintenance of your KOORUI 27E6QCA 27-inch Curved QHD 180Hz Gaming Monitor. Please read this manual thoroughly before using the product to ensure proper functionality and to prevent damage.
2. Садржај пакета
Проверите да ли се све ставке наведене у наставку налазе у паковању вашег производа:
- 1 x KOORUI 27E6QCA Monitor
- 1 к кабл за напајање
- 1 x DisplayPort (DP) кабл
- 1 к Упутство за употребу
- 1 к адаптер за напајање
- 1 к постоље за монитор
- 1 к База монитора

Слика: Фронт view of the KOORUI 27E6QCA Curved Gaming Monitor, showcasing its 27-inch curved display and sleek design.
3. Производ је готовview
The KOORUI 27E6QCA is a 27-inch curved gaming monitor designed for an immersive visual experience. Key features include:
- Приказ: 27-inch VA Panel with 1500R curvature.
- Резолуција: QHD (2560x1440) for clear and detailed images.
- Брзина освежавања: 180Hz for smooth motion.
- Време одговора: 1ms (MPRT) to minimize motion blur.
- Гамут боја: 85% DCI-P3 for rich and accurate colors.
- Прилагодљива синхронизација: Compatible with Adaptive Sync technology to reduce screen tearing and stuttering.
- Заштита очију: Features like blue light filter and flicker-free technology for reduced eye strain.
- Повезивање: Multiple HDMI and DisplayPort inputs.
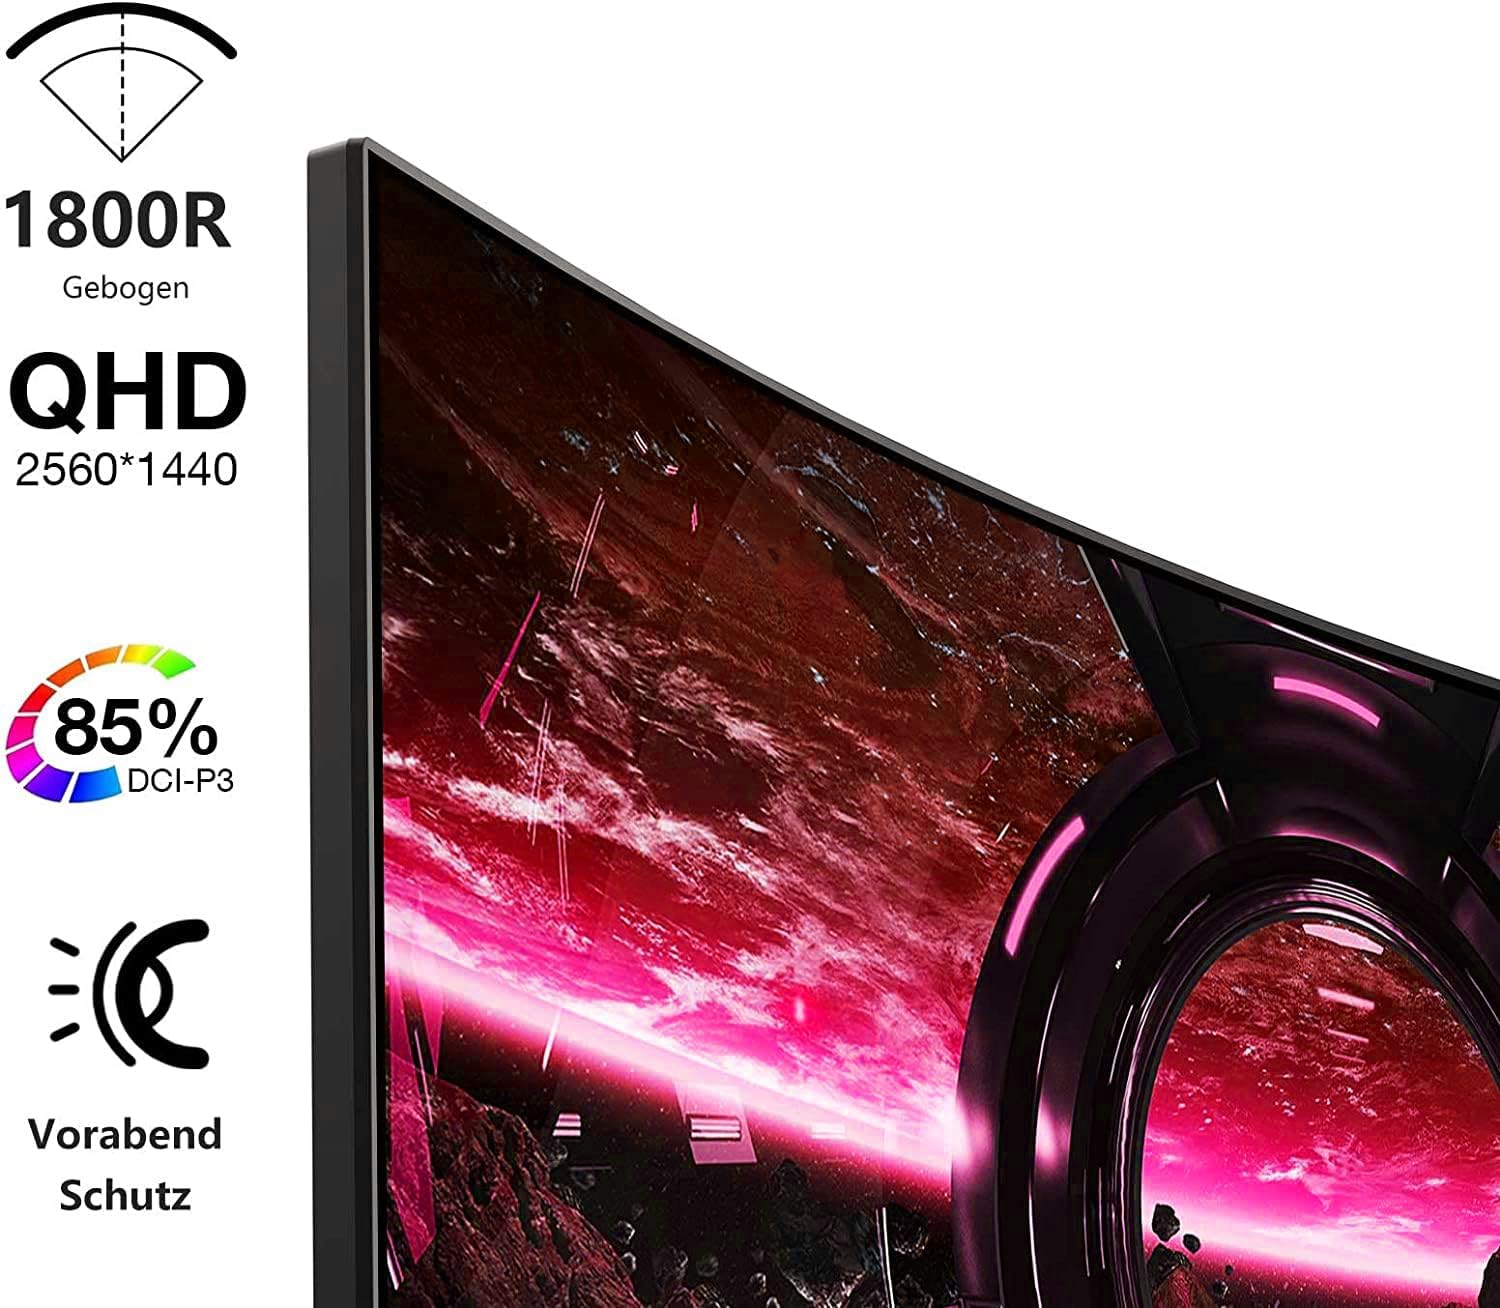
Image: Visual representation of the monitor's key features, including its 1500R curvature, QHD resolution (2560x1440), 85% DCI-P3 color coverage, and eye protection technology.
4. Упутства за подешавање
4.1 Састављање постоља
- Carefully remove the monitor, stand, and base from the packaging.
- Attach the stand to the base, ensuring it clicks securely into place or is fastened with the provided screw.
- Attach the assembled stand to the back of the monitor. Ensure the connection is firm.

Слика: Позади view of the KOORUI 27E6QCA monitor, showing the attachment point for the stand and the overall back panel design.
4.2 Повезивање са уређајем
The monitor supports HDMI and DisplayPort connections. Use the appropriate cable for your device.
- ДисплаиПорт (ДП): Connect one end of the DP cable to the DisplayPort output on your computer's graphics card and the other end to the DisplayPort input on the monitor. This connection is recommended for achieving the full 180Hz refresh rate and QHD resolution.
- ДВИ: Connect one end of an HDMI cable (version 1.4 or higher recommended) to the HDMI output on your device and the other end to one of the HDMI inputs on the monitor.
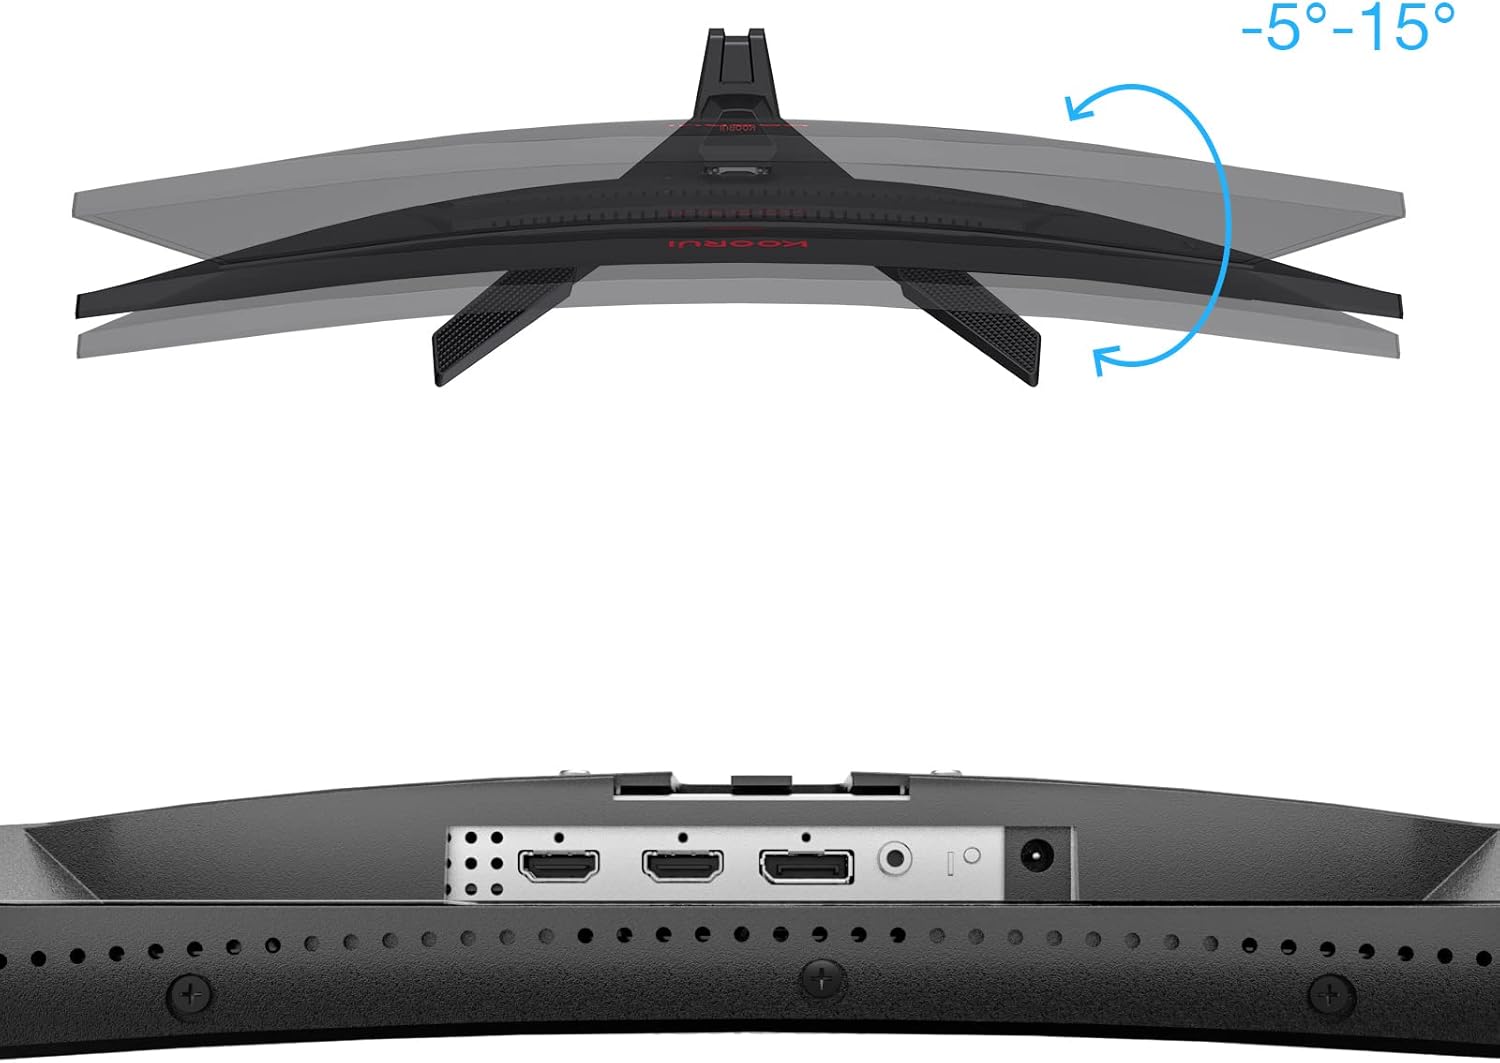
Слика: Крупни план view of the monitor's rear ports, including HDMI and DisplayPort inputs, along with an illustration of the monitor's tilt adjustment range (-5° to 15°).

Image: Diagram illustrating the monitor's compatibility with various devices such as PS5, Xbox, Laptops, and Nintendo Switch via its multiple connection interfaces.
4.3 Прикључак за напајање
- Прикључите адаптер за напајање на улаз за напајање монитора.
- Plug the power cable into the power adapter, then plug the other end of the power cable into a wall outlet.
5. Упутство за употребу
5.1 Укључивање/искључивање
- Укључено: Short press the multi-function joystick button located on the back of the monitor.
- Искључивање: Long press the multi-function joystick button for a few seconds.
5.2 Навигација кроз мени
The monitor features a single multi-function joystick button for navigating the On-Screen Display (OSD) menu.
- Access OSD: Short press the joystick button when the monitor is on.
- Навигација: Push the joystick left/right/up/down to move through menu options.
- Потврди: Притисните дугме џојстика да бисте потврдили избор.
- Повратак: Push the joystick up to go back to the previous menu or exit the OSD.

Image: Diagram illustrating the functions of the multi-function joystick button on the rear of the monitor: long press for power off, short press for power on, push left for minus, push right for plus, push up for return, and press for confirm.
5.3 Подешавања екрана
Adjust various display settings through the OSD menu:
- Осветљеност/контраст: Adjust image luminance and distinction.
- Подешавања боја: Промените температуру боје, гаму и засићеност.
- Режим слике: Изаберите један од унапред подешених режима (нпр. Стандардни, Игра, Филм, Текст).
- Подешавања игре:
- Прилагодљива синхронизација: Enable this feature to synchronize the monitor's refresh rate with your graphics card, reducing screen tearing and stuttering. Ensure your graphics card supports Adaptive Sync.
- Response Time (Overdrive): Adjust for faster pixel response, reducing ghosting.
- Режими игре: Specific modes like RTS, FPS, Reticle, and Timer are available to optimize visuals for different game genres.
- Извор уноса: Manually select between HDMI and DisplayPort inputs.
For optimal gaming performance, ensure your operating system's display settings are configured to the monitor's native resolution (2560x1440) and highest refresh rate (180Hz).
6. Одржавање
Правилно одржавање осигурава дуготрајност и перформансе вашег монитора.
- Чишћење екрана:
- Увек искључите монитор и извуците кабл за напајање пре чишћења.
- Користите меку крпу која не оставља длачицеampводом или специјализованим средством за чишћење екрана.
- Не прскајте средство за чишћење директно на екран.
- Избегавајте употребу абразивних средстава за чишћење, алкохола или раствора на бази амонијака.
- Чишћење Цasing: Користите меку, суву крпу да обришете монитор casing.
- вентилација: Уверите се да вентилациони отвори монитора нису блокирани како бисте спречили прегревање.
КСНУМКС. Решавање проблема
Ако наиђете на проблеме са монитором, погледајте следеће уобичајене кораке за решавање проблема:
7.1 Нема напајања
- Уверите се да је кабл за напајање безбедно повезан са монитором и утичницом.
- Проверите да ли утичница функционише тако што ћете укључити други уређај.
- Проверите да ли је адаптер за напајање правилно повезан.
7.2 Нема сигнала / Празан екран
- Confirm that the video cable (DP or HDMI) is securely connected to both the monitor and your computer/device.
- Уверите се да је изабран исправан улазни извор у OSD менију монитора.
- Check if your computer/device is powered on and not in sleep mode.
- Пробајте други видео кабл или порт ако је доступан.
7.3 Image Flickering or Tearing
- Enable Adaptive Sync in the monitor's OSD menu and ensure it is enabled in your graphics card settings.
- Verify that your graphics drivers are up to date.
- Check the refresh rate setting in your operating system's display settings. It should be set to 180Hz.
7.4 Ghosting or Motion Blur
- Adjust the "Response Time" or "Overdrive" setting in the OSD menu. Experiment with different levels to find the optimal balance.
- Ensure Adaptive Sync is enabled.
7.5 Нетачна резолуција или брзина освежавања
- Go to your operating system's display settings and set the resolution to 2560x1440 and the refresh rate to 180Hz.
- Ensure you are using a DisplayPort cable or an HDMI cable that supports these specifications.
8. Спецификације
| Феатуре | Спецификација |
|---|---|
| Бранд | КООРУИ |
| Број модела | 27E6QCA |
| Величина екрана | 27 инча |
| Панел Типе | VA |
| Закривљеност | 1500Р |
| Резолуција | QHD (2560 x 1440 пиксела) |
| Аспецт Ратио | 16:9 |
| Рефресх Рате | 180 Хз |
| Време одговора | 1 millisecond (MPRT) |
| Гамут боја | 85% ДЦИ-П3 |
| Однос контраста | 2000:1 |
| Повезивање | HDMI (x1), DisplayPort (x1) |
| Подешавање нагиба | -5° до 15° |
| Потрошња енергије | 78 Ватт |
| Димензије (Д к Ш к В) | 61.2 к 45.2 к 18.5 цм |
| Тежина | 5.1 килограма |
| Посебне карактеристике | Blue Light Filter, Curved, Flicker-Free, Adaptive Sync |

Image: Diagram showing the approximate dimensions of the KOORUI 27E6QCA monitor, including height (40cm), width (50cm), and depth (30cm).
9. Гаранција и подршка
For warranty information and technical support, please refer to the warranty card included in your product package or visit the official KOORUI webсајт. Сачувајте рачун као доказ о куповини за потребе гаранције.


