![]()


Amy 1 io

Instructions
Amy 1 io Control With Frame
ORIGINAL INSTRUCTIONS
These instructions apply to all Amy 1 io, the different versions of which are available in the current catalogue.
This complete instruction guide complements the short installation guide available with the product. Please also comply with the instructions set out in the Safety instructions document enclosed with this product and available online on www.somfy.info.
GENERAL INFORMATION
Safety instructions
![]() DANGER
DANGER
Indicates a danger which may result in immediate death or serious injury.
![]() WARNING
WARNING
Indicates a danger which may result in death or serious injury.
![]() PRECAUTION
PRECAUTION
Indicates a danger which may result in minor or moderate injury.
![]() CAUTION
CAUTION
Indicates a danger which may result in damage to or destruction of the product.
PRIOR INFORMATION
1.1.Introduction
Amy 1 io is a wireless radio wall switch that allows the user to control motorised products using io-homecontrol® radio technology.
Amy 1 io embeds an indoor temperature sensor working with TaHoma switch.
Depending on the version, Amy 1 io can be wall-mounted or used as a remote (only with the circular back cover).
1.2.Safety and liability
Before installing and using , please consult the instructions set out in the Safety instructions document enclosed in the product box and available online on www.somfy.info.
1.3.Items included in the box
Depending on the reference, 2 kits are available:
1.3.1.Kit with square frame
a) Amy 1 io module (with 1 x type CR2032 battery, 3 V included).
b) Square frame
c) Short installation guide
d) Safety instructions
e) Double-sided tape
f) Mounting plate

1.3.2.Kit with circular back cover
a) Amy 1 io module (with 1 x type CR2032 battery, 3 V included).
b) Circular back cover
c) Short installation guide
d) Safety instructions
e) Double-sided tape

1.4.Amy 1 io in detail
![]() NOTICE
NOTICE
For more information on button functions, refer to the Installation or Use and Maintenance chapters.
a) Up button
b) Stop/my button
c) Down button
d) Feedback LED
e) Embedded temperature sensor (Not visible, integrated inside the control point)
f) On/Off button
g) Battery cover
h) PROG button
i) Mode selector
j) Settings feedback LED

INSTALLATION
![]() NOTICE
NOTICE
Do not use any tools to press buttons !
![]() NOTICE
NOTICE
For transportation, Amy 1 io is switched off: the front panel buttons (Up, Stop/my, Down) are deactivated, but the PROG button and the mode selector are always active.
It is advisable to do next steps with front panel buttons still deactivated to avoid sending unwanted commands by manipulating the module. Activation of the front panel buttons can therefore be carried out after adding Amy 1 io, before wall mounting (refer to Switching on Amy 1 io).
2.1.Mode selection
The mode selector is used to deactivate or activate the Low Power Mode (LPM) depending on the type of motorised products being controlled. The Low Power Mode has to be activated if is associated with autonomous drives or low consumption drives (compatible only with Somfy autonomous products).

![]() NOTICE
NOTICE
- By default, the Low Power Mode is activated on Amy 1 io.
- Deactivating the Low Power Mode increases the autonomy of Amy 1 io and reduces radio communication and any associated interference.
1] To check if Low Power mode is activated or deactivated:
Press and hold the mode selector (more than 2 seconds) to see the color of the settings feedback LED flash corresponding to the currently selected Low Power mode management.

| LED color and number of flashes | Low Power mode management | ||
| Green LED | blinks 1 time |  |
LPM activated |
| Red LED | blinks 1 time | LPM deactivated | |
2] To activate/deactivate Low Power mode:
Briefly press once or twice in succession the mode selector to activate or deactivate Low Power mode.

| Number of short presses | Low Power mode management |
| Briefly press 1 time | LPM activated |
| Briefly press 2 times | LPM deactivated |
2.2.Adding/Deleting Amy 1 io
![]() NOTICE
NOTICE
To program the first control point, refer to the instructions for the io drive or receiver.
The procedures for adding or deleting Amy 1 io are the same.
![]() NOTICE
NOTICE
It is advisable to do next steps with front panel buttons deactivated to avoid sending unwanted commands by manipulating the module (refer to Switching on Amy 1 io).
To add or delete Amy 1 io, use the Somfy local io control point already paired with the motorised product.
- Position the motorised product at its half-way position.
- On the individual control point already paired with the motorised product:
⇒Press the PROG button until the motorised product moves up and down: programming mode is activated. - On Amy 1 io to be added or deleted:
⇒ Briefly press the PROG button: the motorised product moves up and down and Amy 1 io is added or deleted.

2.3.Switching on Amy 1 io
For transportation, Amy 1 io is switched off: the front panel buttons (Up, Stop/my, Down) are deactivated.
To check whether Amy 1 io is switched on or off, press any front panel button and see if the feedback LED lights up.
- To activate the front panel buttons, long press the On/Off button until the settings feedback LED lights up green. It switches from Off status to On status.
- To deactivate the front panel buttons, long press the On/Off button until the settings feedback LED lights up red: this indicates the Off status.

![]() NOTICE
NOTICE
The PROG button and the mode selector are always active, even when the front panel buttons are deactivated by the On/Off button.
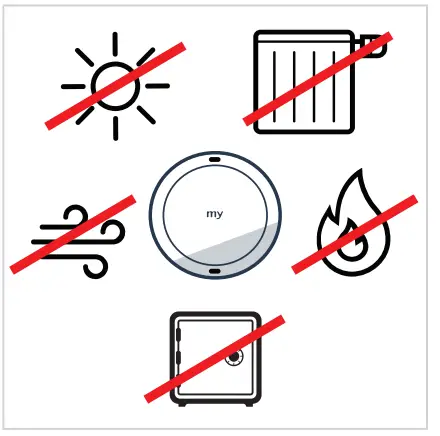
2.4.Optimization of temperature sensor performance
To ensure optimum performance of the embedded temperature sensor, follow these recommendations:
- Prefer wall mounting to reach higher performance of the sensor (accuracy and repeatability). Temperature measurement will thus be more consistent with temperature felt in the room.
- Avoid placing Amy 1 io in direct sunlight.
- Place it away from any source of heat or cold (ideally 1 m from a radiator, an air conditioner, a wood stove,…).
- Place it away from direct airflow (at least 25 cm from an opening).
- Avoid enclosed area, where the sensor will not be influenced by the surrounding air.
2.5.Wall mounting
![]() NOTICE
NOTICE
- The use of radio appliances operating on the same frequency may cause interference and reduce the product’s performance.
- Never use the control point near a metal frame or metal surfaces, as this can reduce the radio range.
- The environment in which the product is used might reduce the radio range.
- The use in the same floor as the controlled products is recommended.
- Radio range in free field: 150 m.
There are two possible ways of wall-mounting Amy 1 io, depending on the type of back cover:
- By fixing it with double-sided tape (provided with the product).
- By fixing it with screws (on the wall or in a flush-mounted box).
2.5.1.Wall mounting with mounting plate and square frame
2.5.1.1. Using double-sided tape
![]() NOTICE
NOTICE
The product is designed to be fixed to most wall surfaces, such as paint, wallpaper, earthenware, wood, varnished wood, primer/coating. However the walls must be flat and clean.
- Remove the protective films from the double-sided tapes.
- Take the provided black mounting plate and stick the double-sided tape on its back.
- Remove the second protective films from the double-sided tapes already sticked.
- Following the orientation indicated on the front part of the black mounting plate, press it on a flat, clean, and dry surface. Make sure it is firmly fastened to the surface.
- First clip the square frame onto the black mounting plate.
 NOTICE
Make sure Amy 1 io is switched on before clipping the module (refer to Switching on Amy 1 io). - Clip the Amy 1 io module onto the black mounting plate. Press firmly on the front of the module, on the right and left near the my button as close as possible to the translucent circle without pressing on the edges of the module (to avoid unwanted radio transmission), until it clicks into place.

2.5.1.2. Using screws
![]() CAUTION
CAUTION
- Do not use an electric screwdriver.
- The order of assembly must be followed to ensure that the parts fit together correctly and don’t get damaged.
- To fix the black mounting plate on a flush-mounted box, the 2 screw holes of the flush-mounted box must be horizontal and not vertical.
- In case of wrong mounting, use a cover plate to hide the box and fix with double tape.

![]() NOTICE
NOTICE
To fix the black mounting plate directly on the wall, use either the 2 horizontal holes, or the 4 holes in each corner.
- Fix the black mounting plate using screws appropriate for hole size and wall type, following the orientation shown on the front panel.
- First clip the square frame onto the black mounting plate.
NOTICE
Make sure Amy 1 io is switched on before clipping the module (refer to Switching on Amy 1 io). - Clip the Amy 1 io module onto the black mounting plate through square frame. Press firmly on the front of the module, on the right and left near the my button as close as possible to the translucent circle without pressing on the edges of the module (to avoid unwanted radio transmission), until it clicks into place.

2.5.2.Wall mounting with circular back cover
2.5.2.1. Using double-sided tapes
![]() NOTICE
NOTICE
The product is designed to be fixed to most wall surfaces, such as paint, wallpaper, earthenware, wood, varnished wood, primer/coating. However the walls must be flat and clean.
- Remove the protective films from the double-sided tapes.
- Take the provided circular back cover and stick the double-sided tapes on its back.
- Remove the second protective films from the double-sided tapes already sticked.
- Following the orientation indicated inside the circular back cover, press it on a flat, clean, and dry surface. Make sure it is firmly fastened to the surface.
NOTICE
Make sure Amy 1 io is switched on before clipping the module (refer to Switching on Amy 1 io). - Clip the Amy 1 io module onto the circular back cover. Press firmly on the front of the module, on the right and left near the my button as close as possible to the translucent circle without pressing on the edges of the module (to avoid unwanted radio transmission), until it clicks into place.

2.5.2.2. Using screws
![]() CAUTION
CAUTION
- Do not use an electric screwdriver.
- The order of assembly must be followed to ensure that the parts fit together correctly and don’t get damaged.
- Drill 2 horizontal holes through the indicated drill marks on each side inside the circular back cover.
- Fix the circular back cover using screws appropriate for hole size and wall type, following the orientation indicated inside the circular back cover.
NOTICE
Make sure Amy 1 io is switched on before clipping the module (refer to Switching on Amy 1 io). - Clip the Amy 1 io module onto the circular back cover. Press firmly on the front of the module, on the right and left near the my button as close as possible to the translucent circle without pressing on the edges of the module (to avoid unwanted radio transmission), until it clicks into place.

2.6.Use as a remote control
![]() NOTICE
NOTICE
Amy 1 io can be used as a remote control without being wall-mounted. However, care must be taken to ensure that the circular back cover is securely attached to Amy 1 io module to protect the back access from any risk of damage and avoid accidental activation.
- Take the circular back cover and clip the Amy 1 io module onto it, following the orientation indicated inside the circular back cover. Press firmly on the front of the module, on the right and left near the my button as close as possible to the translucent circle without pressing on the edges of the module (to avoid unwanted radio transmission), until it clicks into place.
- Amy 1 io can therefore be used as a remote control that can be put down and moved around.

2.7.Tips and advice on installation
2.7.1.Questions about the product?
| Observations | Possible causes | Solutions |
| The selected motorised product does not react at all when a button on Amy 1 io is pressed (No LED reaction when pressing the buttons). | Amy 1 io is switched off, the front panel buttons (Up, Stop/my, Down) are deactivated. | Switch it on to activate the buttons (refer to Switching on Amy 1 io). |
| The selected motorised product does not react at all when a button on Amy 1 io is pressed (No LED reaction in the front when pressing a button AND in the back when pressing the On/Off button). | The control point battery is low. | Change control point battery as required (refer to Replacing the battery). |
| The selected motorised product does not react at all when a button on Amy 1 io is pressed but the LED lights up. | The control point is not paired with this motorised product. | Refer to Adding/Deleting Amy 1 io. |
| The selected motorised product does not react at all when a button on Amy 1 io is pressed but the LED lights up and the control point is paired with this motorised product. |
External radio equipment is interfering with the radio reception. | Turn off any nearby radio equipment. |
| The motorised product does not react when the indoor temperature rises (the scenes programmed in TaHoma in the event of a change in indoor temperature do not launch). | The temperature feedback to TaHoma is deactivated on Amy 1 io. | Check sensor status on TaHoma application and refer to Use with TaHoma if necessary. |
USE AND MAINTENANCE
![]() CAUTION
CAUTION
To prevent damage to the product:
- Avoid impacts!
- Do not drop it!
- Do not spill liquid on the product or immerse it in liquid.
- Do not use abrasive products or solvents to clean the product.
![]() NOTICE
NOTICE
To use the Up, Stop/my or Down buttons, they must be activated: the product must be switched on (refer to Switching on Amy 1 io).
3.1.Up and Down buttons
Press the Up or Down button:
- To raise or lower roller shutters, awnings, screens, venetian blinds, or garage doors.
- To open or close windows, swinging shutters, curtains, or gates.
- To switch on or switch off lightings or heatings.

The feedback LED flashes green during activation of the motorised product(s).
3.2.Stop/my button
- The motorised product(s) are being activated:
◦ Briefly press my to stop the motorised product(s) from activating. - The motorised product(s) are stopped:
◦ Briefly press my to move the motorised product(s) to their favourite position (my).

![]() NOTICE
NOTICE
To use the favourite position (my) function, the motorised products must not be activated and their favourite position (my) must be registered [refer to Saving or modifying the favourite position (my)].
3.3.Saving or modifying the favourite position (my)
![]() NOTICE
NOTICE
Refer to the instructions guide for the io drive or receiver to ensure it includes this function.
- Press the Up or Down button to send the motorised product in the desired position.
- Briefly press my to stop the motorised product in the desired position.
- Press and hold my until the activation of the motorised product to save or to modify the favourite position (my).

3.4.Checking the battery level
When the battery level is low, the feedback LED on the front of Amy 1 io dims progressively during activation of the motorised product(s). When the battery is too weak, the control point can no longer transmit radio orders, its operation is inhibited.

Battery status can be checked on TaHoma application, if Amy 1 io has been added in TaHoma, and an alert may be sent out if this feature is activated (Follow the instructions in TaHoma application).
3.5.Use with TaHoma
A temperature sensor, not visible, is embedded into Amy 1 io.
This sensor works in combination with TaHoma where it appears as an indoor temperature sensor.
When Amy 1 io is added in TaHoma application and the temperature feedback to TaHoma is activated on Amy 1 io, the sensor measures the temperature inside the room (around Amy 1 io) and sends the measured values to TaHoma. These temperature values can be consulted in TaHoma and can then be used for scenes to optimize home automation.
![]() CAUTION
CAUTION
Be careful in case of wind!
Automation provided by TaHoma and Amy 1 io allows the automatic use of a motorised product when the temperature of the room equals a certain threshold, without consideration of the wind.
To maximize the protection of the motorised product from the wind and limit the risk of breaking, use a wind sensor paired with the motorised product (sold separately).
In any case, a wind sensor does not protect against sudden gusts of wind. In the event of such weather risks, deactivate the embedded temperature sensor (see below).
3.5.1.Adding Amy 1 io in TaHoma
To add or delete Amy 1 io in TaHoma, you need to access and use a TaHoma switch and TaHoma application: you must have a compatible phone or mobile device. The application is downloadable for free from Apple Store platforms and Google Play Store on the following mobile devices:
- Apple iPhone® mobile phone or mobile device with iOS operating system running iOS and later.
- Mobile phone or mobile device with operating system Android™ OS and later.
The software version of the TaHoma application may be updated from time to time to add new features and services.
To add or delete Amy 1 io in TaHoma, follow the instructions in TaHoma application.
3.5.2.Activation/Deactivation of the temperature feedback
![]() NOTICE
NOTICE
To do next steps, Amy 1 io must be switched on, with the front panel buttons activated (refer to Switching on Amy 1 io).
By default, the temperature feedback to TaHoma is deactivated on Amy 1 io.
- To check whether the temperature feedback to TaHoma is activated or deactivated:
Briefly press once the On/Off button to see the settings feedback LED corresponding to the current status:
▪ Orange LED blinks 4 times: the temperature feedback is deactivated.
▪ Orange LED blinks 2 times: the temperature feedback is activated. - To activate/deactivate the temperature feedback to TaHoma:
Briefly press twice successively the On/Off button to activate/deactivate the temperature feedback:
▪ Orange LED blinks 2 times: the temperature feedback is activated.
▪ Orange LED blinks 4 times: the temperature feedback is deactivated.

3.6.Replacing the battery
![]() DANGER
DANGER
Read the Safety instructions document.
Explosion risk if the battery is replaced by an incorrect type.
- Insert a flat screwdriver inside the hole at the bottom of the circular back cover to easily eject the module from its support or, if the mounting plate and its square frame are being used, manually remove the module from its supports by pulling it towards you.
- On the back of the module, remove first side of the battery cover by pushing on the clip. Then pulling on the middle part of the battery cover to release the first side of the cover. Push on the second clip to completely release the cover.
- Remove the battery cover.
- Insert a CR2032 battery (3 V) with the (+) polarity side visible (on top), Slide it and push to engage on the right side of the battery contact. Then insert the stops of the cover on the bottom.

 CAUTION
• Ensure you comply with the polarity.
• The power supply terminals must not be short-circuited. - Press on the top of the cover to engage the clips.
- Clip the module onto the circular back cover or onto the square frame and clip the square frame assembly onto the mounting plate again.
3.7.Tips and advice on use
3.7.1.Questions about the product?
| Observations | Possible causes | Solutions |
| The selected motorised product does not react at all when a button on Amy 1 io is pressed (No LED reaction when pressing the buttons). | Amy 1 io is switched off, the front panel buttons (Up, Stop/my, Down) are deactivated. | Switch it on to activate the buttons (refer to Switching on Amy 1 io). |
| The selected motorised product does not react at all when a button on Amy 1 io is pressed (No LED reaction in the front when pressing a button AND in the back when pressing the On/Off button). | The control point battery is low. | Change control point battery as required (refer to Replacing the battery). |
| The selected motorised product does not react at all when a button on Amy 1 io is pressed but the LED lights up. | The control point is not paired with this motorised product. | Refer to Adding/Deleting Amy 1 io. |
| The selected motorised product does not react at all when a button on Amy 1 io is pressed but the LED lights up and the control point is paired with this motorised product. | External radio equipment is interfering with the radio reception. | Turn off any nearby radio equipment. |
| The motorised product does not react when the indoor temperature rises (the scenes programmed in TaHoma in the event of a change in indoor temperature do not launch). | The temperature feedback to TaHoma is deactivated on Amy 1 io. | Check sensor status on TaHoma application and refer to Use with TaHoma if necessary. |
![]() NOTICE
NOTICE
If the product still does not operate, contact a drive and home automation professional.
3.7.2.Replacing a broken or lost Somfy control point
To replace the last broken or lost control point, contact a home motorisation and automation professional.
TECHNICAL DATA
Frequency range and maximum power used: 868.700 MHz – 869.200 MHz e.r.p. <25 mW.
The environment in which the product is used might reduce the radio range. The use in the same floor as the controlled products is recommended. Radio range in free field: .
Operating temperature: 0 °C (+32 °F) to +48 °C (+118.4 °F).
Power supply: 1 x type CR2032 battery, 3 V.
![]() SOMFY ACTIVITES SA, 74300 CLUSES FRANCE hereby declares that the radio equipment covered by these instructions is in compliance with the requirements of Radio Directive 2014/53/EU and the other essential requirements of the applicable European Directives.
SOMFY ACTIVITES SA, 74300 CLUSES FRANCE hereby declares that the radio equipment covered by these instructions is in compliance with the requirements of Radio Directive 2014/53/EU and the other essential requirements of the applicable European Directives.
The full text of the EU declaration of conformity is available at www.somfy.com/ce.
![]() Somfy limited, Yeadon LS19 7ZA UK, hereby declares that the radio equipment covered by these instructions is in compliance with the requirements of UK legislation: the Radio Equipment Regulations S.I. 2017 N°1206.
Somfy limited, Yeadon LS19 7ZA UK, hereby declares that the radio equipment covered by these instructions is in compliance with the requirements of UK legislation: the Radio Equipment Regulations S.I. 2017 N°1206.
The full text of the UKCA declaration of conformity is available at www.somfy.co.uk
![]()
SOMFY ACTIVITES SA
50 avenue du Nouveau Monde
74300 CLUSES FRANCE
www.somfy.com


SOMFY ACTIVITES SA, Société Anonyme, capital 35.000.000 Euros, RCS Annecy, 303.970.230 – 06/2024 – Images not contractually binding
Documents / Resources
 |
somfy Amy 1 io Control With Frame [pdf] Instructions 5175792A, Amy 1 io Control With Frame, Amy 1 io, Control With Frame, With Frame, Frame |