VEVOR JMB-X3 Button Maker Machine Instruction Manual

NEED HELP? CONTACT US!
Have product questions? Need technical support? Pleasefeel freetocontact us:
 CustomerService@vevor.c
This is the original instruction, please read all manual instruction carefully before operating. VEVOR reserves a clear interpretation of our user manual. The appearance of the product shall be subject totheproduct you received. Please forgive us that we won’t in for my ouaga in if there are any technology or software updates on our product.
SAFETY REMINDER
- This badge machine is only applied for the intended purpose. Don’t apply in other applications which exceed safety considerations.
- Children cannot operate this product unless accompanied by indult.
- Pay attention to safety during operation, and avoid crushing fingers.
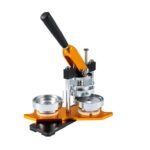
COMPONENTS


INSTALLATION STEPS
- Install the up mold on the machine, mold side pin align to back and upward push, the magnetism automatically absorbed.

- Make up mold three holes aligning and lift up, down mold align to sliding rail groove and push to middle, loosen and put down the up mold.

- Put the pinon the side of the slide rail.

- Installation finished and able to start manufacture.

- Put “Tin up cover”–”Paper”(pattern levelly placed)– “Transparent plastic film” into “Lower mold(A)” in sequence, then push the lower mold till up and down mold aligned.

- Use one hand hold the machine body first then stable the machine body by handle, another hand press the machine handle till down press to be bottom.

(NOTE: this time down pressed up mold hinge is open status.

NOTE: Up mold hing is open status. - Put the “Back plate” into “Lower mold(B)”.
- (NOTE: Brooch should be level and not raised.
Adjust the level as indicated by the top triangle.)
Push the lower mold to bottom from left to right till up and down mold aligned.

- Hand hold the machine body, right hand down press the handle till up and down mold merged to bottom.

NOTE: Now the up mold hinge is close status, pin pass through the hole.

- Finish.

NOTE: If use metal back plate, then the “Lower mold(B)” need place the plastic washer. (Metal back plate more thinner, only 58mm need add washer, 25mm and 32mm needn’t it.)

MODEL AND PARAMETER
| Model Product Model | JMB-X3 |
| Manufactured Badge Specification | Φ25/Φ32/Φ58mm |
| Machine Body Color | Black |
| Paper Requiremen | 127-157g Copper Plate Paper |
| Accessories With Machine |
|
FAILURE AND TROUBLESHOOTING
| Failure Appearance | Possible Reasons | Troubleshooting |
| First time downward press iron cover and not absorbed to up mold |
|
|
| Second downward press part not wrapped in |
|
|
| Not tightly press thebadge. pressed in but not firm |
|
|
| Up mold unable to lift up after pressing manufacture, blocked |
|
Use a sharp tool (such as a straight screwdriver) to align to middle merge position clearance which is between up and down mold, and pry open with the object like a hammer (Attention: Just tap it, generally, it will not be too tightened). |
Address: Baoshanqu Shuangchenglu 803long 11hao1602A-1609shiShanghai
Imported to AUS: SIHAO PTY LTD, 1 ROKEVA STREETEASTWOODNSW 2122 Australia
Imported to USA: Sanven Technology Ltd., Suite 250, 9166Anaheim Place, Rancho Cucamonga, CA 91730
SHUNSHUN GmbH
Römeräcker 9 Z2021,76351
Linkenheim-Hochstetten, Germany
Pooledas Group Ltd
Unit 5 Albert Edward House, The Pavilions Preston, United Kingdom
TOUGH TOOLS, HALF PRICE
Technical Support and E-Warranty Certificate www.vevor.com/support

Documents / Resources
 |
VEVOR JMB-X3 Button Maker Machine [pdf] Instruction Manual JMB-X3 Button Maker Machine, JMB-X3, Button Maker Machine, Maker Machine, Machine |