UTRAI JS-9 Multi Functional Car Jump Starter User Manual

![]() Attention
Attention
Please read the instruction manual carefully and use the product correctly according to the guidelines in the operation manual, so that you can get familiar with the product more conveniently and quickly!
Please Scan the Code for After-sales Service!
WARNING
- It is very important to follow the instructions carefully before each use of the emergency jump starter.
- When it is necessary to use this product continuously to start the car, please at least 60 seconds interval!
- After 10 minutes continuous pumping, it is recommended to stop for 10 minutes to allow the temperature of the machine to decrease before.
Please Scan the Code for After-sales Service!
CUSTOMER CARE
If you have any questions or problems, please feel free to contact us at any time Contact us via email or Facebook. We will do our best to help you as quickly as possible.
Contact us by email:

support.de@utrai.com
Find news, deals and events on our official website and social media.
You can also download the electronic user manual on our official website.
Watch influencer product unboxing videos and how-to videos on our YouTube channel.

Official Website
http://www.utrai.com
Facebook
@utraicompany
You tube
UTRAI Company
- It is very important to follow the instructions carefully before each use of the emergency starter.
- When it is necessary to use this product continuously to start the car, please respect an interval of at least 60 seconds
- After 10 minutes of continuous pumping, it is recommended to stop for 10 minutes to allow the temperature of the machine to decrease before continuing to use it
- Please put this product out of reach of children.
- Non-professionals must not dismantle the device, so as not to damage it and not to compromise safety.
- This product should be well ventilated, do not block the cooling vents, do not use in the following environments
- Damp places and places easily splashed by water.
- Places where it’s easy to fall.
- Places presenting risks of vibrations, corrosion, dust, chemical gases.
- Places where flammable and explosive materials are stored, and near high temperature heat sources.
- After starting the car with the jump starter, do not immediately charge the jump starter and leave it for 30 minutes until the battery cools down!
- Do not charge the product in an environment below 0°C or above 345°C 1+
- It is strictly prohibited to short-circuit the positive and negative terminals of the starter output port, and do not mix it with any metal objects or sharp objects (such as screwdrivers) when storing!
- 10. Before using, make sure your car has stopped and you have applied the emergency brake.
- Before using the device, turn off all electrical equipment in the car.
- It is forbidden to short-circuit the positive and negative terminals of the clamp or connect the positive and negative terminals of the clamp to the car under any circumstances, to avoid any risk to safety !
- Before using it, make sure the car key is in the OFF position, for the smart car key button (one key start), make sure the car is completely turned off.
- Do not use coarse chemicals, such as soap or other cleaning products containing strong alkalis and acids to scrub.
- the power indication on the product and all models used in this manual are for reference only, please refer to 3 the material object,
- in case of prolonged non-use, it is recommended to keep a reserve of charge the battery and recharge the device at least once every three months.
Detailed explanation diagram of product function

- Illumination lamp button
- Power/inflatable start button
- Mode/unit switch button
- Preset air pressure increase button
- Preset air pressure decrease button
- LED lighting
- Display
- Inflatable pump interface
- Start output
- port 10 USB output port
- TYPE-C input port

- output indication icon
- charging indicator icon
- car inflation mode
- motorcycle inflation mode
- bicycle inflation mode
- basketball inflation mode
- BAR air pressure unit 1
- KPA air pressure unit
- PSI air pressure unit
- power indicator light
Description of the button function:
Button: 1 lighting button. Key function: When the machine is turned on, long press the key to turn the light on/off; when the light is on, a short press on the button allows you to change the lighting mode.
Button 2: Power button / inflation start button. Function: When the machine is off, press the button to turn on the machine; when the machine is turned on, long press the button to start inflation; Short press the button to stop inflation.
Button 3: mode/unit switch button.
Key Function: Long press the key to change the air pressure unit BAR/KPA/PSI after power on. Short press the button to switch the inflation mode, support “car inflation mode”, “motorcycle inflation mode”, “bicycle inflation mode”, “basketball inflation mode”, “motorcycle inflation mode”, “custom inflation mode” 5 switching modes (the “custom inflation mode” has no mode icon indication). Button : 4
Button : 5 “+” key, “-” key. Key function: short press the key to preset the air pressure value after power on, short press the “+” or “-” key to preset the value will be increased/decreased by 0.1BAR /10KPA/1PSI, long press “+” or “-” key, the preset value will be quickly increment or decrement, do not press the time to stop.
Introduction to product functions
- USB port can charge and power cell phones, PSP, MP3/MP4, tablet PCs and other digital products.
- With LED lighting function, can switch lighting, burst flash, SOS mode.
- Built-in inflatable pump, support 5 kinds of inflation mode:
 Car inflation mode, adjustment range 1.8BAR~3.5BAR;
 motorcycle inflation mode, adjustment range 1.8BAR~3.0BAR;
 bicycle inflation mode, adjustment range 30PS1~65PSL;
 basketball inflation mode, adjustment range 4PSI~16PSI;
custom air pressure mode, adjustment range 3PSI~150PSI; The inflatable pump supports 3 types of unit change, BAR, KPA, PSI. - Support tire pressure detection function, the air tube into the corresponding interface of the machine, tighten the air tube to prevent air leakage, short press the d button Power to turn on the machine, the air tube into the tire, the screen displays the current tire pressure data.
- The car emergency start function can easily start the car when the car battery loses power.
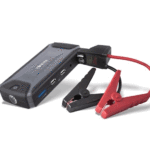
Detailed diagram of product accessories
- JS-9

- Valve connector

- Charging cable

- EVA case

- Air pump hose

- Smart gripper

- User Manual

Product parameters
Battery capacity: 15000mAh (55.5Wh)
USB output: 5V/3A 9V/2A 12V/1.5A
Charging mode: 5V 2A 9V = 2A
Discharge temperature: -20°C~60°C
Charging temperature range: 0°C~45°C
Maximum inflation pressure: 150psi
Size: 105x202x48mm
Instructions for use
- How to charge the jump starter:
Plug the charging cable into the charging input port, another plugged into the charger (5V/2A and above), when the charging icon on the digital screen flashes, it indicates charging starts, and when the “IN” icon stops flashing, the power display is on and the power level is 4, it means it is fully charged.

- How to turn on the LED lighting and emergency light:
Short press the power button ② to turn on the machine, the digital screen displays the current power, then long press the light button, long lighting , and short press the button again 1 to switch the lighting mode, cycle “long lighting → SOS → burst flash” 1 , and long press the lighting button again turn off the lighting.

- How to charge mobile phones, PSP, MP3/ MP4, tablet PCs and other digital products:
Short press the power button ② to turn on the device, then insert the USB charging cable into the USB output port, you can charge mobile phones, PSP, MP3, MP4, tablet PCs and other digital products , the display preset air pressure after selecting the mode; 4. After setting the air pressure value, connect the air hose tip to the tire, long press the inflation start button to start inflation (if the air hose pressure value is air is greater than the set value, it will not start to inflate), when the air pressure value reaches the preset value, it will automatically stop inflating; 5. Remove the air hose after finishing inflation, i.e. completing one inflation. (If the air pipe is not removed and the air pressure value is ≥0.2BAR after inflation is completed, the machine will not turn off; after removing the air pipe, the machine will automatically shut down without any operation for about 20S). shows the remaining energy. - how to turn off the machine:
Connect the air tube with no air pressure or no output from the machine, the machine will shut down after 20 seconds. - How to inflate tires:
Before inflating the tires, make sure the battery power is greater than 3 cells.- Connect the air pump hose to the corresponding connector of the machine and tighten the air pipe to prevent air leakage;
- Short press the power button 2 to turn on the machine, short press the mode button 3 to select the inflation mode, support “car inflation mode”, “motorcycle inflation mode”, “bicycle inflation mode”, “basketball inflation mode”, “custom inflation mode”, 5 kinds of mode switching; Long press button 3 can change the air pressure unit, supporting “BAR”, “KPA”, “PSI” 3 kinds of unit change, after setting the parameters, the data will be saved automatically, and the last setting data will be remembered when the machine is turned on;
- Press 4 “+” and 5 “-” keys to adjust the preset air pressure value after selecting the mode;
- After setting the air pressure value, connect the air hose tip to the tire, long press the inflation start button to start inflation (if the air hose pressure value is air is greater than the set value, it will not start to inflate), when the air pressure value reaches the preset value, it will automatically stop inflating;
- Remove the air hose after finishing inflation, i.e. completing one inflation. (If the air pipe is not removed and the air pressure value is ≥0.2BAR after inflation is completed, the machine will not turn off; after removing the air pipe, the machine will automatically shut down without any operation for about 20S).


How to check tire air pressure:- Short press the power button ② to turn on the machine;
- Connect the air hose quick connect to the tire tip, making sure to squeeze the bottom of the hose;
- The pressure displayed on the screen is the current tire pressure

- How to start the car:
Car starting method:
a: Check the remaining power of the starter, it will be able to start the car usually when the electricity is more than 3 cells.
b: Insert the battery clip plug into the output port of the jump starter, then match the positive pole of the center of the battery to the positive end of the car battery cable.
c: Connect the red clamp to the positive terminal of the car battery and the black clamp to the negative terminal, then screw the car key to the starting gear, the car will start.
d: After successful start-up, remove the battery clip and disconnect it from the device. If booting is not successful, wait a minute and repeat the steps above.
The process of the operation is illustrated below:- Plug the battery clip into the output port of the EC5

- Connect the clamp to the positive and negative terminals of the car battery.

- Start the car

- Remove the clamp from the positive and negative battery terminals.

- Disconnect the battery clip.

- Plug the battery clip into the output port of the EC5
Smart clip mandatory function instructions:
If the smart clip correctly connected to the car battery cannot be identified after driving, you can use the smart clip mandatory function. The battery clamp plugs into the output port of the jump starter, the positive and negative parts of the battery clamp connect to the positive and negative parts of the car battery cable, the red clamp connects to the positive terminal of the car battery and the black clip to the negative terminal. Long press the obligatory button side of the clamp smart, when the smart clamp is forced to open, you should start the car as soon as possible!
(Note: After opening the mandatory function, the protection function of the smart clip is no longer valid, and it is prohibited to short-circuit the red and black clips of the battery clip).

Description of error code displayed
“El”: low temperature charging protection prompt code, it is recommended to unplug the charger and continue to use the device after the temperature protection is lifted;
“E2”: prompt code for high temperature charging protection, it is recommended to unplug the charger and continue to use the device after the temperature protection is lifted;
“E3”: high temperature discharge protection prompt code, it is recommended to unplug the electrical equipment and continue to use the machine after the temperature protection is lifted;
“E7”: Cylinder overheat protection code, it is not recommended to immediately contact the machine and air tubes in order to avoid burns due to high temperature. Operate the machine after a rest period of 10 to 15 minutes.
Documents / Resources
 |
UTRAI JS-9 Multi Functional Car Jump Starter [pdf] User Manual JS-9, JS-9 Multi Functional Car Jump Starter, Multi Functional Car Jump Starter, Car Jump Starter, Jump Starter, Starter |