![]() Lighting made better.
Lighting made better.
User Manual
T8 Type B
Ballast Bypass LED Tube
SKU: T8_BY_C
T8_BY_F support@sunco.com
844-334-9938
What’s in the Box?
T8 Tube
Before You Start
Safety Information
To reduce the risk of fire, electric shock, or physical injury:
- Turn off the circuit breaker before installing this fixture.
- This product should be installed by a person familiar with the construction and operation of the product and the hazards involved. Safety eyeglasses and gloves are recommended.
- Abide by related regional and local laws or regulations.
- Proper grounding is required to ensure safety.
- Do not alter, relocate, or remove wiring during installation.
- Do not make or alter any open holes in the wiring enclosure or electrical components during installation.
- Check for shipping damage before installing. If the product is damaged, do not use it.
- Keep the fixture away from corrosive substances.
- Suitable for damp locations at temperatures ranging from 4°F to 104°F. Not for use where directly exposed to water.
- Clean the fixture regularly to ensure proper operation. Do not clean with harsh solvents.
- Use safety precautions and abide by regional and local laws or regulations.
- This product is not compatible with 3rd party sensors.
- This product is not compatible with photo controls.
- This product is not compatible with occupancy sensors.
- This product is not compatible with timing devices.
This device complies with Part 15 of the FCC rules.
Operation is subject to the following two conditions:
- This device may not cause harmful interference.
- This device must accept any interference that may cause undesired operation. Please review all instructions carefully prior to installation.
![]() WARNING:
WARNING:
Cancer & Reproductive Harm- www.P65Warnings.ca.gov
Tombstone Compatibility
| Single-Ended Installation (Non-Shunted Compatible Only) | Double-Ended Installation (Non-Shunted & Shunted Compatible) |
 |
 |
Installation Guide (Without Ballast, Single or Double Ended)

STEP 1
a. Turn off the power by locating the circuit breaker that controls the existing fluorescent fixture and switch it off.
 STEP 2
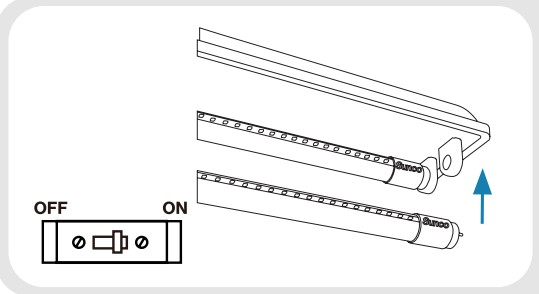
a. Carefully remove the old T8 fluorescent tube by gently twisting it and sliding it out of the tombstone sockets.
b. Remove the fixture cover, locate the ballast, then disconnect the ballast wires as indicated with an “X”. Safely dispose of the ballast for cleaner wiring as well as reduce fire risk.
Single-Ended Wiring Note: If the socket lamp holders are shunted, replace them with new non-shunted ones.
STEP 3
Determine if the wiring for the T8 will be single-ended or double-ended:
Single-Ended:
a. Before tube installation, check if the tombstones are shunted. Replace them with new non-shunted ones.
b. Place one end of the T8 (marked L and N) into the tombstone that is powered.
c. Place the other end of the T8 into the tombstone that is not powered.
Double-Ended Wiring

STEP 3
Double-Ended:
a. Wire the Live (L) to one end of the tombstone.
b. Wire the Neutral (N) to the opposite end of the other tombstone.
c. Place the T8 tube into both ends of the tombstone socket, then twist the tube to secure it in place.
STEP 4
a. If installing multiple T8 tubes in one fixture, follow Step 3 but run the wires for the additional lights in parallel. Refer to the wiring diagram below for assistance.
b. Turn on the circuit breaker to test the light.
Note: Do NOT power the T8 tubes if the ballast has not been removed. Failure to remove the ballast will damage the tubes and cause a fire hazard.
Installation Guide (Multiple Lamps Wiring Diagram)
Multiple Lamps Installation (Single-Ended)

Multiple Lamps Installation (Double-Ended)

Product Details
T8_BY_C-18W / T8_BY_F-18W
| Voltage | 120 to 277V |
| Wattage | 18W |
| Wattage Equivalency | 40W |
| Beam Angle | 120°(Clear), 180°(Frosted) |
| Efficacy | 120 lm/W |
| Housing Material | Glass (Clear/Frosted) |
| Dimmable | No |
| Average Lifetime | 50,000 Hrs |
| Lumens | 2200 lm |
| Moisture Rating | Damp Rated |
| CRI | 80+ |
| Usage | Indoor |
| Frequency | 50Hz/60Hz |
| Warranty | 5 Years |
T8_BY_C-15W
| Voltage | 120 to 277V |
| Wattage | 15W |
| Wattage Equivalency | 32W |
| Beam Angle | 120° |
| Efficacy | 120 lm/W |
| Housing Material | Glass(Clear) |
| Dimmable | No |
| Average Lifetime | 50,000 Hrs |
| Lumens | 1800 lm |
| Moisture Rating | Damp Rated |
| CRI | 80+ |
| Usage | Indoor |
| Frequency | 50Hz/60Hz |
| Warranty | 5 Years |
T8_BY_C-24W
| Voltage | 120 to 277V |
| Wattage | 24W |
| Wattage Equivalency | 52W |
| Beam Angle | 120° |
| Efficacy | 120 lm/W |
| Housing Material | Glass (Clear) |
| Dimmable | No |
| Average Lifetime | 50,000 Hrs |
| Lumens | 3000 lm |
| Moisture Rating | Damp Rated |
| CRI | 80+ |
| Usage | Indoor |
| Frequency | 50Hz/60Hz |
| Warranty | 5 Years |
Common Troubleshooting
Feeling in the dark about an issue with your product? No worries! Our troubleshooting section is here to shed some light and provide you with easy-to-follow solutions for any problem.
If you still need some assistance, please feel free to contact us with any questions. Our team of lighting experts is happy to help brighten your day.
| Installation | |
| Light isn’t turning on. | Double-check if the fixture is wired correctly and verify that the fixture is properly connected to the tombstones. Check if the circuit breaker hasn’t been tripped. |
| Light isn’t bright enough. | Verify if the ballast is compatible with the fixture for Type A installation. |
| Flickering | |
| Light is flickering when turning on. | Check that fixture wiring connections are secure. |
| Light flickering with other lights on the same circuit. | Check that the lights on the same circuit are not overloading the circuit. |
| Light flickers when turned on. | Verify if the ballast is compatible with the fixture for Type A installation. |
| Buzzing | |
| Fixture buzzing with appliances or electronic devices. | Verify if the breaker has tripped, and carefully inspect the tube for any signs of damage. |
| Fixture buzzing with power outages. | Look for nearby interferences that can cause buzzing. Such as televisions, radios, computers, etc. |
![]() CAUTION
CAUTION ![]()
Remove existing ballasts and rewire the fixture before installing Type B tubes to avoid tube damage and fire risk.
![]() Lighting made better.
Lighting made better.
support@sunco.com
844-334-9938
REV1.0
Documents / Resources
 |
Sunco T8 Type B Ballast Bypass LED Tube [pdf] User Manual T8_BY_C, T8_BY_F, T8 Type B Ballast Bypass LED Tube, Ballast Bypass LED Tube, Bypass LED Tube, LED Tube |
 |
Sunco T8 Type B Ballast Bypass LED Tube [pdf] User Manual T8_BY_C, T8_BY_F, T8_BY_C2, T8_BY_FR2, T8 Type B Ballast Bypass LED Tube, T8 Type B, Ballast Bypass LED Tube, Bypass LED Tube, LED Tube, Tube |