Storm Interface AudioComm Module

Important Information
The content of this communication and / or document, including but not limited to images, specifications, designs, concepts, data and information in any format or medium is confidential and is not to be used for any purpose or disclosed to any third party without the express and written consent of Keymat Technology Ltd. Copyright Keymat Technology Ltd. 2022 .
Storm, Storm Interface, Storm AXS, Storm ATP, Storm IXP , Storm Touchless-CX, AudioNav, AudioNav-EF and NavBar are trademarks of Keymat Technology Ltd. All other trademarks are the property of their respective owners
Storm Interface is a trading name of Keymat Technology Ltd
Storm Interface products include technology protected by international patents and design registration. All rights reserved
Using the Windows Utility to change USB Codes
If any other keypad utility software is installed (e.g EZ-Key Utility) then you should un-install that before you start.
System Requirements
The utility requires .NET framework to be installed on the PC and will communicate over the same USB connection but via the HID-HID data pipe channel, no special drivers are required.
Compatibility
Windows 11 ![]()
Windows 10 ![]()
- The utility can be used to configure the product to
- Select Code Table
- LED brightness (0 to 9)
- Test
- Create customised keypad table
- Load a saved configuration from file
Reset to factory default - Update Firmware
Installing the Configuration Utility
To install the Configuration Utility doubleclick on the downloaded .exe file and the Setup Wizard will launch
Select the folder where you would like this installed
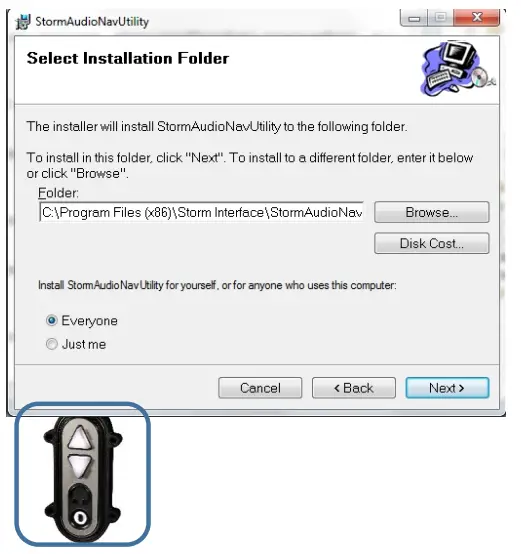
Choose you would like to install for all users of this pc (everyone) or just yourself (just me)
Click Next to start the installation
On complete a shortcut will be installed on your desktop.
Double-click this to start the Utility and the following screen will appear. If an Audio Comm is connected it will be detected automatically and the details displayed. The available functions are described in detail on the following pages

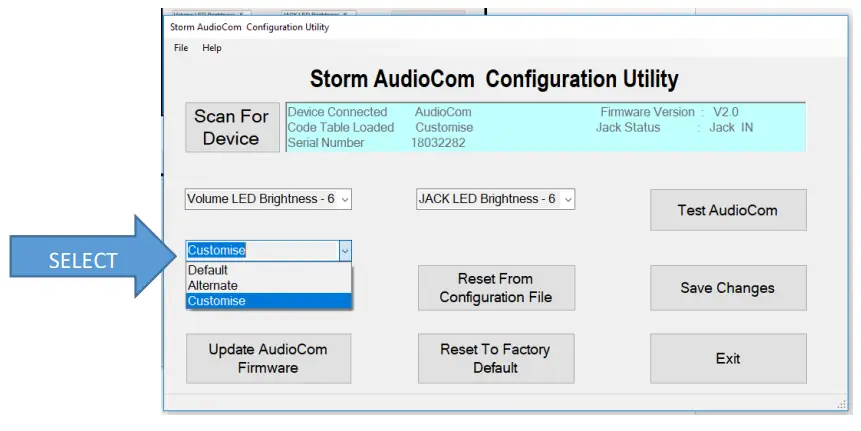
Select Code Table
The user can select from three tables:
| DEFAULT CODE TABLE | ALTERNATE CODE TABLE | CUSTOMISED CODE TABLE | ||||
| Function | Hex | USB | Hex | USB | ||
| Uo | 0x52 | Up Arrow | <0x01><0x02> | Multimedia Vol Up | Up Arrow | Set initially to the factory default values |
| Down | 0x51 | Down Arrow | <0x01><0x04> | Multimedia Vol Down | Down Arrow | |
| Jack IN | 0x6A | F15 | 0x6A | F15 | F15 | |
| Jack OUT | 0x6B | F16 | 0x6B | F16 | F16 | |
Once a table has been selected then the keypad will hold that configuration unless it is disconnected.
Once the keypad has been disconnected that configuration will be lost unless you save the configuration in memory by clicking on “Save Changes”

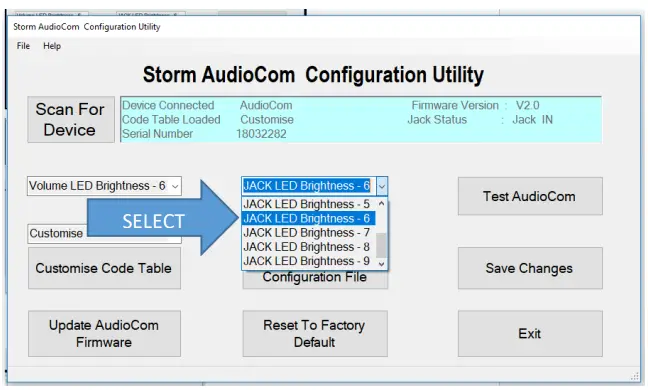
LED Brightness
This will set the brightness of the LEDs. The selection is from 0 to 9.
Test
This will test all the functions

- LEDs will flash
- LED brightness will cycle
Test Audio - Plug in headphones
- Listen to Audio
- Press Record , Start. speak into microphone – you will see the progress bar
Test Keys, Jack In. Out - Press Up and Down keys Vol Up / Down will confirm
- Remove / Insert headphones Jack In / Out will confirm
Press close when finished.
Customise Code Table
Select the Customise table, and then click on
Note that Multimedia Control Codes ( Vol Up / Down ) are not available in Customised Table.
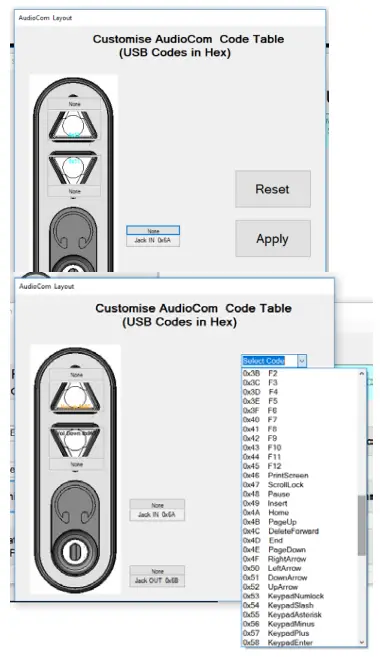
The following will be displayed when “Customise code” is clicked.
The current customised code table will be displayed from memory on the keypad.
Attached to each key is another button (“NONE”), this shows the modifier for each key.
To customize a key, click on the key and Key Code combo box will appear, with “Select Code”.
Now press on the down arrow on the combo box:
This will display all the codes that can be selected.
These codes are the ones defined by USB.org.
Once code is selected, the code will be displayed on the selected button.
In this example I have selected “e” and code is represented by 0x08 and button colour will change to Aqua.
Press the “Apply” button and the code will be sent to the AUDIOCOMM.
When you press key “Down” on keypad, “e” will be sent to the relevant application.
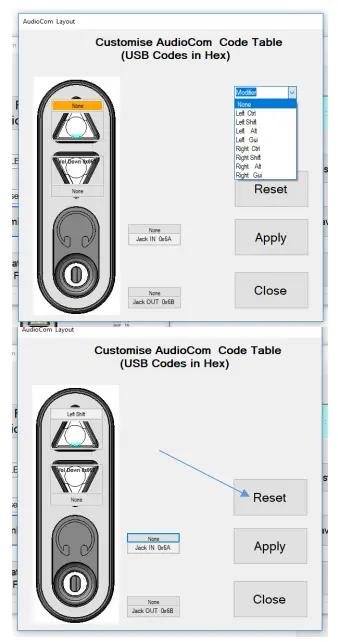
If you did not want the current setting then click on “Reset” then all buttons will revert to original coding and then click on “apply” to send this coding to Audio COMM keypad.
“Close” will exit the customize form and return back to main screen.
Saving Changes
If you don’t press “Save Changes” your changes will not be saved to the keypad.

Factory Default
Clicking on “Factory Default” will reset the keypad to the default code table Code Table – Default LED brightness – 9
Change History
| Instructions for | Date | Version | Details |
| Configuration Utility | 15 Aug 24 | 1.0 | First Release |
| Configuration Utility | Date | Version | Details |
| 14 Nov 18 | 1.0 | First Release | |
| 06 Jan 21 | 3.0 | Added test of mic function and fixes serial # overwriting when loading a saved config file/ | |
| 02 Feb 22 | 3.1 | New user agreement |
AudioComm Configuration Utility Rev 1.0
www.storm-interface.com

Documents / Resources
 |
Storm Interface AudioComm Module [pdf] Owner's Manual Horizontal, Black, AudioComm Module, Module |