Software M1 Max MacBook Pro Resolution Workaround
Product Information
The M1 Max and M1 Pro MacBook Pro laptops have a limitation in their native screen resolution, which prevents users from changing to lower 16:10 resolutions such as 1280×800 and 1600×1000. This limitation restricts the resolution to 1920×1200, resulting in smaller text. Apple is aware of this issue and actively working on a patch to resolve it. In the meantime, a 3rd party solution called SwitchResX can be used to adjust screen resolution options.
Product Usage Instructions
- Click here to download the most recent version of SwitchResX.
- Install the application by following the on-screen instructions.
- Restart your laptop.
- Ensure both Xebec Tri-Screens are connected to your MacBook Pro via the USB-C cables.
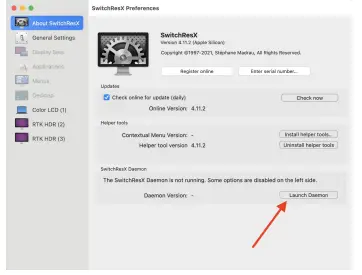
- Launch SwitchResX from your System Preferences window.
- Click “Install Helper Tools” and follow the on-screen instructions.
- Click “Launch Daemon”.
- In the left-hand menu, click “RTK HDR (2)”.
- In the Display Information tab, select the checkbox next to “Scaled resolutions base:” and change the numbers to 1920 x 1200.
- Select the Custom Resolutions tab and click the “+” button in the bottom left.
- In the Scale to input field, enter 1280 for Horizontal and 800 for Vertical. Click OK.
- Click the “+” again and enter 1600 for Horizontal and 1000 for Vertical. Click OK.
- In the SwitchResX Control Apple Menu bar, select File -> Save settings or press the “S” key.
- Restart your MacBook Pro.
- Launch SwitchResX from your System Preferences window.
- In the left-hand menu, click “RTK HDR (2)” and go to the Current Resolutions tab.
- Scroll to find and select “1280 x 800, 60 Hz”. Notice how the resolution scales and the text on your screen appears larger.
- In the left-hand menu, click “RTK HDR (3)” and in the Current Resolutions tab, scroll to find and select “1600 x 1000, 60 Hz”.
- Congratulations! You have now installed 1280×800 and 1600×1000 resolutions as native options on your M1 Max or M1 Pro.
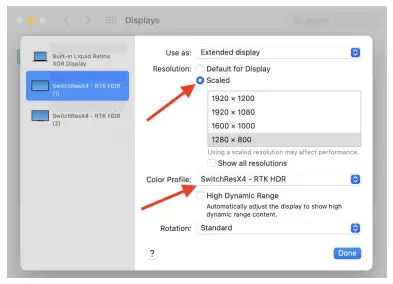
- Open your Display Settings (System Preferences -> Displays -> Display Settings).
- Select either of your Tri-Screens from the left-hand menu (RTK HRD (1) or RTK HRD (2)).
- Under the Color Profile dropdown, select “SwitchResX4 – RTK HDR”.
- Select “Scaled” under Resolution.
- You should now see your two new resolutions that you can select: 1280 x 800 and 1600 x 1000.
INTRODUCTION
We are aware of the current native screen resolution limitations on the new M1 Max and M1 Pro MacBook Pro laptops that affect your ability to change to a lower 16:10 resolution such as 1280×800 and 1600×1000, thus limiting your resolution to 1920×1200 (aka – rather small text). We have been in close contact with Apple regarding this limitation and they are both aware of the issue and actively working on a patch in MacOS to resolve this issue.
In the meantime we found a 3rd party solution, SwitchResX, that allows you to adjust your screen resolution options
Install Instructions
- Click here to download the most recent version of SwitchResX
- Install the application following the on screen instructions
- Restart your laptop
- Make sure you have both of your Xebec Tri-Screens connected to your MacBook Pro via the USB-C cables.
Launch SwitchResX from your System Preferences window
- Click “Install Helper Tools” and follow the on screen instruction

- Click “Launch Daemon”
- In the left hand menu click “RTK HDR (2)”
- Within the “Display Information” tab select the checkbox next to “Scaled resolutions base:” and change the numbers to “1920” x “1200”

- Select the “Custom Resolutions” tab and click the “+” button in the bottom left

- In the Scale to input field, under the Horizontal column input “1280” and under Vertical input “800”. Click “OK”

- Click the “+” again and under the Horizontal column input “1600” and under Vertical input “1000”. Click “OK”

- In the SwitchResX Control Apple Menu bar select File -> Save settings. Or key in ⌘ S

- Restart your MacBook Pro
- Launch SwitchResX from your System Preferences window
- In the left hand menu click “RTK HDR (2)” and click in the “Current Resolutions” tab. Under Resolution scroll to find and select 1280 x 800, 60 Hz. Notice how the resolution scales and the text on your screen appears “larger”

- In the left hand menu click “RTK HDR (3)” and in the “Current Resolutions” tab, under Resolution scroll to find and select 1600 x 1000, 60 Hz
Congratulations! You have now installed 1280×800 and 1600×1000 resolutions as native options on your M1 Max or M1 Pro.
You can now access these resolutions within your Display Settings menu.
- Open your Display Settings (System Preferences –> Displays –> Display Settings)
- Select either of your Tri-Screens from the left hand menu (RTK HRD (1) or RTK HRD (2))
- Under the Color Profile dropdown select SwitchResX4 – RTK HDR
Select “Scaled” under Resolution - Now you should see your two new resolutions that you can select: 1280 x 800 and 1600 x 1000
Documents / Resources
 |
Software M1 Max MacBook Pro Resolution Workaround [pdf] User Guide 12, B0CFLJQLPZ, B08ZLVK881, M1 Max, M1 Max MacBook Pro Resolution Workaround, MacBook Pro Resolution Workaround, Resolution Workaround, Workaround |