![]() DAC-NET Digital Audio Card
DAC-NET Digital Audio Card
Instruction Manual
DAC-NET Digital Audio Card

The Model DAC-NET from Siemens Industry, Inc. is the CAN-BUS master for all CAN modules. One DACNET is required in each control panel and each transponder. It is the source point for eight digital audio channels and communicates audio data via ASIBUS to all digital audio cards.
There is one BACnet (Building Automation & Control Network) interface. It communicates all instructions and messages directly with the PMI/PMI-2/PMI-3 (CPC-DAC interface).
It provides network communication (D-NET) between control panels and transponders (nodes). The network can be wired either Class B or Class X. EachDAC-NET occupies one D-NET address. The DACNET contains various on board tones and audio messages.
The DAC-NET can contain an optional LPB (Local Page Board) which has to be mounted piggyback. This CAN module has a fixed CAN address (100) and provides two inputs. One is for the microphone located at the LVM and the other connects the internal telephone system. Additionally, the LPB provides one output for the monitor speaker located at the LVM. For more information refer to the LPB Installation Instructions, P/N 315-035200 / A24205-A334-B836.
The D-NET is supervised for open, short and ground fault. Each D-NET input / output is electrically isolated. Wiring can be either Class B or Class X with unshielded twisted pair. The maximum distance between two DAC-NETs is 300m with cat3 cable, 900m with cat5 cable or 700m with cable 1pr.
18B FPLR / 1pr. 16B FPLR / 1pr. 14B FPLR. A maximum wiring length can be up to 10 km throughout the entire network with a maximum of 32 DAC-NET nodes. Up to 99 CAN sub-modules are addressable. The system is able to handle eight independent audio channels. Software updates for µC and D-NET controller are downloadable. Tones and audio messages are downloadable. Diagnostic LEDs for troubleshooting are located on the front panel of the DAC-NET. Refer to Figure 1.
OPERATION
Each DAC-NET occupies one card slot in the CC-5/CC-2 card cage. Only the left connector of the CC-5/CC-2 contains the signals to the CPC-DAC interface. The connection from the PMI/PMI-2/PMI-3 to the CC-5/CC-2, in which the DAC-NET is mounted, must be on the left side of the CC-5/CC-2.
D-NET
The D-NET Main In / Return Out and Main Out / Return In are isolated from each other and from the DAC-NET. This allows the use of different power sources with different ground references. The DAC-NET is able to detect ground faults and data faults of each D-NET section. Each DAC-NET sends and receives a data stream consisting of digital audio stream and control data. The baud rate is 1.536 Mbps.
NOTE:
Class B/Style 4 = ULC DCLB
Class X/Style 7 = ULC DCLC
Class B
The node with the lowest node number (master) sends the data stream from Main Out to Main In at the next node. The last node combines Main In with Return Out and returns the data stream back. When the data stream comes back to the node with the lowest node number this node combines Return In with Main Out and sends it to Main In of the next node.
 Figure 2 DAC-NET D-NET Class B
In a Class B configuration, two unshielded twisted pairs are required. They can be in one cable.
Class X
In a Class X configuration, the master sends the data stream by using Main Out / Main In in a loop. The Return Out / Return In loop contains only a test data stream for supervision.
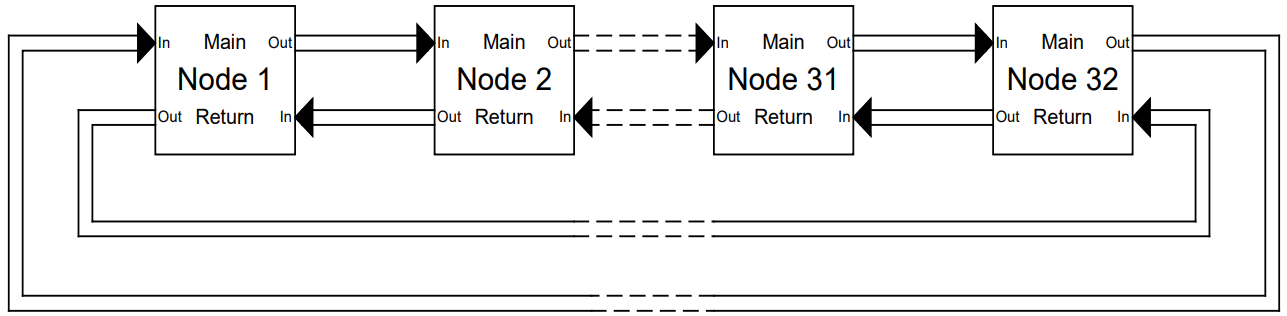 Figure 3 DAC-NET D-NET Class X
Class X Fault Status
If there is a fault in the Main loop, the node before the fault point combines Main In with Return Out. The node after the fault point combines Return In with Main Out. Both loops are combined and the net is still running. In this situation there is no test data stream. After repair D-NET reconfigures automatically. If there is a fault in the Return loop the failure of the test data stream will be detected and notified.
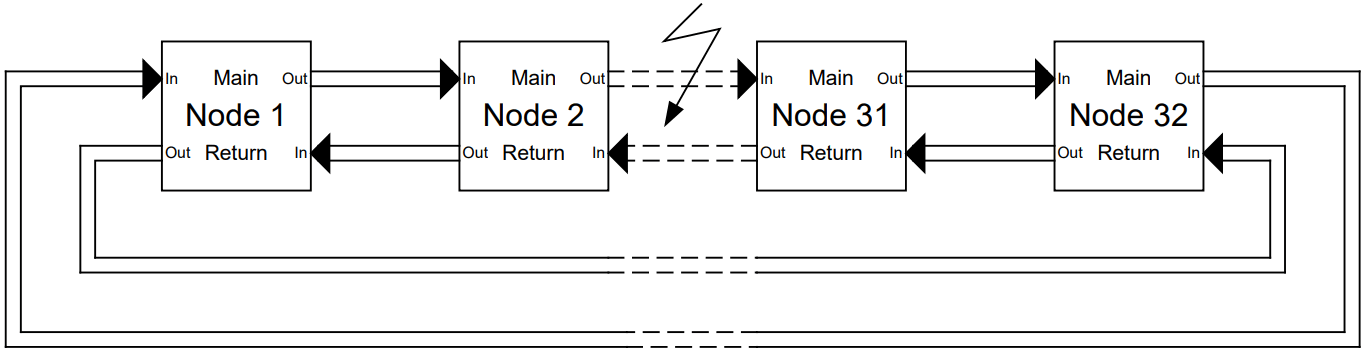 Figure 4 DAC-NET D-NET Class X Fault Status
In Class X configuration, two unshielded twisted pairs between the nodes are required. The connection between Node 1 and Node 32 must be in a separate cable and must not share a conduit with any other cable.
Controls and Indicators
The front panel of the DAC-NET contains one reset switch and seven LED for the DAC-NET, and one D-NET address switch and four LEDs for the DNET.
For the optionally mounted LPB, there is one reset switch and eight LEDs as shown in Figure
A reset switch is located on the top of the front panel. Pushing the reset switch re-initializes the DAC-NET operation.
The LEDs follow the reset switch. Their functions are defined as follows:
DAC-NET
| POWER | (Green) | Normally ON, When illuminated, indicates that power for the DAC-NET is applied to the card. When blinking twice per second, indicates that the DAC-NET is not configured by ZEUS Tool. When blinking fast, indicates that the DAC-NET gets a SW Update. |
| CARD FAIL | (Yellow) | Normally OFF. When illuminated, indicates that the card microprocessor has failed. |
| CAN FAIL | (Yellow) | Normally OFF. When illuminated, indicates that the CAN communication has terminated. When blinking twice per second, indicates that no CAN module is connected. |
| ASI FAIL | (Yellow) | Normally OFF. When illuminated, indicates that the ASI communication has terminated. |
| CPC-DAC FAIL | (Yellow) | Normally OFF. When illuminated, indicates that the communication between MI/PMI2/PMI-3 and DAC-NET has terminated. |
| ALARM | (Red) | Normally OFF. When illuminated, indicates that the DAC-NET has detected an active alarm. |
| EXT ALARM TRBL | (Yellow) | Normally OFF. When illuminated, indicates that the DAC-NET has detected a trouble on the External Alarm input (open circuit or short circuit). |
D-NET
| TRBL MAIN IN RETURN OUT | (Yellow) | Normally OFF. When illuminated, indicates that the DAC-NET has detected a trouble on Main In. |
| GND FAULT | (Yellow) | Normally OFF. When illuminated, indicates that the DAC-NET has detected a ground fault on one of its field wires before the node. |
| TRBL MAIN OUT RETURN IN | (Yellow) | Normally OFF. When illuminated, indicates that the DAC-NET has detected a trouble on Main Out. When blinking twice per second, indicates that the DAC-NET has detected a trouble on Return In (open circuit, short circuit or data trouble). |
| GND FAULT | (Yellow) | Normally OFF. When illuminated, indicates that the DAC-NET has detected a ground fault on one of its field wires after the node. |
PRE-INSTALLATION
The following components must be set prior to inserting the card into the CC-5/CC-2:
S4, Test Switch: These switches select programming and test functions. All switches must be set to the OFF position.
S6, Network Address Switch: Set the three-digit D-NET address for the DAC-NET using the three position switch located near the bottom of the front panel. (Refer to Figure 1 for the location of the switch.) The address at the DAC-NET front panel must be the same as the address selected in the Zeus Programming Tool. To increment each digit of the address, press the “+” button above the desired digit; to decrement each digit, press the “-“ button below the desired digit. The range of allowable network addresses is from 0 to 9 (left digit) and allowable node addresses is from 1 to 32 (two right digits).
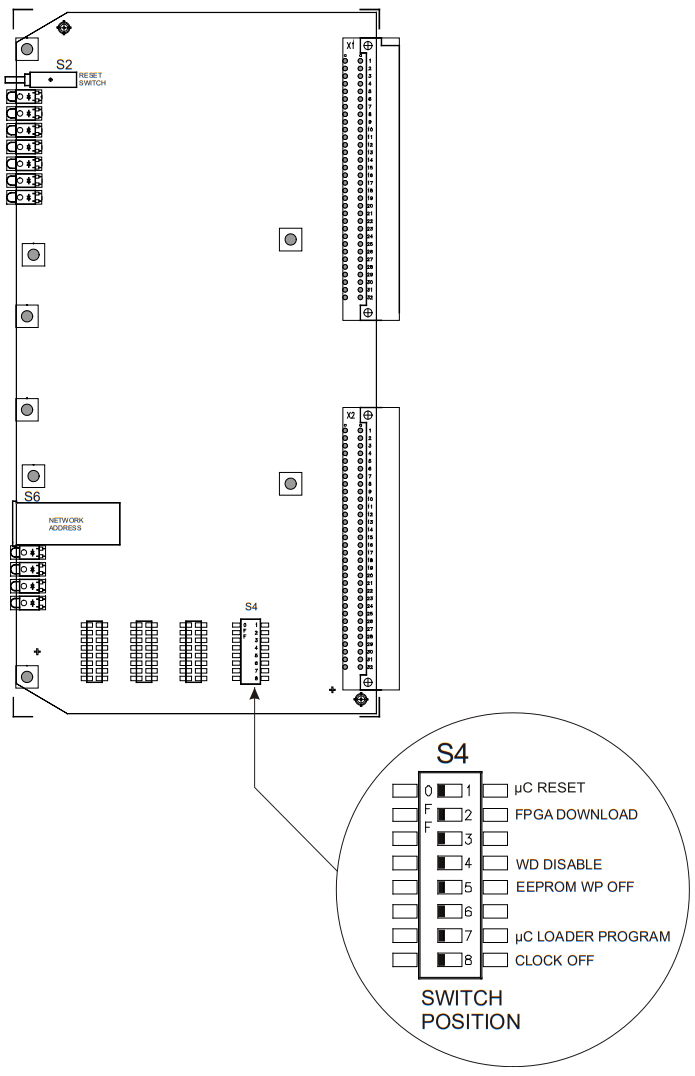 Figure 5 DAC-NET Switch Location
Lift the white cover on the terminal block
Loosen the screw of the terminal by turning it counterclockwise.
Insert the wire into the side of the terminal block.
Tighten the screw of the terminal block by turning it clockwise.
The DAC-NET supports D-NET Class B (ULC DCLB) and Class X (ULC DCLC) wiring. Check the ZEUS configuration for the proper network.
NOTES
- Power limited.
- Use twisted pair
- 18AWG (Ø 0,5m) Min. 12 AWG (2,5mm²) Max.
- The two pairs between the nodes can be in one cable.
- Max. cable length between DAC-NETs: 300m (38Ω Ø 0,6mm) (21Ω Ø 0,8mm) with cat 3 cable as J-Y(ST)Y.
- Max. cable length between DAC-NETs: 900m (157Ω Ø 0,51mm) with cat 5 cable as J-02YS(ST)Y.
- Max. cable length between DAC-NETs: 700m
(30 Ω AWG 18Ω
(19ΩAWG 16Ω
(12 Ω AWG 14Ω with cable
18B FPLR or 1pr. 16B FPLR or 1pr. 14B FPLR. - Distance between the first DAC-NET and last DAC-NET must not exceed wire lengths specified in Notes 5-7.
- 10km max. total distance around the ring.
- 32 DAC-NETs Max.
- Positive or negative ground fault detected at <5kΩ for terminals 1-8.
 Figure 6 DAC-NET Class B (ULC DCLB) D-NET Wiring
NOTES
- Power limited.
- Use twisted pair.
- Terminate shields at the entrance of the enclosure.
- 18AWG (Ø 0,5m) Min.
12 AWG (2,5mm²) Max. - The two pairs between the nodes can be in one cable.
- Max. cable length between DAC-NETs300m (38ΩØ 0,6mm) (21Ω Ø 0,8mm) with cat 3 cable as J-Y(ST)Y.
- Max. cable length between DAC-NETs900m (157Ω Ø 0,51mm) with cat 5 cable as J-02YS(ST)Y.
- Max. cable length between DAC-NETs700m
(30 Ω AWG 18Ω
(19 Ω AWG 16Ω
(12 ΩAWG 14Ω with cable
18B FPLR or 1pr. 16B FPLR or 1pr. 14B FPLR. - Distance between the first DAC-NET and last DAC-NET must not exceed wire lengths specified in Notes 6-8.
- 10km max. total distance around the ring.
- 32 DAC-NETs Max.
- Positive or negative ground fault detected at <5k Ω for terminals 1-8.
 Figure 7 DAC-NET Class X (ULC DCLC) D-NET Wiring
Each connection between two nodes has to be installed in separate cable routes.
All CAN cards and modules must be combined via CAN Bus. The CAN Bus requires a 120 Ohm termination resistor on both ends. Use a CAN terminator at CAN connectors and a termination resistor at screw terminals to fulfill it. They are shipped with DAC-NET. See Figures 9-14.
All digital audio cards and modules must be connected via the ASI-Bus (LPB, AIC, ZAC-40, ZAM-180, XDMC). The ASI-Bus consists of 4 pairs (Part of CC5). They require four 120 Ohm termination resistors on both ends. Use an ASI terminator at 60-pin connectors to fulfill it. They are shipped with DAC-NET. See Figures 9-14.The PMI/PMI-2/PMI-3 provides ASI termination at one end when used.
The Analog Audio Bus includes three audio signals with a level of 0dBu/+6dBu (LVM microphone, LVM monitor speaker, FMT Phone). The LPB supervises the microphone signal wiring. The supervision requires an EOL resistor 3.3K. The EOL resistor is integrated in the LVM.
If one LVM is mounted, the jumper P7 must be set in position 1 – 2.
LVM default factory setting: Jumper P7 in position 1 – 2
Connecting The Internal CAN, ASI And Analog Audio Bus
CAN BUS
Install the CAN cable into P3 of the CC-5/CC-2 or into P2 of the OCM-16 / SIM-16.
Install the other end of the CAN cable into the first CAN module on the inner door.
Observe the location of the CAN termination devices. Install a CAN terminator in the last CAN module on the inner door. Install the 120 Ohm CAN termination resistor into TB1 10 and 11 on the PSC-12.
ASI BUS with PMI/PMI-2/PMI-3
Install the 60-pin cable into P1 of the CC-5/CC-2.
Install the other end of the 60-pin cable into the PMI on the inner door. There is no need to install an ASI terminator at the PMI/PMI-2/PMI-3. The PMI/PMI-2/PMI-3 has it already inside. Install an ASI terminator into the 60-pin connector on the PSC-12.
Analog Audio BUS
Install the Analog Audio cable into the 10-pin connector of the PMI/PMI2/PMI-3.
Install the other end of the Analog Audio cable into one 10-pin connector of the LVM.
If there is a FMT install a further Analog Audio cable into the second 10-pin connector of the LVM and the other end into the FMT.
The DAC-NET must be installed into any open slot of the CC-5/CC-2 which is connected at the left side with the PMI/PMI-2/PMI-3.
Anti-Interference Capactitor:
It is a 6.8µF / 100V bipolar capacitor. In every Voice system must be one Anti Interference Capacititor.
It has to be connected between Ground and Earth. This capacitor is necessary to eliminate noise on the speaker lines.
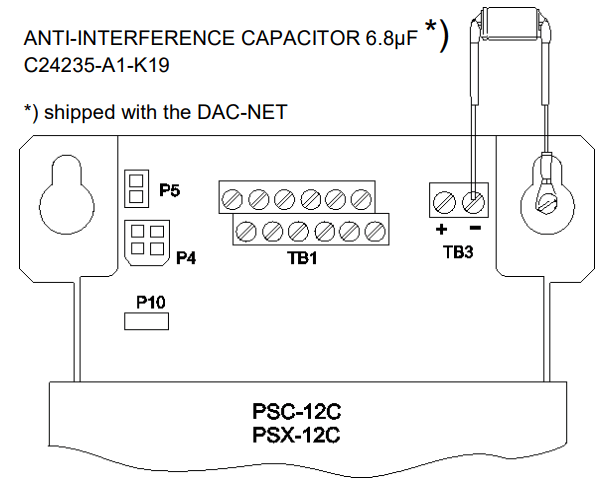 Figure 8 Anti-interference Capacititor
 Figure 9 CAN BUS, ASI BUS, Analog Audio BUS Wiring – Single Control Panel with PMI/PMI-2/PMI-3
- shipped with the DAC-NET
- ASI termination resistors are inside the PMI/PMI-2/PMI-3 A separate ASI terminator is not required
- shipped with the FMT
Connecting The Remote CAN Bus
CAN BUS
Observe the location of the CAN termination devices. Install one CAN terminator in the last CAN module on the inner door. If no CAN modules are installed on the inner door insert the CAN terminator into P3 of the CC-5/CC-
Install the second CAN terminator in the last CAN module in the remote enclosure.
 Figure 10 Remote Control Panel with SIM-16 and OCM-16
RNI is needed for EMC Protection if LVM, and FMT (SCM, LCM and FCM) shall be placed remote.

- 22 AWG MIN.
- 12 AWG MAX.
- 15 Ωs MAX. PER PAIR
- USE TWISTED PAIR
Figure 12 Remote Control Panel – Detail A
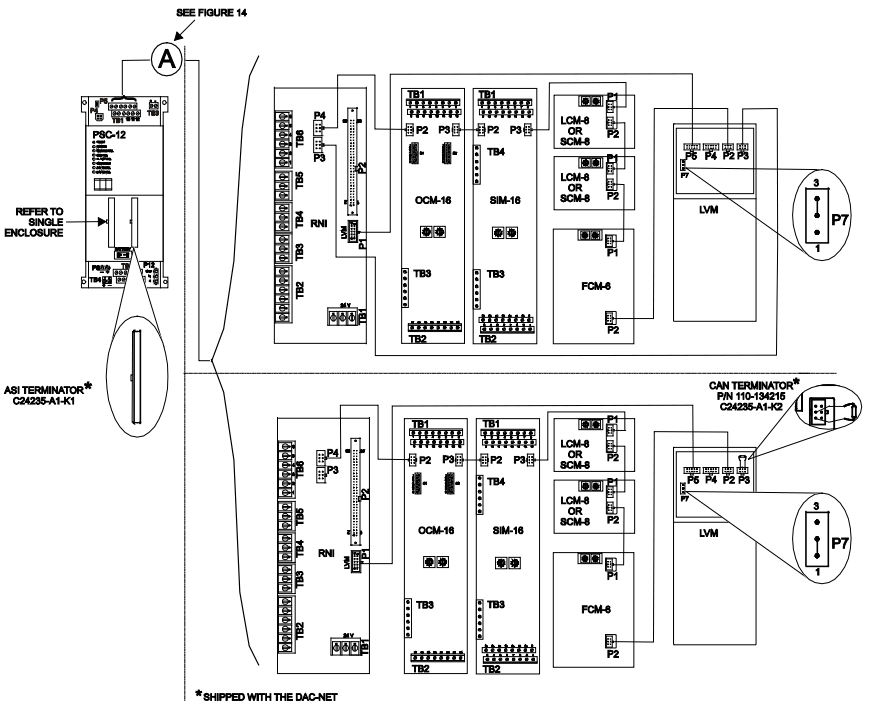 Figure 13 Multiple Remote Control Panels
- 22 AWG MIN.
- 12 AWG MAX.
- 15 Ωs MAX. PER PAIR
- USE TWISTED PAIR
Figure 14 Multiple Remote Control Panels – Detail A
ACCESSORY PACK (shipped with DAC-NET)
| Item | Part No. SBT Munich | Part No. SBT Florham Park |
| 2 CAN Terminators | C24235-A1-K2 | P/N 110-134215 |
| 2 ASI Terminator | C24235-A1-K1 | Not Available |
| 1 Can Termination Resistor 120 Ohms | C24235-A1-K12 | P/N 140-034723 |
| 1 External Alarm EOL Resistor 3.3K Ohms | C24235-A1-K14 | P/N 140-034721 |
| 1 External Alarm Resistor 680 Ohms | C24235-A1-K13 | Not Available |
| 1 Anti-Interference Capacitor 6.8pF / 100V bipolar | C24235-A1-K19 | Not Available |
ELECTRICAL RATINGS
| Power Consumption DAC-NET | |
| 24V Back Plane Current | 230 mA |
| 24V Screw Terminal Current | 0 |
| 6.2V Back Plane Current | 0 |
| 24V Standby Current | 230 mA |
INSTALLATION
The DAC-NET plugs perpendicularly into one slot in the CC-5/CC-2 card cage via two 96-pin DIN connectors and can occupy any slot in the card cage.
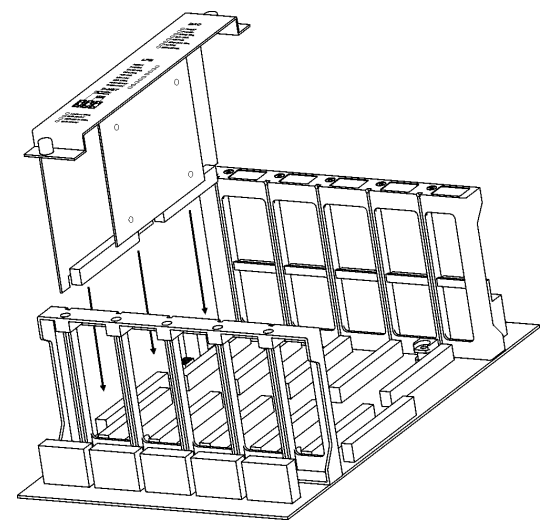 Figure 15 Installing the DAC-NET
Insert the DAC-NET card into the card guides right side up (lettering on the front panel is legible)
Slide the card in until the card edge connectors contact the receptacles on the motherboard.
Verify that the DIN connectors of the card and the card-cage aligned properly. The card can only plug in one direction to the card cage, if it does not align, DO NOT FORCE the card.
Place thumbs on the front panel adjacent to the captive screws and gently apply even pressure on the card until the connectors seat in the receptacles on the motherboard.
Secure with the captive screws.
Power up the system and verify that the DAC-NET power LED turns ON.
Cyber security disclaimer
Siemens products and solutions provide security functions to ensure the secure operation obuilding comfort, fire safety, security management and physical security systems. The security functions on these products and solutions are important components of a comprehensive security concept.
It is, however, necessary to implement and maintain a comprehensive, state-of-the-art security concept that is customized to individual security needs. Such a security conceptresult in additional site-specific preventive action to ensure that the building comfort, fire safety, security management or physical security system for your site are operated in a secure manner. These measures may include, but are not limited to, separating network physically protecting system components, user awareness programs, defense in depth, For additional information on building technology security and our offerings, contact your Siemens sales or project department. We strongly recommend customers to follow our security advisories, which provide information on the latest security threats, patches and other mitigation measures.
http://www.siemens.com/cert/en/cert-security-advisories.htm
© Siemens AG, I BT DE FS SYS, 2003-2012
Siemens Industry, Inc., Building Technologies Division, Florham Park, NJ
Siemens Canada, Ltd., Oakville, Ontario, L6H 0H6 Canada
Issued by Siemens AG I BT DE FS SYS
D-81379 Munchen
Delivery subject to availability; right of technical modifications reserved.
Order No. A24205-A334-B839 (Edition 14)
P/N 315-035100-14
Document ID A6V10259397
firealarmresources.com
Documents / Resources
 |
SIEMENS DAC-NET Digital Audio Card [pdf] Instruction Manual DAC-NET Digital Audio Card, DAC-NET, DAC-NET Audio Card, Digital Audio Card, Audio Card, Digital Card, Card |


