![]() TAIL LIGHT
TAIL LIGHT
CAN-AM COMMANDER 2021+
PLUG & PLAY MULTI-FUNCTION
 INSTRUCTION MANUAL
PLUG & PLAY MULTI-FUNCTION TAIL LIGHT
Part #: 65-504
Fitment: CAN-AM COMMANDER 2021+
TOOLS NEEDED:

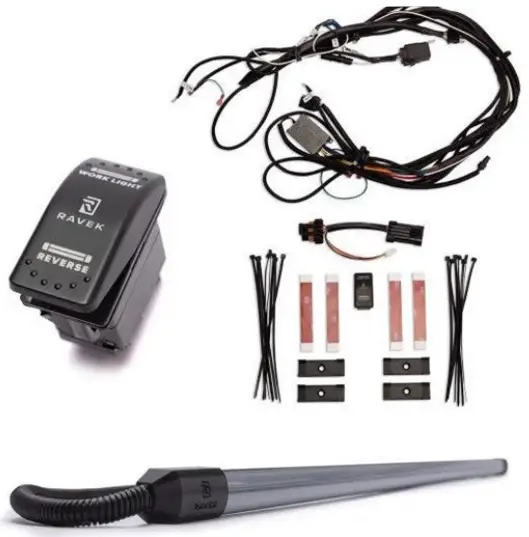
PARTS INCLUDED:
- UTV Multi-function Tail Light (1x)
- Main Harness (1x)
- Tail light Harness (2x)
- Tail light Extension Harness (1x)
- Work Light Harness (1x)
- Battery Positive Harness (1x)
- Battery Negative Harness (1x)
- Rocker Switch (1x)
- Mounting Clips (4x)
- Zip Tie (10x)
- Adhesive Promotor Wipe (2x)
Rubbing Alcohol Wipe (2x) - Heat Shrink (1x)
- Dielectric Grease (1x)
INSTALL VIDEO TUTORIAL
DON’T LIKE INSTRUCTIONS? VISIT OUR WEBSITE TO ACCESS THE VIDEO TUTORIAL.

GENERAL NOTES
- Throughout this process, be sure to keep track of any screws or fasteners you remove as they will be re-installed in the same location.
- Make sure your vehicle is off and key is out of the ignition before starting.
- Dielectric grease is provided, and you can use it for added protection.
PREP THE VEHICLE
Locate your switch panel and remove an open rocker switch knock out by prying it out using a SMALL FLAT HEAD SCREWDRIVER. [SEE FIGURES 1A – 1D]
NOTE: You’ll install the rocker switch provided with

 Remove the seats bottoms and backs from the Commander by lifting them up and carefully removing [SEE FIGURES 1E & 1F]
NOTE: If your Commander has two rows of seats; remove the rear seats too.
Remove the seats bottoms and backs from the Commander by lifting them up and carefully removing [SEE FIGURES 1E & 1F]
NOTE: If your Commander has two rows of seats; remove the rear seats too.

Remove the rubber seat belt cover by removing the single torx screw holding it place and lifting it off of the seat belt. Use a T-30 TORX to remove the screw. [SEE FIGURES 1G – 1I] NOTE: If your Commander has two rows of seats; remove the rear rubber seat belt cover too. [SEE FIGURE 1J – 1L]


Remove the shifter lever cover by removing the three torx screws securing it to vehicle, using a T-30 TORX. Once screws are removed, lift and remove panel. [SEE FIGURES 1M-1O]

Remove the center tunnel cover from the driver’s side by removing the two push pins using PUSH PIN PLIERS. Once the push pins are removed, carefully remove the side cover by pulling it up and out. [SEE FIGURES 1P & 1Q] NOTE: If your Commander has two rows of seats; remove the rear cup holder panel by removing the torx screw on the cup holder furthest to the front and the two push pins all the way to the back of the panel. [SEE FIGURES 1R – 1S]

Open the tailgate and remove the two twist pins holding the side cover by the taillight. With the twist pins removed, remove the side cover by carefully pushing towards the rear of the Commander.
Unplug the OEM connector from your Commander taillight (do this on both sides of your Commander) [SEE FIGURES 1T – 1V]

MOUNT LIGHT
Wipe your lower tailgate half using one of the rubbing alcohol wipes provided. Let dry.
Wipe the same surface with one of the adhesive promoter wipes provided. Let dry. [SEE FIGURES 2A-2C]
 Locate the four mounting clips provided in the kit. [SEE FIGURE 2D] Clean the back surface of the mounting clips using a rubbing alcohol wipe. Let dry. [SEE FIGURE 2E]
Wipe down the surface of the mounting clips with the adhesive promoter wipe. Let dry. [SEE FIGURE 2F] Place the double sided tape on to the back surface of the mounting clips and place them on the back of the light. [SEE FIGURE 2D – 2I]
Locate the four mounting clips provided in the kit. [SEE FIGURE 2D] Clean the back surface of the mounting clips using a rubbing alcohol wipe. Let dry. [SEE FIGURE 2E]
Wipe down the surface of the mounting clips with the adhesive promoter wipe. Let dry. [SEE FIGURE 2F] Place the double sided tape on to the back surface of the mounting clips and place them on the back of the light. [SEE FIGURE 2D – 2I]

Peel off the double sided tape protective film and adhere the light to the clean tailgate surface. [SEE FIGURE 2J] NOTE: Install the light so the RAVEK logos on the end caps are right side up. [SEE FIGURE 2K]

MAKE YOUR CONNECTIONS
Grab both of your Tail Light Harnesses and plug them in line to your OEM tail light and harness. [SEE FIGURE 3A]
NOTE: If additional accessories are plugged into the tail light already, connect the Multi-function Tail Light Harness closest to the OEM tail light.
 Grab your Tail Light Extension Harness and plug in each labeled connector to the corresponding Tail Light Harness, routing the Tail Light Extension Harness underneath the tailgate. [SEE FIGURES 3B – 3E AND DIAGRAM A]

Set your Main Harness (harness with the controller box) in the engine compartment and make the following connections [SEE FIGURES 3F-3H]:
- Plug in the 1-pin connector coming out the white wire on the Main Harness to the Work Light Harness (harness with relay)

- Plug in the trailer connector coming out the Main Harness to the connector on the Tail Light Extension Harness on the middle of the Defender

- Plug in the 4 pin connector coming out the Main Harness to the connector on the light connector on the light to the left side of the Defender
HOOK UP ROCKER SWITCH
Disconnect both battery terminals on your Defender using a 10MM DEEP WELL SOCKET and a RATCHET. Battery located behind panel removed in step iv[SEE FIGURES 4A – 4C]
NOTE: Disconnect the negative battery terminal first to prevent arcing. Make sure cables don’t touch each other or any metal surfaces when disconnected.
 Grab both your Battery Negative and Battery Positive Harnesses. Hook the ring terminal to the corresponding battery terminals and re-install 10mm nut on positive and negative battery terminals. [SEE FIGURES 4D & 4E]

Grab the red spade connector on the Work Light Harness, the two black spade connectors from the Battery Negative Harness, and the green spade connector from the Battery Positive Harness, and bundle all four spade connectors together. Route all four spades to the open rocker switch location referenced in step 1.i. [SEE FIGURES 4F-4K AND DIAGRAM A] NOTE: Be sure to keep all wiring away from hot or moving components.


Reference diagram below to connect each spade connector to the appropriate spade terminal on the backside of the rocker switch.
- Plug in main ground spade connector to PIN #7 (BLACK WIRE)
- Plug in ground jumper spade connector to PIN #8 (BLACK WIRE)
- Plug in power (green spade connector) to PIN #2 (GREEN WIRE)
- Plug in the red spade connector on the Work Light Harness to PIN #3 (RED WIRE)

Now is time to confirm light works as designed:
- Red Running Light
- Brake Light
- White Work Light (with vehicle on or off)
NOTE: If you have turn signal kit hooked up to your Commander; verify the turn signal feature built in to the light.
TIDY UP YOUR MACHINE
Go over all your wiring and secure it to the different frame tubes and OEM harnesses. [REFRENCE DIAGRAM A FOR OVERVIEW OF WIRING]
NOTE: Stay away from hot or moving components. Once all of your wiring is secured with the help of the zip ties, cut all the excess zip ties using side cutter pliers.
With your wiring neatly routed and secured to the Commander, reverse steps 1.i. – 1.vi. to reinstall the different Commander components.
WHY RAVEK
Stock UTVs don’t come with enough storage, lighting, comfort, and protection. That’s why we started RAVEK.
We live to design, manufacture, and test innovative SxS upgrades that elevate the riding experience. Here’s what you can expect from us:
- Durable products built to last (100% lifetime guarantee)
- UTV upgrades thoughtfully designed & tested by riders
- Outstanding installation support (videos & USA customer service)
- Constant flow of epic riding content (check out our social media)
We’re confident your RAVEK product will earn its place on your machine. Please call or e-mail us if we can help.
– Harry & Ricky (Brothers & Owners)
MESSAGE FROM THE DESIGNER
When I designed the UTV Multi-function Tail Light, I thought about all the aspects a UTV rider needs: added visibility, sleek look, and easy installation.
This product checks all the boxes, which is why I love it. It makes your machine look meaner and makes you and your ride crew safe at night on the trails.
![]() BUILT FOR MORE
BUILT FOR MORE
Documents / Resources
 |
RAVEK Can-Am Commander Plug and Play Multi-Function UTV Tail Light [pdf] User Guide Can-Am Commander Plug and Play Multi-Function UTV Tail Light, Can-Am, Commander Plug and Play Multi-Function UTV Tail Light, Play Multi-Function UTV Tail Light, UTV Tail Light, Tail Light, Light |