![]() Mk9 Central Unit Add on KIT
Mk9 Central Unit Add on KIT
Installation Guide User’s Manual
O2 Safety System
NOTE: Always test your set, BEFORE INSTALLATION!
The different sets are delivered pre-connected in the package.
Be aware! During the test a very loud sound will be emitted from the horn.![]() The test procedure is described in chapter 3.1 in this manual.
The test procedure is described in chapter 3.1 in this manual.
Explanations of symbols for the O2 Safety System
![]() Please note that whenever installing or disconnecting a system, refer to this manual first!
Please note that whenever installing or disconnecting a system, refer to this manual first!
![]() Double insulation protected equipment may also be called “Class 2”.
Double insulation protected equipment may also be called “Class 2”.
![]() Symbol for the marking of electrical and electronic equipment.
Symbol for the marking of electrical and electronic equipment.
(The symbol indicating separate collection for electrical and electronic equipment).
General information on O2-detection
NITROGEN GENERATORS
Please note that if a nitrogen generator is being used in the area where the O2 sensor is installed, the excess oxygen created by the nitrogen generator must be led out of the area. It is not allowed to use the O2 sensor in the area if the oxygen is not led out. The LogiCO2´s O2 Safety Systems measures the O2 concentration in an enclosed space environment and provides alerts/alarms in the event that O2 levels in that space reaches the pre-set alarm levels.
The O2 sensing devices uses optical analysis for detection of O2.
Depending on how the sensors alarm levels are set, if a sensor detects a low or high O2 level, the O2 sensor alerts via sound and light-diodes as well as remotely connected warning lamps, horns or horn/ strobes which will be activated. If it is connected to the Mk9 central unit it will also display which sensor has detected an O2 level alarm.
First after a self-diagnostics program has been done by the system the sensor will begin to detect O2 levels when powered on. The system is delivered pre-connected. With auxiliary kits, functionality can be substantially extended. There is a set which is comprised of one O2 sensor, one central unit, one horn/strobe as well as appropriate signs. As well as one with the Stand alone version.
O2 concentration levels (%) and effects (%)……………. Effect
20.9…………………. Normal.
19.0………………… Some unnoticeable adverse physiological effects.
16.0…………………. Increased pulse and breathing rate, impaired thinking andattention, reduced coordination.
14.0………………….. Abnormal fatigue upon exertion, emotional upset, faulty coordination, poor judgment.
12.5…………….. Very poor judgment and coordination, impaired respiration that may cause permanent heart damage, nausea and vomiting.
<10.0……………. Inability to move, loss of consciousness, convulsions, death.
Source:…………. Compressed Gas Association, 2001.
General LogiCO2 Safety System description
LogiCO2´s O2 Safety Systems measure O2 concentration in an enclosed space environment and provides alerts/alarms in the event that O2 levels in that space reaches a pre-set level. The O2 sensing devices uses an optical sensor for accurate detecting of O2. When installed properly, the system will continuously monitor the O2 concentration where a O2 sensor is located.

Depending on how the sensors alarm levels are set, if a sensor detects a low or high O2 level, the O2 sensor alerts via sound and light and remotely connected warning lamps, horns or horn/strobes will be activated. The central unit will alert with sound and display which sensor that has detected a low or high O2 level. A properly installed system will begin to detect O2 levels when powered on, after a self-diagnostics program has been made by the system.
The system is delivered as pre-connected sets with auxiliary kits to extend the function of the sets. The sets are comprised of one or more O2 sensors, with auxiliary central unit/s, horn/s and relay boxes.
Examples of sets and kits:
Test and installation
LEGAL NOTICE
![]() All persons responsible for the operation and maintenance of this equipment must read and understand the safety and operating information contained in this guide. Installation and service of this equipment should be performed only by professionals. The function of the equipment will be impaired if it is not properly installed. Disconnection from power supply source: when installing the O2 Safety System to the power net, please ensure that the fuse that the system runs on is clearly marked. This makes it easy to disconnect the power to the system, if needed.
All persons responsible for the operation and maintenance of this equipment must read and understand the safety and operating information contained in this guide. Installation and service of this equipment should be performed only by professionals. The function of the equipment will be impaired if it is not properly installed. Disconnection from power supply source: when installing the O2 Safety System to the power net, please ensure that the fuse that the system runs on is clearly marked. This makes it easy to disconnect the power to the system, if needed.
It is very important to be aware that the O2 Safety System does not function if disconnected from power mains.
3.1 Testing set, BEFORE INSTALLATION
The different sets are delivered pre-connected in the package. Always test the set before installation to verify proper function! NOTE: Be aware that during the test a very loud sound will be emitted from the horn.
 Open the box and carefully take the components out of the package.
 Find the power supply in the package and attach the correct mains-adaptor for your country’s outlet, then connect the power supply to the electrical outlet. The set should now activate.
 If you test a Mk9 detector set, please check that all LEDs on the central unit and the sensors illuminate and the built-in buzzers beep, this is part of the self-diagnostics
program. Approximately 3 seconds after connection all external horns and/or strobes (connected to the sensor) should be activated for approximately 5 seconds. Now your set is tested and you can start the installation.
Note! If additional kits are to be installed. Please check appropriate part of the manual for correct DIP-switch setting (ID-address).
3.2 Installation of the O2 Sensor
Correct placement of the O2 Sensor
The O2 sensor should be placed in the room where there is a risk for unsafe oxygen concentration – this would be at the distribution points of the nitrogen, nitrogen generator or nitrogen tank as well as mixed gas with nitrogen. Please observe, this does not necessarily have to be where the asphyxiant gas is stored, for example when it is stored outside and the gas is routed into the building via pipes.
It is also VERY IMPORTANT to be aware that the danger always is relative to how much asphyxiant gas is used and stored in relationship to the volume of the room in question.
NOTE: If the room has only mechanical ventilation, it should have a sensor. Installation of the O2 Sensor
The O2 sensor should be installed at breathing height, between 150-180 cm/5-6 feet from the floor.
Try to find an installation position where the unit is least likely to be damaged. Mount the O2 sensor with supplied mounting screws.
3.3 Installation of the Horn/Strobe 
- The horn/strobe/s must be installed on the wall above the O2 sensor, approximately 2-2.4 m/80-96 inches (as per NFPA 72) above the floor, clearly visible from any entrance of the area being monitored. It is recommended that a second horn/strobe be placed OUTSIDE the area being monitored, preferably placed over the door/s leading to the monitored area. This will require more than one horn/strobe. Mount the unit with supplied mounting screws.
- Mount the included warning signs so they are clearly visible, next to or above the horn/strobes, in a permanent way.
3.4 Installation of the Central Unit 
- If your set includes a central unit, it must be installed outside the area or room being monitored, for example on a wall in the manager’s office. The central unit must be installed at a clearly visible and reachable height.
- Mount the included information signs clearly visible, next to or above the units, in a permanent way.
3.5 Installation and connection of the cables The different units are connected to each other by cables. The blue marked cable is used for signalisation (horn/strobe, warning beacon and remote control box). The red marked cable is for communication and power. Please observe, all cables have splitters at the end to facilitate extended cable lengths. When installing, the cables may need to be disconnected for purposes of cable routing.
When reconnecting, please make sure that you connect to the original splitters and connectors. Make sure to mount the protective collar seals with the tie-wraps in order to protect the connections from moisture and dust. The collar seals as well as the tie-wraps are also delivered in the box that the sensor comes in. If possible, route the cables through cable conduits between the units, for a neat and safe installation.
Protective collar seals and cable ties are included. They must be used as below to protect the RJ45 1-1 connector or RJ45 1-2 splitter from moisture and dust.  3.6 Connection of the power supply
A separate power supply (100-240 VAC) supplies power to the system. Please observe that you have to connect the appropriate plug adaptor to the power supply depending on which country you are in.
Connect the power supply to the electrical outlet.
Mount the included plug-lock so that the power supply cannot be disconnected without the use of tools.
It is also possible to order a hardwired power supply option when and were it is needed.
Calibration
Automatic calibration
The LogiCO2 O2 sensor has an automatic self calibration function activated as standard, and no manual calibrations should be needed in normal conditions.
Manual calibration
Before a manual calibration can be done, the sensor needs to be powered for at least 20 minutes, to make sure it is heated up and adjusted to the environment. Try to make sure that the room is well ventilated.
Instruction:
![]() A more detailed instruction can be found in chapter 7.5, ”Service Mode Three”, in this manual.
A more detailed instruction can be found in chapter 7.5, ”Service Mode Three”, in this manual.
- Press and hold the button on the sensor for 10 seconds.
- An asterisk (*) is now flashing, in the upper right corner of the display.
- When the asterisk (*) is shown, push the button shortly. Repeat this five times in a row to enter the Calibration mode. For each correct push of the button, a dot will be shown in the lower left corner. If an incorrect push happens, the procedure starts over again, from step 2.
- The instructions in the display will say Push the button to start calibration. Push the button shortly and a 90 second timer will start counting down. If the calibration is
successful, the display will show “Calibration OK” and go back to Service Mode One, for 30 seconds, and then go to “normal view”.
Connection diagram
This connection diagram shows an example of how the system can be installed. Please note:
A separate installation manual is provided with each extra O2 sensor kit explaining the simple installation process for adding additional sensors to an existing set.
What to do in case of an Alarm?
| INDICATION | CAUSE | ACTION |
| Central Unit: •The red diode is ON •Constant sound signal Display: •Sensor number, 02 % and Gateway Alarm A |
ALARM! TAKE PRECAUTIONS Low concentration of 02 |
DO NOT ENTER the risk zone. Evacuate the area if 02 level is under 19.5%. |
| Central Unit: •The yellow diode is blinking •Beeping sound signal Display: •Sensor number, (Fault information) |
SYSTEM FAULT | Check the manual, communication cables and 02-Sensor. If no fault is found, call service. |
| After an alarm, always reset the system. | ALARM RESET | Press reset button on Central Unit until “Alarm cleared!” is shown in the display |
| Test the alarm to insure that communication, warning lamps and sounders function. | ALARM TEST | Press reset button on Central Unit until ‘Testing system” is shown in the display |
Mk9 O2 Sensor, General information
 7.1 General Description
The sensor is an O2 sensor with display that is used to monitor the O2 levels of an enclosed space. This unit can be connected to a Central Unit or to an existing Mk9 CO2 System for full functionality. Horn/strobes, flash units or external connection boxes can also be connected to the sensor for added functionality. The O2 sensor display shows the current O2 level and the current alarm settings.
The LogiCO2 oxygen sensor (O2) has a FBO oxygen sensor with built-in temperature and pressure adjustment. This means that it has an automatic altitude compansation function. The oxygen sensor is factory calibrated and measures the ambient oxygen partial pressure (ppO₂) levels. The sensor benefits from low power operation and a long lifetime, due to the optical sensing principle.
The O2-sensor is compatible with LogiCO2 Mk9 CO2 Safety System. It communicates via Modbus RTU with the LogiCO2 Mk9 Central unit and can be used together with the different LogiCO2 CO2 sensors. The unit is delivered together with a horn and strobe alarm device.
7.2 LED (Light Emitting Diode), buzzer and display indications
| Indication | Explanation |
| Green LED on | Unit in operation |
| Red LED on and constant sound signal | Alarm. Ambient 02 concentration level is under or over the alarm settings. The display on the 02 sensor will show the current 02 level and the information text: “EVACUATE AREA: Very critical 02 level!”. If the 02 level is under 19.5%, evacuate the area. The Central Unit will emit constant sound signal and the digital display will show “Gateway Alarm A”. Connected remote horns/strobes will be activated. |
| Yellow LED on and intermittent audible tone | Error. The display on the 02 sensor will show “Sensor error” or “System error”, together with an information text. A beeping tone will be made by the Central Unit. The error will be described in the display of the Central Unit until the fault has been rectified and cleared/reset on the Central Unit. |
7.3 Mk9 O2 Sensor, Internal layout 
| O2 Sensor | Function/Indication |
| 1. DIP-switch | ID settings |
| 2. LED yellow | Fault |
| 3. LED red | Alarm |
| 4. LED green | Power ON |
| 5. Buzzer | High-Alarm |
| 6. Display | Measurement and alarm information |
| 7. O2 Sensor | O2 measurement sensor |
| 8. RJ45 input connector | Power and communication (red connector) |
| 9. RJ45 output connector | Alarm outputs (blue connector) |
7.4 Mk9 O2 Sensor, DIP-switch settings
ID-address 1-8:
| ID- addres | Dip1 | Dip2 | Dip3 | |
| ID1 | OFF | OFF | OFF | 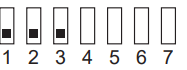 |
| ID2 | ON | OFF | OFF |  |
| ID3 | OFF | ON | OFF |  |
| ID4 | ON | ON | OFF |  |
| ID5 | OFF | OFF | ON |  |
| ID6 | ON | OFF | ON |  |
| ID7 | OFF | ON | ON |  |
| ID8 | ON | ON | ON |  |
Alarm levels:
The O2 sensor can be set to either make alarms in case of low O2 levels (depletion) or high O2 levels (enrichment). This is set using Dip 6. Dip 6 is OFF in the default setting, meaning the sensor will only make an alarm if low levels of O2 are detected.
| Alarm for low 02 levels (Depletion) |
Alarm for high 02 levels (Enrichment) |
Dip4 | DipS | |
| A-ALARM: 19.5% B-ALARM: 19.5% |
A-ALARM: 23.5% B-ALARM: 23.5% |
OFF | OFF |  |
| A-ALARM: 18.0% B-ALARM: 19.5% |
A-ALARM: 25.0% B-ALARM: 23.5% |
ON | OFF |  |
| A-ALARM: 18.0% B-ALARM: 18.0% |
A-ALARM: 25.0% B-ALARM: 25.0% |
OFF | ON |  |
| A-ALARM: 17.0% B-ALARM: 18.0% PC changeable |
A-ALARM: 25.0% B-ALARM: 24.0% PC changeable |
ON | ON |  |
Depletion or Enrichment:
| Depletion/Enrichment | Dip6 | |
| Alarm for low O2 levels (Depletion) | OFF |  |
| Alarm for high O2 levels (Enrichment) | ON |  |
7.5 Mk9 O2 Sensor, Display information
Display information during start-up:
| Start-up software version | Start-up test |
 |
 |
Display information during no alarm mode:
| Operation O2 concentration | Normal view |
 |
In normal view, the displays shows: The current O2 concentration in %. Also, the A-ALARM trig level and the B-ALARM trig level. These levels can be the same depending on the setting. The A-ALARM activates the audible (Horn) alarm device and the B-ALARM activates the optical (Strobe) alarm device. |
Display information during alarm mode:
O2 High-Alarm * Information text is only shown during alarm or error situations.
Display information during error/fault mode:
Error/Fault * Information text is only shown during alarm or error situations.
Display information – The service buttons three functions:
| 1. Service Mode One | |
 |
One short push: a. Reading of sensor element data, total run-time of the O2-sensor, days since the last manual Calibration. C: The readout of the total correction factor. P: The number of automatic background Calibrations. T: The ambient temperature (Celsius) at the last automatic bakgruound Calibration. b. To return to “normal display view”, push the button short or wait for 30 seconds. |
| 2. Service Mode Two | |
 |
In the “normal display view” push and hold the button for 10 seconds: a. Reset of the number of automatic background Calibrations (P:). Release the button. b. To return to “normal display view”, wait for 30 seconds. c. In this mode it is possible to go to Service Mode Three. |
| 3. Service Mode Three | |
Entering Service Mode Three Service Mode Three Service Mode Three Service Mode Three calibration Service Mode Three calibration |
Calibration*: In the “normal display view”, push and hold the button for 10 seconds: a. When the asterisk (*) in the upper right corner of the display is lit, push the button shortly. Repeat this five times in a row to enter the Calibration mode. For each correct push of the button, a dot will be lit in the lower left corner. If an incorrect push happens, the procedure starts over again. The reason for this advanced way to enter the Calibration is to avoid unintentional calibration. b. If no further actions is performed for 1 minute, in Calibration mode, the O2 Sensor will go back to Service Mode One. c. The instructions in the display will say ”Press the button to start the calibration”. Push the button shortly and a 90 second timer will start counting down. If the calibration is successful, the display will show “Calibration OK” and go back to Service Mode One, for 30 seconds, and then go to “normal view”. If the display says “Calibration Error”, try to ventilate the room more and make a new calibration. If the calibration still fails, replace the O2-sensor. |
* Calibration – Only to be performed by trained and certified service personnel.
7.6 Mk9 O2 Sensor, Specifications
| Power supply: | 24V DC |
| Power consumption: | <30 mA |
| Wiring connections: | RJ 45 |
| Digital interface: | RS485 serial port MODBUS |
| Outputs: | 2 x transistor output 24V DC, Min 1 mA |
| Display: | Graphical 128×64, backlit |
| Acoustic signal-strength: | 76 dBa (1m) max. |
| Operating principle: | FB-optical |
| O2 measuring range: | 0-25 Vol.% |
| Accuracy O2: | <2% FC |
| Ambient temperature: | -20 to +50°C (-4 to +122°F). Only for indoor use. |
| LED indications | |
| Green: | Operation |
| Yellow: | Fault |
| Red: | Alarm (<19.5% O2) |
| Sound indications | |
| Beeping: | Fault |
| Continuous: | Alarm |
| Approvals: | Tested in accordance with DIN6653-2, applied to O2 sensors. |
| Dimensions (LxWxD): | 90 x 161 x 38 mm / 3.5” x 6.3” x 1.5” |
| Ingress protection: | IP54 |
Please observe that since this is a safety product we recommend that a function control should be carried out at least once a year. For more information see chapter 9.5 “Test the system” and chapter 4 “Calibration”.
Horn/Strobe LED, General information
 8.1 General Description
The horn/strobe is equipped with a pre-wired cable for connection to the O2 Safety System. The horn/strobe is power supplied from the O2 sensor. Horn/Strobe LED is a loud warning horn (110 dB/1 m) and high intensity strobe (115 cd).
8.2 Horn/Strobe, Warning Sign
The sign for the horn/strobe should be mounted in a permanent way next to the unit.![]() 8.3 Horn/Strobe LED, Specifications
8.3 Horn/Strobe LED, Specifications
| Nominal voltage: | 18-24V DC |
| Average current: | 120 mA @ 24V DC supply |
| Decibel: | 110 dB / 1 m (High-Alarm) |
| Flash intensity: | 115 cd (Low-Alarm) |
| Flash frequency: | 65/min |
| Ambient temperature: | -5°C to +50°C (+23°F to +122°F) |
| Dimensions (LxWxD): | 134 x 115 x 61 mm / 5.3” x 4.5” x 2.4” |
| Ingress protection: | IP65 |
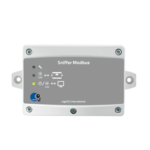
Mk9 Central Unit, General information
 9.1 General Description
The Central Unit has a display that is used to monitor and control a O2 Safety System with up to eight sensors. The central unit is multi-lingual and it displays information text for all alarm and error conditions. It also displays the O2 values of all connected O2 sensors, indicating which sensor the value comes from. The central unit has an alarm memory that remembers and reactivates any alarm after a power interruption.
9.2 LED (Light Emitting Diode), buzzer and display indications
| Indication | Explanation |
| Green LED on | Unit in operation |
| Red LED on and constant sound signal | Alarm. Ambient O2 concentration level is under or over the alarm settings. The display will show “Gateway Alarm A”, indicating which sensor the alarm comes from. Connected remote horn/strobes will be activated. If the O2 level is under 19.5%, evacuate the area. |
| Yellow LED on and intermittent audible tone | System fault. The error will be described in the display until the fault has been rectified and cleared/reset on the central unit. |
9.3 Mute/reset button
On the right side of the display, there is a sound mute/reset and test button. A short push on the reset button mutes the internal buzzer during an alarm situation. Push and hold the reset button for approximately 4 seconds to clear/reset an alarm. “Alarm Cleared!” is shown in the display.
 9.4 O2 Alarm
In case of Alarm, the buzzer in the central unit may be muted by pressing the reset button shortly. The alarm can only be totally cleared/reset when the O2 level is within the alarm level settings.
9.5 Test the system
To test all alarm indications (horn/strobe/LED/buzzer), push and hold the reset button for approx. 10 seconds. “Testing system…” is shown in the display.
 9.6 System fault
In the event of a system fault, the yellow LED is activated and a beeping tone will be made by the central unit. The error will be described in the display until the fault has been rectified and cleared/reset on the central unit.
9.7 Removal of the Mk9 unit cover
If the cover of the Mk9 central unit or the O2 sensor needs to be removed please observe the following order of screw reassambling.
Note! When remounting the cover, be careful not to damage the reset button. 9.8 Mk9 Central Unit, Internal layout

| Central Unit | Function/Indication |
| 1. DIP-switch | Setting number of connected O2 sensors |
| 2. LED yellow | Fault |
| 3. LED red | Alarm |
| 4. LED green | Power ON |
| 5. Buzzer | Alarm |
| 6. Display | Measurement and alarm information |
| 7. Mute/Reset/Test button | Mute/Reset/Test button |
| 8. RJ45 input connector | Power and communication |
| 9. RJ45 output connector | Power and communication |
9.9 DIP-switch settings
All DIP-switches are set to OFF as default.
Default functions/settings:
 – Connection to one O2 sensor
The number of connected O2 sensors is set on dip 1-3.
Dip 4-8 are not used and must be in position OFF.
9.10 DIP-switch settings, Number of connected sensors
Dip 1-3. NOTE! Dip 4-8 is not in use and must be placed in “OFF” position
It is possible to expand the system with up to eight Mk9 O2 sensors, Mk9 CO2 sensors or Mk90 CO2 sensors.
| Number of connected sensors |
Dip1 | Dip2 | Dip3 | Dip 4-8 Not used | DIP-swith |
| 1 connected sensor | OFF | OFF | OFF | OFF |  |
| 2 connected sensors | ON | OFF | OFF | OFF |  |
| 3 connected sensors | OFF | ON | OFF | OFF |  |
| 4 connected sensors | ON | ON | OFF | OFF |  |
| 5 connected sensors | OFF | OFF | ON | OFF |  |
| 6 connected sensors | ON | OFF | ON | OFF |  |
| 7 connected sensors | OFF | ON | ON | OFF |  |
| 8 connected sensors | ON | ON | ON | OFF |  |
9.11 Mk9 Central Unit, Display information
Display information during start-up:
| Software version | Cycle/Start-up |
 *FW = Firmware version |
 |
Normal display information, one O2 sensor connected:
One O2 sensor is attached Display information during O2 alarm mode:
O2 Alarm Display information during error alarm mode:
Central unit display together with blinking yellow LED and intermittent internal buzzer.
Fault in the O2 sensor measuring device
Error Alarm
 9.12 Error alarm codes (shown in the Central Unit display):
| Fault message | Measures |
| Out of range! | O2-measuring fault. |
| Sensor error! | Internal fault in O2-Sensor. |
| Lost sensor! | Communication error. Check red cabling and connectors. Check affected O2 Sensors ID- number. |
9.13 Mk9 Central Unit, Warning Sign
The sign for the Mk9 central unit should be mounted in a permanent way next to or above the unit. 9.14 Mk9 Central Unit, Specifications
| Supply: 24 | 24V DC |
| Current consumption: | No alarm status: 21 mA Alarm status: 32 mA |
| Communication: | RS485, Modbus |
| Display: | Graphical 128×64, backlit |
| Acoustic signal-strength: | 80 dBa (1m) max. |
| Ambient temperature: | 0 to +40°C (+32°F to +102°F) |
| Humidity: | 0-90% non condensing |
| Approval: | CE: Emission tests according SS-EN 61000-6-3 and the immunity tests according to SS-EN 61000-6-2. Manufactured in accordance with DIN 6653-2. The O2 Safety System is tested by the German TÜV-Rheinland. Certified by UL. |
| Dimensions (LxWxD): | 90 x 161 x 38 mm / 3.5” x 6.3” x 1.5” |
| Ingress protection: | IP44 |
Plug-In Power Supply, Specifications
| Type: | Model FJ-SW2401000N |
| Input voltage: | 100-240V AC, 50/60 Hz, max 0.5 A. |
| Output: | 24V DC, max 1.0 A |
| Ambient temperature: | 0-40°C (+32°F to +102°F) |
| Dimensions (LxWxD): | 82.4 x 44.5 x 36.2 mm / 3.2” x 1.8” x 1.4” + input plug |
It is also possible to order a hardwired power supply option when and were it is needed.
Environmental conditions for the system
a) For indoor use.
b) Altitude operating range to 5500m (18000 ft).
c) Ambient temperature 0°C to +40°C.
d) Maximum relative humidity 95% (non condensing).
e) Mains supply voltage fluctuations up to ±10% of the nominal voltage.
f) Transient overvoltages up to the levels of overvoltage category II.
NOTE: These levels of transient overvoltage are typical for equipment supplied from the building wiring.
g) Pollution degree 2.
Service and maintenance
- Should be performed only by authorized professional service agents who are familiar with the O2 Safety System and all pertinent safety and service procedures. Contact your representative for the name of the authorized service agent(s) in your area.
- Since this is a safety product we recommend that a function check be performed on the O2 Safety System by a qualified professional service agent at least once every year.
- The O2 Safety System has no user serviceable parts. All service work should be performed by an authorized professional agent.
- NOTE: Any attempt to service the equipment by unauthorized persons or to perform unauthorized modifications will void the warranty.
- The O2 sensor and central unit housing must NEVER be opened by unauthorized personnel.
- Cleaning is done by use of water on a moistened cloth.
Function and installation check
| Store Name (Store Number) | |
| Address | |
| City | |
| State / Region | |
| Zip Code | |
| Country | |
| Date of inspection | |
| Service Provider’s Company Name | |
| Repair Company Name (if different) |
13.1 Power supply control
If a plug-in power supply is used, make sure that the plug-lock is mounted in a way to eliminate the risk for the power supply to be un-plugged.
| Checklist Power supply | YES | NO |
| Is it a hardwired power-supply (directly connected to the power network without any plug, OBSERVE not for the US)? |
||
| Is it a plug-in power supply? | ||
| If it is a plug-in power supply, is the plug-lock securely mounted (or any other mechanical system that eliminates the risk for the power supply to be un-plugged)? |
13.2 Central Unit check
 The central unit must be mounted at a height and where it is easily reachable (to control/reset the system and to read the values/messages). The sign “What to do” must be mounted in a permanent manner (NOT TAPE) next to the central unit so that the personnel can easily read it. Phone number of the service provider responsible if there is a O2 alarm, should be registered on the “What to do” sign. When the central unit is running properly, the green diode (ON) is ON, and the screen should display the O2 levels of the O2 sensor or sensors that are connected.
| Checklist Central Unit | YES | NO |
| Is the central unit mounted in a way that makes it easy to read? | ||
| Is the “What to do” sign mounted next to the central unit and is it easily readable? | ||
| Is the “What to do” sign mounted in a permanent way? | ||
| Is the phone number of the service provider, which is responsible if there is a O2 | ||
| alarm, written on the “What to do” sign? | ||
| Is the green diode ON? | ||
| Is the yellow diode (Error) ON? | ||
| Is the red diode (Alarm/Alert) ON? | ||
| Is any error message displayed? if yes, what is it…………………….…………… |
13.3 O2 Values displayed on the Central Unit
When the system is running properly, the O2 level measured by each sensor is displayed in % (actual value). The values are displayed on the second line of the display. The first character displayed is the sensor ID and the value is displayed after.
| Checklist O2 Values | Value in % |
| Sensor 1 | |
| Sensor 2 | |
| Sensor 3 | |
| Sensor 4 | |
| Sensor 5 | |
| Sensor 6 | |
| Sensor 7 | |
| Sensor 8 |
13.4 Mk9 O2 Sensor check
 Each sensor should be mounted at breathing height, between 150-180 cm/5-6 feet from the floor. The warning lamp should be mounted so that it can easily be seen by the personnel without entering the zone at risk. Under normal conditions the O2 value displayed should read between 20-21%.
Checklist Mk9 Sensor 1, Specifications
| Sensor serial number (normally written on a sticker on the side of the sensor housing). | |
| O2 Value on sensor | % |
| Checklist Mk9 Sensor 1 | YES | NO |
| Is the green diode ON? | ||
| Is the yellow diode ON? | ||
| Is the red diode ON? | ||
| Is the horn/strobe mounted at a height of 2.0-2.4 m/80-96 inches, so that the staff can see it without any obstructions in the way? | ||
| Is there a O2 warning sign mounted next to the horn/strobe, with a telephone number to the service provider? | ||
| Is the O2 warning sign next to the horn/strobe or warning lamp mounted in a permanent way? | ||
| Is a horn/strobe installed above the sensor at a height of 2.0-2.4 m/80-96 inches? | ||
| Is there a O2 warning sign mounted next to the horn/strobe? | ||
| Is this O2 warning sign, next to the horn/strobe, mounted in a permanent way? |
 Checklist Mk9 Sensor 2, Specifications
| Sensor serial number (normally written on a sticker on the side of the sensor housing). | |
| O2 Value on sensor | % |
| Checklist Mk9 Sensor 1 | YES | NO |
| Is the green diode ON? | ||
| Is the yellow diode ON? | ||
| Is the red diode ON? | ||
| Is the horn/strobe mounted at a height of 2.0-2.4 m/80-96 inches, so that the staff can see it without any obstructions in the way? | ||
| Is there a O2 warning sign mounted next to the horn/strobe, with a telephone number to the service provider? | ||
| Is the O2 warning sign next to the horn/strobe or warning lamp mounted in a permanent way? | ||
| Is a horn/strobe installed above the sensor at a height of 2.0-2.4 m/80-96 inches? | ||
| Is there a O2 warning sign mounted next to the horn/strobe? | ||
| Is this O2 warning sign, next to the horn/strobe, mounted in a permanent way? |
13.5 Installation Record
The two year warranty as of the date of installation is only valid when this form has been completed.
| Installing company: | |
| Name of installer: | |
| The LogiCO2 O2 Safety System has been properly installed and tested by an authorized person. Operation instructions have been provided by: | |
| Date: | |
| Signature/installation company: | |
| Signature/user: |
Warranty
Warranty Policy
LogiCO2 warrants to the Purchaser of the O2 Safety System equipment for two years from the installation date that said equipment shall be free from any defects in workmanship and materials.
Purchaser agrees that as a pre condition to any LogiCO2 liability hereunder, Purchaser or its appointed agents shall fully inspect all goods immediately upon delivery and shall give LogiCO2 written notice of any claim or defect within ten (10) days after discovery of such defect.
As a further pre condition to any LogiCO2 liability about hereunder, both parts replacement and labour must be supplied by an approved LogiCO2 service company. LogiCO2 may elect to repair or replace such equipment or any defective component or part thereof which proves to be defective, or to refund the purchase price paid by the original Purchaser. LogiCO2 shall not be liable for defects caused by the effects of normal wear and tear, erosion, corrosion, fire, explosion, misuse, or unauthorized modification. Alterations or repair by others than those designated and approved by LogiCO2 or operation of such equipment in a manner inconsistent with LogiCO2 accepted practices and all operating instructions, unless pre authorized in writing by LogiCO2, shall void this Warranty.
LogiCO2’s sole and exclusive liability under this Warranty is to the Purchaser and shall not exceed the lesser of the cost of repair, cost of replacement, or refund of the net purchase price paid by the original Purchaser. LogiCO2 is not liable for any losses (including O2), damages, or costs of delays, including incidental or consequential damages. LogiCO2 specifically makes no warranties or guarantees, expressed or implied, including the warranties of merchantability or fitness for a particular purpose or use, other than those warrantied expressed herein.
Warranty Claims Procedure
All warranty claims must be previously authorized by: LogiCO2 / electronic approval may be obtained by contacting: E-mail info@logico2.com.
Authorization must be obtained from LogiCO2 prior to shipping any equipment to LogiCO2 facilities. The customer returning the goods is responsible for all freight, proper packing, and any damage incurred during shipment of the goods back to LogiCO2.
IMPORTANT
All persons responsible for the use and maintenance of this equipment must read and understand the safety and operating information contained in this guide. Installation and service of this equipment should be performed only by professionals. The function of the equipment will be impaired if it is not properly installed.
Important information regarding third party products
The functionality of LogiCO2’s products are only warranted if connected to LogiCO2’s systems and products. LogiCO2 is not liable for the functionality of any systems if LogiCO2 components or parts are connected to third party products. LogiCO2 permits its products to be connected to external relays controlling ventilation and valves as well as fire alarm panels and building management systems.
Subject to typographical errors and change without prior notice.
Contact information
Sales and service contact:
For parts or service contact your local authorized supplier or equipment service agent.
Company: ………………………………………………….
Phone: ……………………………………………………..
Place company stamp or sticker here
![]() Manufactured by:
Manufactured by:
LogiCO2 International AB
Box 9097
400 92 Gothenburg, Sweden
E-mail: info@logico2.com
Web: www.logico2.com
© 2023-01-31 R4.0 LogiCO2 HFE1109 EN
Documents / Resources
 |
logico2 Mk9 Central Unit Add on KIT [pdf] Installation Guide Mk9 Central Unit Add on KIT, Mk9, Central Unit Add on KIT, Add on KIT |