![]() Soundbar Measurement Using HDMI
Soundbar Measurement Using HDMI
Connection
Introduction
This sequence demonstrates how to measure the output of a soundbar over an HDMI connection using the WASAPI (Windows Audio Session API) driver option in SoundCheck. The sequence is not exclusive to soundbars. Any audio device that accepts audio over HDMI (e.g. TV, computer monitor, home theater speakers, etc.) can be tested using this sequence.
The sequence itself is quite simple, containing 4 steps: Stimulus, Acquisition, Analysis and Display. Frequency response, THD, Rub & Buzz and ePRB are shown on the final display. More important are the instructions for configuring your SoundCheck system’s Hardware and Calibration to support the HDMI connected device:
- Hardware: Digital hardware output channels are created and configured with the WASAPI driver option.
- Calibration: Digital output Signal Paths are created, assigned to the digital hardware channels and digital calibrated device files are assigned to the Signal Paths.
 Why use WASAPI?
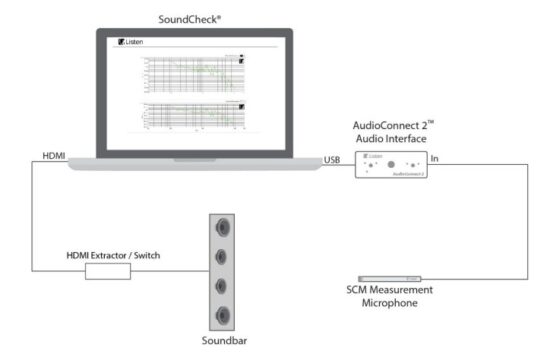
WASAPI is Windows’ high-end method for interfacing with audio devices and has many benefits over its predecessor, WDM (Windows Driver Model). Most significantly, WASAPI provides multichannel support, more stable latency than WDM and unlike ASIO, multiple WASAPI devices can be used simultaneously. In this example, we are using an ASIO audio interface (Listen’s AudioConnect 2) for our input and a soundbar connected over HDMI using WASAPI for our output.
Requirements
Software:
- SoundCheck Basic – Version 22 or higher
Hardware:
- p/n 4012 – Listen SCM4 reference microphone or equivalent.
- p/n/ 4047 – Listen AudioConnect 2 audio interface/microphone power supply or equivalent
- HDMI extractor / switch (for ARC/eARC devices)
Setup & Calibration
- Calibrate your reference microphone as instructed in the SoundCheck user manual.
- Connect the HDMI device to your SoundCheck PC (an HDMI extractor/switch may be required for eARC/ARC devices)
- Configure SoundCheck
a. Connect your device to the computer’s HDMI port (via the HDMI extractor switch, if used) before launching SoundCheck.
b. Launch SoundCheck and go to Setup> Hardware > Audio Tab > Output Channels Table
c. Right click on the Channel Name column, select Add Channel and name it HDMI 1.
d. Select WASAPI from the “Driver” dropdown list.
e. Select your HDMI device from the “Device” dropdown list.
f. Select the desired HDMI output from the “Channel” dropdown list.
g. Under “Type” select Digital
h. Set the sample rate to be the same as your Input Channel hardware.
i. Add a second HDMI output channel (HDMI 2) as described above.
Your Audio Tab should look similar to this: 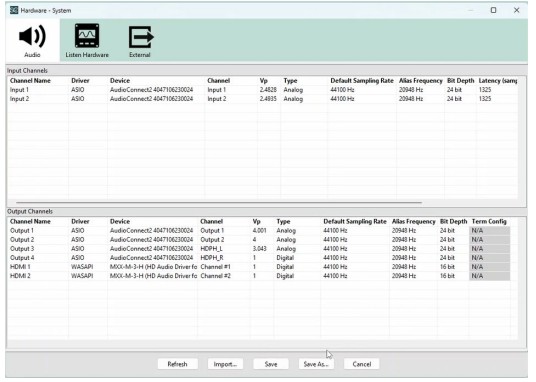 j. Configure the calibration editor. Open the sequence from the distribution folder. You will likely encounter a relink dialog informing you that the Signal Paths HDMI Out 1 and HDMI Out 2 do not exist in your current calibration setup. You may add these paths to your existing calibration (recommended) or use existing signal paths.
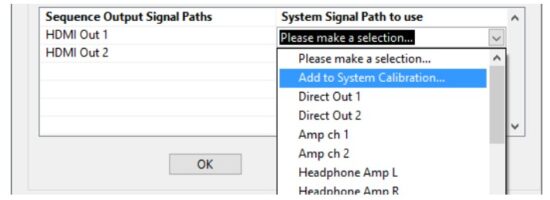
If you add these paths to your calibration, you will be asked if you want to import the calibrated device files to which you should respond ‘No’ since the calibrated device file (Unity Digital Out (AES17)) is included as a part of your default SoundCheck installation.
Place the reference microphone 0.5 meter from the HDMI device, centered between the left and right speakers.
You are now ready to run the sequence.
System Diagram
Further sequence development
This sequence has been designed for simplicity, to be accessible to 100% of SoundCheck users. Ways to modify or further develop the sequence include:
- Edit the stimulus start stop frequencies, resolution, and level to suit your device.
- Add Limits and Autosave steps.
- Add a 2nd microphone for left/right nearfield measurements.
- Configuring additional outputs for devices with more than 2 output channels
- Explore other connectivity options for your device. It may support one or more of the following:
a. SPDIF (Optical)
b. SPDIF (Coax)
c. Analog
d. Bluetooth
![]() Listen, Inc. • Boston, MA 02118
Listen, Inc. • Boston, MA 02118
sales@listeninc.com
Documents / Resources
 |
Listen Soundbar Measurement Using HDMI Connection [pdf] Instructions Soundbar Measurement Using HDMI Connection, Measurement Using HDMI Connection, Using HDMI Connection, HDMI Connection, Connection |