
Mr. Christmas
Alexa Compatible LED Christmas Tree
Instruction Manual
FOR INDOOR USE ONLY
Step 1: Check the contents of your box
- Your tree will come in various combinations depending on the size. (Figure 1)
- A metal tree stand with 3 eyebolts. (Figure 2)
- Control box and power cord with adaptor. (Figure 3)
- “Ornament” with voice activated command list. (Figure 4)
- Number of spare bulbs for each: 4 (5ft) /6 (6.5ft) /10 (7 ft) /12 (9 ft) (Figure 5). These can be found in the poly bag attached to the end of the light strand inside the tree.


Step 2: Stand Assembly ( Figure 6 ~ 8 )
Place the stand in your desired location as once the tree is fully assembled it may be too difficult to move and relocate.
- Open the tree stand to form an “X”. (Figure 6 and Figure 7)
- Align the threaded holes to insert each eyebolt. Make only a few clockwise turns leaving room to insert bottom section. (Figure 8)

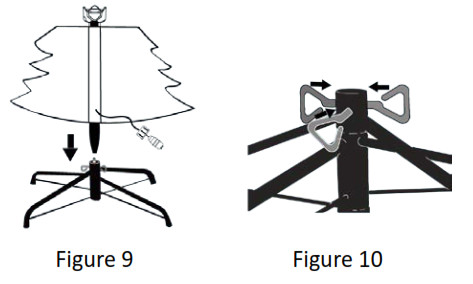
Step 3-A Tree Assembly (Figure 9 ~ 11)
- Locate the bottom section (B or C depending on tree size) and insert into the top of tree stand. (Figure 9).
- Fully tighten the 3 pins into place. Secure the tree base firmly to the tree stand. (Figure 10).
- Insert the remaining section (A or B+A depending on tree size) in the proper order. (Figure 11)
IMPORTANT TREE SET UP TIPS:
- Shake the tree well after assembly to ensure the branches are extended.
- Some shaping of the tree may be required for best appearance.
- Spare bulbs are included in a small bag inside the tree. Remove from the tree and keep in case replacement is needed.

Step 3-B Extend all branches and twigs and shape until the tree looks full.

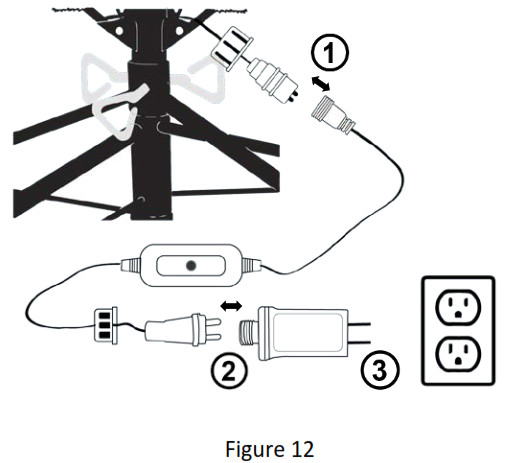
Step 4: Connect Controller and AC Power Adapter (Figure 12).
Attach the power cord with adaptor to the control box, plug the adaptor into an AC power source.
Step 5: Connect to Alexa
- Download the “Amazon Alexa” application from the app store on your mobile device.
- Install and open the “Amazon Alexa” application.
- Go to the settings menu.

- Select “Add Device”
- Select “Christmas Tree” and follow the on-screen instructions.
- To set up a second tree, select “Second Christmas Tree” and follow the on-screen instructions. Alexa will ask for clarification if a command does not target a specific tree.
Barcode Scanning & Location (Figure 13) Note that during device setup you may be asked to scan a device barcode. You can find this on the back of the controller, shown in Figure 13.

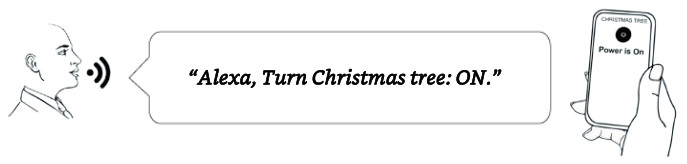
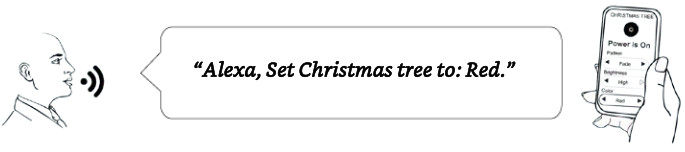
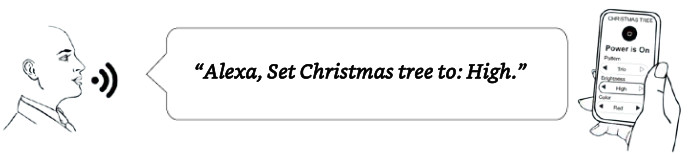
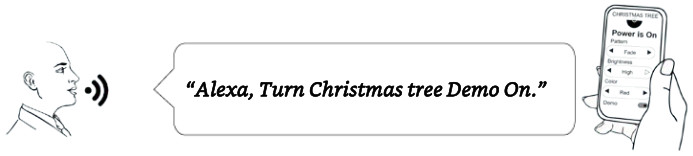
Step 6-A: Change your Christmas Tree LED lighting Mode using Alexa
Follow the voice commands for a list of functions to achieve up to 55 lighting functions. (Figure 14)
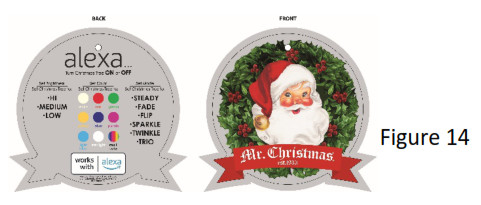 Color options
Command “Set Christmas tree to”
| 1. White 2. Red 3. Green 4. Yellow 5. Blue |
6. Purple 7. Light blue 8. Starlight 9. Multi Color |
Light functions
Command “Set Christmas tree to” :
| A. Steady B. Fade C. Flip |
D. Sparkle E. Twinkle F. Trio |
Brightness Settings
Command “Set Christmas tree to” :
| I. High II. Medium |
III. Low |
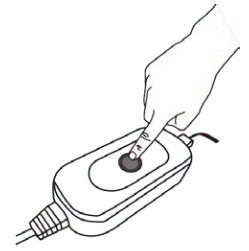
Step 6-B: Manually change your Christmas Tree LED lighting mode
Push Button on Control Box to switch Christmas Tree LED Light Mode. There are a total of 55 lighting modes:
| 00. Power Off 01. White Steady 02. Red Steady 03. Green Steady 04. Yellow Steady 05. Blue Steady 06. Purple Steady 07. Light Blue Steady 08. Starlight Steady 09. Multi Color Steady |
10. White Fade 11. Red Fade 12. Green Fade 13. Yellow Fade 14. Blue Fade 15. Purple Fade 16. Light Blue Fade 17. Starlight Fade 18. Multi Color Fade |
| 19. White Flip 20. Red Flip 21. Green Flip 22. Yellow Flip 23. Blue Flip 24. Light Blue Flip 25. Purple Flip 26. Starlight Flip 27. Multi Color Flip |
28. White Sparkle 29. Red Sparkle 30. Green Sparkle 31. Yellow Sparkle 32. Blue Sparkle 33. Purple Sparkle 34. Light Blue Sparkle 35. Starlight Sparkle 36. Multi Color Sparkle |
37. White Twinkle 38. Red Twinkle 39. Green Twinkle 40. Yellow Twinkle 41. Blue Twinkle 42. Purple Twinkle 43. Light Blue Twinkle 44. Starlight Twinkle 45. Multi Color Twinkle |
46. White Trio 47. Red Trio 48. Green Trio 49. Blue Trio 50. Yellow Trio 51. Light Blue Trio 52. Purple Trio 53. Starlight Trio 54. Multi Color Trio 55. Demo Mode |
Demo Mode: The Demo mode will start and play all 54 lighting functions every 8 seconds.
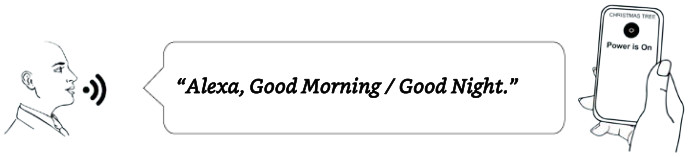
Step 6-C: Automate your Christmas Tree with Routines
Alexa Routines allow you to automate your Christmas Tree Functionality. With Routines, you can turn your tree on with custom commands (i.e. Good Morning) or turn the tree on/off at scheduled times (i.e. every day at 10AM)
How to Enable Routines with Alexa.
- Open the Alexa app.
- Go to the menu and select “Routines”
- Select
 Plus
Plus - Select “When this happens”, and then choose how to begin your Routine (i.e. “Good Morning, or a scheduled time).
- Select “Add Action”, select “Smart Home”, and then select “Christmas Tree”. Configure the desired LED lighting mode for your selected action.
Example 1: Turn Christmas Tree ON
 Example 2: Set lighting mode to Red
 Example 3: Set brightness mode to High
Example 4: Set lighting mode to Fade
 Example 5: Set lighting mode to Demo
Example 6: Turn Christmas Tree on with Routine
 Connectivity Troubleshooting
- I can’t connect my device to Alexa.
• Check your WI-FI settings
• Make sure that your Alexa device and your Christmas Tree are connected to the same Wi-Fi network.
• Make sure that all devices have the most updated Wi-Fi password.
• Check the distance to your Alexa smart speaker
• Check that your device is within 30 ft. (9 m) of your Christmas Tree.
• Check your software version
• Check that your Alexa device and the Alexa app have the latest software version. - I can’t get my Christmas Tree barcode to scan successfully.
• Make sure that there is enough light in the area for the bar code to be detected.
• If that does not work, then during the Alexa mobile app setup process, select “Don’t Have a Barcode” and follow the on-screen instructions. - My Christmas Tree stopped working with Alexa.
• Try a power cycle: Unplug your Christmas Tree from the outlet, and then plug it back in.
• Perform a factory reset : To reset your Alexa Tree: press and hold the button on the control box for 10 seconds. Indication of action done: 3 flashes of white light. Then follow the instructions below.
• Open the “Amazon Alexa” application.
• Go to the settings menu.
• Select “Add Device”
• Select “Christmas Tree” and follow the on-screen instructions. - I can only turn my Christmas Tree On and Off with Alexa.
• Although the Alexa tree can be added to a group, the color and function selections will not work using the group name.
• Color and Function can only be selected by using the utterance “Christmas Tree.” - Alexa is not responding to some but not all of my utterances
• Alexa will not work if you have more than one Alexa device with a similar name
• Rename one of the devices. It is recommended to always store the tree in a cool, dry location protected from excessive exposure to heat or sunlight. - Should a bulb get out of color sync in respect to the light set color selected by Alexa Command, this can be readily fixed by switching out the individual bulb with the replacement bulb provided.
IMPORTANT SAFETY INSTRUCTIONS
When using electrical products, basic precautions should always be followed including the Following:
a) READ AND FOLLOW ALL SAFETY INSTRUCTIONS.
b) Do not use seasonal products outdoors unless marked suitable for indoor and outdoor use. When products are used in outdoor applications, connect the product to a Ground Fault Circuit Interrupting (GFCI) outlet. If one is not provided contact a qualified for proper installation.
c) This seasonal use product is not intended for permanent Installation or use.
d) Do not mount or place near gas or electric heaters, fireplace, candles or other similar sources of heat.
e) Do not secure the wiring of the product with staples or nails, or place on sharp hooks or nails.
f) Do not let bulbs rest on the supply cord or on any wire.
g) Unplug the product when leaving the house, when retiring for the night, or if left unattended.
h) This is an electric product-not a toy! To avoid risk of fire, burns, personal injury and electric shock it should not be played with or placed where small children can reach it.
i) Do not use this product for other than its intended use.
j) Do not hang ornaments or other objects from cord, wire, or light string.
k) Do not close doors or windows on the product or extension cords as this may damage the wire insulation
l) Do not cover the product with cloth, paper or any material not part of the product when In use.
m) This product is equipped with push-in type bulbs. Do not twist bulbs.
n) Read and follow a instructions that are on the product or provided with the product.
o) Save these instructions.
User Servicing Instructions
Replace the bulb. (Figure 18)
- Grasp plug and remove from the receptacle or other outlet device. Do not unplug by pulling on cord.
- Pull bulb and plastic base straight out of bulb holder
- Replace bulb with only 3 Volt 0.06 Watt LED type bulb (provided with product).
If the new bulb base does not fit in bulb holder, follow the steps below before step 3.
a) Remove the base of burned out bulb by straightening bulb leads and gently pull bulb out.
b) Thread leads of new bulb through holes In old base with one lead in each hole.
c) After bulb is fully inserted into base, bend each lead up like other bulbs in the light set. so that the leads will touch the contacts inside the bulb holder.

CAUTION
- To reduce the risk of fire or electric shock do not attempt to replace bulbs or modify string.
- To reduce the risk of fire and electric shock
a) Do not install on trees having needles, leaves or branch coverings of metal or materials which look like metal, and
b) Do not mount or support strings in a manner that can cut or damage wire insulation. - This is not a toy, for decorative use only.
This device complies with Part 15 of the FCC Rules. Operation is subject to the following two conditions:
- this device may not cause harmful interference, and
- this device must accept any interference received, including interference that may cause undesired operation.
WARNING: Changes or modifications to this unit not expressly approved by the party responsible for compliance could void the user’s authority to operate the equipment.
NOTE: This equipment has been tested and found to comply with the limits for a Class B digital device, pursuant to Part 15 of the FCC Rules. These limits are designed to provide reasonable protection against harmful interference in a residential installation. This equipment generates, uses and can radiate radio frequency energy and, if not installed and used in accordance with the instructions, may cause harmful interference to radio communications. However, there is no guarantee that interference will not occur in a particular installation. If this equipment does cause harmful interference to radio or television reception, which can be determined by turning the equipment off and on, the user is encouraged to try to correct the interference by one or more of the following measures:
- Reorient or relocate the receiving antenna.
- Increase the separation between the equipment and receiver.
- Connect the equipment into an outlet on a circuit different from that to which the receiver is connected.
- Consult the dealer or an experienced radio/TV technician for help.
Made by Mr. Christmas Inc.
6045 E. Shelby Dr., Suite 2, Memphis TN 38141-7601
Email: customerservice@mrchristmas.com
Customer service number: 1-800-453-1972
Made in China
Model #: H259964, H259965, H259966, H259967
H259968, H259969, H25970, H259971 68341, 68342, 68343, 68344, 68345, 68346, 68347, 68348
This device complies with part 15 of the FCC Rules. Operation is subject to the following two conditions:
- this device may not cause harmful interference, and
- this device must accept any interference received, including interference that may cause undesired operation.
Any changes or modifications not expressly approved by the party responsible for compliance could void the user’s authority to operate the equipment. NOTE: This equipment has been tested and found to comply with the limits for a Class B digital device, pursuant to Part 15 of the FCC Rules. These limits are designed to provide reasonable protection against harmful interference in a residential installation. This equipment generates, uses and can radiate radio frequency energy and, if not installed and used in accordance with the instructions, may cause harmful interference to radio communications. However, there is no guarantee that interference will not occur in a particular installation. If this equipment does cause harmful interference to radio or television reception, which can be determined by turning the equipment off and on, the user is encouraged to try to correct the interference by one or more of the following measures:
- Reorient or relocate the receiving antenna.
- Increase the separation between the equipment and receiver.
- Connect the equipment into an outlet on a circuit different from that to which the receiver is connected.
- Consult the dealer or an experienced radio/TV technician for help. The device has been evaluated to meet general RF exposure requirement. The device can be u sed in portable exposure condition without restriction
FCC ID: 2AZ4R-68341
Documents / Resources
 |
Lamues Light Enterprise 68341 RGB Light String With Bottom Controller [pdf] Instruction Manual 68341, 2AZ4R-68341, 2AZ4R68341, 68341 RGB Light String With Bottom Controller, RGB Light String With Bottom Controller, Bottom Controller, RGB Light String, Light String, String |


