Business PCs Using HP Image Assistant

Specifications
- Product Name: HP Image Assistant (HPIA)
- Functionality: Scans the computer and installs recommended BIOS updates, drivers, and HP software for business PCs
- Availability: Free tool
Product Usage Instructions
Install HP Image Assistant (HPIA)
- Download and install HP Image Assistant from the HP website or
using the Client Management Script Library (CMSL). - Download and install the latest version of HP Image Assistant from the HP website:
- Go to HP Image Assistant (HPIA).
- In the SoftPaq column, select the SoftPaq download link.
- Double-click the downloaded HPIA SoftPaq file to launch the installation wizard.
- Follow the on-screen instructions to extract the utility. The utility is extracted to the SWSetup folder on the system drive.
- Download and install the latest version of HP Image Assistant in CMSL using PowerShell:
- Search for PowerShell, and then select Run as an administrator.
- In the PowerShell window, type Install-HPImageAssistant.
Capture and Save an Image Configuration
- In File Explorer, navigate to HPImageAssistant.exe. Right-click HPImageAssistant.exe, and then select Run as an administrator.
- Click Languages, and then select your language.
- Click Tools, and then select a configuration type:
- Capture Target Image Configuration: Captures the system image of the PC that you are using. Save the configuration files to a USB flash drive.
- Configuration options: Allows you to create and save a proxy system image. Continue with these steps.
- If an internet proxy is required, provide the necessary details in the Proxy tab.
- Save the configuration files.
Analyze the System to Identify Available Updates
- In File Explorer, navigate to HPImageAssistant.exe. Right-click HPImageAssistant.exe, and then select Run as an administrator.
- Click Languages, and then select your language.
- Click Analyze. HP Image Assistant analyzes the device and makes recommendations for updates.
- After the analysis is complete, click the Recommendations tab.
- Select the updates to install, and then click Download.
FAQ
Q: Do I need an internet connection to receive recommendations from HP Image Assistant?
A: Yes, you must be connected to the internet to receive recommendations from HP Image Assistant.
HP Business PCs – Using HP Image Assistant
- HP Image Assistant (HPIA) is a free tool that scans the computer and installs recommended BIOS updates, drivers, and HP software for business PCs.
- For more information about HP Image Assistant, go to Client Management Solutions.
Install HP Image Assistant (HPIA)
Download and install HP Image Assistant from the HP website or using the Client Management Script Library (CMSL).
Download and install the latest version of HP Image Assistant from the HP website
Follow these steps to download the HPIA utility from the HP website.
- Go to HP Image Assistant (HPIA).
- In the SoftPaq column, select the SoftPaq download link.
The SoftPaq exe file downloads in the browser download bar or the Downloads folder on the computer. - Double-click the downloaded HPIA SoftPaq file to launch the installation wizard.
- Follow the on-screen instructions to extract the utility. The utility is extracted to the SWSetup folder on the system drive.
Download and install the latest version of HP Image Assistant in CMSL using PowerShell
Follow these steps to install the HPIA utility using the Client Management Script Library and PowerShell.
- Search for PowerShell, and then select Run as an administrator.
- In the PowerShell window, type Install-HP Image Assistant.
NOTE: For more information on this command, see Install-HP Image Assistant | HP Developer Portal (in English).
Capture and save an image configuration
You can use HP Image Assistant to capture and save an image configuration or manage an internet proxy configuration.
- In File Explorer, navigate to HPImageAssistant.exe. Right-click HPImageAssistant.exe, and then select Run as an administrator.
NOTE: The default installation location is C:\SWSetup. If you changed the default folder location while installing the setup file, navigate to the correct location. - Click Languages, and then select your language.
- Click Tools, and then select a configuration type.
- Capture Target Image Configuration: Captures the system image of the PC that you are using. Save the configuration files to a USB flash drive.
- Configuration options: Allows you to create and save a proxy system image. Continue with these steps.
- If an internet proxy is required, click the Proxy tab, and in the URL area, type the Address and Port for the proxy configuration in the appropriate fields.
- In the Credential area, type the Username, Password, and Domain for the proxy configuration in the appropriate fields.
- Click the Thread tab to set the number of simultaneous downloads.
- Save the configuration files.
Analyze the system to identify available updates
Analyze the system image to identify available updates.
NOTE: To receive recommendations from HP Image Assistant, you must be connected to the internet.
- In File Explorer, navigate to HPImageAssistant.exe. Right-click HPImageAssistant.exe, and then select Run as an administrator.
NOTE: The default installation location is C:\SWSetup. If you changed the default folder location while installing the setup file, navigate to the correct location. - Click Languages, and then select your language.
- Click Analyze.
HP Image Assistant analyzes the device and makes recommendations for updates. - After the analysis is complete, click the Recommendations tab.
- Select the updates to install, and then click Download.
- In the Download Solutions window, select Download SoftPaq(s), extract files, and install, and then click Start.
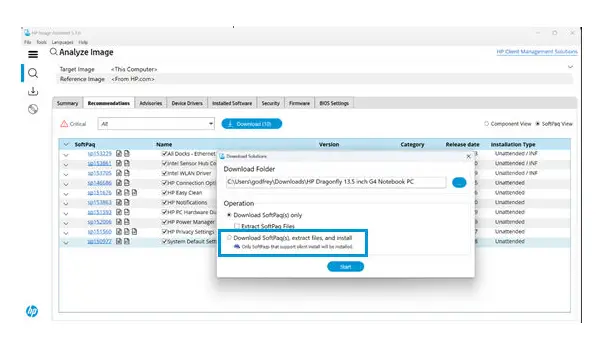
- Your computer might need to be restarted after the updates are installed.
Download SoftPaqs
Download available SoftPaqs for your computer using HP Image Assistant.
- In File Explorer, navigate to HPImageAssistant.exe. Right-click HPImageAssistant.exe, and then select Run as an administrator.
NOTE: The default installation location is C:\SWSetup. If you changed the default folder location while installing the setup file, navigate to the correct location - Click Languages, and then select your language.
- Click the Download SoftPaqs tab
 .
. - In Step 1 Create My Products List, click Create or Edit to open the Edit My Products List.
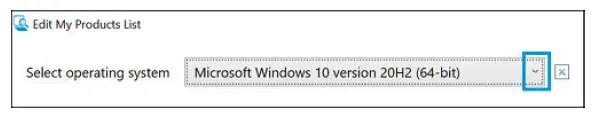
- Click the drop-down menu for Select operating system, and then select your version of Windows.
- Select your product from the HP Product Catalog menu or use the search box and search for your product by name or number. For example, you could search for EliteBook or 800.
NOTE: You must be connected to the internet to view or search the list of supported platforms.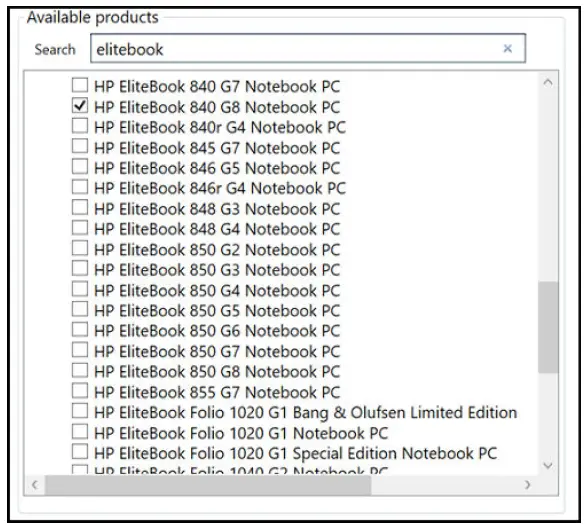
- Click Apply.
- In Step 2 Select from My Products List, select your product or products.
NOTE: If you directly search for your computer from the HP Product Catalog menu, you might see multiple compatible operating system options. Select the correct Windows operating system version.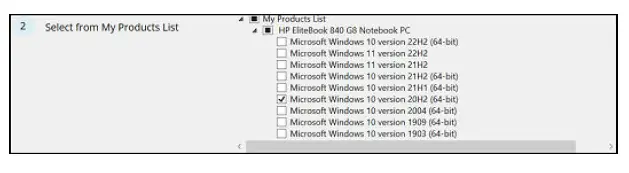
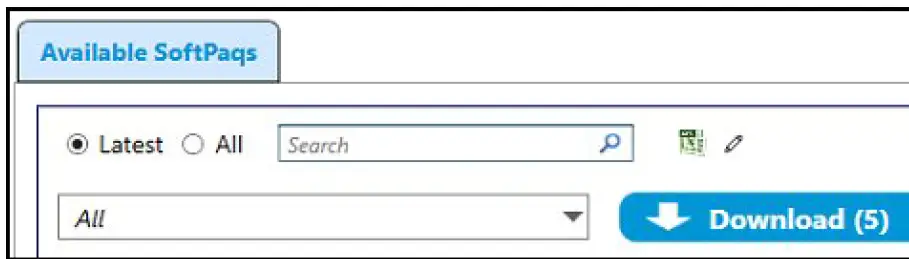
- In Step 3 Get SoftPaqs, click Analyze, and then wait while HPIA retrieves and downloads the image configuration from HP. The Available Soft Paqs tab lists the Soft Paqs available for the selected computers.
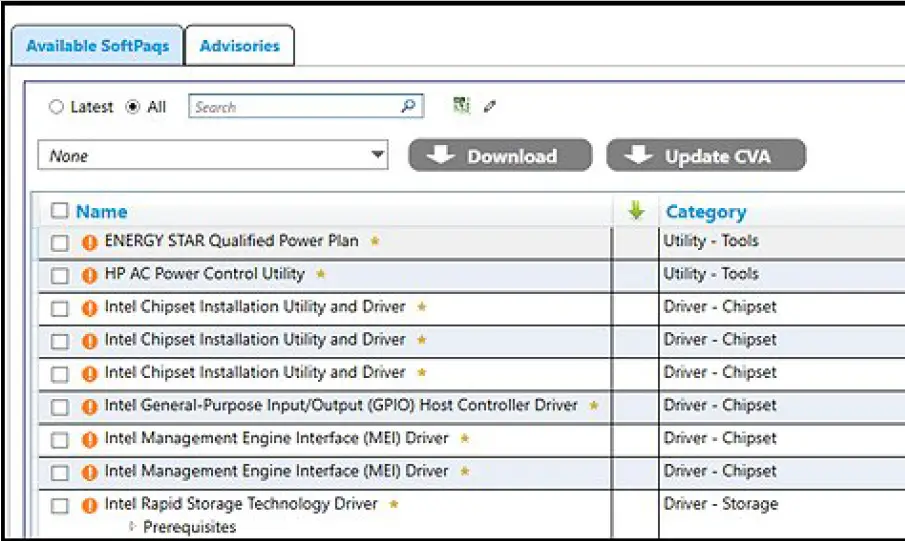
- Click the drop-down menu for Select Components to Download/Apply, and then select one of the options.
- All: Selects all packages.
- None: Selects no packages.
- Supersede: Selects all superseded packages.
- Critical: Selects all critical packages.
- Recommended: Selects all recommended packages.
- Routine: Selects all packages classified as routine.
- INF Installation Supported: Selects all packages that support installation via INF.
- Unattended Installation Supported: Selects all packages that support Software Manager (SSM) installation.
- Universal Windows Platform (UWP): Selects all packages that contain UWP applications.

- Click the pencil icon
 to select the columns to include in the table, and then click OK.
 - Click Download.
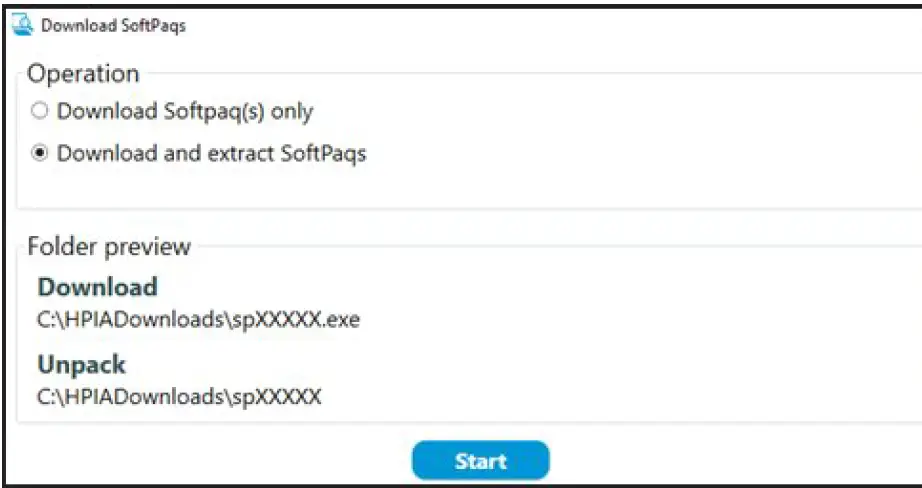
The download button displays the number of items. - Choose to Download Soft Paq(s) only or to Download and extract Soft Paqs, and then click Start.
Create a driver pack
Create a new driver pack for any supported system using HP Image Assistant.
- In File Explorer, navigate to HPImageAssistant.exe. Right-click HPImageAssistant.exe, and then select Run as an administrator.
NOTE: The default installation location is C:\SWSetup. If you changed the default folder location while installing the setup file, navigate to the correct location. - Click Languages, and then select your language.
- Click the Create Driver Pack tab
 .
.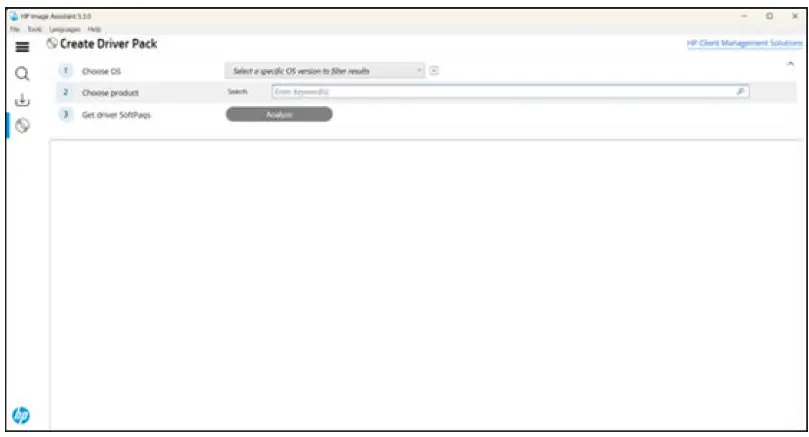
- In Step 1 Choose OS, select your Windows operating system version.
- In Step 2 Choose product, select the PC that you are using.
- In Step 3 Get driver SoftPaqs, click Analyze.
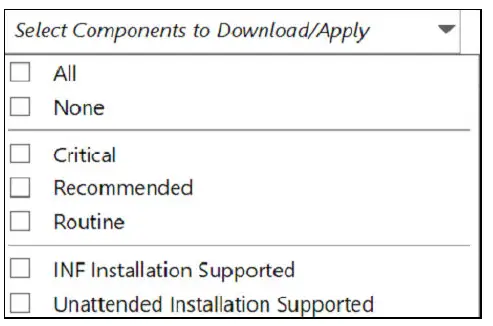
HP Image Assistant lists the driver SoftPaqs available for the selected product and operating system. - Click the drop-down menu for Select Components to Download/Apply, and then select one of the following options.
- All: Selects all packages.
- None: Selects no packages.
- Critical: Selects all critical packages.
- Recommended: Selects all recommended packages.
- Routine: Selects all packages classified as routine.
- INF Installation Supported: Selects all packages that support installation via INF.
- Unattended Installation Supported: Selects all packages that support Software Manager (SSM) installation.
- Click the pencil icon
 to select the columns to include in the table, and then click OK.
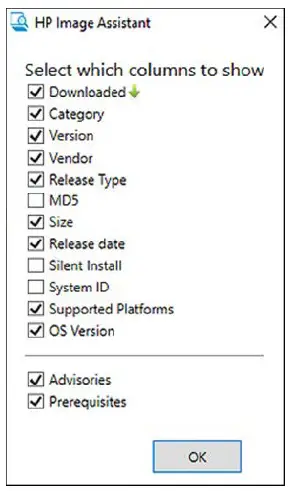
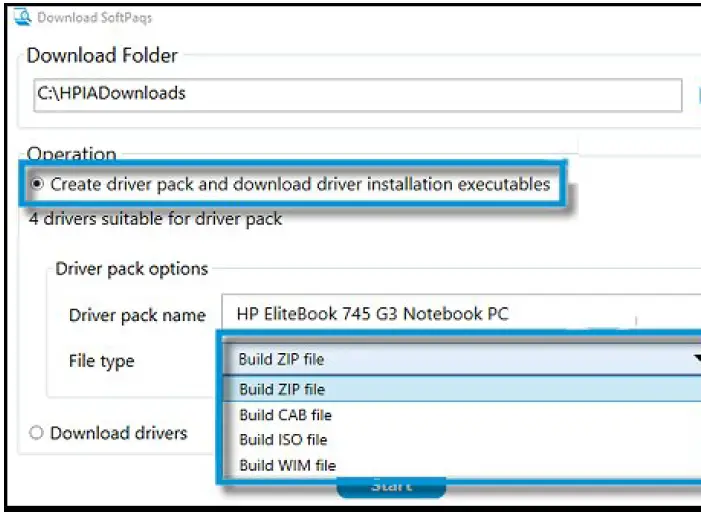
- Click Download to open the Download dialog.
- On the Download Folder screen, select one of the following.
- Create driver pack and download driver installation executables: Select a File type compatible with your corporate environment, and then click Start to save the driver pack.
 Download drivers: Click Start to download the drivers.

Documents / Resources
 |
hp Business PCs Using HP Image Assistant [pdf] User Guide Business PCs Using HP Image Assistant, PCs Using HP Image Assistant, Using HP Image Assistant, HP Image Assistant, Image Assistant, Assistant |


