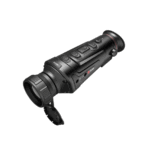
TD Series Handheld Thermal Imaging Monocular

Thank you for choosing this product. Please read this Guide carefully before use and keep it properly for future reference. Pictures for reference only, please refer to the actual product you receive.
IMPORTANT
Thank you for choosing this product. Please read this guide before use and keep it for future reference. We hope you’ll be satisfied with this product. This guide is a general guide for a series of products, which means that the specific model you receive may differ from the picture in the guide. Please refer to the actual product you receive. This user guide is organized for the convenience of users to use and understand our products. We will do our best to ensure the accuracy of the contents of this guide, however, we still cannot guarantee the completeness of the contents thereof. As our products are subject to continuous upgrading, we reserve the right to modify this guide from time to time without prior notice.
FCC WARNING
This equipment may generate or use radio frequency energy. Changes or modifications to this equipment may cause harmful interference unless the modifications are expressly approved in the instruction manual. The user could lose the authority to operate this equipment if an unauthorized change or modification is made. This device complies with part 15 of the FCC Rules. Operation is subject to the following two conditions: (1) This device may not cause harmful interference, and (2) this device must accept any interference received, including interference that may cause undesired operation. The device has been evaluated to meet general RF exposure requirements. The device can be used in portable exposure conditions without restriction.
NOTE: This equipment has been tested and found to comply with the limits for a Class B digital device, under part 15 of the FCC Rules. These limits are designed to provide reasonable protection against harmful interference in a residential installation. This equipment generates, uses, and can radiate radio frequency energy and, if not installed and used in accordance with the instructions, may cause harmful interference to radio communications. However, there is no guarantee that interference will not occur in a particular installation. If this equipment does cause harmful interference to radio or television reception, which can be determined by turning the equipment off and on, the user is encouraged to try to correct the interference by one or more of the following measures:
- Reorient or relocate the receiving antenna.
- Increase the separation between the equipment and the receiver.
- Connect the equipment into an outlet on a circuit different from that to which the receiver is connected.
- Consult the dealer or an experienced radio/TV technician for help.
- The rating information is located at the button of the unit.
DANGER
- Please charge the battery with the method described in this Guide and follow the charging procedure and precautions. Improper battery charging will cause heating, damage and even physical injury.
- Do not try to open or disassemble the battery at any time. Once the battery leaks and the spill enters the human eye, wash the eyes with clean water immediately and take medical care.
WARNING
- When using the equipment, please try to keep it stable and avoid violent shaking.
- Do not use or store the equipment in an environment that exceeds the allowable operating temperature or storage temperature.
- Do not directly aim the equipment at high-intensity thermal radiation sources, such as the sun, lasers, spot welding machines, etc.
- Do not plug the holes on the equipment.
- Do not knock, throw or vibrate instruments and accessories to avoid damage.
- Do not disassemble the machine by yourself, which may cause equipment damage and loss of warranty rights.
- Do not use soluble or similar liquids on equipment and cables, which may cause damage to the equipment.
- Please do not use the equipment in an environment that exceeds the operating temperature of the equipment, which may cause damage to the equipment.
- Please observe the following measures when wiping this device:
- Non-optical surface: Use clean and soft cloth to wipe the non-optical surface of the thermographic camera.
- Optical surface: When using the thermographic camera, please avoid polluting the optical surface of the lens, especially avoid touching the lens with your hands, because the sweat on your hands will leave traces on the lens glass and may corrode the optical coating on the glass surface. When the surface of the optical lens is polluted, use special lens paper to wipe it carefully.
- Do not place the battery in a high temperature or near a high-temperature object.
- Do not short circuit the positive and negative poles of the battery.
- Do not expose the battery to moisture or water.
- Do not use non-original adapters or chargers (the contents of the original packaging shall prevail).
NOTES:
- Do not expose the equipment to dust or moisture. Avoid water splashing to the equipment when being used in an environment with water. Cover the lens when not using the camera.
- Please put the camera and all accessories in the special packaging box when not using it.
LIST OF PARTS
| Number | Items | Qty |
| 1 | 18650 BATTERY | 1 PCS |
| 2 | 18650 CHARGER | 1 PCS |
| 3 | USB TYPE-C CABLE | 1 PCS |
| 4 | CARRYING CASE | 1 PCS |
| 5 | EYESHADE | 1 PCS |
| 6 | WRIST STRAP | 1 PCS |

INTRODUCTION TO PRODUCT PARTS
This Guide is applicable to multiple products of this series, and the illustration just shows general functions. 
LENS COVER
Please cover the lens when not using the product to protect the lens!
USB TYPE C PORT
Use the USB cable to connect external power via the external interface to supply power to the product. The output specification of external power is 5V 2A. You can also use the video cable to connect the screen to output the thermographic camera image to the external monitor.
BATTERY COVER
The battery cover is the entrance of battery disassembly and assembly when the product uses a battery. Press the battery box cover button slide down to open the battery box cover and place the battery according to the positive and negative labels.
Note: Please place the battery in the direction shown. Do not push in forcibly.
TRIPOD INTERFACE
1/4 inches standard interface, supporting PTZ.
QUICKSTART INSTRUCTIONS
| Buttons | Current Device Status | Short press | Long press |
|
Power button |
Power on (No menu display) |
Calibration |
Display off/ Power off |
| Power off | / | Power on | |
|
Display off |
Display on |
Display on |
|
| Power on (Menu display) |
Calibration |
Display off/ Power off | |
|
Brightness button |
Power on (No menu display) | Switch screen brightness | / |
|
Power on (Menu display) |
Switch menu options to the left |
The device stays in the menu state |
|
|
Pseudo color button |
Power on (No menu display) | Switch the pseudo color | Enter the menu setting interface |
| Power on (Menu display) | Adjust the corresponding option value | Exit the menu and save the settings | |
|
Zoom button |
Power on (No menu display) | Switch the zoom multiple | / |
|
Power on (Menu display) |
Switch menu options to the right |
The device stays in the menu state |
Power button
Power on
Long press the Power button until the boot screen appears in the eyepiece (the button may be released), then the device is turned on successfully.
Power off
Manual power-off: Long press the Power button to display the shutdown progress bar and the screen of the device will get blank when 5 progress bars appear, and the shutdown is successful. Automatic power-off: Within the set automatic power-off time, no operation with any button is needed. After the device reaches the set power-off time, a power-off progress bar will appear automatically. After the 5 progress bars appear, the device will be powered off.
Display off
Long press the Power button to display the shutdown progress bar. Release the Power button before the 4 progress bars to cancel the shutdown and enter the Display off mode.
Display on
In Display off mode, long press or short press the power button to wake up the screen and the actual function of the button will not be activated.
Calibration
Short press the power button in startup status to complete the corresponding calibration action. A prompt indicating successful calibration will be displayed at the top of the screen.
Brightness button
When the menu is not displayed, short press the brightness button to switch the screen brightness, which can be adjusted at 5 levels, and the brightness may be observed and adjusted in real-time. When the menu is not displayed, long press the brightness button, and the device does not respond. When the menu is displayed, short-press the brightness button to move the device menu cursor to the left. When the menu is displayed, long press the brightness button to keep the device in the menu state.
Pseudo color button
When the menu is not displayed, short press the pseudo color button to display pseudo colors, such as white hot, black hot, red hot, iron red, blue hot, and green hot in sequence circularly. When the menu is not displayed, long-press the pseudo color button to enter the menu setting interface. When the menu is displayed, short-press the pseudo color button to adjust the corresponding option value. When the menu is displayed, long press the pseudo color button to exit the menu and save the settings.
Zoom button
When the menu is not displayed, short press the zoom button to switch the zoom multiple. When the menu is not displayed, long press the zoom button, and the device does not respond. When the menu is displayed, short press the zoom button to move the device menu cursor to the right. When the menu is displayed, long press the zoom button to keep the device in the menu state.
FUNCTION DESCRIPTION
 Hotspot tracking: When hotspot tracking is turned on, a blue-green arc box will be displayed, with a dotted cursor in the middle to track the highest temperature point in the entire image.
 Wi-Fi: After the connection of Wi-Fi, if the mobile can connect to the hotspot of the device side, the user may preview real-time images of the device, remotely control the thermal imager with full functionality, and manage and share image library and files through the mobile APP.
- Note: Search and download the ‘TargetIR’ APP in the mobile application market, open the APP, and find ‘HandHeld-TI-X’ in the WLAN settings of the mobile phone, enter the password ‘12345678’, and return to the APP again.
 Working indicator: the working indicator can be turned on or off.
 Video output: the device video output switch can be turned on or off.
 Scene mode: natural, enhanced, and highlighted modes are available. The three modes may save the corresponding detector brightness contrasts respectively.
 PIP: Modes of Off, Top Left, Top Center, and Top Right are available.
 Screen brightness: the screen brightness may be adjusted at 5 levels, and the screen brightness may be observed and adjusted in real-time.
 Image brightness: the detector brightness may be adjusted at 5 levels, and the image brightness may be observed and adjusted in real-time.
Note: The value after brightness adjustment will be saved in the current scene mode.- Image contrast: the contrast may be adjusted at 5 levels, and the image contrast may be observed and adjusted in real-time.
Note: The value after contrast adjustment will be saved in the current scene mode. - Automatic sleep: Automatic sleep time can be set at 5/10/15min. If no operation is made within the set time, the device will enter the sleep state (set on the APP).
- Automatic power off: Automatic power off time can be set at 15/30/60min. If no operation is made within the set time, a countdown to power off will appear and the camera will be powered off when the countdown is over (set on the APP).
TROUBLESHOOTING
- The device cannot be powered on Solution: replace the battery or connect the adapter for the power supply.
- The screen goes black during use Solution: short press/long press any button to wake up and light up the screen.
STORAGE AND TRANSPORTATION
The following is about the correct storage and transportation methods of the product. In order to prevent danger and property loss, please read this guide carefully before using the device and strictly observe it during use. Please keep this guide properly after reading.
Storage
- The storage environment of packaged products is -30 ℃ ~ 60 ℃, the relative humidity is not more than 95%, without condensation and corrosive gas, and is well-ventilated and clean indoors.
- Please charge the thermographic camera once every 3 months.
Transportation
The thermographic camera shall be protected from rain, water, inversion, violent vibration, and impact during transportation, and shall be handled with care. Throwing is not allowed. Special statement: the version of the Guide will be updated after the technical improvement of the product.
Documents / Resources
 |
Guide TD Series Handheld Thermal Imaging Monocular [pdf] User Guide TD Series Handheld Thermal Imaging Monocular, TD Series, Handheld Thermal Imaging Monocular, Thermal Imaging Monocular, Imaging Monocular, Monocular |