![]()
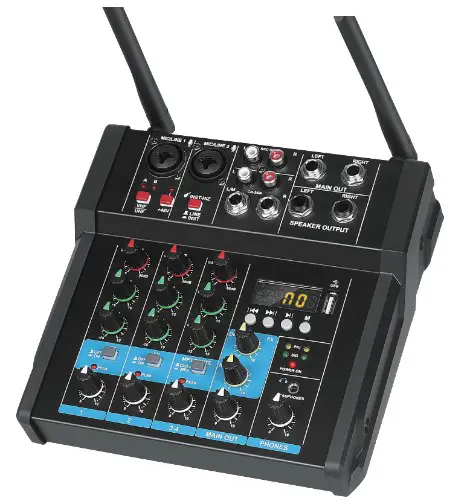
G4 Professional 4 Channel Mixer Console and Aux Plus Effects Processor
![]() Owner’s Manual
Owner’s Manual
Professional 4 – Channel mixer console
and Aux paths plus effects processorG4
G4-M
G4-P
G4-PM owner’s Manual
WELCOME
Thank you for purchasing the G44G4-M1G4-G/G4GM Mixing Console.
Please read this manual thoroughly to get the most out of the product and ensure long-term, trouble-free use. After reading this manual, keep it readily available for future reference.
* For the remainder of this manual, the word “mixer” is used instead of “Mixing Console” ** In this manual, all panel illustrations show the G4-PM panel.
Main Features
- 4 Channels Input} The Mini Mixing Console is great for multiple devices connectivity .2 XLR Lines input jack to connect mics or guitar, 1 pair 1/4″ and 1 pair RCA stereo inputs to connect CO plays/key- board/computer. Plus 1 pair 1/4″ Main output to connect Speakers/Power Amplifier ect.
- [Automatic recording to USB Stick DJ sound controller has built-in recording control with audio recording output through the USB Stick
- [Recording to Computer/Phone/iPad] This sound board mixer connect to the computer/mobile phone/tablet with a cable for sound recording, live broadcasting. voic chat,and also be used as a computer sound card. It can be used with various recording software. Note:If the USB mixer is used with a mobile phone or tablet, it needs the OTG’s connector to connect your mobile phone or tablets.
- [Bluetooth Wireless Connection] this DJ mixer enable users to wirelessly stream music from Pad, Phone and Computer to mix music. It has built-in control like Play/Pause/switch songs and Modes Bluetooth works within 1.5ft.
- TUSB stick music player] The USB interface can be connected to your USB stick/ast memory/MP3 fo play music.
- 48V Phantom Power] The sound mixer have 3 XLR inputs with phantom power.you can feel free to switch 48V phantom power and ultra-low noise distortion enables the audio mixer to be used with condenser micraphone.
- Headphone monitor 3 3.5mm headphone jack, you can plug in headphones at any time to monitor the sound and volume.
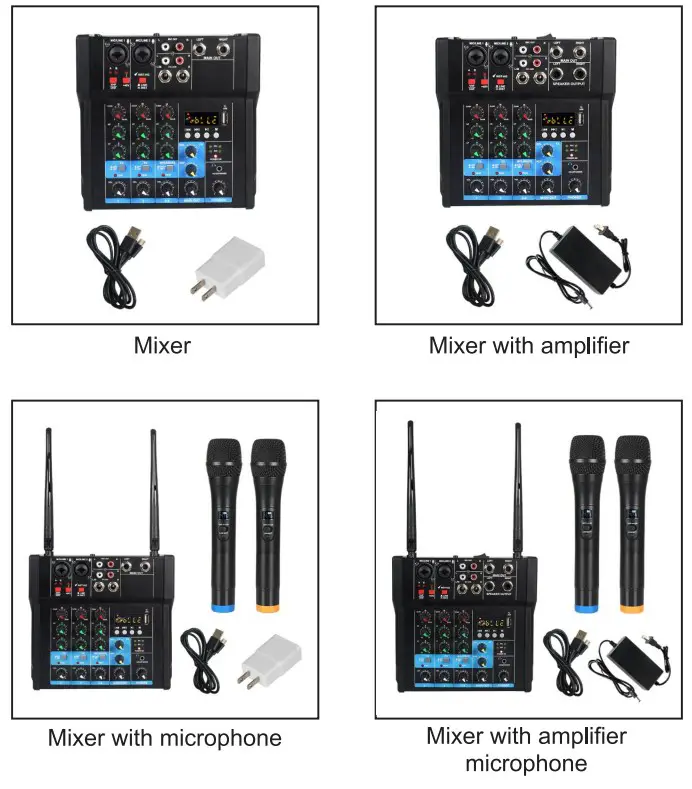
Included Accessories
- Mixer * 1
- power cord ° 1
- Microphone * 2 (G4-M/G4-PM only has configuration)
- 5V power adapter * 1 (G4/G4-M only has configuration}
- 24V power adapter * 1 (G4-P/G4-PM only has configuration)
- Owner’s Manual
Configurations
Quick start guide
Connect external devices, such as speakers, microphones and musical instruments, etc.
Make sure all external devices connected to this device are turned off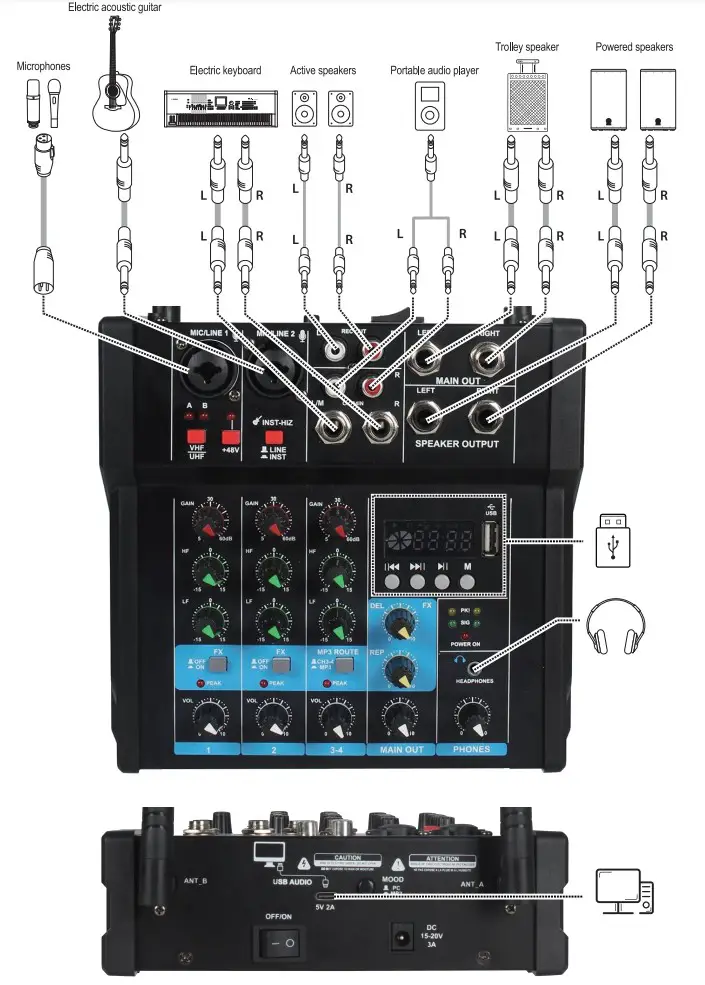
STEP 2: Getting Sound to the Speakers
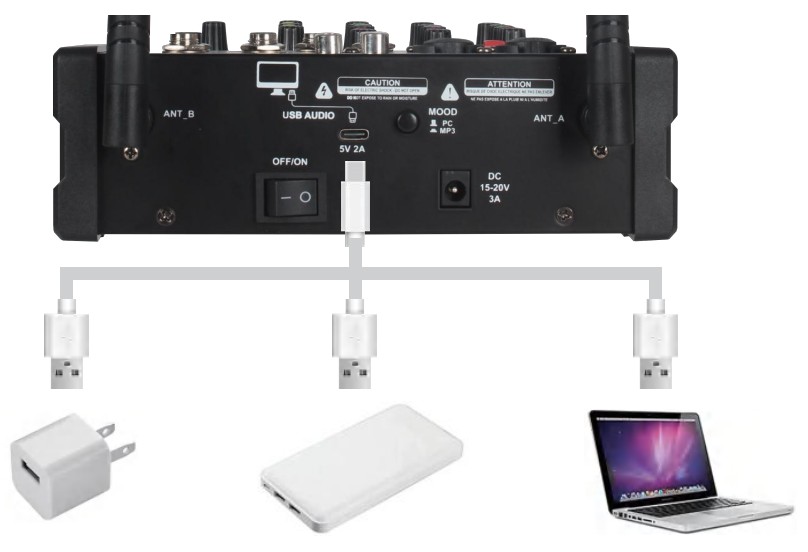
- Plug in the mixer with a USB to TYPE-C cable then connect the supplied AC power adaptor
- Make sure that all the switches on the machine are not turned on (pressed).
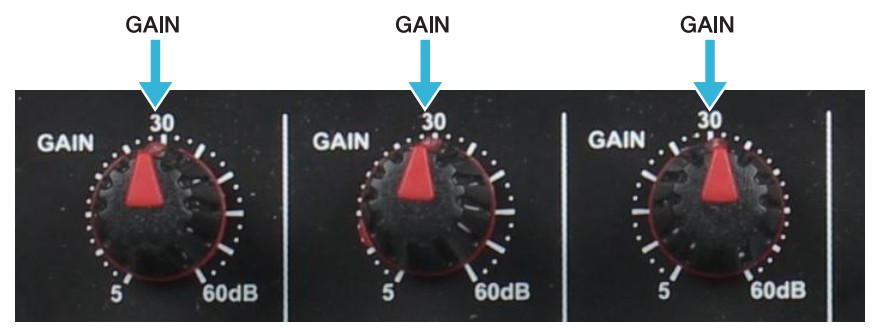
- Adjust all the level control knobs to the left (minimum) all the way.including [GAIN] knob(red),[LEVEL] knob (blue) and [MAIN] knob(white);Then set the equalizer knob (green) to the center “12 o’clock”

- If connecting other audio input devices, such as guitars, electronic organs, etc. to connect channels 1-2, please turn on the [INST-HIZ] switch of the corre- sponding channel (
 ).
).
- Make sure that the volume of the powered speakers or power amplifier is adjustedto the minimum.
- Power on connected devices in the following order:
 NOTICE Follow this order to avoid any loud, unexpected noise from the speakers. Reverse the order when tuming the power off.
 - Turn the [MAIN] knob to adjust to the “12 o’clock direction” position.

- For channels connected to a microphone, you can set the [GAIN] knob to approximately 12 o’clock
- While playing your instrument or speaking into the microphone, turn the [LEVEL] knob to adjust the volume of the corresponding channel.
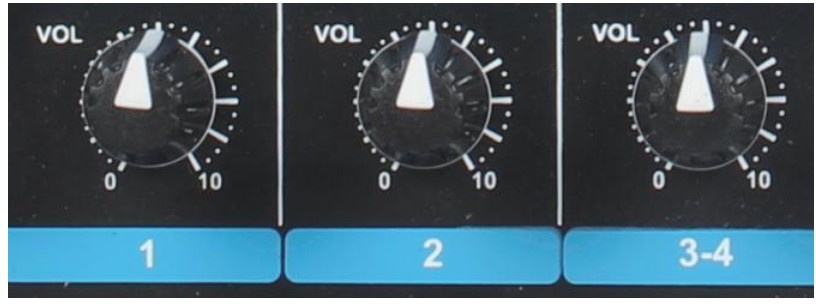
- Set the [LEVEL] knob as required to adjust the volume balance between the corresponding channels.
NOTICE
There are two functions to adjust the volume: [GAN] and [LEVEL]. Once the (GAIN] knob have been set, do not adjust these controls as much as possible. Generally, the volume is adjusted with the [LEVEL] knob
Computer Recording Method
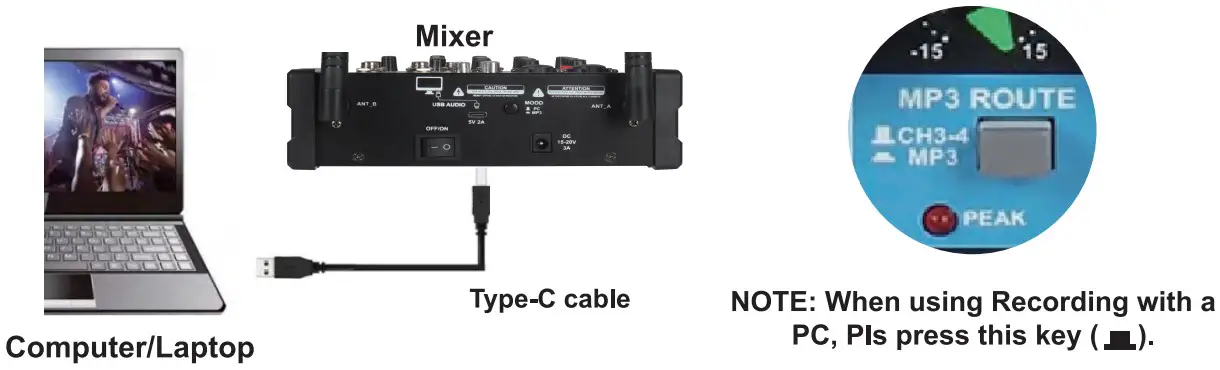
STEP 1: First, connect the PC or laptop to the mixer using a cable to power it on and then directly open the recording software to record (no need to install a driver).
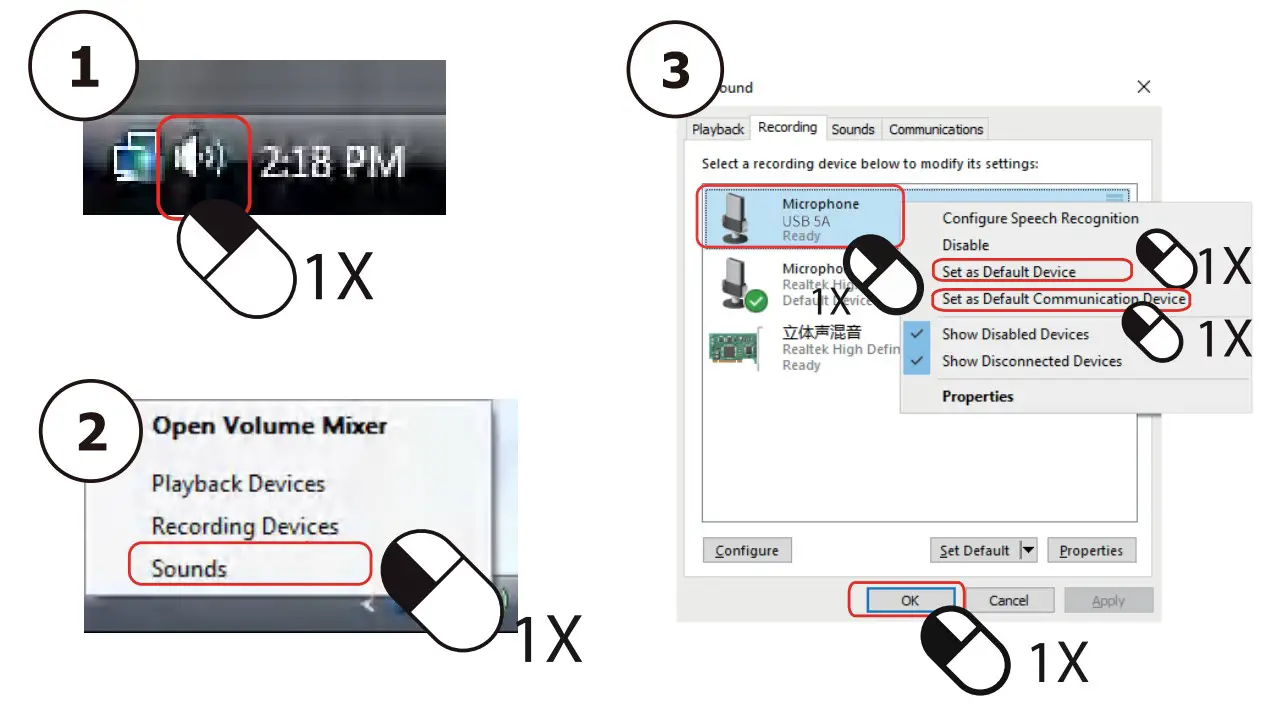
STEP 2: Before connecting to the PC or laptop to record, you need to set the computer as follows.
Windows system settings
- Open the Start menu, and then click Control Panel.
- Open the sound preferences from the control panel folder.
- Click “Record” and set the microphone to the default value to start recording.
Apple system settings
- Open the “System Preferences” application.

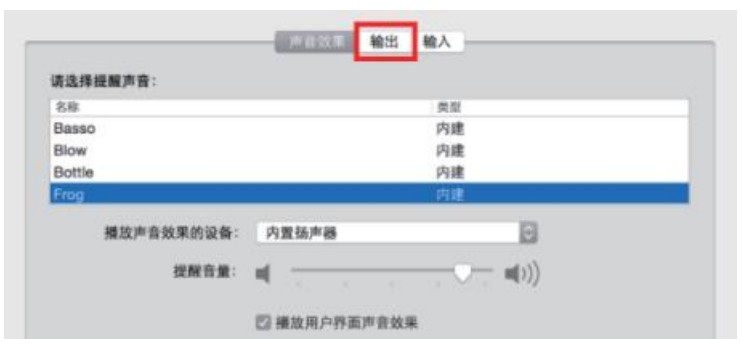
- Find “Sound” and click to open it.
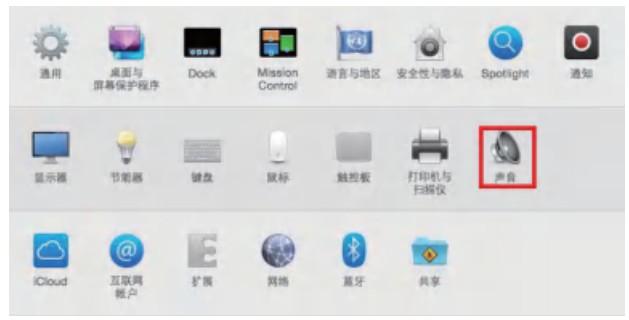
- Click to open the “Output” interface to select the microphone and start recording.
Operating Steps for USB Playback

- Connect the USB flash disk.
- Display screen ‘MP3’ ‘USB’ lights up, music automatically plays
![]() NOTE: When using Bluetooth and USB functions, Pls press this key (
NOTE: When using Bluetooth and USB functions, Pls press this key (![]() )
)
Operating Steps for Bluetooth Playback

- Click MODE’ to switch Bluetooth mode, and the display screen BT’ lights up.
- Open Bluetooth mode on the phone, click ‘*XY-BT’ to connect successfully, and then playmusic.
![]() NOTE: When using Bluetooth and USB functions, Pls press this key (
NOTE: When using Bluetooth and USB functions, Pls press this key (![]() ).
).
USB Automatic Recording Mode Operation Steps
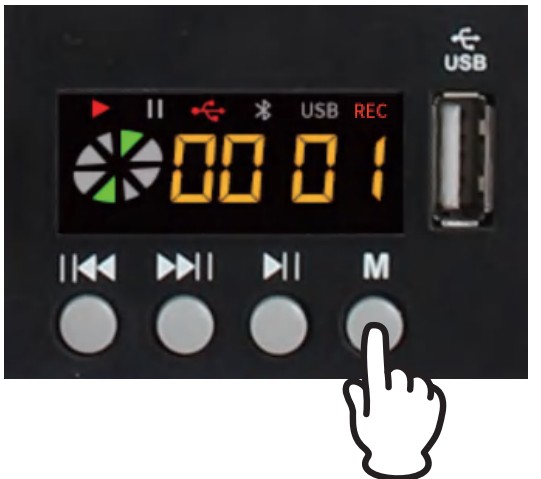
- Hold down ‘MODE’ key toswitch the USB REC mode for automatic recording.
- Hold down ‘MODE’ key-tofinish recording.
Operating Instructions for Reverberation and Delay Effects
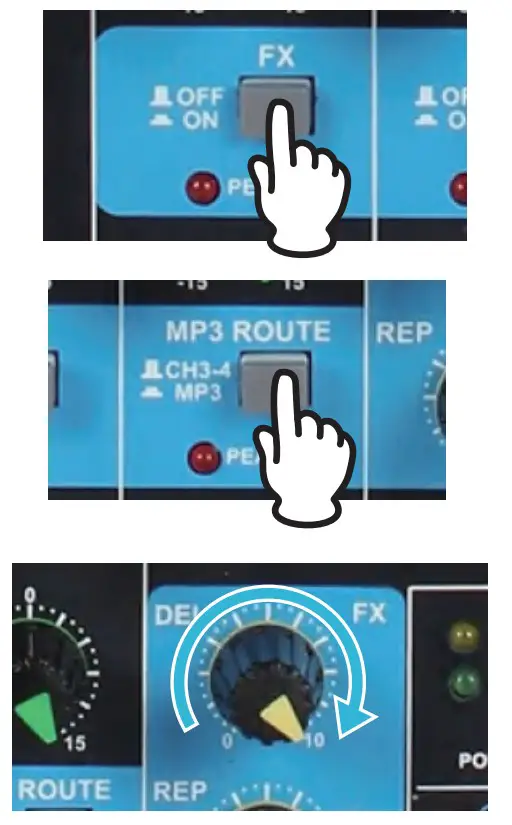
Click the ‘FX’ button to turn on the reverberation effect.
Click[![]() ] It is used to select the output destination of the input signal of channel 3/4.
] It is used to select the output destination of the input signal of channel 3/4.
Click[ ![]() ]to control the effect adjustment of USB Delay effect knob.
]to control the effect adjustment of USB Delay effect knob.
Adjust the intensity of the delay effect processing for the input signal.
Panel introduction

- [MIC/LINE] mono input jack (channels 1-2)
Used to connect microphones, musical instruments, or audio equipment (CD players,etc.) to this device. These jacks support both XLR and phone plugs - [+48V] Switch/LED
When the switch is turned on, the LED lights up to indicate that the device has applied DC+48V phantom power to the XLR plua on the IMIC/LINE mono input port @). When using a condensel microphone powered by phantom power, turn on this switch.
NOTE
If you do not need phantom power supply, be sure to set this switch to off. When operating this switch please observe the following important precautions in order to prevent noise and damage to the unit and external equipment.
-When the microphone or other equipment connected on channels 1-2 does not support the phantom power supply function, make sure that the switch is kept off.
-When the switch is on, do not connect/disconnect the cables on channels 1-2.
-Before operating this switch, set the [LEVEL] knobs of channels 1-2 to minimum. - [VHF/UHF] knob
Wireless microphone switch (only available with microphone version X ). - [INST-HIZ] knob
Switching between wired microphones and audio devices on channels 1-2. - [GAIN] knob
Determines the basic volume of each channel from channel 1 to 2. Adjust these controllers to make the corresponding [PEAK] LED © flash briefly when singing and playing at the maximum volume. - Equalizer (EQ) knob
Use the [HIGH] (high band) and [LOW] (low band) knobs to adjust the sound quality.If you do not need to adjust the sound quality, you can set the knob to the “12 o’clock direction” position. - [FX] Effect switch
The FX control adjusts the effect volume of the corresponding channel. - [PEAK] LED
It will light up when the volume of the input signal or the volume after the equalizer is too high (when it reaches 3dB below the clipping distortion). If it lights up frequently, turn the [GAIN] knob ©) to the left to decrease the volume. - [LEVEL] knob
Used to adjust the volume balance between each channel. Usually this switch is set to the “3 o’clock direction”position. - [CH3-4
 /MP3 ]switch
It is used to select the output destination of the input signal of channel 3/4 - Lotus input port
For input connections, devices that support lotus line jacks. - Lotus output port
Used for output connections, devices that support lotus line sockets. - 6.35 output port
It is used for output connection and supports 6.35 line socket equipment. - Low level output port
Low level output (only available in power amplifier models * ). - 6.35 Input port
It is used for input connection and supports 6.35 line jack devices. - MP3/USB module
Control MP3, UBS, Bluetooth function modules. - [DELAY] Delay effect knob
Adjust the intensity of the delay effect processing for the input signal. - Level meter
The L and R level meters will be displayed . - [PHONES] output jack
Used to connect headphones. - [REPEAT] Reverb effect knob
Adjust the intensity of the reverberation effect processing for the input signal - [PHONES] knob
You can adjust the volume of the sound output from the [PHONES] jack. - [MAIN] knob
The main signal output control knob. - Microphone receiving antenna
Enhanced microphone reception signal (>< Only with microphone version with this antenna configuration X ). - Power switch for power amplifier
Power switch for power amplifier (>< Only available in versions with power amplifier X ). - [PC/MP3] knob
PC and MP3 function switching button. - [DC5V 2A] Type-C power socket
Used to connect the included power cord. - [DC15-20V 3A] power socket
Amplifier power socket( > This socket is only available for versions with power amplifiers X ).
Microphone introduction
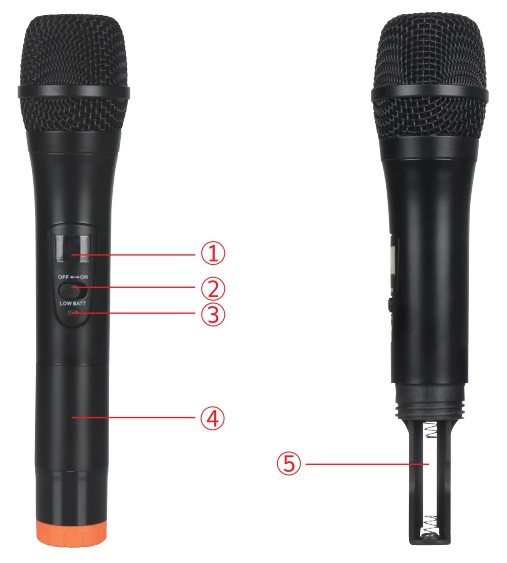 As shown in above pictures:
- Display Screen
- On/Off Switch
- Low Power Indicator
- Tail Tube
- Battery Compartment
Install 2*AA batteries before using the wireless microphone and installing instruction is as follows:
- Take down the tail tube of mic.
- Install the batteries and tighten tail tube of mic.
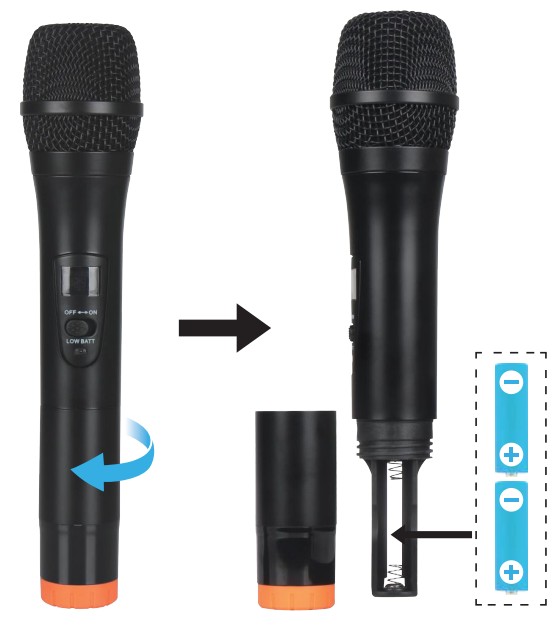 Note: The positive and negative polarity of battery cannot be reversed.
Note: The battery should be provided by yourself
Geneeral Specifications
| Microphone input |
Electronic | balance, discrete input configuration |
| Frequency response | 10 Hz — 200 kHz | |
| Gain range | +14 dB |
|
| SNR | 120 dB E.I.N. | |
| Line input | Electronic balance | |
| Frequency response | 10 Hz — 130 kHz | |
| Gain range | -6 dB — +38 dB | |
| SNR | 95 dB E.I.N. | |
| STEREO CHANNELS |
Frequency response | 10 Hz — 70 kHz |
| Gain range | line: -8—+15 dB/microphone: +13—+60 dB | |
| SNR | line: 90 dB/microphone: 104 dB E.I.N. | |
| EQUSLIZATION | LOW | 50 Hz, + / – 15dB |
| MID | 700 Hz, + /- 15 dB | |
| HIGH | 10 kHz, + / – 15dB | |
| Main mix | +28 dBu balance/ + 22 dBu unbalanced | |
| Main output | +22 dBu unbalanced | |
| AUX sending | +22 dBu unbalanced | |
| EFF sending | +22 dBu unbalanced | |
| Tape output | +15 dBu / 150 | |
| physical | America/Canada | 120 V |
| UK/Australia | 240 V |
|
| Europe | 230 V |
|
| Japan | 100 V |
|
| China | 200 V |
|
Troubleshoot
The power cannot be turned on.
- Is the power cord plugged into the correct outlet correctly?
- Have you connected the power plug securely and firmly?
There is no sound.
- Have you turned on active speakers or amplifiers?
- Are the microphones, external devices, and speakers properly connected?
- Are there any connecting wires or damage?
- Have you set the [MAIN] and [LEVEL] rotations of all relevant channels to appropriate levels?
The sound is weak, distorted or noisy.
- [PEAK] Does the LED light up?
Turn down the [GAIN] knobs of all relevant channels. - Are the [GAIN] and [LEVEL] knobs of all relevant channels set too high?
- Does the “PEAK” (red) indicator of the level meter light up?
Set the [LEVEL] knobs of all relevant channels to the correct level. - ls the volume of the connected device too high?
Decrease the volume of the connected device.
Human voice and speech are not clear enough
- Adjust the equalizer knob (for example: lower the [LOW] knob, raise the [HIGH] knob).
Notice
To avoid the possibility of malfunction/ damage to the product, damage to data, or damage to other property, follow the notices below.
Handling and Maintenance
- Do not use the device in the vicinity of a TV, radio, stereo equipment, mobile phone, or other electric devices. Otherwise, the device, TV, or radio may generate noise.
- Do not expose the device to excessive dust or vibration, or extreme cold or heat (such as in direct sunlight, near a heater, or in a car during the day), in order to prevent the possibility of panel disfiguration, unstable operation, or damage to the internal components.
- Do not place vinyl, plastic or rubber objects on the device, since this might discolor the panel.
- When cleaning the device, use a dry and soft cloth. Do not use paint thinners, solvents, cleaning fluids, or chemical- impregnated wiping cloths.
- Condensation can occur in the device due to rapid, drastic changes in ambient temperature—when the device is moved from one location to another, or air conditioning is turned on or off, for example. Using the device while condensation is present can cause damage. If there is reason to believe that condensation might have occurred, leave the device for several hours without turning on the power until the condensation has completely dried out.
- To avoid generating unwanted noise, make sure there is adequate distance between the AC power adaptor and the device.
- Avoid setting all equalizer and level knobs to their maximum. Depending on the condition of the connected devices, doing so may cause feedback and may damage the speakers.
- When turning on the AC power in your audio system, always turn on the power amplifier LAST, to avoid speaker damage. When turning the power off, the power amplifier should be turned off FIRST for the same reason.
- Always turn the power off when the device is not in use.
Precautions
Please keep this manual in a safe place for future reference.
![]() WARNING
WARNING
Always follow the basic precautions listed below to avoid the possibility of serious injury or even death from electrical shock, short-circuiting, damages, fire or other hazards. These precautions include, but are not limited to, the following:
Power supply/AC power adaptor
- Do not place the power cord near heat sources such as heaters or radiators, and do not excessively bend or otherwise damage the cord, place heavy objects on it,or place it in a position where anyone could walk on, tripover, or roll anything over it.
- Only use the voltage specified as correct for the device.The required voltage is printed on the name plate of thedevice.
- Use the specified adaptor (MU18 or PA-130, or anequivalent recommended by Aveek) only. Using thewrong adaptor can result in damage to the instrument oroverheating.
- Check the electric plug periodically and remove any dirtor dust which may have accumulated on it.
Water warning
- Do not expose the device to rain, use it near water or indamp or wet conditions, or place on it any containers (suchas vases, bottles or glasses) containing liquids whichmight spill into any openings. If any liquid such as waterseeps into the device, turn off the power immediately andunplug the power cord from the AC outlet. Then have thedevice inspected by qualified AVEEK service personnel.:
- Never insert or remove an electric plug with wet hands.
Fire warning
- Do not put burning items, such as candles, on the unit.
A burning item may fall over and cause a fire.
![]() CAUTION
CAUTION
Always follow the basic precautions listed below toavoid the possibility of physical injury to you or others,or damage to the device or other property. These pre-cautions include, but are not limited to, the following:
Power supply/AC power adaptor
- Do not cover or wrap the AC power adaptor with a cloth or blanket.
- Remove the electric plug from the outlet when the deviceis not to
- When removing the electric plug from the device or anoutlet, always hold the plug itself and not the cord. Pullingby the cord can damage it. be used for extended periods of time, or duringelectrical storms.
Location
- Do not place the device in an unstable position where it might accidentally fall over.
- Do not place the device in a location where it may comeinto contact with corrosive gases or salt air. Doing so mayresult in malfunction.
- Before moving the device, remove all connected cables.
- When setting up the device, make sure that the AC outlet you are using is easily accessible. If some trouble or malfunction occurs, immediately turn the power off and disconnect the plug from the outlet.Even when the poweris turned off, electricity is still flowing to the product at the minimum level.
- When you are not using the product for along time, make sure to unplug the power cord from thewall AC outlet.
Connections
- Remove the power plug from the AC outlet when cleaning the device.
Maintenance
- Before connecting the device to other devices, turn off thepower for all devices.Before turning the power on or offfor all devices, set all volume levels to minimum.
Mixer cannot be held responsible for damage caused by improper use or modi?cations to the device, or data that is lost or destroyed. Handling caution - Avoid inserting or dropping foreign objects (paper, plastic,metal, etc.) into any gaps or openings on the device.|fthis happens, turn off the power immediately and unplugthe power cord from the AC outlet. Then have the deviceinspected by qualified service personnel.
- Do not rest your weight on the device or place heavy ob-jects on it, and avoid use excessive force on the buttons,switches or connectors.
- Do not use speakers or headphones for a long period oftime at a high or uncomfortable volume level, since thiscan cause permanent hearing loss. If you experience anyhearing loss or ringing in the ears,consult a physician.
Warning:
Changes or modifications to this unit not expressly approved by the party responsible for compliance could void the user’ s authority to operate the equipment.
NOTE:
This device complies with part 15 of the FCC Rules. Operation is subject to the following two conditions: (1) This device may not cause harmful interference, and (2) this device must accept any interference received, including interference that may cause undesired operation.
FCC Statement:
This equipment has been tested and found to comply with the limits for a Class B digital device, pursuant to part 15 of the FCC Rules. These limits are designed to provide reasonable protection against harmful interference in a residential installation. This equipment generates, uses and can radiate radio frequency energy and, if not installed and used in accordance with the instructions, may cause harmful interference to radio communications. However, there is no guarantee that interference will not occur in a particular installation. If this equipment does cause harmful interference to radio or television reception, which can be determined by turning the equipment off and on, the user is encouraged to try to correct the interference by one or more of the following measures:
—Reorient or relocate the receiving antenna.
—Increase the separation between the equipment and receiver.
—Connect the equipment into an outlet on a circuit different from that to which the receiver is connected.
—Consult the dealer or an experienced radio/TV technician for help.
The equipment complies with FCC Radiation exposure limit set forth for uncontrolled environment. This equipment should be installed and operated with minimum distance 20cm between the radiator and your body.![]()
Documents / Resources
 |
EMIXING CONSOLE G4 Professional 4 Channel Mixer Console and Aux Plus Effects Processor [pdf] Owner's Manual G4 Professional 4 Channel Mixer Console and Aux Plus Effects Processor, G4, Professional 4 Channel Mixer Console and Aux Plus Effects Processor, Console and Aux Plus Effects Processor, Plus Effects Processor, Effects Processor |


