electro harmonix POG 3 Digital Polyphonic Octave Generator

Specifications
- Power Supply Requirements:
- Voltage: 9VDC
- Current: 300mA
- Polarity: Center-Negative
Product Usage Instructions
Setup
- Plug the supplied AC adapter into an AC outlet and insert its output plug into the power jack on the rear panel of the POG3.
- Plug your instrument into the INPUT jack.
- Connect either the LEFT or RIGHT OUTPUT jack to an amplifier. Make sure the corresponding LEFT or RIGHT button in the upper left corner of the POG3 is illuminated.
- Set the FILTER slider to maximum.
- Turn the MASTER VOL knob to 12:00.
- Push the desired octave voice sliders up and start playing!
ATTACK Slider
- Push the ATTACK slider up to the middle of its range for fade-in effect voices for each note played.
- Adjust the ATTACK slider for longer Attack time.
- Push the DRY slider up to hear your Dry signal along with the effect voices.
- Press the DRY ATTACK button to route the dry signal through the Attack effect for a fade-in effect.
FILTER Controls
- Set Q and ENV knobs to 50% and FILTER slider to maximum.
- Experiment with moving the FILTER slider down from its maximum position for filter sweep on effect voices.
- Adjust the Q knob and move the FILTER slider for a more dramatic and resonant filter sweep.
- Set FILTER slider to lower half, turn up ENV knob, and play to experience envelope sweeping the filter frequency.
- Press the DRY FILTER button to route dry signal through the filter effect.
DETUNE Controls
- The DETUNE slider controls depth for Detune chorus/doubling effect.
- Set DETUNE slider to 50% for Detune effect on +1 and +2 voices.
- Press DRY DETUNE button to enable Detune effect for dry signal as well.
Saving Presets
Create a setting you like, then save it by pressing and holding the center of the NavCoder knob for just over one second.
FAQ
- Q: What should I do if I encounter power supply issues?
- A: Ensure you are using the correct ElectroHarmonix 9.6DC-500 power supply with the specified voltage, current, and polarity. Using an incorrect adapter may damage the device and void the warranty.
- Q: How can I reset the POG3 to factory settings?
- A: To reset to factory settings, press and hold both OCTAVE UP and OCTAVE DOWN buttons while powering on the device. This will reset all settings and presets to default.
Setup
- Plug the supplied AC adapter into an AC outlet and insert its output plug into the power jack on the rear panel of the POG3.
- Plug your instrument into the INPUT jack.
- Connect either the LEFT or RIGHT OUTPUT jack to an amplifier. Make sure the corresponding LEFT or RIGHT button in the upper left corner of the POG3 is illuminated.
- Set the FILTER slider to maximum.
- Turn the MASTER VOL knob to 12:00.
- Push the desired octave voice sliders up and Rock-n-Roll!
ATTACK Slider
- Push the ATTACK slider up to the middle of its range. The effect voices for each note you play will fade-in. The POG3’s Attack effect is polyphonic so each note has its own fade-in sweep.
- The further up you push ATTACK, the longer the Attack time.
- Push the DRY slider up so you hear your Dry signal also. Your dry voice does not fade-in but the effect voices do.
- Press the DRY ATTACK button to route the dry signal through the Attack effect; this button is now lit. Your Dry voice now also fades-in.
FILTER Controls
- Set the Q and ENV knobs to 50%and the FILTER slider to maximum.
- While sustaining a note or chord, move the FILTER slider down from its maximum position. You will hear the filter sweep on the effect voices.
- Turn up the Q knob to maximum and move the FILTER slider again. This time the filter sweep will sound more dramatic and resonant.
- Set the FILTER slider to the lower half of its range.
- Turn up the ENV knob to about 3 o’clock. Now, when you play, the envelope sweeps the filter frequency.
- When ENV is set to its positive half, the envelope sweeps upward from the FILTER slider setting. When ENV is in its negative half, the envelope sweeps downward from the FILTER slider setting.
- Press the DRY FILTER button to route dry signal through the filter effect.
DETUNE Controls
- The DETUNE slider is a depth control for the Detune chorus/doubling effect.
- Set the DETUNE slider to 50%. The Detune effect will be heard on the + 1 and +2 voices.
- Press the DRY DETUNE button to enable it. The dry signal now goes through the DETUNE effect as well.
Saving Presets
- Once you create a setting you like, save it by pressing and holding the center of the NavCoder knob for just over one second.
- If the current preset slot is empty, Preset Saved is displayed and all slider LEDs blink for about a second.
- You can release the NavCoder once Preset Saved is shown. The preset is saved.
- If you are modifying or saving on an existing preset, the POG3 will ask you to Cancel, Save, or Save As. Choose Save to save the preset to the same preset number or Save As to save to a different location.
Recalling Presets
Footswitches
- If in LIVE mode, press and release either PRESET
 to load the current preset number.
 - The green PRESET LED between the footswitches lights solid.
- Now each press of the PRESET
 footswitch will scroll up through the preset number and immediately load the preset.
 - Each press of the PRESET
 foot-switch will scroll down through the preset number and immediately load the preset.
 - Press and hold either PRESET to rapidly scroll through the presets.
Navcoder
- If in LIVE mode, rotate the NavCoder knob to the desired preset.
- Press and release the center of the NavCoder. The preset loads and the green PRESET LED lights solid.
- Turn the NavCoder in either direction to automatically load the next preset.
LIVE / Preset Toggle
- NavCoder: If a preset is activated, press and release the center of the NavCoder knob to unload the preset and enter LIVE mode.
- NavCoder: Press and release the NavCoder while in LIVE mode to load the currently selected preset.
- Footswitches: Press both PRESET footswitches simultaneously to unload the current preset and enter LIVE mode.
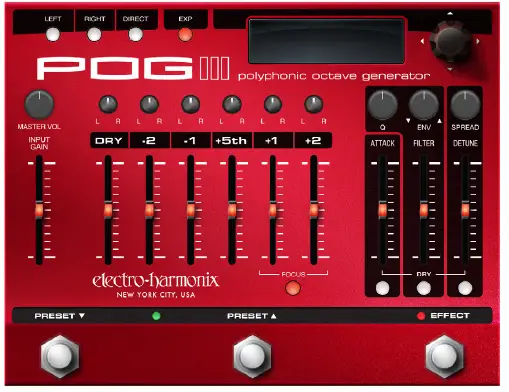
Top Panel Controls

- NAVCODER Knob Allows you to navigate menus, parameters, and presets as well as adjust settings. The NavCoder provides the following movements
- Rotate clockwise and counter-clockwise to scroll through values, presets, and lists.
- Center press (push straight down) for preset load/unload and choosing menu options. Center press and hold for preset save.
- Directional pad (D-pad) in four directions: up, down, left, and right, allows for easy navigation around menus and screens
- LEFT, RIGHT, DIRECT Buttons Press the LEFT, RIGHT, and DIRECT buttons to enable their respective outputs. The POG3 remembers the state of these outputs separately for EFFECT and BYPASS modes and their states are saved to each preset.
- EXP Button Press and release the EXP button to enable expression control. Press and hold the EXP button for 2 seconds to enter the Expression menu. For more on the Expression menu, go to page 15.
- OLED Graphical Display Shows essential information such as preset number, preset name, status of all outputs and buttons, and more. Detailed descriptions of all OLED display information can be found on page 8. Use the NavCoder knob to navigate around the display.
- MASTER VOL Knob Controls the POG3’s overall output volume.
- INPUT GAIN Slider Controls the level of the signal seen at the POG3’s input. The gain of this control ranges from 0.5-3X.
- PAN Knobs Allow each voice to be moved within the stereo field, from hard left to hard right and anywhere in between.
- DRY Slider Control the output volume of the dry/unison signal.
- VOICE Sliders Controls the volume of the -2, -1, +5th, +1 and +2 octave voices.
- FOCUS Button Toggles between the original POG octave algorithm and the Pitch Fork style algorithm for the +1 and +2 octave voices. The POG algorithm, which features lower latency, is active with the FOCUS button off. The Pitch Fork algorithm is active when the FOCUS button is lit. Focus allows the +1 and +2 voices to engage in whammy-style pitch bends and freeze effects when using Expression Warp and the two Freeze modes. Please Note: Focus changes the algo-rithm for both the +1 and +2 octave voices simultaneously.
- ATTACK Slider Controls the attack envelope of all octave voices. As the ATTACK slider is pushed upward, the attack time increases producing a volume swell effect. Maximum attack time is 3 seconds. Push the ATTACK slider down to its minimum position to disable the attack effect. The attack effect will also work on the DRY signal whenever the DRY button below it is lit.
- FILTER Slider Controls the cutoff or center frequency of the multimode resonant filter. As the FILTER slider is pushed upward, the filter frequency rises. The FILTER control can be used to shape the tone of the POG3’s voices. All of the generated signals go through the FILTER. The dry signal can also be routed through the FILTER when the DRY button below the FILTER slider is lit. By default, the filter is set to Low-Pass. More filter options are available in the FILTER menu which is accessed by pressing and holding the DRY Filter button for about 2 seconds.
- Q Knob Adjusts the resonance of the FILTER. As Q is turned clockwise, the sound of the filter becomes peakier, making the filter effect more pronounced.
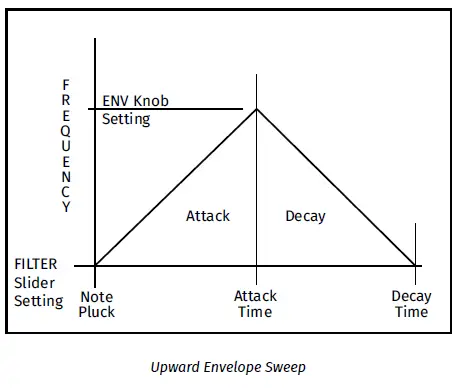
- ENV Knob Adjusts the depth of envelope sweep applied to the Filter frequency. With ENV turned CW from noon, a positive envelope sweeps the frequency upward from the FILTER slider’s setting. Turn ENV CCW from noon, a negative envelope sweeps the frequency downward from the FILTER slider’s setting. The ENV knob’s center position disables the envelope.
- DETUNE Slider Controls the amount of chorus/doubling effect applied to the +1 and +2 Octave signals. As the DETUNE slider is pushed up, the depth of the detune effect increases. When DETUNE is pushed down to its minimum position, the detune function is disabled. The DETUNE slider may also be applied to the dry signal by enabling the DRY button below the DETUNE slider.
- SPREAD Knob Independent of the DETUNE slider, the SPREAD knob introduces a short delay line on the+5th, +1, and +2 voices, and the Dry voice when the DETUNE DRY button is enabled. The two suboctave voices do not go through the Spread effect. The Right channel delay time is 3x longer than the Left delay time producing a wide stereo spectrum. Right delay time maximum is 150ms while the Left maximum is 50ms. Helpful Hint: Disable Dry Detune to make best use of the Spread effect when the POG3 is routed in mono.
- DRY Buttons The DRY buttons below the ATTACK, FILTER, and DETUNE sliders route the dry signal through the corresponding effects when lit.
- PRESET Footswitch Activates the current preset and then, with sub-sequent presses, scrolls down and loads the next preset. Press and hold this footswitch to scroll down quickly through the presets. Press the PRESET and PRESET footswitches at the same time to deactivate the current preset and return to LIVE mode.
- PRESET Footswitch Activates the current preset and then, with sub-sequent presses, scrolls up and loads the next preset. Press and hold this footswitch to scroll up quickly through the presets. Press the PRESET and PRESET footswitches at the same time to deactivate the current preset and return to LIVE mode.
- PRESET LED The PRESET LED lights solid green when a preset is loaded and blinks when a loaded preset has been edited. The PRESET LED is off when no preset is loaded, as in LIVE mode.
- EFFECT Footswitch The EFFECT footswitch toggles the POG3 between effect mode and buffered bypass.
- EFFECT LED The EFFECT LED lights solid to indicate the POG3 is in effect mode and is off in bypass.
ILLUMINATED SLIDERS Slider values are generated by various sources including presets, expression sweeps, MIDI, the EHXport application, or in LIVE mode, the actual position of the slider. The POG3 employs illuminated sliders to indicate the current position of each slider, no matter the source of its value. As a slider is pushed up to maximum, the LED brightness increases.
If a slider is moved after loading a preset, the new physical setting of the slider takes over. The slider’s LED blinks indicating that the slider has been moved, and that its value no longer matches the value in the preset.
Helpful Hint: the current value of any control always comes from the last source to update it. The available sources are presets, MIDI, expression, EHXport or physical movement of the control.
Connections
- POWER Jack Connect the output plug of the factory-supplied AC adapter into the 9VDC power jack. The current requirement is 300mA at 9VDC. The polarity of the power jack is center-negative. The maximum allowable power supply voltage is 10.5 VDC.
- USB Port Connects to the Electro-Harmonix EHXport™ app running on a Windows or Mac computer. EHXport allows for preset editing and creation, preset transfers—for backup, restore and preset rearrangement within the POG3, firmware updates, and global settings adjustments.
- MIDI IN Jack Connect a standard 5-pin DIN MIDI cable to this connector to receive MIDI Control Change (CC), Program Change (PC), and MIDI Note messages. Using MIDI CC and PC mes-sages, you can control every parameter on the POG3’s top panel. MIDI Note messages allow you to play the POG3 from a MIDI keyboard controller, turning it into an organ or synthesizer module.

- MIDI OUT Jack Connect a standard 5-pin DIN MIDI cable to this connec-tor. MIDI OUT provides a MIDI Thru connection.
- INPUT Jack The 1/4″ INPUT jack is an unbalanced, high impedance input intended for both instruments and line level signals. The Input can accept signal amplitudes up to +6.2dBu. The input impedance presented at this jack is 2MΩ.
- DIRECT OUT Jack The DIRECT OUT jack is an unbalanced, low impedance output, which carries a buffered version of the signal present at the INPUT jack. Direct Out is enabled or muted by the DIRECT button on the top panel of the POG3. The output impedance present-ed at this jack is 550Ω. The maximum output level is +12.5dBu.
- EXP / CV IN Jack Supports either an expression pedal with a 1/4″ TRS plug or a control voltage ranging from 0-5V on a TS plug. Nearly all the top panel features can be controlled via expres-sion pedal or CV and expression control is easy to setup via the expression menu. The Exp/CV In jack will accept any expression pedal that uses a potentiometer ranging from 10kΩ to 100kΩ and has the wiper connected to the tip (T) of the plug.
Accepted expression pedals include (but are not limited to):- Electro-Harmonix Expression Pedal
- Electro-Harmonix Dual Expression Pedal
- Electro-Harmonix Next Step Expression Pedal
- Expression pedals by other manufacturers include:
- Boss FV-500L
- Moog EP-3
- M-Audio EX-P
- L & R OUTPUT Jacks The LEFT and RIGHT OUTPUT jacks are unbalanced, low impedance outputs. Connect these outputs to amplifiers, a mixer, audio interface, tape recorder or any other suitable device. Use the PAN controls on the front of the POG3 to split or blend the various voices between these two jacks in fun and creative ways. You may also quickly mute or unmute these outputs using the LEFT and RIGHT buttons on the top panel. The output impedance sourced by each of these jacks is 550Ω. The maximum output level is +7.2dBu.
OLED Display and Home Screens
For most display screens, the graphics provide instructions or hints on the available actions. Most navigational actions are carried out by the NavCoder knob. When performing more critical tasks, usually having to do with presets or expression, the display will provide instructions.
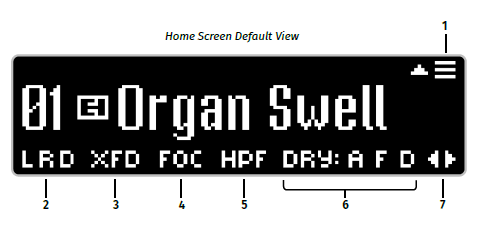
- Menu Icon
 The hamburger menu icon indicates that pushing UP ( ) on the NavCoder will open the POG3 Global Settings Menu. The Global Set-tings Menu can be accessed on most Home View pages.
 - Output Icons: L, R, D Indicate when the LEFT, RIGHT, and DIRECT outputs are active.
- Expression Icons
- VOL, XFD, WRP, FIL, FRG, FRV
The expression icons, located to the right of the L R D icons, are displayed when expression is enabled. The icon displayed represents the currently selected Expression mode: - VOL = Volume
- XFD = Crossfade
- WRP = Warp
- FIL = Filter
- FRG = Freeze+Gliss
- FRV = Freeze+Volume
- VOL, XFD, WRP, FIL, FRG, FRV
- FOCUS Icon: FOC Indicates when the FOCUS feature is active. The FOCUS button switches +1 and +2 Octaves between the original POG algorithm (Focus Off) and a Pitch Fork style algorithm (Focus On)
- FILTER Icons: LPF, BPF, HPF Indicates the currently selected filter type: Low-Pass, Band-Pass or High-Pass.
- DRY Icons: A, F, D
Indicate when the Dry signal is being routed through the ATTACK, FILTER, and DETUNE effects, respectively.  Arrows Indicate that pressing the LEFT
 arrows on the NavCoder will change the user’s Home View.
STANDARD View
The STANDARD Home View is the factory default. It displays the preset number, preset name, all available status icons, as well as the hamburger menu and left-right icons. Only the status icons that are currently active will be displayed.

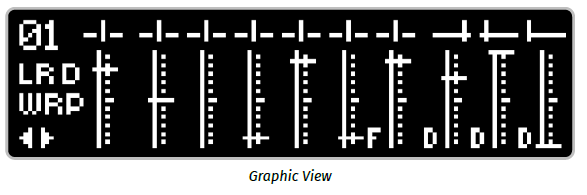
GRAPHIC View
- The GRAPHIC Home View’s main feature is that it displays a graphical representation of the POG3’s sliders and knobs, all of which move in real-time on the display. This view is helpful if you want to get an idea of where the controls are set after loading a preset. This view also displays the preset number, all available status icons, as well as the left-right icons. The status of each DRY button is indicated by a ‘D’ icon next to their respective slider. The status of the FOCUS button is indicated by an ‘F’ icon.
- Helpful Hint: If you move a slider or knob after loading a preset, the short end of the control’s line graphic blinks and remains at the location saved in the preset while the long end of the line graphic moves in real-time with the control.
DATA View
- DATA view displays the current value of each control, whether the setting comes from a preset, MIDI message, or the live position of the control.
- DATA view is two pages long. Use the NavCoder UP
 arrows to page up and down between pages 1 and 2. The first Data View page displays each octave voice in a column. The top row of the column shows the voice’s name, the middle row shows the value of the voice’s PAN control, and the bottom row shows the value of the voice’s volume/slider position. When FOCUS is on, an ‘F’ icon appears next to the +1 and +2 Octave names.

- The second page of DATA View organizes ATTACK, FILTER, and DETUNE sections into their own rows, with their associated controls in each row. When the DRY signal is routed through any of these effects, a ‘DRY’ icon appears at the end of the row.
- The top line of both pages in DATA View shows the preset number, output icons, expression mode icon—if expression is enabled, and values for VOLUME and INPUT GAIN.
PERFORMANCE View
PERFORMANCE view gives the user the most minimal view possible and is well suited for performing live. Only the preset number and name are displayed in large fonts.

Menu tree with ranges and/or brief function description (see the following pages for detailed descriptions of each menu).
Presets
- Save Preset: NavCoder right saves the preset
- Edit Name: Allows you to change a preset’s name
- Copy Preset: Allows for copying one preset to another preset location
- Swap Presets: Swaps the location of two presets
- Erase Presets: Allows you to select a preset and then erase it
Filter
- Filt Mode: Low-Pass (default), Band-Pass, High-Pass
- Attack Time: 1-101 (default = 50)
- Decay Time: 1-101 (default = 50)
- Trigger Sensitivity: 0-127 (default = 64)
Expression
- EXP Mode: Volume (default), Crossfade, Warp, Filter, Freeze+Gliss, Freeze+Volume
- Heel Value: range varies depending on chosen expression mode Toe Value: range varies depending on chosen expression mode Reverse: Off (default)/On
- No-Pedal Value: 0-127 (default = 127), only available when a plug is not inserted into EXP/CV IN jack
- Calibration: only available when a plug is inserted into EXP/CV IN jack
MIDI
- MIDI Channel: Omni (default), 1-16
- MIDI Thru: Off (default) / On
- MIDI Keyboard: Off (default) / On
Display Options
- Home View: Standard (default), Graphic, Data (Pg) 1, Data (Pg) 2, Performance
- Contrast: 1-10 (default = 10)
- Name Crawl: On (default) /Off
Factory Settings
Restore: Preset 1-10, Expression, Display, All settings
Firmware Version
Displays your POG3’s firmware version.
Presets
The Presets menu handles all things presets. To enter the submenu for the highlighted function, push the NavCoder to the right.
- Save Preset: while Save Preset is highlighted, push the NavCoder to the right. The POG3 immediately saves the current settings to the currently selected preset number.
- Helpful Hint: Possibly the quickest way to save a preset from a home screen is to push the NavCoder D-Pad in the following sequence: up, right, right. Preset saves immediately.
Edit Name: upon entering this submenu, first choose a preset by turning the NavCoder, then push the NavCoder downward to edit the name.
- For each character position, rotate the NavCoder in either direction to cycle through the list of available characters.
- Push the NavCoder right or left to advance to the next or previous character.
- A downward push on the NavCoder changes the character to a space.
- Once the name is ready, perform a center press and hold on the NavCoder for just over a second, until the screen displays Preset Name Saved.
Copy Preset: copy a preset to a different preset location.
- Upon entering the Copy Preset submenu, the Copy field is active, allowing you to choose the source preset by rotating the NavCoder in either direction.
- Once the source preset is chosen, move the NavCoder in the downward direction to choose the destination location. Again, turn the NavCoder in either direction to choose the location.
- When you’re ready to copy the preset, press and hold the NavCoder with a center push to initiate the preset copy.
- If you are copying to an occupied preset location, the display will ask OVERWRITE EXISTING PRESET? Choose OK or CANCEL.
Swap Presets: allows two presets to swap their locations.
- Enter the submenu and choose the A preset by rotating the NavCoder in either direction.
- Push downward on the NavCoder, and then choose the B preset.
- Press and hold the NavCoder center push for just over one second. The display will show Presets Swapped.
Erase Presets: allows for deleting a preset.
- Upon entering the submenu, the Erase field is highlighted. Rotate the NavCoder to choose the preset to erase.
- Press and hold the NavCoder center push for just over a second. The display will then ask ERASE THIS PRESET? Choose OK or CANCEL. If you choose OK, the preset will be erased and that preset location will now show as empty.
You cannot recover a preset once it has been erased unless it was previously saved to your computer through the EHXport app.
Filter
The Filter menu can be reached through the Global Menu tree, accessed by pushing the NavCoder up on most Home screens.
Shortcut: press and hold the DRY button under the FILTER slider for approxi-mately 2 seconds.
For a complete picture of the POG3’s Filter, also see the Filter controls Top Panel Controls section on page 5.
Filter Mode: Choose between Low-Pass, Band-Pass, High-Pass.
- Low-Pass: A low-pass filter allows frequencies lower than the cutoff frequency to pass through and attenuates frequencies above the cutoff. The cutoff frequency is set by the FILTER slider.
- Band-Pass: A band-pass filter attenuates the frequencies both above and below the center frequency set by the FILTER slider.
- High-Pass: A high-pass filter allows frequencies higher than the cutoff frequency to pass through the filter and attenuates frequencies below the cutoff.
For the above three filter modes, the Q knob amplifies the cutoff or center frequency set by the FILTER slider. The higher the setting of the Q knob, the more amplification at the cutoff frequency. Higher Q results in a peakier or narrower sounding filter.
- Attack Time: Range 1 to 101. When the filter envelope is in use (ENV knob set above or below the 12 o’clock position) the Attack time parameter sets the speed for the first half of the envelope’s sweep—which sweeps either upward or downward from the FILTER slider setting. Higher Attack settings yield slower sweep speeds.
- Decay Time: Range 1 to 101. When the filter envelope is in use (ENV knob set above or below the 12 o’clock position) the Decay time parameter sets the speed for the second half of the envelope’s sweep, when it sweeps back to the FILTER slider setting. Higher Decay settings yield slower sweep speeds.
- Trigger Sensitivity: range 0 -127. The notes you play trigger the filter envelope sweep. Trigger Sensitivity allows you to adjust how easily your playing will trigger the envelope, with higher settings allowing the envelope to be triggered more easily.
You should find there is a sweet spot for your style of playing and your instrument but also each different instrument may require a different Trigger Sensitivity setting.
Helpful Hint: If you find the envelope does not always trigger when you play a note, set Trigger Sensitivity to a higher setting. If the envelope sweep seems to trigger multiple times on a single note or chord, turn down the Trigger Sensitivity setting.

Expression
The Expression menu can be reached through the Global Menu tree, accessed by pushing the NavCoder up on most Home screens.
- Shortcut: press and hold the EXP button for approximately 2 seconds.
Expression control can be easily enabled or disabled at any time with a press and release of the EXP button. When the EXP button is lit, expression control is enabled. - Reverse Off/On: Every expression mode includes the Reverse parameter, which swaps the heel and toe positions, reversing the expression pedal sweep. For example, when set to Volume, normally the effect volume increases as you sweep from heel to toe but set Reverse to On, and the effect volume decreases from heel to toe. For all modes, Off is the default Reverse setting.
- No-Pedal Value: You may still use the expression modes even if no expression pedal or control-voltage is connected to the EXP/CV IN jack. First enable expression mode by pressing the EXP button so that it lights. Then set the No-Pedal Value anywhere in its range, from 0-127, where 0 represents the heel position and 127 the toe position.
- Calibration: We recommend you calibrate the POG3’s expression pedal input either when first using the POG3 in your set up or if you change expression pedals. POG3 calibration is only available when an expression pedal or control-voltage is connected to the EXP / CV IN jack.
To perform the calibration procedure, do the following
- Highlight Calibration Set> with the NavCoder then push right.
- Rock the expression pedal back and forth through its full range, until all six bars on the display are filled. If you are using CV, attach a slow-moving waveform that sweeps the entire voltage range—within the POG3’s 0-5V allowable range.
- Continue to move the expression pedal to finish up: most LEDs will blink and the display will indicate when the calibration procedure is completed. The calibration data is automatically saved by the POG3 and recalled after power is cycled.
EXP Modes
- Volume (VOL) Allows for expression control over the POG3’s effect volume. The expression pedal does not affect dry level in this mode.
- Reverse (Off/On): when On, swaps the heel and toe positions
- Calibration: Set> (only available when a plug is inserted into the EXP jack)
- No-Pedal Value: 0-127 (only available when plug is not inserted into the EXP jack)
- Crossfade (XFD) POG3 allows musicians to set up custom expression settings for each slider and knob. Assign the slider and knob positions from any available preset to the heel or toe or choose Custom to create new assignments. When arranging custom settings, it is usually good practice to only move the controls which are to be swept by the expression pedal. Note: when choosing a preset for heel or toe, the expression settings from that preset are ignored.
Heel: Select
- Rotate NavCoder CW for Presets. This allows for obtaining the heel’s slider and knob positions from any available preset. Optionally, the controls may be further tweaked by pushing right on the NavCoder to enter the Heel setup screen. The settings on the screen start from the chosen preset.
- Rotate NavCoder CCW for Custom. Push NavCoder right to enter the Heel setup screen
- Upon entering the setup screen, the POG3 will ask you to set the expression pedal to the heel setting. Upon doing so, a Graphic View screen will appear. Note: settings can be changed without an expression pedal attached but the displayed controls might not update as they are moved because POG3 defaults to the toe position. Optionally, set the No-Pedal Value to 0 to see your heel settings.

- Move the desired sliders and controls to their heel positions.
- Push the NavCoder downward to save the heel settings. The POG3 will display a confirmation screen: Heel Settings Saved.
Toe: Select ![]()
- Rotate NavCoder CW for Presets.
- Rotate NavCoder CCW for Custom. Push right on the NavCoder to enter the Toe setup screen.
- The Toe setup screen works the same as for Heel. One difference is that you can move the expression pedal to hear and see the sliders and knobs sweep as you tweak their toe positions.
Note: if you return to Crossfade to edit either the heel or toe, the Preset number you originally chose will not be displayed. The screen will show “Preset”, and allows for the settings to be edited with a NavCoder right push.
- Reverse: Off/On
- Calibration: Set>
- No-Pedal Value: 0-127
Warp (WRP) Warp mode engages whammy style pitch bend on all voices except DRY. FOCUS must be enabled to Warp—or bend—the +1 and +2 Octaves. The -2, -1, and +5th voices are always available for Warp sweep. - Heel Trans: Set the interval for the heel position, ranging from 0 to 120, where each decade is a note on the chromatic scale, the standard notes on a piano keyboard. See the note interval chart below. You may also further adjust cents between 0 and 9.
NOTE INTERVAL CHART FOR -1 AND +1 OCTAVES
| SETTING | -1 Octave Interval / Example Note | +1 Octave Interval / Example Note |
| 0 | Unison / C | Unison / C |
| 10 | Minor 2nd / B | Minor 2nd / C# |
| 20 | Major 2nd / Bb | Major 2nd / D |
| 30 | Minor 3rd / A | Minor 3rd / D# |
| 40 | Major 3rd / Ab | Major 3rd / E |
| 50 | Perfect 4th / G | Perfect 4th / F |
| 60 | Tritone / Gb | Tritone / F# |
| 70 | Perfect 5th / F | Perfect 5th / G |
| 80 | Minor 6th / E | Minor 6th / G# |
| 90 | Major 6th / Eb | Major 6th / A |
| 100 | Minor 7th / D | Minor 7th / A# |
| 110 | Major 7th / Db | Major 7th / B |
| 120 | Octave / C | Octave / C |
Note: The above chart does not pertain to the -2, +5th, or +2 voices as they will produce other intervals at the above settings.
- Toe Trans: Set the interval for the toe position, with same range as the heel. Reverse: Off/On
- Calibration: Set>
- No-Pedal Value: 0-127
Filter (FIL) Sweep the filter frequency with an expression pedal for wah and synth effects. - Heel – 0-100%: set the heel setting anywhere in the Filter slider’s frequency range. 0% is the slider at minimum and 100% is the slider at maximum. Default is 15%.
- Toe – 0-100%: same as the heel setting. Default is 100%.
- Reverse: Off/On. When On, swaps the heel and toe positions.
- Calibration: Set>
- No-Pedal Value: 0-127
Freeze+Gliss (FRG) Allows you to freeze the sound you hear at the moment you move an expression pedal from the heel position towards the toe. When in the full toe position, the frozen sound sustains indefinitely, and you can play the dry voice over it. In between the heel and toe positions of the expression pedal, the POG3 glissandos or slides from one frozen note to the next. The position of the expression pedal sets the glissando speed: the closer the pedal is to the toe position the slower the glissando rate. - Reverse: Off/On
- Calibration: Set>
- No-Pedal Value: 0-127
- Helpful Hints: To play over the frozen sound in the full toe position, adjust the DRY slider to the appropriate volume.
FOCUS must be enabled to freeze the +1 and +2 Octave voices.
To freeze the dry signal, ensure the DRY ATTACK button is enabled and that the ATTACK slider is activated—set above 10%.
Freeze+Vol (FRV) Freezes your notes at the moment you move an expression pedal from the full heel position towards the toe. The expression pedal position then sets the volume of the freeze effect when it is located between the heel and toe, with full volume achieved in the toe position of the expression pedal. Please note: moving the Expression Pedal to the full heel position erases the frozen note(s) in memory and allows you to freeze a new chord or note. - Reverse: Off/On
- Calibration: Set>
- No-Pedal Value: 0-127
- Helpful Hints: To play over the frozen sound, adjust the DRY slider to the appropriate volume.
FOCUS must be enabled to freeze the +1 and +2 octave voices.
To freeze the dry signal, ensure the DRY ATTACK button is enabled and that the ATTACK slider is activated—set above 10%.
MIDI
The POG3 has both MIDI IN and OUT ports. MIDI IN is used for a number of functions including: controlling nearly every parameter on the POG3 in real-time, choosing and loading presets, or playing the POG3 like an organ or synthesizer with standard MIDI Note messages from a MIDI keyboard. MIDI OUT works as a MIDI Thru connection.
- MIDI Channel: 1-16, OMNI. Sets the MIDI receive channel.
- MIDI Thru: Off/On. Allows all MIDI messages to be sent from MIDI IN to MIDI OUT.
- MIDI Keyboard: Off/On. When set to On, MIDI notes received by the POG3 will play the effect voices and trigger the attack function and filter envelope sweep. This allows the POG3 to be played as an organ or synthesizer module. The POG3 also responds to the MIDI Note velocity and Pitch Bend. Maximum Pitch Bend may be set in the EHXport application’s global settings.
MIDI CC Map
The POG3 accepts MIDI Control Change (CC) messages to control nearly all of the POG3’s top panel controls plus a number of other functions. The following table details the CC messages the POG3 accepts and the POG3’s handling of each message.
| MIDI CC | POG3 Function | Description | Data Range |
| 1 (Mod Wheel) | DETUNE slider | The mod wheel takes control of the Detune slider. | 0…127 |
| 4 | Expression pedal MSB or upper values | Works in conjunction with MIDI CC 36 to provide detailed control over the expression pedal function. If only one MIDI CC is able to control the expression pedal, use MIDI CC 4. | 0…127 |
| 7 | MASTER VOL knob | Controls POG3’s output volume. | 0…127 |
| 9 | INPUT GAIN slider | Controls the INPUT GAIN slider. | 0…127 |
| 36 | Expression pedal LSB or lower values | Works in conjunction with MIDI CC 4 to provide detailed control over the expression pedal function. Use MIDI CC36 to provide finer control over the expression pedal sweep. | 0…127 |
| 70 | LEFT output button | Enable or disable the Left Output jack. | 0=Disable, 1…127=Enable |
| 71 | RIGHT output button | Enable of disable the Right Output jack. | 0=Disable, 1..127=Enable |
| 72 | DIRECT output button | Enable or disable the Direct Output jack. | 0=Disable, 1…127=Enable |
| 73 | EXP enable button | Enable or disable the Expression pedal. | 0=Disable, 1…127=Enable |
| 74 | FOCUS enable button | Enable or disable FOCUS function. | 0=Disable, 1..127=Enable |
| 75 | DRY ATTACK
enable button |
Enable or disable the DRY ATTACK button, where the DRY signal is routed through the Attack effect. | 0=Disable, 1..127=Enable |
| MIDI CC | POG3 Function | Description | Data Range |
| 76 | DRY FILTER en-
able button |
Enable or disable the DRY FILTER button, where the DRY signal is routed through the Filter. | 0=Disable, 1..127=Enable |
| 77 | DRY DETUNE enable button | Enable or disable the DRY DETUNE button, where the DRY signal is routed through the Detune effect. | 0=Disable, 1..127=Enable |
| 78 | Home Screen | Choose home screen view. | 0…4 |
| 79 | EFFECT enable footswitch | Enable or bypass the POG3 effect. | 0=Bypass, 1..127=Effect |
| 80 | Save to preset | Save the current POG3 settings to the preset number specified by the MIDI CC data value +
1. For example, send data value 00 to save to Preset 1. |
0…99 |
| 81 | Load Preset and Effect On | Load the preset specified by the MIDI CC data value + 1. Enable the POG3 effect. For example, send data value 00 to load to Preset 1. | 0…99 |
| 82 | Load Preset and Effect Off | Load the preset specified by the MIDI CC data value + 1. Put the POG3 into bypass. For example, send data value 00 to load to Preset 1. | 0…99 |
| 102 | DRY Pan knob | DRY L/R position | 0…127 |
| 103 | -2 Pan knob | -2 L/R position | 0…127 |
| 104 | -1 Pan knob | -1 L/R position | 0…127 |
| 105 | +5th Pan knob | +5th L/R position | 0…127 |
| 106 | +1 Pan knob | +1 L/R position | 0…127 |
| 107 | +2 Pan knob | +2 L/R position | 0…127 |
| 108 | Q knob | Q knob setting | 0…127 |
| 109 | ENV knob | ENV knob setting | 0…127 |
| 110 | SPREAD knob | SPREAD knob setting | 0…127 |
| 111 | DRY Level slider | DRY volume | 0…127 |
| 112 | -2 Level slider | -2 volume | 0…127 |
| 113 | -1 Level slider | -1 volume | 0…127 |
| 114 | +5th Level slider | +5th volume | 0…127 |
| 115 | +1 Level slider | +1 volume | 0…127 |
| 116 | +2 Level slider | +2 volume | 0…127 |
| 117 | ATTACK slider | Attack time | 0…127 |
| 118 | FILTER slider | Filter frequency sweep | 0…127 |
| 119 | DETUNE slider | Detune depth | 0…127 |
| 122 | Local Control On/Off | Enables or disables physical control of all sliders and knobs. Must be sent on Channel 16. Default is Local Control set to On. | 0=Local Off, 1=Local On |
| 124 | OMNI OFF | Disables OMNI MIDI Channel control. Must be sent on Channel 16. | 0…127 |
| 125 | OMNI ON | Enables OMNI MIDI Channel control. Must be sent on Channel 16. | 0…127 |
MIDI PC Map
The POG3 accepts MIDI Program Change (PC) messages to select presets and initiate certain functions related to footswitches. The following table details all PC messages the POG3 accepts.
| MIDI PC | POG3 Function | Description |
| 1 – 100 | Preset Load | Loads the preset associated with the MIDI PC number |
| 122 | EFFECT footswitch | Equivalent to pressing the EFFECT footswitch |
| 123 | PRESET footswitch |
Equivalent to a press on the PRESET |
| 124 | PRESET footswitch |
Equivalent to a press on the PRESET |
| 125 | EFFECT OFF | Put the POG3 into bypass no matter the state of the POG3 |
| 126 | EFFECT ON | Enable Effect mode no matter the state of the POG3 |
| 127 | Toggle between Preset and Live mode | Toggle between loading the current preset or Live mode. |
| 128 | Go to Live mode | Go to Live mode, no matter the state of the POG3 |
Display Options
This menu allows for control over POG3’s OLED display.
- Home View: Standard (default), Graphic, Data (Pg) 1, Data (Pg) 2, Performance. This menu provides the option to choose the default home screen upon power up. Please see the Home Views section on page 8 for examples and descriptions of each Home View.
- Please Note: the Home View may be changed by moving the NavCoder left and right while on any of the Home screen views but the Home screen shown on power up will be determined by this Home View setting in the Display Options menu.
- Contrast: 1-10 (default = 10): adjusts the brightness or contrast of the POG3’s OLED display. A setting of 1 is the lowest contrast and is the darkest setting. A setting of 10 has the highest contrast and is the brightest setting.
- Name Crawl: Off/On (default = On): the Name Crawl setting comes into play when a preset is loaded with a name longer than can be fully displayed on the Home screen’s Standard View; usually longer than 14 or 15 characters. The POG3 will scroll the name from right to left three times after the preset is loaded. The maximum preset name length is 24 characters.
Factory Settings
This menu allows you to restore presets and settings back to the default factory settings.
- Please Note: Restoring factory settings overwrites your settings and presets. Your presets cannot be recovered after performing the Presets 1-10 or All settings functions. We recommend backing up your presets to your computer using the EHXport application before performing a factory restore.
- Restore: Presets 1-10 (default), Expression, Display, All Settings
- Presets 1-10: The factory presets are located in Presets 1-10. Performing this function will erase the presets currently located in Presets 1-10 and overwrite them with the factory presets.
- Expression: Restores the factory expression settings.
- Display: Restores the three Display Options.
- All Settings: Erases all presets on the POG3 and then restores factory Presets 1-10. This function also resets all other settings to their factory defaults. After performing All settings restore, the POG3 restarts.
- Please Note: all of your presets should be backed up to your computer using the EHXport app prior to running the All settings function.
Firmware
The last entry in the Global Settings Menu displays the POG3’s current firmware version. The POG3’s firmware is user updateable using the EHXport™ application, which will alert you to when a firmware update is available.
- Register your POG3 online at www.ehx.com/production-registration.
- You will recieve an email when a POG3 firmware update is available for download through the EHXport™ application.
- Stay up to date with your POG3 firmware by periodically running the EHXport™ app and clicking on the Device Settings/Firmware tab.
Notes and Specifications
- Current Draw: 300mA at 9V
- Maximum allowable power supply voltage: 10.5 VDC
- Power Supply: 9.6VDC/0.5A/Center-Negative
- Input Impedance: 2MΩ
- Output Impedance All Jacks: 550Ω
- Maximum allowable voltage at the EXP / CV IN phonejack: 0V to 5V
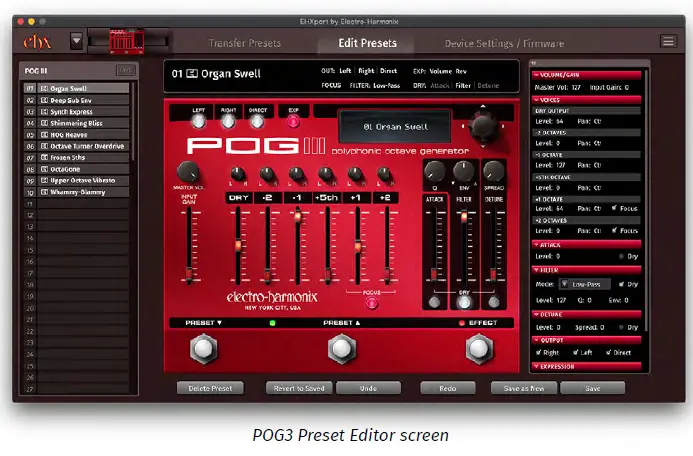
EHXport™ Computer Application
The EHXport™ companion software for your POG3 runs on Windows and Mac and provides
- Preset editing and creation
- Preset transfer and backup to and from your computer Preset rearrangement
- Global settings entry
- Firmware updates
EHXport™ is available as a free download at ehx.com/pog3.

Documents / Resources
 |
electro harmonix POG 3 Digital Polyphonic Octave Generator [pdf] User Guide POG 3 Digital Polyphonic Octave Generator, POG 3, Digital Polyphonic Octave Generator, Polyphonic Octave Generator, Octave Generator, Generator |


