Autex Acoustics Type E Perth Building Materials Autex Edging Solution

Specifications
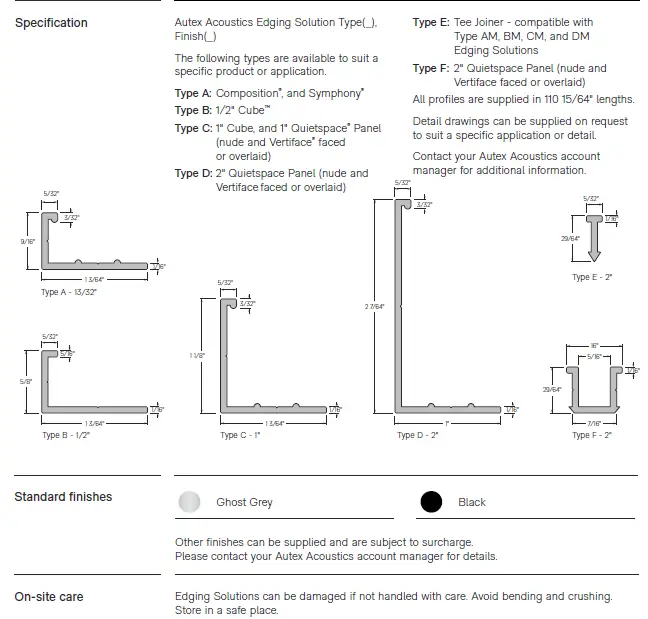
- Type A – 13/32
- Type B – 1/2
- Type C – 1
- Type D – 2
- Type E – 2
- Type F – 2
Product Overview
The Edging Solutions offered by Autex Acoustics are designed to provide a finishing touch to various applications. The product comes in different types to suit specific needs, with standard finishes available in Ghost Grey and Black.
General Information
- Edging Solutions should be handled with care to avoid damage.
- Store them in a safe place, avoiding bending or crushing.
General Installation
- Install Method: Always follow the provided instructions and specifications. Plan the installation before cutting or installing any trims.
- Cutting: Measure and cut trims with a suitable cutting tool. Corners should be mitre cut.
- Joining: Minimize joins and avoid asymmetrical layouts. Ensure no visible gaps between panels and trims.
- Finishing: File sharp edges smooth and touch up with paint if necessary.
Mechanical Fix
- Screws: Counter sink screw heads and use appropriate length to secure through the lining into the subframe.
- Plaster & Cement Linings: Use suitable anchors for fixing.
- Fixing Placement: Place fixings no more than 1″ from any end and no more than 15 3/4″ apart.
- Tee Joiner: Apply adhesive in the gap when using Tee Joiners, ensuring no excess leaks out onto the panel surface.
Product overview
- Edging Solutions are a series of exclusive trims designed to complement the Autex Acoustics® range of acoustic solutions.
SPECIFICATION
General information
- Edging Solutions should always be installed in accordance with the instructions below and as per the specification details. If there is conflicting information, you must seek clarification from all appropriate parties before proceeding with the work.
- It is imperative that the installation is planned before cutting and installing any product. Edging Solutions are referred to as trims
in this document.
General installation
- Autex Acoustics recommends that you minimize the number of joins and avoid creating asymmetrical layouts.
- Confirm where trims are required, then measure and cut with a suitable cutting tool such as a drop saw or power Mitre Saw. We recommend you “measure twice and cut once”. Corners should be mitre cut. Trims are typically installed around the perimeter before fitting the acoustic panel. On completion of the job, there should be no visible gaps between the acoustic panel and the edging trims.
- Sharp edges are to be filed smooth.
- Touch up with paint to match he finish where it’s required. Where Tee Joiners are used between acoustic panels, allow for a small, even gap to accommodate the Tee Joiner.
- A waste section of extrusion can be used to achieve a consistent gap. Ideally, the gap should be 1/16″ wide.
- Ensure no gaps are visible between profiles and panels once installed.
- Cutting and installing the Ethe dging Solution poses safety hazards if not adequately managed by the installer. Please identify site-specific hazards and follow relevant local OH&S regulations and guidance. Suitable PPE such as safety goggles, hearing protectio,, and gloves must be worn during the installation of Edging Solutions.
Install method
Mechanical fix
- The head of the screw should be becountersunkk. The fixings must be long enough to secure through the lining into the subframe.
- Plaster and cement-based linings require a suitable anchor.
- Fixings should be placed no more than 1″ from any end, and no more than 15 3/4″ apart.
- Where a Tee Joiner is being used, a bead of adhesive can be applied in the gap to secureit in place. Care must be taken to ensure excessive adhesive is not applied and allowed to leak out onto to panel surface.
Adhesive fix
- The only instances in which Autex Acoustics recommends using an adhesive to fix trims are when the substrate is not suitable to pick up a mechanical fixing. Autex Acoustics recommends a high-quality MS tape and construction adhesives. Check with the adhesives supplier for compatibility and any preparation requirements. It is the installer’s responsibility to ensure that any adhesive is fit for the intended purpose.
- It is also the installer’s responsibility to ensure that the substrate is fit for the application of adhesives. For information regarding adhesive suppliers, please contact your Autex Acoustics account manager.
Install method continued
- Contact and double-sided tapes are not recommended.
- Adhesives should be applied strictly in accordance with the adhesive manufacturer’s instructions. Refer to the product label or the technical datasheet for spread rates, tack-off times, application methods, and equipment required.
- The job should be progressively checked for appearance, installation quality, and adequate adhesion. Any faults must be notified and discussed with your account manager. No claims will be accepted where the job continues with obvious faults, and no consultation with Autex Acoustics has taken place.
- Care must be taken to ensure excessive adhesive is not applied and allowed to leak out onto the panel and substrate.
- Adhesive spills or surface contamination should be cleaned immediately, ensuring care instructions on the specific Autex Acoustics product Care and Maintenance Guide are followed.
- Completion
Check and ensure all profiles are fixed securely. Ensure any sharp edges are removed, and remove any waste and filings. Recycle offcuts where possible. - New Zealand
702-718 Rosebank Road, Private Bag 19988 Avondale 1746, Auckland T 0800 428 839
T +64 9 828 9179 autexacoustics.co.nz - Australia
285 Swan Street, Richmond, VIC 3121
T 1800 678 160
T +61 3 9450 6700 autexacoustics.com.au - United Kingdom
Unit J4, Lowfi elds Way, Lowfi elds Business Park, Elland, West Yorkshire HX5 9DA
T +44 0 142 241 8899 autexacoustics.co.uk - United States
1630 Dan Kipper Drive, Riverside, CA 92507 T +1 424 203 1813 autexacoustics.com - Autex is an ISO certifi ed organisation encompassing Quality (ISO 9001), Environmental (ISO 14001), and Health and Safety (ISO 45001). Brand names and logos are registered or unregistered trademarks owned or used under license by Autex Industries Limited or other members of the Autex Group. © Copyright 2025 Autex Industries Ltd. All rights reserved. It is the user’s responsibility to determine if the product and information presented in this document are suitable for the intended application by engaging a suitably qualifi ed consultant. The information contained in this document is correct to the best of our knowledge at the date of its publication. To verify that this document is the most current publication, please check our website or contact your Autex Acoustics account manager.
- IA_IAG_DO_Edging Solutions Product Guide US_Jul25_LC
FAQS
Can I use different finishes for the Edging Solutions?
Yes, other finishes can be supplied upon request but may be subject to a surcharge. Contact your Autex Acoustics account manager for details.
What safety precautions should I take during installation?
Wear suitable PPE such as safety goggles, hearing protection, and gloves to prevent any safety hazards while cutting and installing Edging Solution
Documents / Resources
 |
Autex Acoustics Type E Perth Building Materials Autex Edging Solution [pdf] User Guide Type E, Type F, Type E Perth Building Materials Autex Edging Solution, Type E, Perth Building Materials Autex Edging Solution, Materials Autex Edging Solution, Edging Solution, Solution |