![]() E-CON KIT 12
E-CON KIT 12
Wired Intercom System with Smartphone App
User Guide
EliteConnect www.aap.co.nz
Specifications
| Power Supply | 15VDC 1.3A |
| Internet Connection | Ethernet or Wifi to Monitor |
| App Support | Tuya Smart |
| Phone Support | iOS & Android |
| Weather Resistant | Gate Station Only |
| Mounting Height | Monitor:1.5m Gate Station:1.2 – 1.5m |
| Maximum Monitors | Up to 6 Monitors |
| Maximum Stations | Up to 2 Call Stations |
Cabling Overview
- It is recommended to use CAT6 for all cabling on the EliteConnect intercom system.
- Direct burial or gel filled CAT6 is recommended for externally run cable (including inside conduit).
![]() Tuya App Requirements:
Tuya App Requirements:

Internet Connection
E-CON MONITOR must have an Ethernet or Wifi Internet connection for the Tuya Smart app to operate.
Smartphone
Apple iOS 11.0 & Above ![]()
Android 5.0 & Above ![]()
Account
All APP Owners& invited Users must have an active Tuya Smart account.
 Wiring Schematic – This example shows 2 x gate stations connected to 3 x monitors
Wiring & Addressing the E-CON System (Important)
- A maximum of 6 monitors can be wired to 1 system.
- A maximum of 2 gate stations can be wired to 1 system.
- Gate station 1 & 2 must always be wired to ‘Monitor 1’.
- Each monitor requires its own 15V 1.3A power supply.
- Each monitor is default set as ‘Monitor 1’. For systems with more than 1 monitor, each monitor must be set to a unique address. See below for more details:
How to Address Monitors
- Tap the screen to bring up the main menu. Go to ‘Settings’ then ‘System’.
- Here you can change the ‘Device ID’ to the next unique & available number.
- The monitor should now restart as the new selected number.
Wiring Colours
E-CON MONITOR
Power IN
RED = 1SVDC
BLACK = GND
Comms
RED =V+
WHITE = AUDIO
BLACK = GND
YELLOW = VIDEO
Clean Contact Triggered by Monitor ‘Key Icon’
BLACK = NO
RED = COM
YELLOW = NC
Ethernet
RED = RxN
BROWN = RxP
BLACK = TxN
YELLOW = TxP
E-CON GATE KP
Power IN
PURPLE = 12-1SVDC
GREY = GND
Comms
RED =V+
WHITE = AUDIO
BLACK = GND
YELLOW = VIDEO
Clean Contact Triggered by Monitor ‘Gate icon’ & smartphone APP
GREEN = NO
ORANGE = COM
BROWN = NC
REX {N/O Button)
BLUE = OPEN TRG
GREY = GND
E-CON GATE
See Schematic
App & Site Setup with Monitor Connected via Ethernet
- Before proceeding, make sure your monitor has an Ethernet internet connection & your smartphone is connected to the Wifi of the same router.
- Download the App

Search ‘Tuya Smart’ on the ‘App’ or ‘Play’ Store or scan the QR link at the top right of this page.
- Create a Tuya account

All users must have an active ‘Tuya Smart’ account to either add a device or operate an E-CON KIT from any smart device.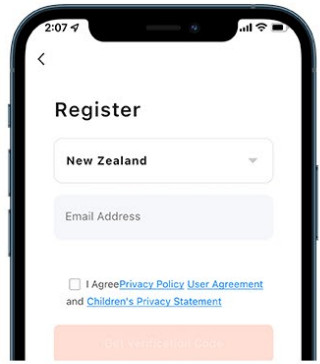
Press ‘’Sign Up’ from within the app to register. - . Monitor Setup

Go to ‘Settings’, then ‘Network Settings’ & select ‘Cable’ under ‘Netpairing Mode’ Next press the back button & the monitor will restart in the new selected mode.
- Add Device

From the ‘Home’ screen, press ‘Add Device’. This can also be accessed via the orange circle/plus icon.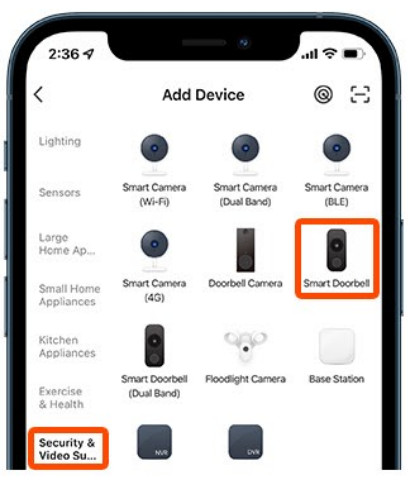
Next press ‘Camera & Lock’, then press ‘Smart Doorbell”. - Pairing Device

Press the top right of the screen, then select ‘Cable’ from the drop down list.
Next press the ‘Power on the device…” tick. Lastly press the large orange “Next’ button. - Search/Add

The app should now begin searching for the monitor.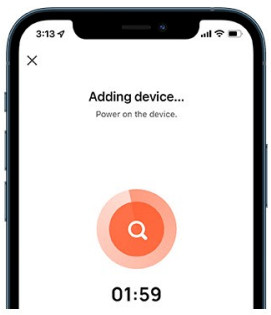
Once found, the device will be added to your app. If searching fails, make sure the device is powered & has an active internet connection.
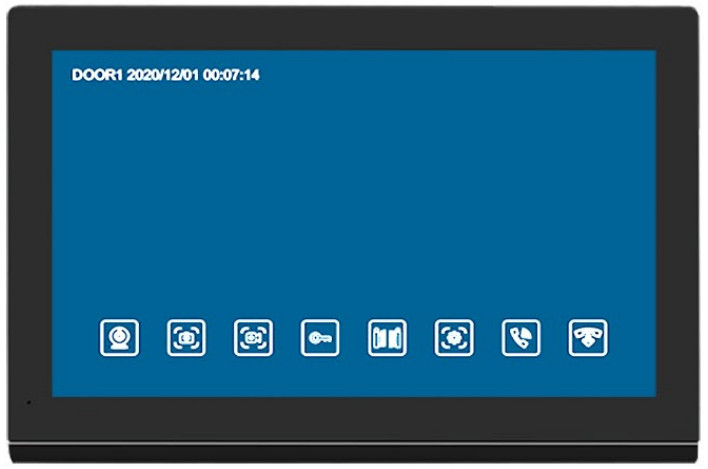
Intercom App Overview

- Hang up / Exit.
- Audio from door station ON/OFF.
- Snapshot – Capture image & save to phone app or gallery.
- Turns on/off microphone for two way communication.
- Opens the door/gate connected to the relay of monitor 1.
- Switches communication between gate station 1&2.
- Playback of recordings fromn monitor SD card (if fitted).
- Access to images from intercom snapshot history.
- Opens the door/gate connected to the gate station relay.
- Records video during gate station communication.
- Turns video into full screen mode.
- Settings menu.
Monitor Wifi Setup
- Use this page in conjunction with Ethernet setup. Swap out steps 3 &5 as detailed below;
- Make sure your smartphone is connected to the same wifi that the monitor is being connected to. Wifi must be 2.4GHz only
3.Monitor Setup![]()
Go to ‘Settings’, then ‘Network Settings’ & select ‘EZ Mode’ under ‘Netpairing Mode’ Next press the back button & the monitor will restart in the new selected mode. 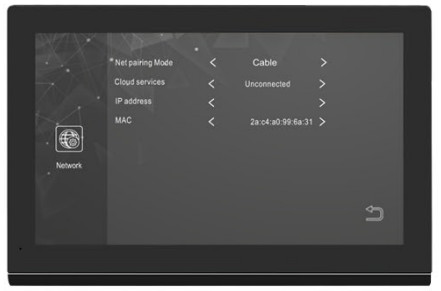
5.Pairing Device
Press the top right of the screen, then select ‘Wi-Fi Mode’ from the drop down list.
Now press ‘Next step’, then the ‘EZ Mode’ button. Enter the Wi-Fi password that you are connected to then press ‘Next’.
| View door station camera. | |
| Snapshot image during communication (requires SD card). | |
| Video recording during communication (requires SD card). | |
| Triggers relay contact from within the monitor. | |
| Triggers relay contact from within the call station’ | |
| Adjust volume, brightness, contrast & saturation. | |
| Transfer call station call to another connected device. | |
| Answer/enable 2 way communication between call station & monitor. | |
| Hang up/cancel communication between call station & monitor. | |
| Return to the previous screen. |
| Return to the previous screen. |
Extra Functions & Features
- The E-CON MONITOR & E-CON GATE (KP) supports extra features that are not detailed in this manual such as: ‘Motion detection’, ‘Relay reset times’ & ‘Custom standby screen images’.
- If you wish to use these functions, please follow the intuitive monitor user interface to access & enable these settings. ‘Custom screen images’ require images to be loaded onto an SD card that is then inserted into the monitor (SD card not included).
- Wifi monitor connection is not recommended as connection can easily be lost by interference, changing your router (or router password). Please use Ethernet/Cable connection where possible.
Inviting Users & Device Ownership
The person who first registers a device becomes the ‘Owner’ & can add or remove a users directly from the app. Invited users must have an active Tuya account. See step 2 on page 3 of this manual for information on how to register.
- Create a Home

From the home screen, select ‘Me’ found at the bottom right.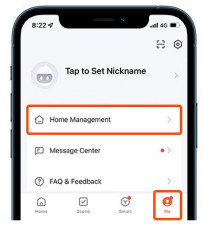
Then press ‘Home Management’. - Create a Home
Press ‘Create a home’
- . Name Home

Enter a ‘Home Name’ then press ‘Save’ found at the top right to continue.
- Open Created Home
Next, press on the ‘Home’ that you created in step 3 to access the ‘Add Member’ options. 5. Add Member
Press ‘Add Member’, then select the path you would like to send via.L.e. Text, email or other.
- Send Invitation Code

Enter the invited users details and press ‘Send’. he invited user is required to use the code shown here in the steps detailed below:
Accepting Invitations
- Invited users must enter the invitation code detailed above (in step 6) to start using the device
- Join a Home @ From the home screen, select ‘Me’ found at the bottom rig
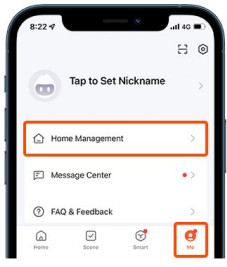 Then press ‘Home Management’.
 - Join a Home

Press ‘Join a home’
- Invitation Code
Enter the invitation code that was sent by the device owner shown in step 6.
- Use the Device

The device should now appear in the ‘Home’ tab found on the ‘”Home’ screen.
Keypad Code & Swipe Tag Programming (E-CON GATE KP Only) =
- This keypad supports up to 60 user codes & up to 199 swipe tags.
- Beep Indications: 2 beeps = Successful entry 4 beeps = Unsucsessful entry.

Entering Management Mode![]()
Press * then 999999, then #. You will hear a double beep and the numbers will flash slowly, indicating that you are in management mode.
Note: 999999 is the default management code. If the management code has been lost then the call station will need to be reset.
Exiting Management Mode ![]()
To exit management mode, double press the * button.
Alternatively the unit will return to normal user mode after 30 seconds of inactivity. In this case 3 beeps will be heard & the numbers will stop flashing.
Adding/Change a User Keypad Code ![]()
Enter ‘Management Mode’.
Press 933# (keypad will fast flash), then enter the user slot number (001 – 060) followed by #. Now enter a (4-6 digit) code followed by #, then enter the same code again followed by #.
Adding Swipe Tags![]()
Enter ‘Management Mode’.
Press 1 (keypad will fast flash), then select a slot from 001 – 199, followed by #. Next swipe an unused tag over the keypad. Double beep indicates successful learn.
Delete Single User Keypad Code![]()
Enter ‘Management Mode’.
Press 944# (keypad will fast flash), then select a user slot to delete from 001 – 060, followed by #.
Deleting Swipe Tags![]()
Enter ‘Management Mode’.
Press 2 (keypad will fast flash), then select a slot to delete from 001 – 199, followed by #. The keypad will beep 3 times to confirm deletion.
Delete All User Keypad Codes![]()
Enter ‘Management Mode’.
Press 988# (keypad will fast flash) The keypad will beep 7 times indicating that all user codes have been deleted.
Call Station Relay Reset Time![]()
Enter ‘Management Mode’.
Press 4 (keypad will fast flash), then select a reset time from 00 – 99(sec), followed by # & the new time will be saved.
Note: 00 = Latching
Changing Management Code![]()
Enter ‘Management Mode’.
Press O (keypad will fast flash), then press 77 followed by #.
Now enter a new 6 digit code, followed by #,
then enter the same code again followed by #.
Restore Factory Management Code![]()
Power down gate station.
Short blue wire (REX) to grey wire (GND) while powering up the gate station. Keep shorted until you hear 3 beeps & the management code will now be reset to 999999.
![]() Proudly Supplied by Arrowhead Alarm Products Ltd
Proudly Supplied by Arrowhead Alarm Products Ltd
1A Emirali Road, Silverdale 0932, Auckland, New Zealand – www.aap.co.nz
Documents / Resources
 |
Arrowhead Alarm Products E-CON KIT Wired Intercom System with Smartphone App [pdf] User Guide E-CON KIT Wired Intercom System with Smartphone App, E-CON KIT, Wired Intercom System with Smartphone App, Wired Intercom System, Intercom System |