![]()
CineView M7
User Manual
V1.0
01 In the Box


CineView M7 × 1 User Manual × 1
02 Introduction
Thank you for choosing the Accsoon CineView M7 professional monitor. Powered by high-performance chipset and Wi-Fi connectivity, CineView M7 combines professional monitoring tools with advanced video features, expanding the possibility of on-set workflows. Each unit undergoes precision calibration to deliver cinema-grade color accuracy that meets professional film and television production standards. This ensures precise control over every frame while accommodating diverse shooting requirements.
03 Product Features
- Precision in Color Accuracy for Professional Monitoring
- 4K60 Video Inputs & Outputs
- SDI & HDMI Cross Conversion
- SDI & HDMI Simultaneously Outputs
- Up/Down Convert HD/4K Video
- LUT Box | Real-Time Look Application
- SD Card Support
- USB 3.0, Supports External Storage
- Stream, Cloud-Upload, Share via Built-in Wi-Fi
- Microphone and Headphone Jacks
- Supports PD, DC & NP-F power
04 Applications
4.1 Camera monitor
Connect a video source via HDMI or 3G-SDI to use CineView M7 as a professional 7-inch camera monitor.
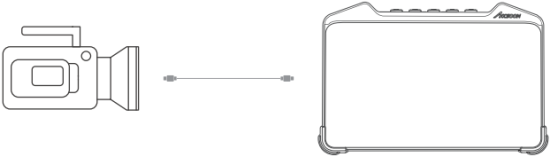
HDMI/SDI source Displaying input signal
4.2 LUT box for on-set applications
CineView M7 supports loading 3D LUT via USB to perform real-time live grading, you can apply a film look to the input signal and output to other monitors through HDMI and SDI.
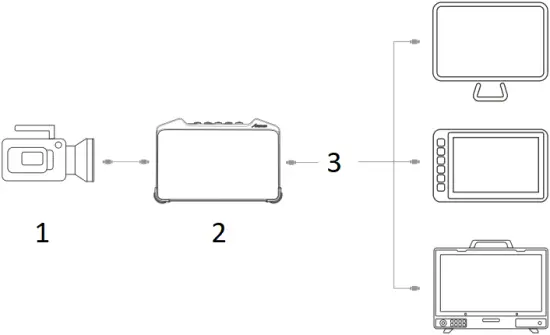
- HDMI/SDI source
- LUT application
- Look applied output
4.3 Streaming
With its built-in Wi-Fi, CineView M7 is able to stream wired video signal directly to online live streaming platforms, enabling professional-grade broadcasts. Refer to 7. Live Stream for further details.
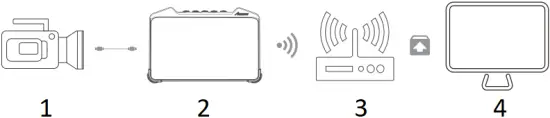
- HDMI/SDI source
- CineView M7
- Wi-Fi Router
- Live Stream
05 Quick Use
5.1 I/O interface
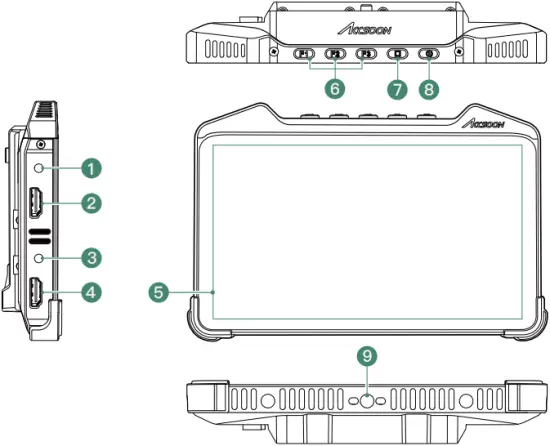
| (1) 3.5mm microphone jack | (6) Shortcut keys |
| (2) HDMI 2.0 input | (7) Home key |
| (3) 3.5mm headphone jack | (8) Power on/off key |
| (4) HDMI 2.0 output | (9) 1/4” screw mount |
| (5) 7 inch touchscreen |
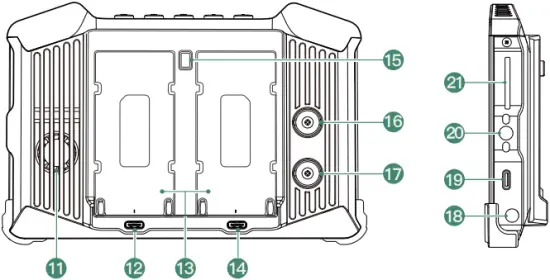
| (10) Air intake [1] | (14) Battery safety lock | (18) USB 3.0 Type-C |
| (11) 5V/2A output (USB-C) | (15) 3G SDI input | (19) 1/4″ screw mount |
| (12) Dual NP-F battery slots | (16) 3G SDI output | (20) SD card slot |
| (13) PD power input (USB-C) [2] | (17) DC power input | |
| [1] Note: Please don’t block the intake. [2] Note: Requires at least 9V/3A input. | ||
5.2 Install monitor cage & sunhood (separate purchase)
Place the CineView M7 to fit the monitor cage. Use the included screws to install the cage onto CineView M7. Then insert the sunhood’s velcro straps through the designated slots on the cage and fasten them to secure the sunhood in place.

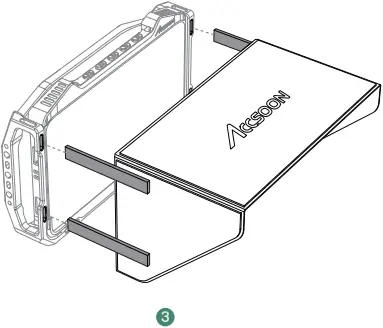
(1) Fit CineView M7 into the cage
(2) Secure them using 1/4″ screws
(3) Attach the sunhood to the cage by threading the velcro through the slots
5.3 Mounting
Mount the CineView M7 to the camera or other devices using cold shoe mount adapter or other mounting accessories.
5.4 Power supply
CineView M7 supports NP-F series batteries, DC power, and USB-C PD power supply. The power supply system supports hot-swapping, i.e., when DC power is supplied, the NP-F batteries can be replaced without powering down the device and vice versa.
5.4.1 NP-F batteries
To install the NP-F970/F750/F550 batteries onto the CineView M7: Insert the battery into the slot at the back of the CineView M7 as shown in the illustration. Push down on the battery until you hear a “click” sound, ensuring it is securely installed. To remove the battery, press the battery lock and pull the battery out.
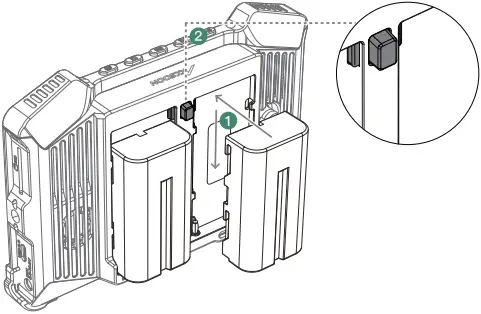
(1) Installing Battery
Insert the battery into slot
Slide it down until the lock pops up
(2) Removing Battery
Push down the lock to slide out battery
5.4.2 DC power
Please use the corresponding DC adapters:
- Connector: 5.5mm x 2.1mm
- Input Voltage: 6.0-16.8V
- Center Positive
- Output current should be no less than 3A.
- It is recommended to use adapters with at least 9V/3A or 12V/3A DC output capability.
5.4.3 USB-C power
Please use the corresponding USB-C adapters:
- Protocol: PD 3.0
- Output voltage should be no less than 9V and output current should be no less than 3A.
- It is recommended to use a 9V/3A, 12V/3A or 15V/3A USB-C adapter.
Note: It is recommended to use Accsoon 100W USB-C GaN adapters.
5.5 Connection
Use SDI or HDMI cables to connect the CineView M7 to cameras and other monitoring devices.
![]() As 4K video transmission demands a higher standard of HDMI cable, please use high quality HDMI cables. We recommend using Accsoon 8K HDMI cables to ensure the best transmission performance.
As 4K video transmission demands a higher standard of HDMI cable, please use high quality HDMI cables. We recommend using Accsoon 8K HDMI cables to ensure the best transmission performance.
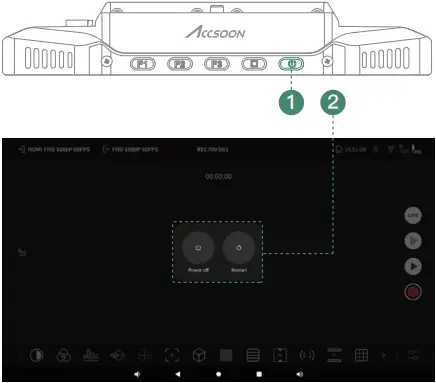
5.6 Power on/off
(1) Power On: Press the power key for 1 second, the system will be powered on.
(2) Power Off / Reboot: Press and hold the power key for 1 second, tap to select power off or reboot on the system pop-up prompt.
06 Monitor Interface
6.1 Interface introduction

| (1) Video input Tap to enter video input setting menu. |
(8) Live stream Tap to enter live stream setting menu. |
| (2) Video output Tap to enter video output setting menu. |
(9) Frame.io Tap to enter Frame.io setting menu. |
| (3) Color space CineView M7 adapts Rec.709 standard color space by default, you can change the color space and white point in the 8.3 Display calibration. |
(10) Video recording playback ( Tap to enter play back page.Video record ( Tap to start/stop video recording. |
| (4) Storage This indicates the remaining available storage of CineView M7. Tap to enter video record setting menu. |
(11) Monitoring tools setting Tap to enter monitoring tools setting. |
| (5) Bluetooth connection Tap to enter system Bluetooth setting to connect to Bluetooth accessories. |
(12) Monitoring tools bar Tap to enable, disable, or switch the corresponding monitoring tools. User can customize which buttons are displayed in this area. (Refer to 8.6 Tool list setting.) |
| (6) Network connection This indicates current network connection status. Tap to enter system network setting. |
(13) Screen lock Tap to switch the screen lock status. |
| (7) Battery power level and power status The current voltage is displayed when drawing power from NP-F battery ( |
6.2 Monitoring tools
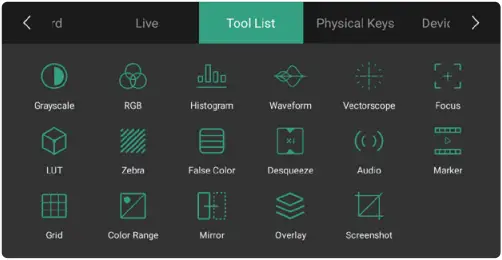
Note: Supported tools are subject to change without notice as part of continuous improvements and firmware updates.
07 Live Stream
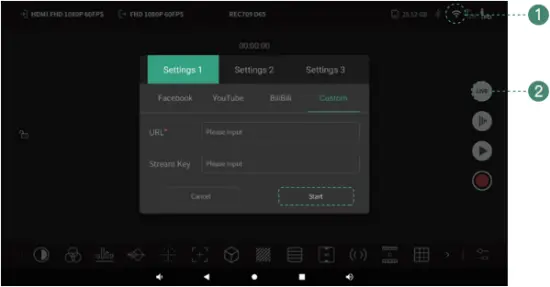
(1) Enable CineView M7’s system Wi-Fi, connect to a Wi-Fi network that can access the Internet.
(2) Enter the monitoring page, tap “Live”, enter streaming URL and Key. Then tap “Start”.
Note:
- Make sure CineView M7 is connected to a Wi-Fi network with Internet access before live streaming.
- Before going live, adjust the live stream bitrate according to the recommended settings provided by your streaming platform.
- The streaming URLs and Keys are provided by the streaming platform, please refer to the official websites of the platforms for detailed instructions.
- Streaming stability depends on various factors such as network bandwidth, connection reliability, and platform performance. If you experience lag or disconnections, please first check your network status and connection quality.
08 Monitor Functions and Settings
Tap any area of the top status bar to enter “Product Function Settings”.
(1) Top status bar
(2) Mode configuration setting
8.1 Input setting
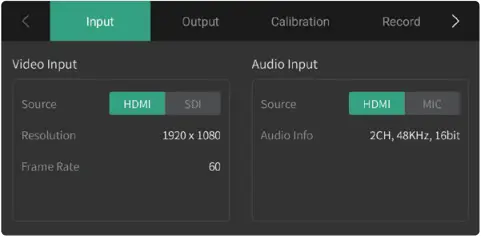
Displays current audio and video input specifications.
Select video input source (HDMI/SDI).
Select audio input source (HDMI or SDI/MIC).
By default, it’s set to embedded audio in HDMI or SDI.
8.2 Output setting
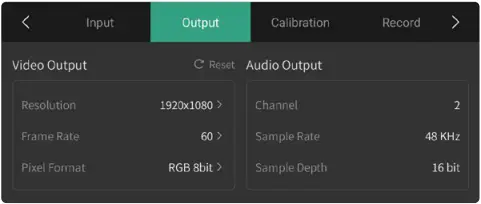
Adjust output resolution, frame rate and pixel format as needed on-set.
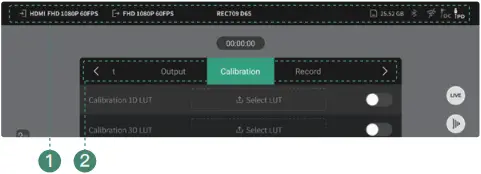
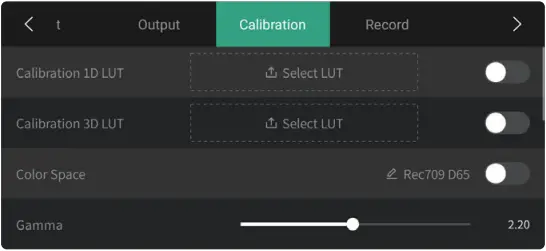
8.3 Display calibration
The CineView M7 supports importing .cube LUT files from SD cards or USB drives for display color calibration. User can also fine-tune the display using built-in settings for color gamut correction, white point adjustment, gamma correction and RGB offset.
Note: Calibration LUTs only support .cube format file.
Note: Calibration LUTs and manual adjustments in this menu do NOT affect HDMI or 3G-SDI output signals.
Only the video look LUT or CDL file loaded through the monitoring tools setting can affect the output image.
![]() Calibration LUTs and manual adjustments in this menu do NOT affect HDMI or 3G-SDI output signals. Only the video look LUT or CDL file loaded through the monitoring tools setting can affect the output image.
Calibration LUTs and manual adjustments in this menu do NOT affect HDMI or 3G-SDI output signals. Only the video look LUT or CDL file loaded through the monitoring tools setting can affect the output image.
8.4 Record setting

After inserting a SD card or a USB drive, enter Record setting to select storage location for recorded files. You can adjust recording parameters such as video and audio bitrates, encoder type, and the maximum file size per clip.
When a recording reaches the size limit, CineView M7 will automatically create a new file and continue recording without interruption.
8.5 Live stream setting

Live streams can be set to different video and audio bitrates and encoders as required.
8.6 Tool list setting
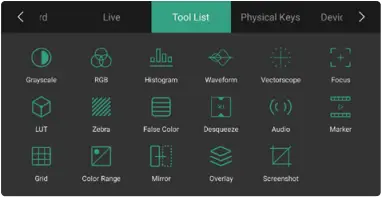
You can add or remove monitoring tool shortcuts by tapping on the tool icon.
Once removed, the corresponding shortcut will disappear from the monitoring tools bar.
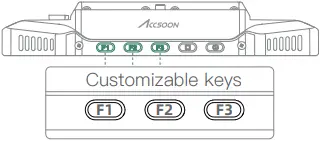
8.7 Physical keys setting
You can customize the functions of the three physical keys on top of the device.

8.8 Device status
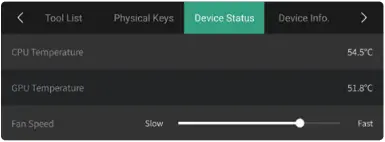
Under the “Device Status” menu, you can check the real-time temperature of CineView M7 and manually adjust the fan speed as needed. The fan supports stepless speed control, you can adjust it to suit your on-set conditions.
Note: If the temperature is too high, the device will automatically adjust the fan speed to ensure proper performance.
8.9 Device info.
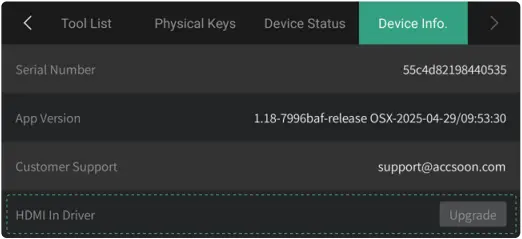
Under the “Device Info.” menu, check the current firmware version and other related device information.
09 Firmware Update
9.1 System update
(1) Download the latest update package from www.accsoon.com.
(2) Please use a PC to download the latest system update package to the root directory of a USB drive or SD card, then insert the USB drive or SD card to CineView M7 and reboot the device. After it’s rebooted, CineView M7 will detect the system version and perform update automatically.
9.2 Video input driver update
(1) Before updating, ensure that the CineView M7 is connected to a Wi-Fi signal that can access the Internet properly.
(2) Go to the Device Status and check the “HDMI In” driver version. If it’s not the latest version, the system will prompt you to download the new driver, follow the instructions to download and update.
![]() Before updating the system and the video input driver, please ensure that:
Before updating the system and the video input driver, please ensure that:
- The CineView M7’s battery level is above 50%.
- Do not disconnect power supply during the update process!
- If you encounter any issues during the firmware update, please refer to the tutorial videos available on Accsoon’s official channels or contact Accsoon official support at support@accsoon.com.
10 System Interface
![]() While file management is a frequently used function, please avoid changing other system settings unnecessarily, as it might affect system performance.
While file management is a frequently used function, please avoid changing other system settings unnecessarily, as it might affect system performance.
10.1 Home page
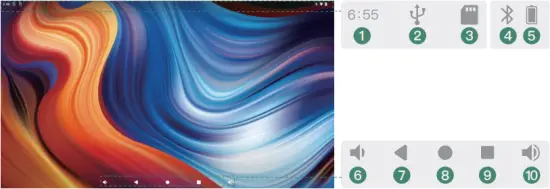
| (1) Current time | (6) Volume down button |
| (2) USB drive status: Displayed when the system identifies there’s an inserted SD card. |
(7) Return button |
| (3) SD card status: Displayed when the system identifies there’s an inserted USB drive. |
(8) Home button |
| (4) Bluetooth status | (9) Tap to browse recently opened applications. |
| (5) Current power level | (10) Volume up button |
10.2 Control center
Swipe down from the top of the monitor screen to access the control center.

| (1) Brightness slider: Swipe left or right to adjust system brightness. | (4) Tap to clear current notifications. |
| (2) Quick control bar: Tap to quickly turn on/off the corresponding system function, and long press to enter the corresponding function system setting menu. |
(5) Tap to enter notification setting menu. |
| (3) Notification bar Tap to browse details. |
10.3 All Apps
Swipe up anywhere on home page for all Apps.
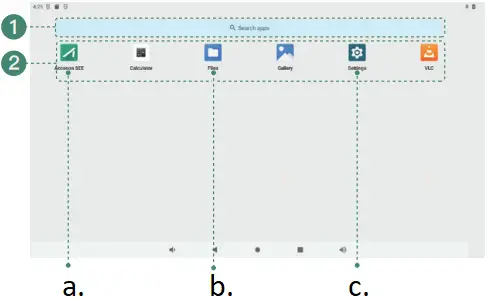
a. Accsoon SEE
b. Files
c. Settings
(1) Tap to search Apps
(2) App lists
![]() Tap to enter CineView M7’s monitoring page
Tap to enter CineView M7’s monitoring page
![]() Tap to enter system setting menu
Tap to enter system setting menu
![]() Tap to enter file manager
Tap to enter file manager
10.4 File and storage management
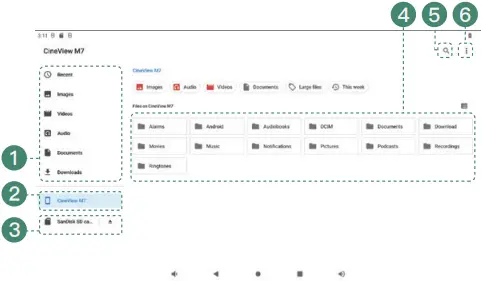
(1) Folder quick access
(2) Tap to browse system internal storage
(3) SD card and USB drive folders
(4) Current folder storage
(5) Search
(6) Settings
11 Specifications
| Display screen | 7” LCD |
| Touchscreen | Ultra High Resolution Capacitive Touchscreen |
| Resolution | 1920 × 1080 pixels |
| PPI | 323 |
| Aspect ratio | 16:9 |
| Brightness | 1000 nits |
| Contrast ratio | 1000:1 |
| Viewing angle | 176°/176° |
| Backlight type | Edge-lit Ultra-transparent LED Backlight |
| Screen color calibration | Supported |
| LUT | 1D and 3D Cube LUTs Supported 1D: up to 4096 points 3D: up to 127 points |
| Video input port | HDMI 2.0/3G-SDI |
| Video output port | HDMI 2.0/3G-SDI |
| HDMI video input format | 4K DCI (4096*2160): 23.98/24/25/29.97/30/50/59.94/60 4K UHD (3840*2160): 23.98/24/25/29.97/30/50/59.94/60 1080p: 23.98/24/25/29.97/30/50/59.94/60 1080i: 50/59.94/60 720p: 50/59.94/60 |
| SDI video input format | 1080p: 23.98/24/25/29.97/30/50/59.94/60 Level A/B 1080i: 50/59.94/60 |
| HDMI video output format | 4K DCI (4096*2160): 23.98/24/25/29.97/30/50/59.94/60 4K UHD (3840*2160): 23.98/24/25/29.97/30/50/59.94/60 1080p: 23.98/24/25/29.97/30/50/59.94/60 1080i: 50/59.94/60 720p: 50/59.94/60 |
| SDI video output format | 1080p: 23.98/24/25/29.97/30/50/59.94/60 Level A 1080i: 50/59.94/60 |
| DC port | 6.0~16.8V 5.5mm*2.1mm Center Positive |
| Compatible battery | Compatible with NP-F550, NP-F750, NP-F970 Batteries |
| USB-C power input port | PD 3.0 9V/3A, 12V/3A, 15V/3A |
| USB-C power output port | Maximum: 5V/2A |
| Microphone jack | 3.5mm TRS |
| Headphone jack | 3.5mm CTIA |
| Microphone input audio sampling | 16bit, 48KHz |
| Power consumption | 12W~28W (Varies according to actual usage) |
| Housing | Aircraft-grade Aluminium Alloy |
| Heat dissipation | Active + Passive Cooling |
| Work environment temperature | -10℃ – 40℃ |
| Weight | 476g |
| Dimensions | 182.2*120.7*31.5mm |
12 FAQ
No video displayed
(1) Please check whether the SDI/HDMI cable of the camera is correctly plugged into the corresponding port of CineView M7.
(2) Please check if the video format and other information are shown on the display interface; if not, please check the cable and the SDI/HDMI video output of the camera.
(3) Please check if the SDI/HDMI video format of the camera is compatible with the formats supported by the product.
(4) Please check your cables and try using higher-quality HDMI/SDI cables.
13 Warranty
13.1 Warranty Period
(1) If there is a quality problem that occurs within 15 days after receiving the product, Accsoon will provide complimentary maintenance or replacement.
(2) Under proper use and maintenance, from the date of receipt, Accsoon will provide a one-year warranty on the monitor and a three-month warranty on the accessories. Free maintenance service is available during the warranty period.
(3) Please keep the proof of purchase and the user manual in a safe place.
13.2 Warranty Exclusions
(1) Out of warranty (If the proof of purchase is not available, the warranty will be calculated from the date the product is delivered from the factory).
(2) Damage caused by use or maintenance that does not follow the requirements of the product manual.
(3) Unauthorized repair, modification or disassembly.
(4) Damage caused by force majeure such as fire, flood, lightning strike, etc.
14 Warranty Process
(1) Contact your local Accsoon authorized dealers for after-sales service. If there is no local authorized dealers, you can contact our customer service via our email (support@accsoon.com) or website (www.accsoon.com) and get appropriate support.
(2) You will get detailed solutions from authorized dealers or Accsoon.
(3) Accsoon reserves the right to review the damaged product.
15 Safety Information
(1) When operating this equipment, read and follow all the instructions in this manual.
(2) Use only accessories/batteries/chargers specified or recommended by Accsoon.
(3) Do not expose to moisture, excessive heat or fire.
(4) Keep away from water and other liquids.
16 Contact Us
![]() Facebook: Accsoon
Facebook: Accsoon
![]() Facebook Group: Accsoon Official User Group
Facebook Group: Accsoon Official User Group
![]() YouTube: ACCSOON
YouTube: ACCSOON
![]() Email: Support@accsoon.com
Email: Support@accsoon.com
![]() Instagram: accsoontech
Instagram: accsoontech
Certificate of Quality
This product is confirmed to meet quality standards and permitted for sale after strict inspection.
QC Inspector: 
![]()
Accsoon® is a trademark of Accsoon Technology Co., Ltd.
Copyright © 2025 Accsoon All rights reserved
Documents / Resources
 |
ACCSOON MITX1 Cine View M7 Android Phone Monitoring Streaming [pdf] User Manual MITX1 Cine View M7 Android Phone Monitoring Streaming, MITX1, Cine View M7 Android Phone Monitoring Streaming, Android Phone Monitoring Streaming, Monitoring Streaming, Streaming |