Logitech K400 Plus Touchpad Keyboard

User Manual
K400 is a quiet, easy-to-use keyboard with a built-in touchpad, plus all the hotkeys Windows® and Android™ users know and love. Complete with media controls that make navigating your PC-controlled TV a breeze.
Specs & Details
FAQ – Frequently Asked Questions
You can use Logitech Options to set up on-screen notifications for your K400 Plus keyboard:
1. Start Logitech Options:
Start > All Programs > Logitech > Logitech Options
2. If you have more than one product displayed in the Logitech Options window, select Wireless Touch Keyboard K400 Plus.
3. In the lower left corner, click More.
4. In the More Settings window, under Notifications, you can enable and disable on-screen notifications for when:
– a lock key is pressed
– the battery level is getting low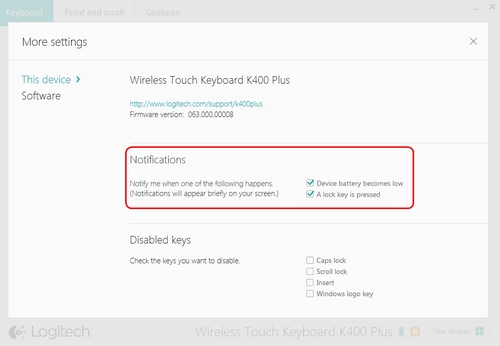
You can use Logitech Options to set the pointer speed.
– Set pointer speed
– Adjust scrolling
If you don’t have Logitech Options, you can get the latest version of the software from the Wireless Touch Keyboard K400 Plus Download page.
To configure your pointer speed:
1. Start Logitech Options:
Start > All Programs > Logitech > Logitech Options
2. If you have more than one product displayed in the Logitech Options window, select Wireless Touch Keyboard K400 Plus.
3. Click the Point and scroll tab in the upper left corner of the window.
4. Under Pointer speed, adjust the slider to your preferred DPI value.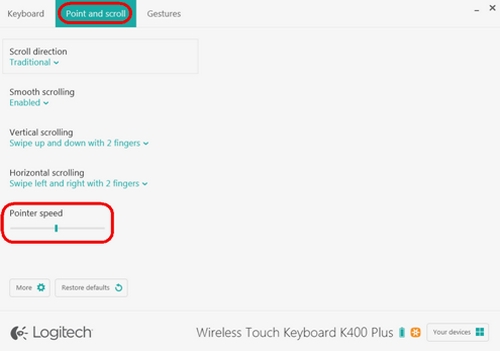
To adjust the scrolling:
1. Start Logitech Options:
Start > All Programs > Logitech > Logitech Options
2. If you have more than one product displayed in the Logitech Options window, select Wireless Touch Keyboard K400 Plus.
3. Click the Point and scroll tab in the left hand corner of the software window.
4. You can adjust the following options for scrolling:
– Scroll direction
– Smooth scrolling
– Vertical scrolling
– Horizontal scrolling
Set the scroll direction
There are two options for scrolling direction:
Traditional — the contents of the window scroll up and down, left and right, depending on the direction you swipe
Content tracks fingers — the contents of the window scroll down when you swipe your fingers up, and scroll up when you swipe your fingers down
Smooth scrolling
This option can be enabled or disabled based on your preference.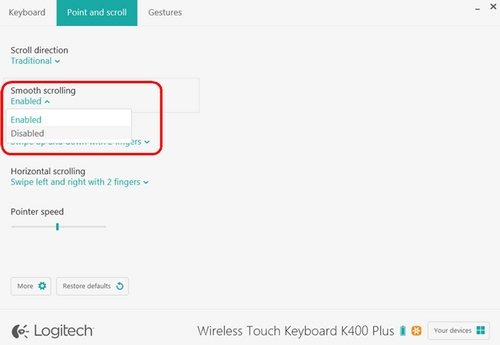
Vertical scrolling
The default for vertical scrolling is Swipe up and down with 2 fingers. You can scroll up or down by swiping up and down on the touchpad with two fingers. Select Disabled to turn off this feature.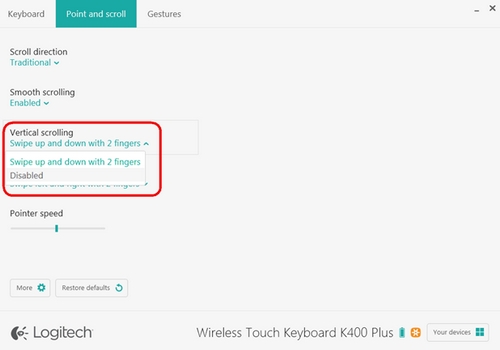
Horizontal scrolling
By default, horizontal scrolling is set to Swipe left and right with 2 fingers. This lets you scroll left and right on a page by swiping left or right with two fingers on the touchpad. Select Disabled to turn off this feature.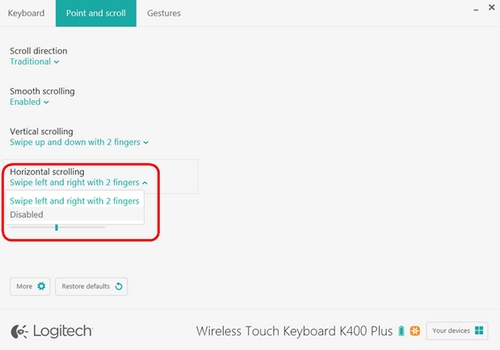
Touch tapping
Press the FN key and the left mouse button to disable and enable touch tapping. 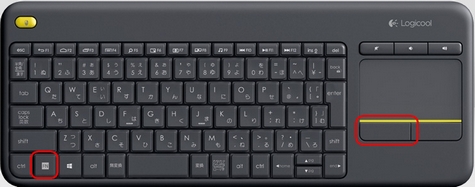
When touch tapping is enabled:
– tap on the touchpad once to generate a single click
– tap on the touchpad twice to generate a double-click
– tap once with two fingers to generate a right-click
NOTE: You can also use the left mouse-click button on the upper left side of the keyboard. This lets you navigate on the touchpad with your right hand and select with your left.
Scrolling
By default, swiping up and down on the touchpad with two fingers scrolls up and down. Swiping left and right with two fingers scrolls left and right. NOTE: You can also press the FN key and slide one finger anywhere on the touchpad to simultaneously scroll in that direction.
The Wireless Touch Keyboard K400 Plus keyboard comes with pre-assigned shortcut and function keys. These streamline navigation, media control and keyboard functions.
| Key | Shortcut / Function |
|---|---|
 |
Back |
 |
Home |
 |
Switch application |
 |
Menu |
 |
Search |
 |
Show/hide desktop |
 |
Maximize window |
 |
Switch screen |
 |
Media |
 |
Previous track |
 |
Play/Pause |
 |
Next track |
 |
Mute |
 |
Volume down |
 |
Volume up |
 |
FN + ins: PC sleep |
 |
FN + backspace: print screen |
 |
FN + caps lock: scroll lock |
 |
FN + left arrow: home |
 |
FN + right arrow: end |
 |
FN + up arrow: page up |
 |
FN + down arrow: page down |
To select a function key, hold down the FN key, and then press one of the keys listed in the table above.
For example, to use F5, hold down FN and then press the Search key 
You can also set the keyboard to only use standard F1 – F12 functions. See Set the K400 Plus keyboard to use standard function keys for more information.
You can disable some or all of the following keys on your K400 Plus keyboard:
– Caps Lock
– Scroll Lock
– Insert
– Windows logo key
To disable the keys:
1. Start Logitech Options:
Start > All Programs > Logitech > Logitech Options
2. If you have more than one product displayed in the Logitech Options window, select Wireless Touch Keyboard K400 Plus.
3. In the lower left corner of the window, click More.
4. In the More Settings window, under Disabled keys, check the keys you want to disable.
5. Click on the X to close the window. Your changes are automatically saved.
You can use Logitech Options software to customize the actions that are performed when you use the function keys on your keyboard. You can download Logitech Options from the Wireless Touch Keyboard K400 Plus Downloads page.
NOTE: Only the F1-F9 and Insert keys can be customized.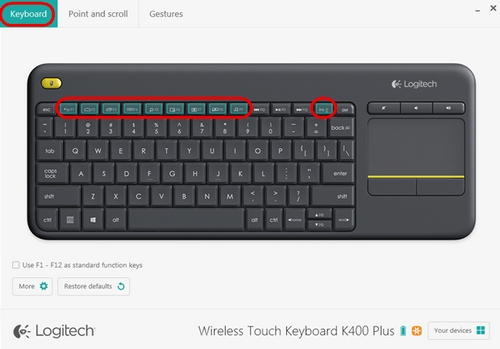
To customize your keyboard’s function keys:
1. Start Logitech Options:
Start > All Programs > Logitech > Logitech Options
2. Select the Keyboard tab in the upper left corner of the window.
3. Click on the function key that you want to assign a new function to. A list of available options appears.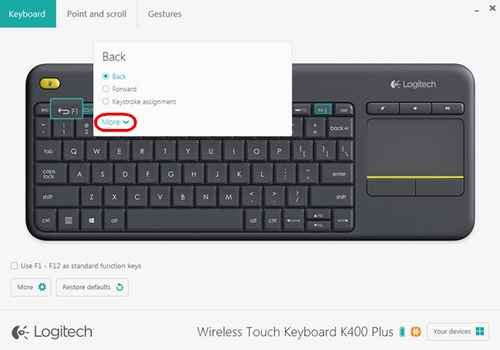
4. Click on More to expand the list. Select the action you want the key to perform. Your selection is automatically saved.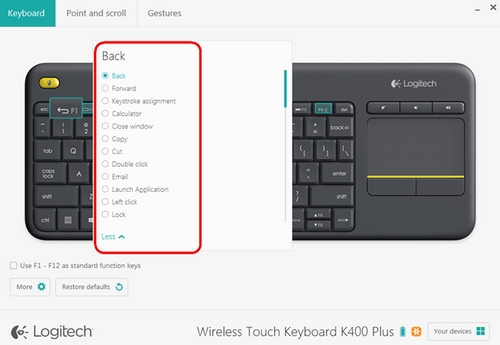
You can also assign one of two different actions to a key:
– Launch an application
– Perform a keystroke combination
To launch an application
1. Select Launch Application from the list.
2. Click on Browse to locate the executable application on your computer or enter the computer path and file name for the application in the box.
To assign a custom keystroke
1. Select Keystroke assignment from the list.
2. Under Enter Keystroke, click inside the box and type the key combination. It will be automatically saved.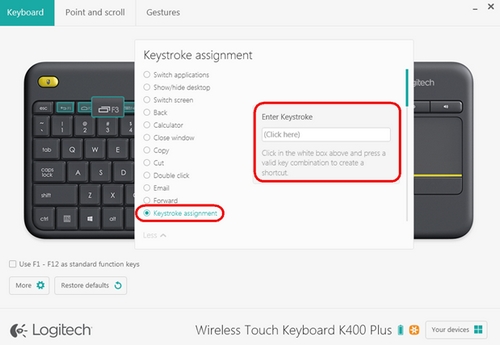
By default, the top row of keys on your K400 Plus keyboard are assigned to navigation and media controls. You can set the keyboard to only use standard F1 – F12 functions using Logitech Options software.
NOTE: If you don’t have Logitech Options, you can download it from the Wireless Touch Keyboard K400 Plus Downloads page.
To set the function keys to use only standard functions:
1. Start Logitech Options:
Start > All Programs > Logitech > Logitech Options
2. Select the Keyboard tab in the upper left corner of the window.
3. In the bottom left hand corner of the window, check Use F1-F12 as standard function keys. Your selection is automatically saved.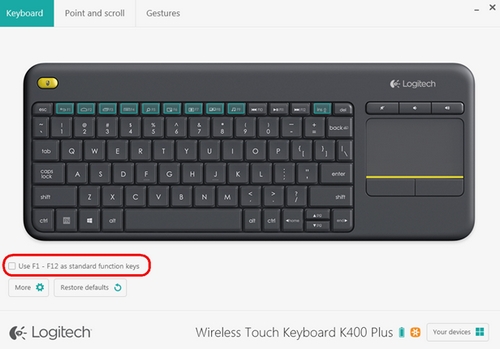
INTRODUCTION
This feature on Logi Options+ allows you to backup the customization of your Options+ supported device automatically to the cloud after creating an account. If you are planning to use your device on a new computer or wish to go back to your old settings on the same computer, log into your Options+ account on that computer and fetch the settings you want from a backup to set up your device and get going.
HOW IT WORKS
When you are logged into Logi Options+ with a verified account, your device settings are automatically backed up to the cloud by default. You can manage the settings and the backups from the Backups tab under More settings of your device (as shown):
Manage settings and backups by clicking on More > Backups:
AUTOMATIC BACKUP OF SETTINGS — if the Automatically create backups of settings for all devices checkbox is enabled, any settings you have or modify for all of your devices on that computer are backed up to the cloud automatically. The checkbox is enabled by default. You can disable it if you don’t want the settings of your devices to be backed up automatically.
CREATE A BACKUP NOW — this button allows you to backup your current device settings now, if you need to fetch them later.
RESTORE SETTINGS FROM BACKUP — this button lets you view and restore all the available backups you have for that device that are compatible with that computer, as shown above.
The settings for a device are backed up for every computer that you have your device connected to and have Logi Options+ that you are logged into. Every time you make some modifications to your device settings, they get backed up with that computer name. The backups can be differentiated based on the following:
Name of the computer. (Ex. John’s Work Laptop)
Make and/or model of the computer. (Ex. Dell Inc., Macbook Pro (13-inch) and so on)
The time when the backup was made
The desired settings can then be selected and restored accordingly.
WHAT SETTINGS GET BACKED UP
– Configuration of all the buttons of your mouse
– Configuration of all the keys of your keyboard
– Point & Scroll settings of your mouse
– Any application-specific settings of your device
WHAT SETTINGS ARE NOT BACKED UP
– Flow settings
– Options+ app settings
Read More About:
Logitech K400 Plus Touchpad Keyboard User Manual


