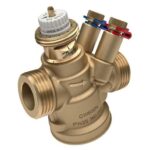
948974 Single Handle Pressure Balancing Valve Trim Set
Specifications:
- Product Name: Simple Select
- SKU: 948974, 948973
- Model Number: SHHB8040, SHGF8040
- Customer Support: 1-855-715-1800
Product Usage Instructions:
Before You Begin:
It is recommended to consult a professional if you are
unfamiliar with installing plumbing fixtures. Ensure to observe all
local plumbing and building codes. Unpack and inspect the valve for
shipping damage. Contact Customer Relations at 1-855-715-1800 if
any damage is found.
Getting Started:
Ensure you have gathered all required materials for
installation:
- Adjustable Wrench
- Safety Glasses
- Phillips Screwdriver
Installation Steps:
- Unscrew the screws and remove the plaster guard.
- Secure backplate (2) to the valve body (3) with the screws (1)
using the provided Allen wrench. - Turn the adjusting bolts (2) clockwise until it connects to the
diverter cartridges (3) and compresses to the limit position. Do
not over-torque.
Operation:
To operate the Simple Select:
- Turn on water lines.
- Press button 1 for water flow from the top spray (outlet
1). - Press button 2 for water flow from the hand shower (outlet
2). - Press buttons 1 and 2 simultaneously for water flow from both
outlets. - Rotate the handle counter-clockwise to switch water flow from
cold to hot.
Frequently Asked Questions (FAQ):
Q: What should I do if I encounter leaks after
installation?
A: Check all connections for tightness and ensure no damage to
seals. If leaks persist, contact Customer Support at
1-855-715-1800.
Q: Can I use this product without professional
installation?
A: While professional installation is recommended, individuals
with plumbing experience can install the Simple Select following
the provided instructions carefully.
SIMPLE SELECT
PRESSURE BALANCE VALVE TRIM REGULADOR DE VÁLVULA DE PRESIÓN BALANCEADA DE SELECCIÓN SIMPLE GARNITURE POUR VANNE DE RÉGULATION DE PRESSION
SKU: 948974, 948973
BEFORE YOU BEGIN
We recommend consulting a professional if you are unfamiliar with installing plumbing xtures. Signature Hardware accepts no liability for any damage to the plumbing, tub, oor, or for personal injury during installation.
Observe all local plumbing and building codes.
Unpack and inspect the valve for shipping damage. If any damage is found, contact our Customer Relations team at 1-855-715-1800
ANTES DE COMENZAR
Le recomendamos que consulte a un profesional si no sabe cómo instalar accesorios de plomería. Signature Hardware no asume ninguna responsabilidad con respecto a los daños causados a la plomería, bañera, suelo, ni por daños personales que ocurran durante la instalación.
Cumpla con todas las normas locales de plomería y construcción.
Retire el inodoro del empaque y verifique si se produjeron daños durante el envío. Si encuentra algún daño, comuníquese con nuestro equipo de Servicio al cliente al 1-855-715-1800
AVANT DE COMMENCER
Nous vous recommandons de consulter un professionnel si vous n’avez pas d’expérience dans l’installation d’appareils de plomberie. Signature Hardware décline toute responsabilité en cas de dommage à la plomberie, à la baignoire, au mur et au plancher, ou en cas de blessure corporelle lors de l’installation.
Respecter tous les codes locaux de plomberie et de construction.
Déballer et inspecter la vanne pour vérifier qu’elle n’a pas été endommagée pendant le transport. Si un dommage est constaté, communiquer avec notre équipe des relations avec la clientèle au 1-855-715-1800
GETTING STARTED
Ensure that you have gathered all the required materials that are needed for the installation.
CÓMO COMENZAR
Asegúrese de haber reunido todos los materiales necesarios para la instalación.
PREMIERS PAS
S’assurer d’avoir réuni tout le matériel nécessaire à l’installation.
TOOLS AND MATERIALS: HERRAMIENTAS Y MATERIALES: OUTILS ET MATÉRIEL :
Adjustable Wrench
Llave ajustable Clé ajustable
Safety Glasses
Gafas de seguridad Lunettes de protection
Phillips Screwdriver
Destornillador Phillips Tournevis cruciforme
REVISED 07/31/2024 CODES: SHHB8040, SHGF8040
1
1.855.715.1800
SIMPLE SELECT
PRESSURE BALANCE VALVE TRIM REGULADOR DE VÁLVULA DE PRESIÓN BALANCEADA DE SELECCIÓN SIMPLE GARNITURE POUR VANNE DE RÉGULATION DE PRESSION
SKU: 948974, 948973
INSTALLATION INSTALACIÓN INSTALLATION
1. Unscrew the screws and remove the plaster guard.
1. Desatornille los tornillos y saque la protección de yeso.
1. Dévisser les vis et enlever le protège-plâtre.
2. Secure backplate (2) to the valve body (3) with the screws (1) using Allen wrench provided.
2. Asegure la placa de montaje (2) al cuerpo de la válvula (3) con los tornillos (1) usando la llave allen que viene con los materiales
2. Fixer la plaque arrière (2) au corps de vanne (3) avec les vis (1) et la clé Allen fournies.
1 4
3 2
2
1.855.715.1800
SIMPLE SELECT
PRESSURE BALANCE VALVE TRIM REGULADOR DE VÁLVULA DE PRESIÓN BALANCEADA DE SELECCIÓN SIMPLE GARNITURE POUR VANNE DE RÉGULATION DE PRESSION
SKU: 948974, 948973
3. With the Allen wrench (1) provided, turn the adjusting bolts (2) clockwise until it connects to the diverter cartridges (3) and compresses to the limit position. Do not torque too much to prevent any damage.
Note: Ensure that the adjusting bolts are tightened correctly to the limit position. Over-tightening may cause improper function of the diverter after installation.
3. Con la llave allen (1) que viene con los materiales, gire los pernos de ajuste (2) hacia la izquierda a la posición límite de los cartuchos de la válvula desviadora (3). No los gire demasiado para evitar cualquier daño.
Nota: Asegúrese de que los pernos de ajuste estén correctamente apretados en la posición límite. Si ajusta en exceso puede provocar que el desviador no funcione correctamente luego de la instalación.
3. Avec la clé Allen (1) fournie, tourner les boulons de réglage (2) dans le sens horaire jusqu’à ce qu’ils se connectent aux cartouches de l’inverseur (3) et se compriment jusqu’à la position limite. Ne pas serrer à un couple excessif pour éviter tout dommage.
Remarque : s’assurer que les boulons de réglage sont correctement serrés jusqu’à la position limite. Un serrage excessif peut entraîner un mauvais fonctionnement de l’inverseur après l’installation.
1 1
2 3
1
4. Loosen the stop plugs (1) with wrench and place the stop valves (1) onto the holes in the bottom of the backplate. 4. Suelte los tapones de detención (1) con la llave y coloque las válvulas de detención (1) en los agujeros en la base de la placa de montaje. 4. Desserrer les bouchons d’arrêt (1) à l’aide d’une clé et placer les robinets d’arrêt (1) sur les trous situés au fond de la plaque arrière.
3
1.855.715.1800
SIMPLE SELECT
PRESSURE BALANCE VALVE TRIM REGULADOR DE VÁLVULA DE PRESIÓN BALANCEADA DE SELECCIÓN SIMPLE GARNITURE POUR VANNE DE RÉGULATION DE PRESSION
SKU: 948974, 948973
1
1
1
2
2
5. Holding escutcheon (2) in place, tighten mounting nut (3) onto the backplate (1). 5. Mantenga la placa (2) en posición y asegure la tuerca de montaje (3) en la placa (1). 5. En maintenant la rosace (2) en place, serrer l’écrou de montage (3) sur la plaque arrière (1).
2 3
6. Water test: Turn on water lines. Press button 1 and 2 allowing water to ow from outlets. If the issues occur, go back to step 3 and re-install. (Before reinstalling, be sure to turn the adjusting bolts counterclockwise to the minimum position and put the stop plugs in original position.) Issue a: Button cannot bounce smoothly. (The adjusting bolts in step 3 cannot rotate to the limit position.) Issue b: There is no ow from outlets or button cannot be switched. (The adjusting bolts in step 3 is too tight.)
4
1.855.715.1800
SIMPLE SELECT
PRESSURE BALANCE VALVE TRIM REGULADOR DE VÁLVULA DE PRESIÓN BALANCEADA DE SELECCIÓN SIMPLE GARNITURE POUR VANNE DE RÉGULATION DE PRESSION
SKU: 948974, 948973
6. Prueba con agua: Abra las tuberías de agua. Presione los botones 1 y 2 para permitir que fluya el agua desde las salidas. Si se produce un problema, regrese al paso 3 y reinstale. (Antes de reinstalar, asegúrese de girar los pernos de ajuste hacia la izquierda hacia la posición mínima y colocar los tapones de detención en la posición original.) Problema a: el botón no se devuelve suavemente. (Los pernos de ajuste, en el paso 3, no pueden rotar a la posición límite.) Problema b: No hay flujo desde las salidas o el botón no se puede cambiar. (Los pernos de ajuste, en el paso 3, están demasiado apretados.)
6. Test d’eau : Ouvrir les conduites d’eau. Appuyer sur les boutons 1 et 2 pour permettre à l’eau de s’écouler. En cas de problème, retourner à l’étape 3 et recommencer l’installation. (Avant de recommencer l’installation, veiller à tourner les boulons de réglage dans le sens antihoraire jusqu’à la position minimale et à placer les bouchons d’arrêt dans leur position d’origine.)
Problème a : Le bouton ne rebondit pas en douceur. (Les boulons de réglage de l’étape 3 ne tournent pas jusqu’à la position limite.)
Problème b : Il n’y a pas de débit aux sorties ou le bouton ne peut pas être basculé. (Les boulons de réglage de l’étape 3 sont trop serrés.)
7. Install the handle (1) into backplate and secure with set screw (2). Cover with index (3). 7. Instale la manija (1) en la placa y asegúrela con el tornillo de sujeción (2). Cubra con el índice (3). 7. Installer la poignée (1) dans la plaque arrière et la fixer avec la vis de réglage (2). Couvrir avec l’index (3).
1 2
outlet 1 salida 1 Sortie 1
3
outlet 2 salida 2 Sortie 2
1 2
5
1.855.715.1800
SIMPLE SELECT
PRESSURE BALANCE VALVE TRIM REGULADOR DE VÁLVULA DE PRESIÓN BALANCEADA DE SELECCIÓN SIMPLE GARNITURE POUR VANNE DE RÉGULATION DE PRESSION
SKU: 948974, 948973
8. Turn on water lines. Press button 1, the water ows continuously from the top spray (outlet 1) . Press button 2, the water ows continuously from the hand shower (outlet 2) . Press buttons 1 and 2 at the same time, and both the top spray and showerhead will release water simultaneously. Rotate the handle counter-clockwise, the water ow pattern can be switched from the cold water to hot water.
8. Abra las tuberías de agua. Presione el botón 1, el agua fluye continuamente desde el rociador superior (salida 1). Presione el botón 2, el agua fluye continuamente desde la ducha manual (salida 2). Presione los botones 1 y 2 al mismo tiempo y el agua fluye simultáneamente tanto del rociador superior como del cabezal de la ducha. Gire la manija hacia la izquierda, puede cambiar el patrón de flujo del agua de agua fría a agua caliente.
8. Mettez les conduites d’eau en marche. Appuyez sur la touche 1, l’eau s’écoule continuellement de la douchette (sortie 1). Appuyez sur le bouton 2, l’eau s’écoule continuellement de la douchette (sortie 2). Appuyez simultanément sur les boutons 1 et 2 pour que le jet supérieur et la douchette libèrent de l’eau en même temps. En tournant la poignée dans le sens inverse des aiguilles d’une montre, il est possible de passer de l’eau froide à l’eau chaude.
Cold Fría Froide
1 2
100°F (38°C)
Outlet 1 1 Salida 1
Sortie 1
Outlet 2 Salida 2 Sortie 2
2
Hottest Más caliente Très chaude
6
1.855.715.1800
Documents / Resources
 |
Signature Hardware 948974 Single Handle Pressure Balancing Valve Trim Set [pdf] Installation Guide 948974, 948973, 948974 Single Handle Pressure Balancing Valve Trim Set, 948974, Single Handle Pressure Balancing Valve Trim Set, Pressure Balancing Valve Trim Set, Balancing Valve Trim Set, Valve Trim Set, Trim Set |