![]() Motion Sensor Quick
Motion Sensor Quick
Start Guide
What comes in the box?
- Motion sensor x 1
- 3V Lithium battery x 1
- Wall screws x 3
- Wall anchors x 3
Motion sensor parts and features
Figure 1: Outside of the sensor 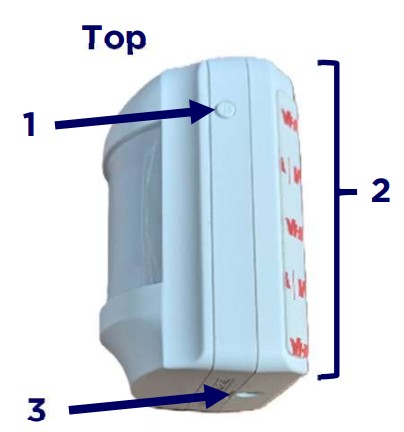
- Pairing button
- Back casing
- Security screw
Figure 2: Inside the sensor (under back casing)
- Pet Pins
- Sensitivity (SENS) Pins
- Battery
Placement tips
- Indoor use only.
- Pair with the panel before mounting.
- Place 6-7 feet above the ground.
- To prevent false alarms, do not install near any heat sources.
- Before mounting, see the Pin Guide.
Mount your motion sensor
tep 1 Clean and dry the location for the sensor.
Step 2 Remove all battery tabs.
Step 3 Pair with the panel.
Settings ( button) > Devices > + > Motion > Follow the prompts to pair the sensor.
Step 4 Peel the backing off the sticker and press the sensor on to the wall. Only press on the hard plastic sensor casing.
Questions?
Contact us at 1-800-574-7798 or CST@shieldpro.com
Pin Guide
Your motion sensor has two separate configuration options:
- Pet size pins –This can help reduce false alarms caused by pets.
Note: These are NOT exact weights. The closer a pet gets to the motion detector, the more likely they will trigger an event despite its size and the pin configuration. - Sensitivity (SENS) pins – Adjust sensor’s coverage sensitivity and distance.
Pet pins
| Pet size | Jumper placement | Pins |
| Pets up to 33 pounds | Cover: Top and middle pin Expose: Bottom pin |  |
| Pets up to 55 pounds (Default setting) | Cover: Bottom and middle pinExpose: Top pin |  |
Sensitivity pins
| Coverage distance | Jumper placement | Pins |
| Low (13 feet) | Cover: Top and middle pin Expose: Bottom pin |
 |
| High (26 feet) (Default setting) | Cover: Bottom and middle pin Expose: Top pin |
 |
How to adjust the configuration pins
Step 1 If the motion sensor is active, bypass it in your security panel.
Step 2 Remove the security screw and back casing.
Step 3 Pull the black plastic jumper straight up to remove it from the pins. You will see 3 pins.
Step 4 Replace the jumper by pushing straight down, covering the desired pins (see Pin Guide).
Step 5 Return sensor to back casing. Press on the hard plastic until it clicks in place. Secure with the security screw.
Step 6 If bypassed, reactivate the sensor in the panel.![]()
Documents / Resources
 |
ShieldPro Motion Sensor [pdf] User Guide Motion Sensor, Motion, Sensor |