sesamsec Sectime IP Based Time and Attendance Terminal
Product Specifications
- Product Name: Sectime IP-based Time & Attendance terminal
- Manufacturer: SESAMSEC
- Website: www.sesamsec.com
Product Description
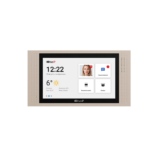
The Sectime IP-based Time & Attendance terminal is designed for tracking employee attendance using IP technology. It provides accurate timekeeping and attendance data for efficient workforce management.
Product Usage Instructions
Safety Information
- Before unpacking and installation, ensure you have read all relevant product documents and safety information.
- Wear safety gloves when handling the product to avoid injuries from sharp edges or sensitive components.
- Verify the completeness of your order by checking the delivery note. Contact SESAMSEC if any items are missing.
- Ensure the mounting location is suitable and safe, with appropriate tools and cables for installation. Refer to the Installation chapter for detailed instructions.
- Inspect all product components for damage before installation. Do not use damaged parts as they may compromise safety.
- Install the product correctly to prevent fire hazards. Make sure the mounting location has necessary safety devices like smoke alarms.
Installation
Follow these steps for installing the Sectime IP-based Time & Attendance terminal
- Choose a suitable mounting location with access to power and network connectivity.
- Unpack the product carefully, avoiding contact with sharp edges or components.
- Connect the device to power and network according to the provided instructions.
- Configure the device settings as per your requirements using the user manual.
- Test the device to ensure proper functionality before regular use.
Frequently Asked Questions (FAQ)
- Q: Where can I find technical support for the Sectime terminal?
- A: For technical support, visit the SESAMSEC website at www.sesamsec.com or contact SESAMSEC technical support at support@sesamsec.com .
- Q: What should I do if my product order is incomplete?
- A: If your order is incomplete, contact your Sales representative or SESAMSEC customer service at info@sesamsec.com for assistance.
Sectime
IP-based Time & Attendance terminal
USER MANUAL
INTRODUCTION
ABOUT THIS MANUAL
This manual is intended for users and installers. It enables the safe and appropriate handling and installation of the product and it gives a general overview, as well as important technical data and safety information about the product. Before using and installing the product, the users and installers should read and understand the content of this manual.
For the sake of better understanding and readability, this manual might contain exemplary pictures, drawings and other illustrations. Depending on the product configuration, these pictures might differ from the actual design of the product.
The original version of this manual has been written in English. Wherever the manual is available in another language, it is considered as a translation of the original document for information purposes only. In case of discrepancy, the original version in English will prevail.
SESAMSEC SUPPORT
In case of any technical questions or product malfunction, refer to the sesamsec website (www.sesamsec.com) or contact sesamsec technical support at support@sesamsec.com
In case of questions regarding your product order, contact your Sales representative or sesamsec customer service at info@sesamsec.com
SAFETY INFORMATION
Transport and storage
Carefully observe the transport and storage conditions described on the product packaging or other relevant product documents (e.g. data sheet).
Unpacking and installation
- Before unpacking and installing the product, this manual and all relevant installation instructions must be read carefully and understood.
- The product might show sharp edges or corners and requires a particular attention during the unpacking and installation.
Unpack the product carefully and do not touch any sharp edges or corners, or any sensitive components on the product. If necessary, wear safety gloves. - After unpacking the product, check that all components have been delivered according to your order and delivery note.
Contact sesamsec if your order is not complete. - The following measures must be checked prior to any product installation:
- Make sure that the mounting location and tools used for the installation are appropriate and safe. In addition, make sure that the cables intended to be used for the installation are appropriate. Refer to Chapter “Installation” for more information.
- The product is an electrical device made of sensitive materials (e.g. glass housing). Check all product components and accessories for any damage.
A damaged product or component may not be used for the installation. - Life-threatening hazard in the event of fire
A faulty or improper installation of the product might cause a fire and lead to death or severe injuries. Check that the mounting location is equipped with appropriate safety installations and devices, like a smoke alarm or fire extinguisher. - Life-threatening hazard due to electrical shock
Make sure that there is no voltage on the wires before starting with the electrical wiring of the product and check that power is turned off by testing the power supply of each wire.
The product may be supplied with power only after the installation has been completed. - Make sure that the product is installed in accordance with local electrical standards and regulations and observe general safety measures.
- Risk of property damage due to transient overvoltage (surges)
Transient overvoltage implies short-duration voltage peaks that might result in system breakdown or significant damage of electrical installations and devices.
sesamsec recommends the installation of appropriate Surge Protection Devices (SPD) by qualified and authorized personnel. - sesamsec also recommends the installers to follow general ESD protective measures during the installation of the product.
Please also refer to the safety information in Chapter “Installation”.
- The product must be installed in conformity with applicable local regulations.
Check if a minimum installation height is mandatory and observe all regulations applicable in the region in which the product is installed. - The product is an electronic product whose installation requires specific skills and expertise.
The installation of the product should be done by trained and qualified personnel only.
Handling
- The product is equipped with light-emitting diodes (LED).
Avoid direct eye contact with the blinking or steady light of the light-emitting diodes. - The product has been designed for use under specific conditions, e.g. in a specific temperature range (refer to the product data sheet).
Any use of the product under different conditions might damage the product or alter its reading performance. - The user is liable for the use of spare parts or accessories other than the ones sold or recommended by sesamsec.
sesamsec excludes any liability for damages or injuries resulting from the use of spare parts or accessories other than the ones sold or recommended by sesamsec.
Maintenance and cleaning
- Any repair or maintenance work should be done by trained and qualified personnel only.
Do not allow any repair or maintenance work on the product by an unqualified or unauthorized third party. - Life-threatening hazard due to electrical shock
Before any repair or maintenance work, turn the power off. - Check the installation and electrical connection of the product in regular intervals for any signs of damage or wear. Should any damage or wear be noticed, contact sesamsec or a trained and qualified personnel for repair or maintenance work.
- The product does not need any special cleaning. However, the housing and display may be carefully cleaned up with a soft, dry cloth and a non-aggressive or non-halogenated cleaning agent on the outer surface only.
Make sure that the used cloth and cleaning agent do not damage the product or its components (e.g. label(s)).
Disposal
The product must be disposed of in accordance with applicable local regulations.
Product modifications
- The product has been designed, manufactured and certified as defined by sesamsec.
- Any product modification without prior written approval from sesamsec is prohibited and considered improper use of the product. Unauthorized product modifications may also result in the loss of product certifications.
- If you are unsure about any part of the safety information above, contact sesamsec support.
- Any failure to comply with the safety information given in this document is considered improper use. sesamsec excludes any liability in case of improper use or faulty product installation.
PRODUCT DESCRIPTION
INTENDED USE
Sectime is an IP-based Time & Attendance terminal intended for time-recording purposes. The product is only for indoor use in environmental conditions according to the product data sheet and installation instructions given in this manual and in the instructions for use delivered with the product.
Any use other than the intended use described in this section, as well as any failure to comply with the safety information given in this document, is considered improper use. sesamsec excludes any liability in case of improper use or faulty product installation.
COMPONENTS
The product is delivered with the following components and documentation
| Main module | The main module is the visible front part of the Sectime terminal. It is the direct user interface of the terminal and it enables the user to define all settings using the touch display. |
| Wall module | The wall module is the rear panel of the Sectime terminal. It contains the connection ports of the Sectime power supply and network cables, as well as a backup storage used to save a “copy” of the main module settings. In case of a replacement of the main module, the backup storage enables a quick and easy configuration of the new main module with the same settings. |
| Special tool | The special tool delivered with the Sectime terminal is intended to facilitate the replacement of the main module. It enables to remove the main module from the wall opening. |
| Instructions for use | The instructions for use delivered with the product give a short description of the installation and safety information. |
TECHNICAL SPECIFICATIONS
| Frequency | 13.56 MHz (HF) |
| Dimensions (L x W x H) | Approx. 248.00 x 128.00 x 40.50 mm / 9.76 x 5.04 x 1.59 inch |
| Weight | Approx. 650 g / 22.93 oz |
| Case material | ABS+PC |
| Power supply | DC input: 12-24 V DC / 1 A max.; PoE 802.af: 36-57 V DC |
| Power consumption | Approx. 10 W |
| Temperature range | Operating: +5 °C up to +55 °C (+41 °F up to +131 °F)
Storage: -20 °C up to +70 °C (-4 °F up to +158 °F) |
| Connectivity | Ethernet 10/100/1000* Mbit/s link capability |
| Touch screen | 7″ WXGA 800 x 1280 capacitive multitouch IPS display up to 850 cd/m² (typ.), 50,000 h lifetime (min.) |
| Audio input/output | Microphone & loudspeaker |
| CPU | ARM quad-core 1.8 GHz |
| Storage | 2 GB RAM / 16 GB eMMC |
Refer to the product data sheet for more information.
FIRMWARE
The product is delivered ex-works with a specific firmware version, which is displayed on the product label.
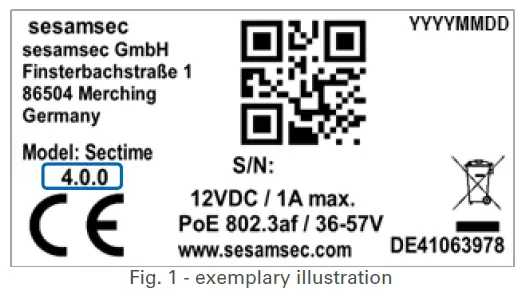
LABELING
The product is delivered ex-works with a label (Fig. 1) attached to the housing. This label contains important product information (e.g. serial number) and may not be removed or damaged. In case of a label wear-out, contact sesamsec.
INSTALLATION
GETTING STARTED
Before starting with the installation of a Sectime terminal, the following measures must be checked
- Make sure you have read and understood all safety information given in Chapter “Safety information”.
- Make sure that there is no voltage on the wires and check that power is turned off by testing the power supply of each wire.
- Make sure that all tools and components required for the installation are available and appropriate.
- Make sure that the installation site is appropriate for the installation of the product. For example, check that the temperature of the installation site is within the operating temperature range given in the Sectime technical documentation and make sure that the wall used for the installation is appropriate. In some cases, the wall material might not be suitable for a safe and durable installation, or it might require specific mounting material (e.g. drywall).
- The product should be installed at an appropriate and service-friendly installation height. sesamsec recommends an installation height of 110 cm from the ground for a standard installation. However, in some cases (e.g. wheelchair access, local regulations, etc.), the actual installation height on site might differ from the recommended height. Please also note the maximum wall mounting height of 200 cm from the ground.
- The product is equipped with a display on the front side. When installing the product, make sure the display is not covered or damaged and stays accessible for the user.
- The main and wall modules are delivered ex-works as a pre-mounted unit (i.e., when unpacking the product, the main module is already mounted on the wall module). Before starting with the installation of the product, it is necessary to separate both modules using the special tool delivered with the product, as illustrated below:
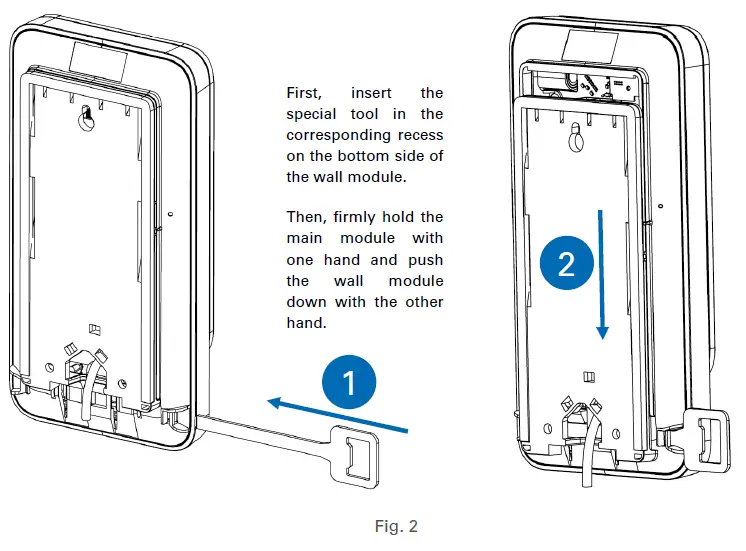
Please note that the special tool can be inserted on both sides (left or right) of the Sectime terminal.
Once both modules have been separated from each other, you can install the product, as described in the chapters below.
WALL MODULE INSTALLATION
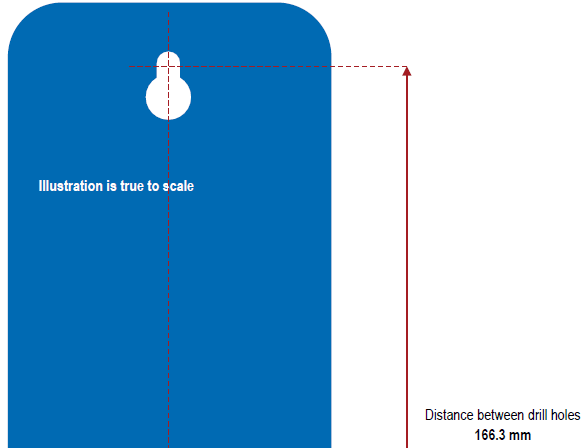
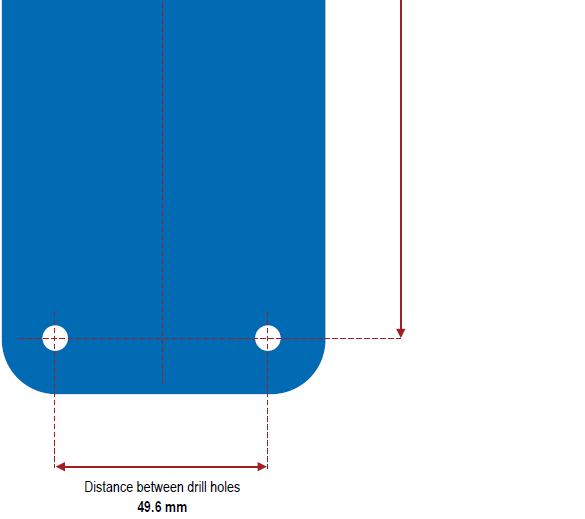
The wall module can be fixed on the wall using the three attachment points (drill holes). The screws used to fix the wall module on the wall must meet the following requirements
- Max. screw diameter: 5 mm
- Max. screw head diameter: 9 mm
- Max. screw head height: 6 mm
sesamsec recommends the use of countersunk screws for the wall module installation.
The true-to-scale pattern in the “Appendix” section can be used to facilitate the mounting of the wall module.
NETWORK AND POWER CONNECTION
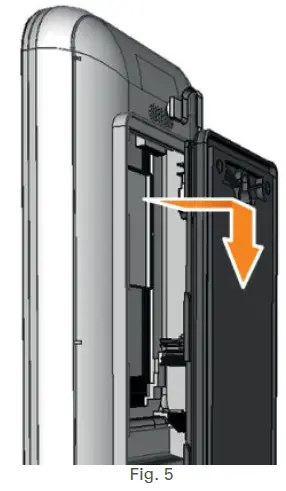
Connect the network cable or the power supply as described below (Fig. 3).
- If the network provides Power over Ethernet (PoE), no power supply needs to be connected.
- sesamsec also recommends to use cable ties (not part of the delivery) as a strain relief for PoE cables or power supply cables.
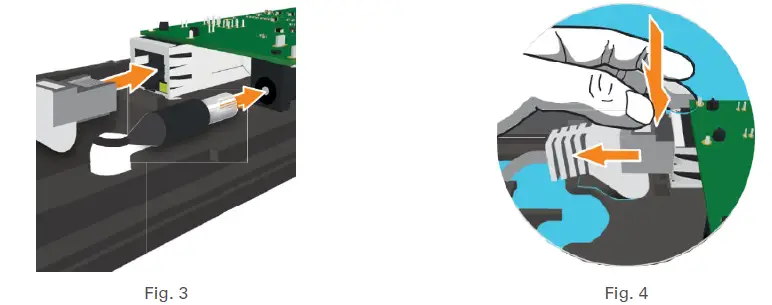
If the wall module needs to be replaced, apply light pressure to slide down the network connector and, in turn, unlock the locking clip on the plug (Fig. 4).
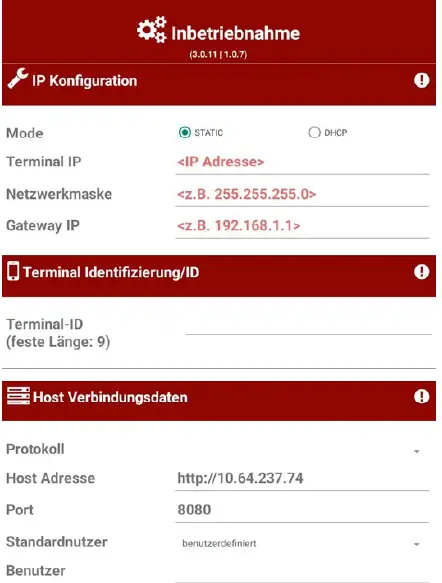
MAIN MODULE INSTALLATION
Once the wall module has been fixed to the wall and the Sectime terminal has been connected, the main module can be mounted. To do so, place the housing just above the wall module and then move it down (Fig. 5). The module then locks in place.
If the main module needs to be replaced, disconnect it from the wall module using the special tool, as described in Chapter “Getting started”, and install the new main module as described above.
HOW TO USE SECTIME
INITIAL START-UP
START-UP ASSISTANT
After the initial booting process, the terminal automatically launches the start-up assistant. You can now configure the basic settings.
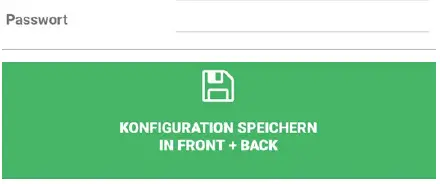
| Network parameters First, select the mode. If “Static” mode is chosen, please enter the IP address of the terminal, the network mask, and the gateway IP. |
| Terminal ID Enter the terminal ID (9 characters mandatory). |
| Host connection Select the respective protocol and then fill out the fields “Host Adresse” (host address), “Port”, “Standardnutzer” (standard user), “Benutzer” (user) and “Passwort” (password).Admin password Choose a secure password to protect the administration interface. Write this password down in a secure place. |
| Save configuration Complete the process with “KONFIGURATION SPEICHERN IN FRONT + BACK” (Save configuration). |
MAIN MODULE / WALL MODULE SYNCHRONIZATION
The Sectime terminal comes with intelligent memory management. This allows you to synchronize the settings from the main module to the wall module or from the wall module to a new main module. The result is an autonomous service process, as only the configuration data needs to be loaded from memory when a component is replaced.
In the case of a main module replacement, the new main module automatically starts up in memory management mode and the following information is displayed on the terminal:
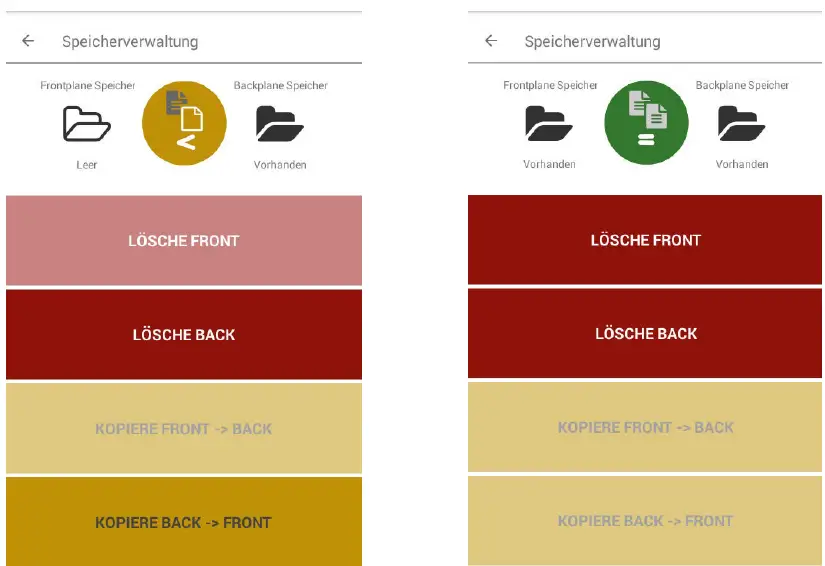

The beige icon![]() in the status bar (Fig. 6) indicates that the front (i.e. main module) memory has not been configured yet.
in the status bar (Fig. 6) indicates that the front (i.e. main module) memory has not been configured yet.
- Use the corresponding button “KOPIERE BACK -> FRONT” (COPY BACK -> FRONT) to copy the configuration to the new main module.
- After the configuration has been transferred, the green icon
 appears in the status bar (Fig. 7). Use the button “Zurück” (Back) to return to the start screen.
CONFIGURATION
You can access the configuration menu via a swiping gesture on the touch display, as described below
- Place two fingers (preferably your index and middle fingers) in the position shown in the illustration below (Fig. 8), and swipe with both fingers down into the white date/time field.
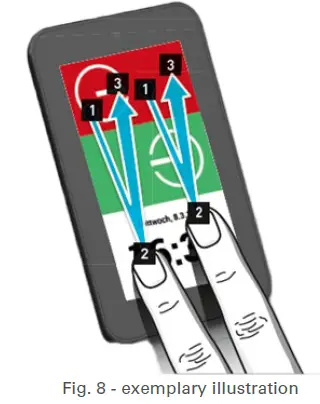
- Then, swipe up with both fingers to the original position. When you are back in the original position, take your fingers off the display.
Your fingers must touch the display during the entire swiping gesture. - Finally, choose the user type (user or admin) under “Benutzer wählen” and enter the password defined during configuration (Fig. 9).
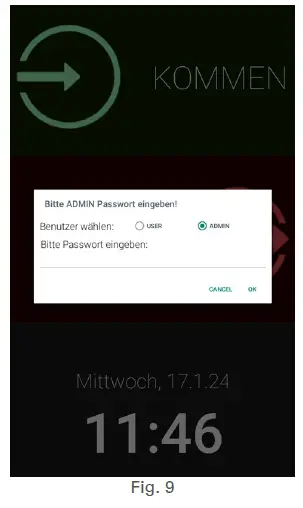
After you have entered the password, the configuration menu opens and enables you to view and change terminal settings, such as IP and terminal identification and host connection.
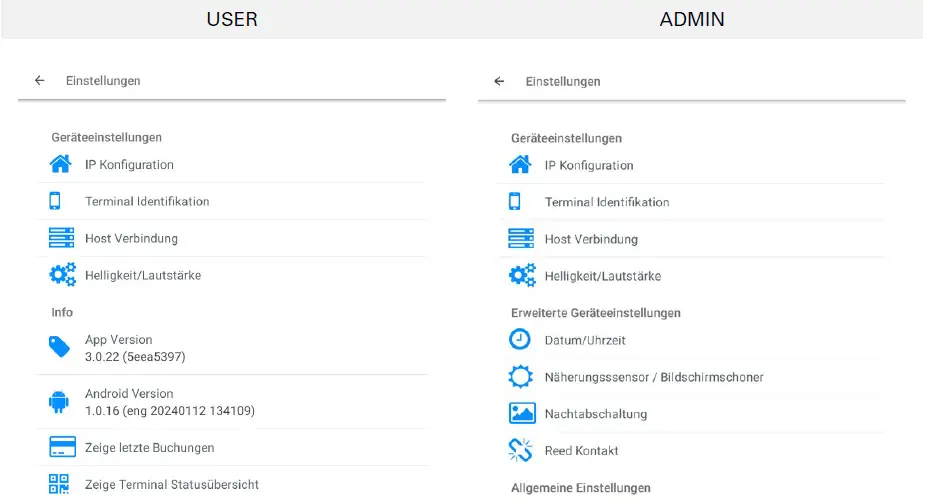
Depending on the user type previously selected (refer to Fig. 9), you can view and change the following settings


In case of setting changes on the main module, these changes only take effect on the main module and must be manually transferred to the wall module. To do so, proceed as follows
- After you have changed the settings, use the arrow on the top left corner to exit the configuration menu.
The following window opens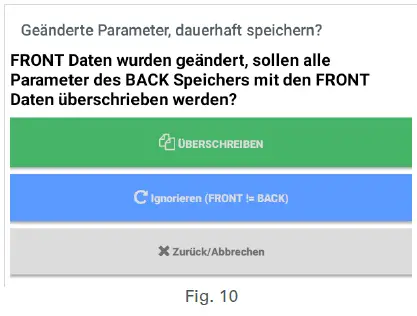
- Select “Überschreiben” to overwrite the settings of the wall module with the new settings defined in the main module (Fig. 11).
Optionally, you can use the “EEPROM Management” function (Fig. 11) to synchronize the settings on the main module and on the wall module. To do so, proceed as follows
- In the configuration menu, select the submenu “EEPROM Management” (Fig. 11).
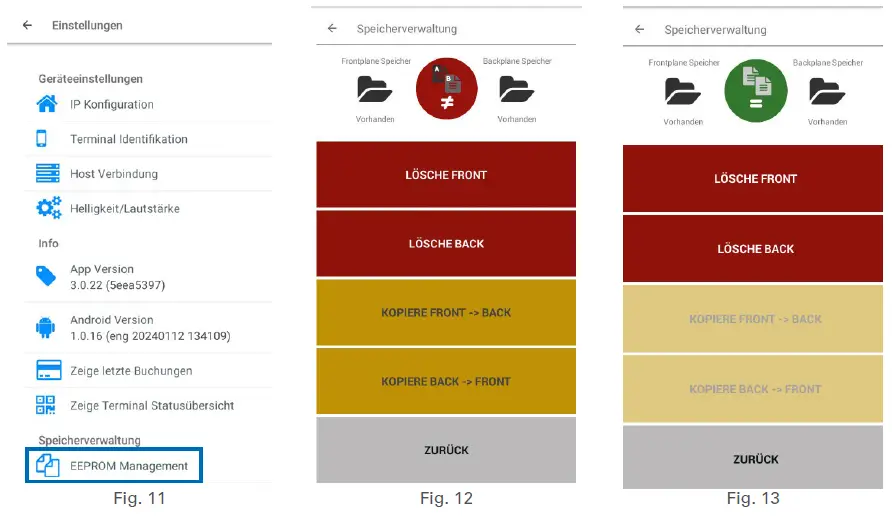 The red icon
 is displayed when the front (i.e. main module) and back (i.e. wall module) memories do not match (Fig. 12).
You can view a detailed description of the setting changes by tapping the red icon on the display. - Select the button “KOPIERE FRONT -> BACK” (COPY FRONT -> BACK) to copy the data to the wall module (Fig. 12).
The green icon indicates that both memories are now running synchronously. - Select “Zurück” (Back) to return to the configuration menu (Fig. 13) and click the arrow on the top left corner to exit the configuration menu.
OPERATION
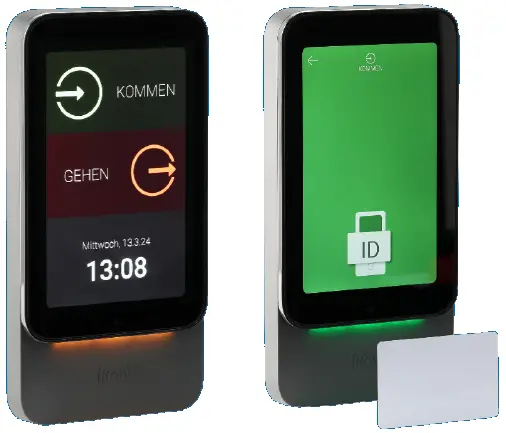
Sectime enables the user to record their time of arrival and departure using simple commands on the touch display (Fig. 14) and their mobile credentials.


The icon![]() displayed in the bottom left corner indicates that Sectime is not connected to the host server.
displayed in the bottom left corner indicates that Sectime is not connected to the host server.
To record your time of arrival, proceed as follows
- Place one finger on the green button (defined ex-works as “KOMMEN”) of the touch display (Fig. 14) and swipe to the right.
The following screen appears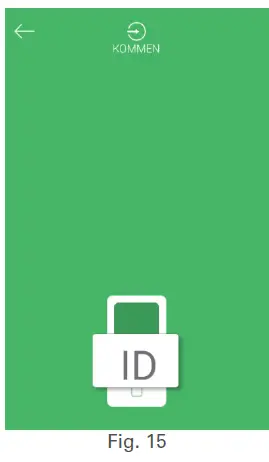
- Hold your credential close to the terminal, below the touch display, to identify yourself.
To record your time of departure, proceed as follows
- Place one finger on the red button (defined ex-works as “GEHEN”) of the touch display (Fig. 14) and swipe to the left.
The following screen appears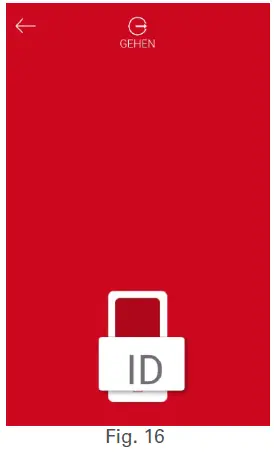
- Hold your credential close to the terminal, below the touch display, to identify yourself.
System administrators (Admin) can rename the tags of both commands “KOMMEN” (arriving) and “GEHEN” (leaving) in the settings menu “Display Texte”.
COMPLIANCE STATEMENTS
EU
Hereby, sesamsec GmbH declares that Sectime complies with Directive 2014/53/EU.
The full text of the EU declaration of conformity is available at the following internet address: sesamsec.me/approvals
UNITED KINGDOM
Sectime complies with the requirements of the UK legislations and other regulations as listed in the respective UK declarations of conformity. The importer is responsible for applying the following information to the packaging of the product
 the importer company’s details, including the company’s name and a contact address in the United Kingdom.
- UKCA marking
RF EXPOSURE COMPLIANCE
RF exposure statement (mobile and fixed devices)
This device complies with the RF exposure requirements for mobile and fixed devices. However, the device shall be used in such a manner that the potential for human contact during normal operation is minimized.
APPENDIX
WALL MODULE INSTALLATION PATTERN
RELEVANT DOCUMENTATION
sesamsec documentation
- Sectime data sheet
- Sectime instructions for use
external documentation
- Technical documentation related to the installation site
- Optionally: Technical documentation related to connected devices
TERMS AND ABBREVIATIONS
| TERM | EXPLANATION |
| EEPROM | electrically erasable programmable read-only memory |
| ESD | electrostatic discharge |
- GND ground
- HF high frequency
- LED light-emitting diode
- PAC physical access control
- PE protective earth
- RFID radio frequency identification
- SPDsurge protection device
REVISION HISTORY
| VERSION | CHANGE DESCRIPTION | EDITION |
| 01 | First edition | 06/2024 |
sesamsec GmbH
- Finsterbachstr. 1
- 86504 Merching
- Germany
- P +49 8233 79445-0
- F +49 8233 79445-20
- E-mail: info@sesamsec.com
- sesamsec.com
sesamsec reserves the right to change any information or data in this document without prior notice. sesamsec declines all responsibility for the use of this product with any other specification but the one mentioned above. Any additional requirement for a specific customer application has to be validated by the customer themselves at their own responsibility. Where application information is given, it is only advisory and does not form part of the specification. Disclaimer: All names used in this document are registered trademarks of their respective owners.
© 2024 sesamsec GmbH – Sectime – user manual – DocRev01 – EN – 06/2024
Documents / Resources
 |
sesamsec Sectime IP Based Time and Attendance Terminal [pdf] User Manual Sectime IP Based Time and Attendance Terminal, Sectime, IP Based Time and Attendance Terminal, Time and Attendance Terminal, Attendance Terminal, Terminal |