SelectBlinds Light Filtering Dual Shades Installation Guide


MOUNTING THE BRACKETS
MOUNTING EXPOSED ROLL HEADRAIL BRACKETS
NOTE: The zebra shade tube is pre-installed in the exposed roll headrail, which simply snaps onto the provided hardware. You will receive two or more headrail brackets, depending on the width of your shade.

EXPOSED ROLL HEADRAIL – INSIDE MOUNT
- At the top corners of the window, measure inward and mark with your pencil 2” – 4” from each side. If you have additional brackets, make an additional mark for each one, evenly spaced between the outer marks.


- Next, you’ll need to measure how deep to place your brackets in the window. Starting at one of your marks, measure back at least 3/4” and make a mark with your pencil. If you want the front of the cassette to be flush with the wall, measure back 1 3/16 ” and make a mark. Repeat this step until you’ve marked the same depth measurement for each bracket.
- Hold each bracket up to the ceiling or window frame so the release lip lines up with your mark. Mark the holes in each bracket, then use your pencil to mark where the screws will go. Repeat this step until you’ve marked the screw holes for each bracket
- Pre-drill the screw holes with a 5/64” drill bit at your marks for each bracket location. Before you mount the brackets, you may want to erase any pencil marks that remain on the wall or window.
- Line up your first bracket with the screw holes, and insert two screws to secure the bracket to the mounting surface. Repeat this step for any remaining brackets. When all brackets are secure, you’re ready to mount the shade into the window.
EXPOSED ROLL HEADRAIL – OUTSIDE MOUNT
- At the top corners of the window, measure inward and mark with your pencil 2” – 4” from each side. If you have additional brackets, make an additional mark for each one, evenly spaced between the outer marks.

- From one of these marks, measure upward and mark the height for the bracket placement. The minimum requirement is 1 5/8”, but if you want the brackets to clear the top of the window, measure and mark at least 3 1/4” above your window. Repeat this until you’ve marked the same height measurement for each bracket.

- Position a bracket so that the back is against your mounting surface, and the top is aligned with one of your upper marks. Hold the bracket in place and mark with your pencil where the screws will go. Repeat this until you’ve marked the screw holes for each bracket.

- Pre-drill the screw holes with a 5/64” drill bit at your marks for each bracket location. Before you mount the brackets, you may want to erase any pencil marks that remain on the mounng surface.

- Line up your first bracket with the screw holes, and insert two screws to secure the bracket to the mounting surface. Repeat this step for any remaining brackets. When all brackets are secure, you’re ready to mount the shade into the window (see below).
ATTACHING THE SHADE
NOTE: Before you attach the shade to the brackets, check that your brackets are straight and aligned with each other. The screw holes on all brackets are elongated, so making small adjustments is easy.
Inside Mount: Use a tape measure to check that each bracket is set to the same depth. If you need to make adjustments, slightly loosen the screws on a bracket and shi it back or forward. Secure the screws when the position is corrected.
Outside Mount: Use a tape measure to check that each bracket is set to the same height, and use a level on top of each bracket to make sure they’re all straight and aligned. If you need to make adjustments, slightly loosen the screws on a bracket and shift it until it’s level and set to the correct height.
EXPOSED ROLL HEADRAIL

- Grab the shade and hold it up to your brackets. Set the front edge of the headrail onto the front hook of each bracket. While in this position, you can slide the shade left or right until the cassette is centered.
- When you’re ready to secure the headrail, push the headrail upward until the back lip of each bracket snaps onto the back edge of the deco bar. When the shade is installed, you may safely remove the bubbled wrapped around the roller.
ADDITIONAL

INSTALLING CHAIN TENSION DEVICE
NOTE: Cord or chain tension device are used to ensure the smooth operation of your shade and to help protect children from getting tangled in loose chains. If there is any protective plastic around the chain, remove it before you proceed. Before doing anything, you must first slide the tension device to the boom of the bead chain loop.
- Insert a small screwdriver, punch, or awl through the screw at the boom of tension device.
- While pressing the tension device release buttons on the sides of the tension device, move the screw hole down to release the safety mechanism.
- Slide the tension device down to the boom of the bead chain loop, position it at the desired location.
- Mark the window casement at the notch in the tension device.
- The goal of using the is to make the chain taut but still slightly loose.tension device The center of the screw hole should be aligned with the notch in the UCT (±1/8″) .The tension device can be mounted in 3 three ways (Inside Mount with bracket or without bracket, Outside Mount).
INSIDE MOUNT WITH BRACKET

A. Hold the ’s Inside bracket with its center hole aligned with the mark and Tension Device mark both hole locations.
B. Drill 1/8″ pilot holes, if wall anchors are required, first tap them into the 7/32” pre-drilled holes. Use a Phillips screwdriver and the longer provided screws to attach the bracket to the wall.
C. Press the tension device release buttons on the sides of the tension device while pulling down on the spring-loaded screw hole. Insert the nub on the inside mount bracket into the back of the screw hole in the tension device.
D. Insert the small provided screw into the nub through the front of the screw hole and tighten it to secure the tension device to the bracket.
INSIDE MOUNT WITHOUT BRACKET

NOTE: If mounting to a textured or uneven surface, use the provided mounting bracket.
A. Position the tension device with its spring-loaded screw hole aligned with the mark.
B. If a wall anchor is required, first tap the anchor into the 7/32” pre-drilled hole.
C. Insert the longer provided screws into the spring-loaded screw hole in the tension device and attach the screw.
OUTSIDE MOUNT

A. Hold the Tension Device’s Outside bracket with its center hole aligned with the mark and mark both screw hole locations.
B. Drill 1/8″ pilot holes, if wall anchors are required, first tap them into the 7/32” pre-drilled holes. Use a Phillips screwdriver and the longer provided screws to attach the bracket to the wall.
C. Press the tension device release buttons on the sides of the tension device while pulling down on the spring-loaded screw hole. Insert the nub on the inside mount bracket into the back of the screw hole in the tension device.
D. Insert the small provided screw into the nub through the front of the screw hole and tighten it to secure the tension device to the bracket.
CAUTION:
- The window covering will not operate properly unless the tension device is secured.
- Locate the tensioner as close to the window glass as possible to minimize accessibility by children and pets.
- Be sure the tension device is not placed in the path of the boom rail or fabric, this may cause the bead chain to become too tight, affecting the shade function and increasing bead chain wear.
WARNING: A damaged, loose, or missing tension device poses a strangulation risk to children. Remove from use and repair or replace if tension device is damaged, loose, or missing.
PROGRAMMING AND USING YOUR REMOTE
IMPORTANT: THE MOTORIZED SHADES WERE PROGRAMMED AND IN SLEEP MODE, PLEASE WAKE UP THE MOTORS BEFORE USING. TO DO THIS, PRESS AND HOLD THE SETTING BUTTON FOR 6 SECONDS UNTIL YOU HEAR THE MOTORS SOUND AND THE LEDS FLASH RED FOUR TIMES.
REMOTE CONTROLER TECHNICAL DATA

NOTE :
* The indoor range is typically 35m but can vary based on the thickness and material of the walls.
* Including battery.

NOTE :
* Only for certain products
* To active the preset special function, hold 2 seconds and then release.
PAIR A SINGLE SHADE TO A CHANNEL
- Select the desired shade channel (channel backlight will turn off after 4 secs).
- Remove the battery cover to access the ‘C’ button.
- Hold the setting button until the shade jogs and the motor’s green LED blinks.
- Hold the setting button again until the shade beeps and the motor’s red LED blinks steadily.
- While the motor beeps (max. 15 secs), press the ‘C’ button. The shade will jog, and the green LED will flash to confirm successful pairing.

DELETE A SHADE FROM REMOTE

- Select the desired shade channel (channel backlight will turn off after 4 secs).
- Remove the battery cover to access the ‘C’ button.
- Press the ‘C’ button three mes within 2 seconds. The shade will jog, and the green LED will flash to confirm deletion.
SET THE FAVOURITE POSITION

- Send the shade to the desired favourite position.
- Remove the battery cover to access the ‘L’ button.
- Hold the ‘L’ button first, then quickly hold the Heart button until the shade beeps and the green LED blinks to set the favourite position.
DELETE THE FAVOURITE POSITION

- Press Heart to send the shade to its favourite position.
- Remove the battery cover to access the ‘L’ button.
- Hold the ‘L’ bttuon first, then quickly hold the Heart button until the shade beeps and the green LED blinks to delete the favourite position.
CHANGE THE MOTOR SPEED

A shade offers three speed levels: Standard (default), Comfort, and Slow. Changing the speed cycles to the next available level
- Make sure the desired shade channel is active.
- Hold Heart first, then quickly hold the Up button until the shade beeps and the green LED blinks to change the speed.
Note:
All shades on the same group channel will have their speed changed.
INSTALL/ REPLACE THE REMOTE BATTERY
If the group channel number no longer lights up or the controlled product stops responding, it’s me to replace the battery.
- Use the included Philips screwdriver to turn the captive screw counter clockwise until it loosens but remains attached to the cover.
- Slide the battery cover off gently to access the battery compartment.
- Carefully remove the old battery and align the battery with the + symbol facing upward. Place it into the socket, ensuring it is seated securely and held in place by the plastic snap legs.
- Securely slide the battery cover back into position and tighten the captive screw.

MOUNT THE REMOTE HOLDER

NOTE: A wall mount remote holder is included with your remote, but it is optional to install it.
- Determine where you’d like to place your remote carrier in the room. It is common to place it near a light switch, or on the wall next to the window.
- With the holder in the upright position, insert the provided screws to secure it to our mounting surface.
- After the screws are attached to the wall, insert the screws cap cover to the desired position in the remote holder.
TROUBLESHOOTING

FREQUENTLY ASKED QUESTIONS


SAFETY INSTRUCTIONS
WARNING: IMPORTANT SAFETY INSTRUCTIONS
Follow all instructions carefully, as incorrect installation or handling can lead to severe injury.
- Do not ingest the battery. This device contains a lithium coin/button cell battery. Swallowing the battery can cause severe internal burns within 2 hours and may lead to death.
- Keep new and used batteries away from children. If the battery compartment does not close securely (or lacks a captive screw), stop using the product immediately and keep it out of reach of children.
- If a battery is swallowed or placed inside any part of the body, seek immediate medical attention.
- Replacing the battery with an incorrect type may compromise safety features.
- Do not dispose of batteries in fire, hot ovens, or crush them, as this can lead to explosions or leakage of flammable liquids or gases.
- Avoid exposing batteries to extremely high temperatures or low air pressure, as this may cause explosions or leakage.
- Keep the device dry and do not paint it.
- Do not drop, knock, or shake the device, as rough handling can damage internal circuit boards.
- Ensure the shade can move freely without obstruction from objects.
- Do not allow children to play with the remote control.
BATTERY RECYCLING INSTRUCTIONS
- To responsibly dispose of the coin cell battery in your remote control:
- Do Not Discard in Regular Trash: Coin cell batteries contain hazardous materials and must not be disposed of in household waste. Improper disposal can harm the environment.
- Locate a Recycling Center:
◦ In the United States, visit Call2Recycle to find a nearby battery recycling drop-off location. Many retail stores, including home improvement and electronics stores, accept used batteries for recycling.
◦ In Canada, check with local recycling programs or visit Call2Recycle Canada to locate a drop-off site. - Prepare the Battery for Recycling: Before recycling, tape over the positive (+) terminal of the battery with clear or electrical tape to prevent accidental discharge or short-circuiting.
- Follow Local Guidelines: Some municipalities may have additional guidelines for battery disposal. Always adhere to your local regulations to ensure safe handling and recycling.
- By recycling your coin cell battery, you help protect the environment and comply with regulations in the US and Canada.
![]()
LEGAL INFORMATION
CE Statement
Hunter Douglas hereby declares that the RW5-G2 and RW14-G2 Remote Controls are in compliance Hunter Douglas hereby declares that the RW5- G2 and RW14-G2 Remote Controls are in compliance with the basic requirements and other relevant provisions of the Electromagnetic Compatibility (EMC) Directive 2014/30/EU, Radio Equipment Directive (RED) 2014/53/EU and Low Voltage Directive (LVD) 2014/35/EU. The full text of the EC declaration of conformity can be obtained online: www.tuiss.com/certifications
![]()
Hunter Douglas herebydeclaresthaheRW5-G2 andRW14-G2 Remote Controls are in compliance with the basic requirements and other relevant provisions of the Electromagnetic Compatibility Regulaons2016, Radio Equipment Regulaons2017 and Electrical Equipment (Safety) Regulaons2016. The full text of the UK declaration of conformity can be obtained online: www.tuiss.com/certifications
![]()
FCC Statement
FCC ID: 2BMQ2RW5RW14
This device complies with part 15 of the FCC Rules. Operation is subject to the following two conditions:
(1) This device may not cause harmful interference, and
(2) This device must accept any interference received, including interference that may cause undesired operation.
This equipment has been tested and found to comply with the limits for a Class B digital device, pursuant to part 15 of the FCC Rules. These limits are designed to provide reasonable protection against harmful interference in a residential installation.
This equipment generates, uses and can radiate radio frequency energy and, if not installed and used in accordance with the instructions, may cause harmful interference to radio communications. However, there is no guarantee that interference will not occur in a particular installation. If this equipment does cause harmful interference to radio or television reception, which can be determined by turning the equipment off and on, the user is encouraged to try to correct the interference by one or more of the following measures:
- Reorient or relocate the receiving antenna.
- Increase the separation between the equipment and receiver.
- Connect the equipment into an outlet on a circuit different from that to which the receiver is connected.
- Consult the dealer or an experienced radio/TV technician for help.
Innovation, Science and Economic Development Canada ICES-003 Compliance
IC: 33385-RW5RW14
CAN ICES-3 (B)/NMB-3(B)
This device contains license-exempt transmitter(s)/receiver(s) that comply with Innovation, Science and Economic Development Canada’s license exempt RSS(s). Operation is subject to the following two conditions:
(1) This device may not cause interference.
(2) This device must accept any interference, including interference that may cause undesired operation of the device.
QUICK START GUIDE OF THE TUISS SMARTVIEW APP
The full app guide is available at https://cdn.selectblinds.com/documents/smartview-motorization-guide.pdf
Here are quick steps to start the app:
Step 1: Download the App.
Search ‘Tuiss SmartView’ on the App Store or Google Play Store.
Or simply use your phone camera to scan the QR code on the front of your blind’s swing label to download the App.

Open the App.
Press the ‘Create account’ button to create your account.
Enter a valid email address, create a password and accept the Terms of Use. Tap ‘Sign Up’.
A confirmation message will appear stating the account was successfully created. Tap ‘Continue’.
When you first open the App, you will be asked for permission for SmartView to use your phone’s Bluetooth. Select ‘Continue’.

Step 2: Wake up the motor.
Wake up the motor by pressing and holding the setting button at the motor head for 6 seconds until the motor sounds and LED flashes red 4x. If you already woke up the motor, please ignore this step.

Step 3: Scan to add blind.
Select the option ‘Add my first blind’.
Adding a blind is as simple as scanning the QR code on the back of your swing label.
You may be asked by your phone to give permission for SmartView to access your camera, make sure you allow it – you only have to do this once.
After scanning the QR code, your blind will move up and down briefly. The App will ask for confirmation.
Press ‘Found it!’ to continue or select ‘Jog to identify’ so that you can recognize the blind by briefly moving it up and down again.

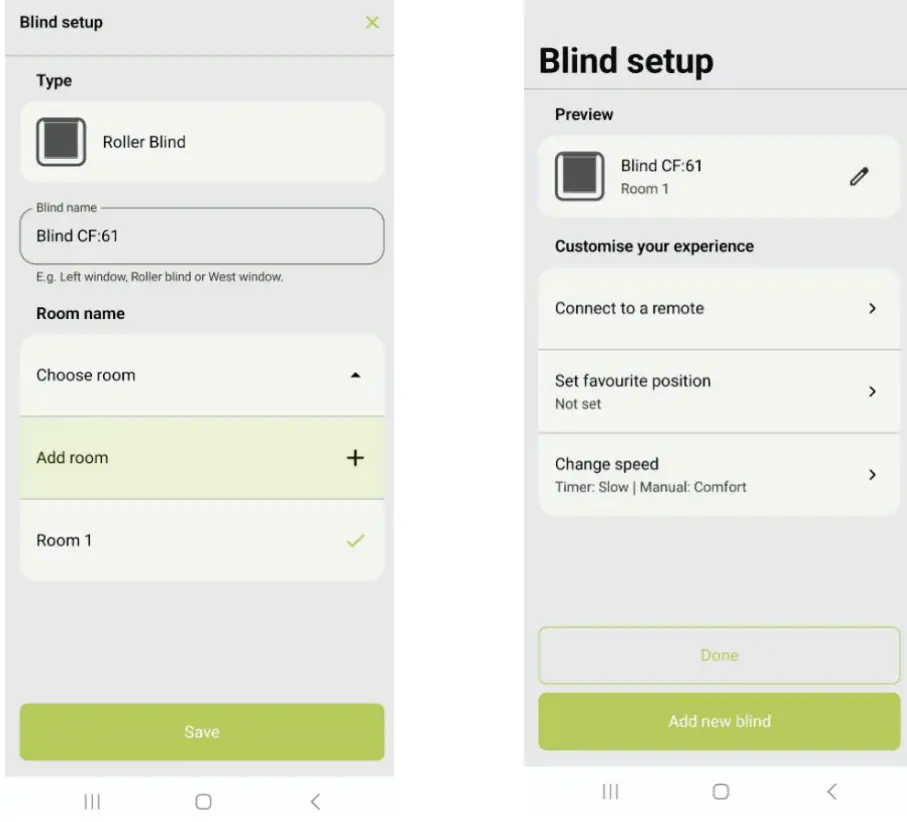
Name the blind and choose the room where your blind is located (create a new room or select an already existing room). Press ‘Save’ then ‘Done’ if you do not need add another blind; press ‘Add new blind’ if you need to add another blind.
Step 4: Ready to use.
You can now use the ‘Open’ and ‘Close’ buttons to move the blind to its top or boom limit positions with a touch.
These Open and Close buttons will move all blinds assigned to the same room simultaneously.
To move individual blinds, press the ‘Select blinds’, then ck the box for the blind you want to move and hit ‘Next’.
You can then drag the blind up or down to a precise position of your choosing.

Documents / Resources
 |
SelectBlinds Light Filtering Dual Shades [pdf] Installation Guide Light Filtering Dual Shades, Filtering Dual Shades, Dual Shades, Shades |
 |
SelectBlinds Light Filtering Dual Shades [pdf] Installation Guide Light Filtering Dual Shades, Filtering Dual Shades, Dual Shades, Shades |