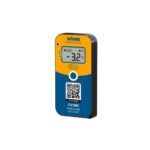
Scigiene MicroDL Initializating Temperature Data Loggers

Product Information
Specifications
- Product Name: MicroDL Temperature Data Loggers
- Model: MicroDL
- Features: Temperature recording, alarm indicators, firmware update
- Display: LCD display
- Interface: USB
Product Usage Instructions
Initialization
- Start the MDAS-Pro software by double-clicking on the icon.
- Plug the MicroDL reader USB into your PC and turn on the MicroDL display by pressing the black Start Button.
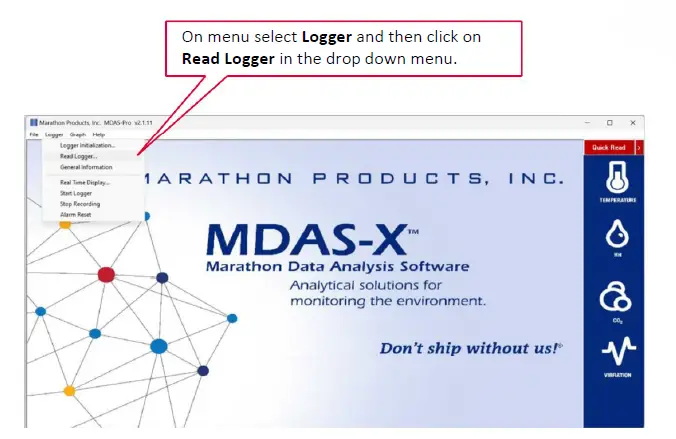
- Place the MicroDL into the reader station with the display side down and select Logger from the menu. Click on Read Logger to initiate communication with the computer.
- Check and set the Duration of Recording, Interval Between Measurements, and Alarm Limits as needed.
- Update the firmware by clicking OK and wait for the process to finish before disconnecting the logger.
Starting the Logger
- Remove the device from the reader station.
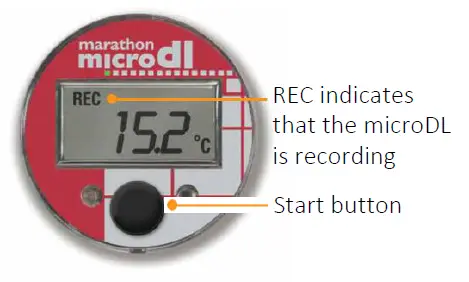
- Press and hold the black Start Button for 7 seconds until RUN displays.
- Confirm that REC appears in the upper left of the display to indicate recording has started.
- Place the MicroDL in the desired monitoring location.
Display Examples
Pressing the Start button will cycle through displaying:
- Current temperature
- Elapsed time in days (RUN)
- High and low temperatures
- Alarm indicators and times
Note: Refer to the Configuration Guide for detailed settings and usage instructions.
FAQ
- Q: How long does the MicroDL display stay on before hibernating?
- A: The display will stay on for four minutes before hibernating.
- Q: How can I update the firmware in the logger?|
- A: Push OK on the Logger Initialization screen to update the firmware. Wait until the updating is finished before disconnecting the logger.
Initializating MicroDL Temperature Data Loggers
Initializating the Logger
- Start the MDAS-Pro software by double clicking on the icon.
- Plug the MicroDL reader USB into your PC. Turn the MicroDL display on by pressing the black Start Button. The display will stay on for four minutes before hibernating.
- Place the MicroDL into the reader station, with the display side down, while the display is still ON in order to communicate with the computer.
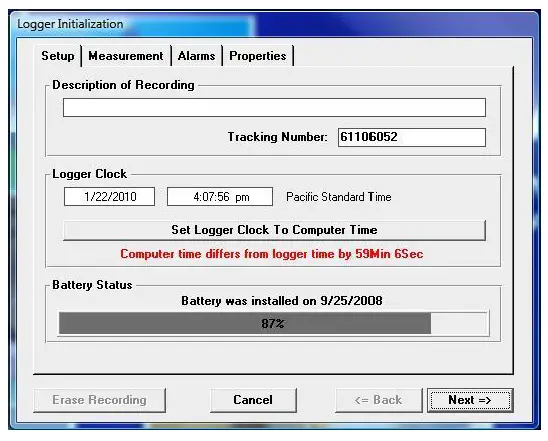
- The Logger Initialization screen will appear.
Setup Tab
- Description: Enter alpha-numeric information, such as the location of the unit.
- Tracking Number: Enter numeric information, such as a record number for shipping or receiving.
- Logger Clock: Set the time manually in the window, or set the logger time based on the time on your PC.
- Battery Status: This displays the date when the battery was installed or replaced.
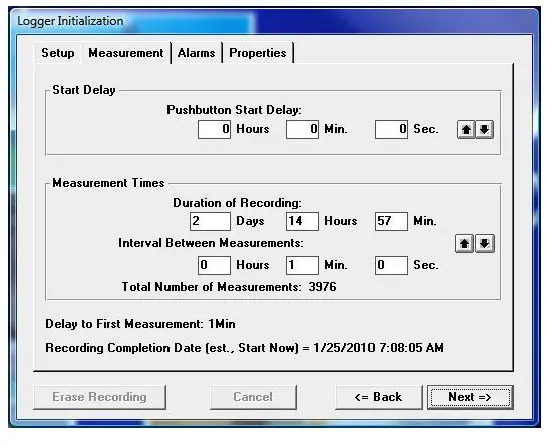
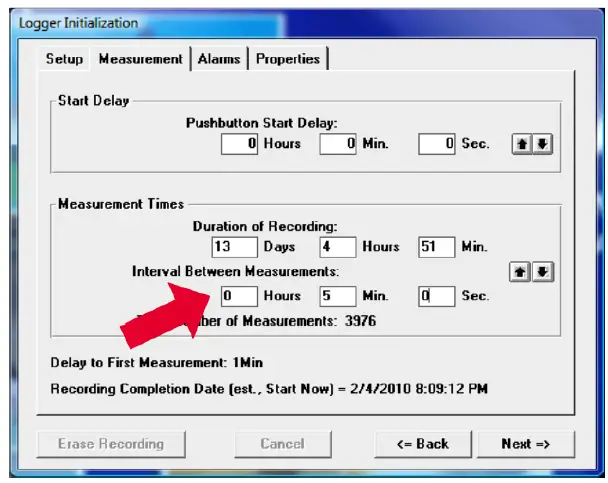
Measurement Tab
- Start Delay: Set a time delay in either hours, minutes, or seconds before the unit will begin to record.
- Measurement Times: Set the length of time in days or hours that you wish to record data. Please note that the Duration of Recording and Interval Between Measurements are dynamically linked.
Setting the Duration
Setting the Duration of Recording will automatically calculate the Interval Between Measurements. Conversely, setting the Interval Between Measurements, will automatically calculate the Duration of Recording. For example, if you set the Duration of Recording to 3 Days, it will automatically calculate the Interval Between Measurements as 34 seconds. Or, if you set the Interval Between Measurements at 15 minutes, it will automatically calculate the Duration of Recording to 79 days and 21 hours. 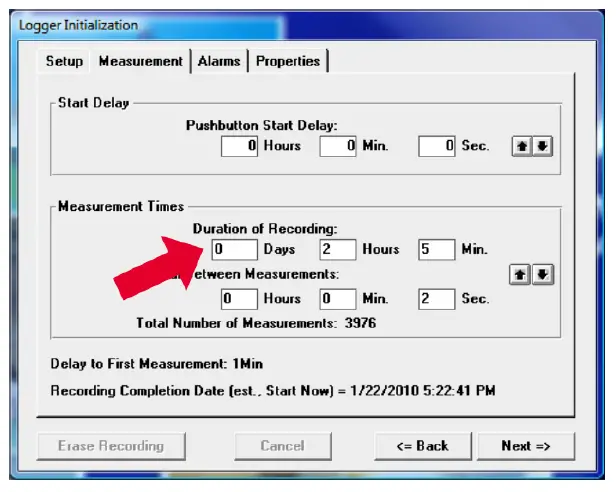
Alarms Tab
- Temperature GREATER Than: Set the maximum temperature for an alarm condition to be triggered.
- Temperature LESS Than: Set the minimum temperature for an alarm condition to be triggered.
- Continuous: Time over or under the alarm continuously.
- Cumulative: Total cumulative time over or under the alarm.
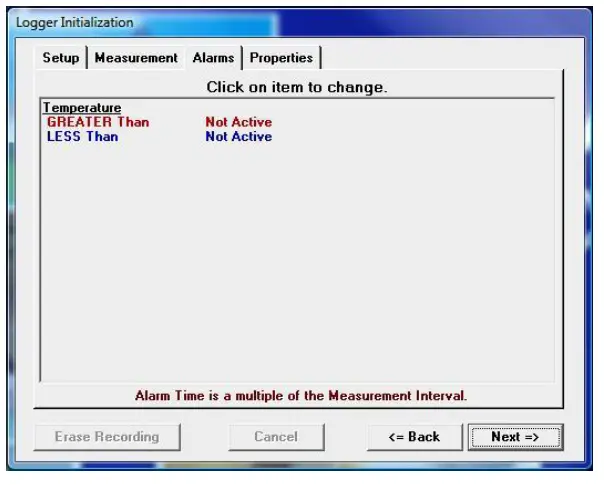
Check the High Alarm Limit or Low Alarm Limit if you want to enable the flashing LED alarm indicator. 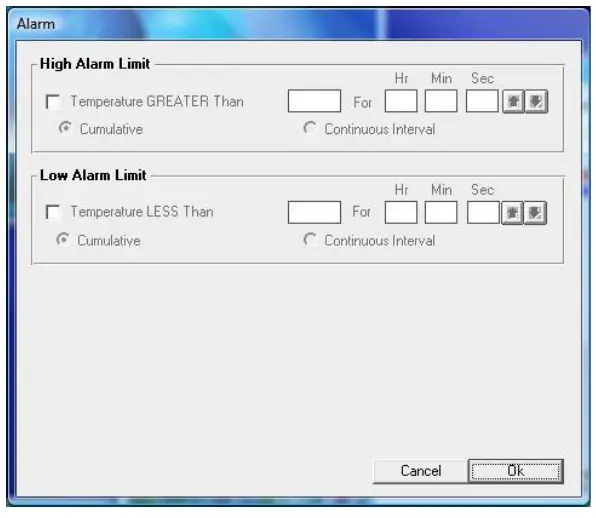
Properties Tab
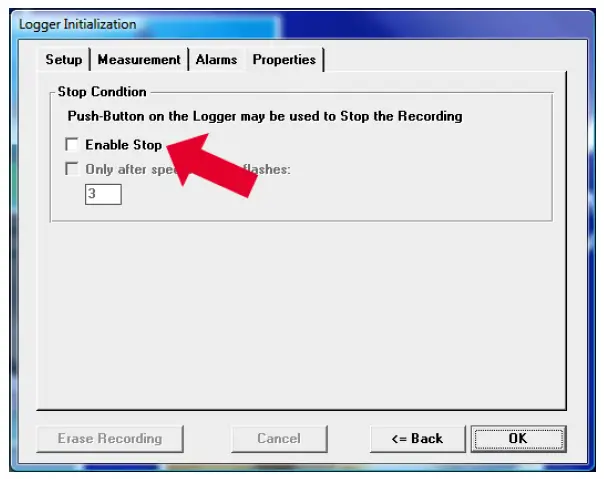
- Stop Condition: The Push Start button on the logger may be enabled as a Stop button mechanism.
Check the Enable Stop box if you want to be able to stop recording. Note that the device cannot be restarted after pushing the Stop button. - Memory Configuration: The memory may be configured two ways. The default is Record to End of Memory (recommended). The other is Continuous which writes over the oldest data.
 Push OK to update the firmware in the logger. Wait until the updating is finished before disconnecting the logger.
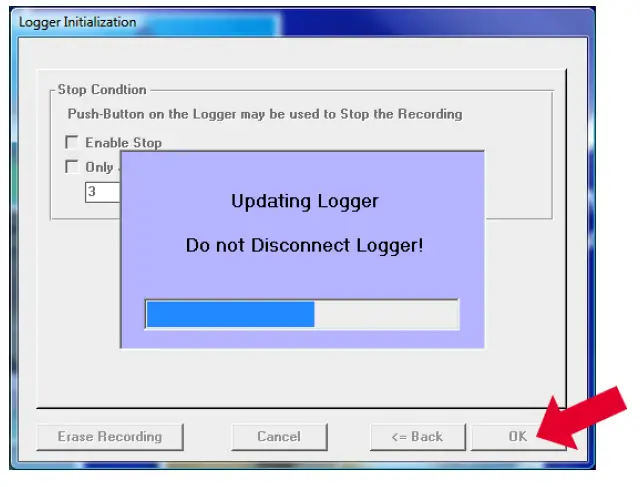
Starting the Logger
- Remove the device from the reader station and press and hold the black Start Button for 7 seconds until the RUN displays.
- To confirm that the logger has been started, REC will appear in the upper left of the display.
- The MicroDL is now recording. The unit can be placed in the location that should be monitored.
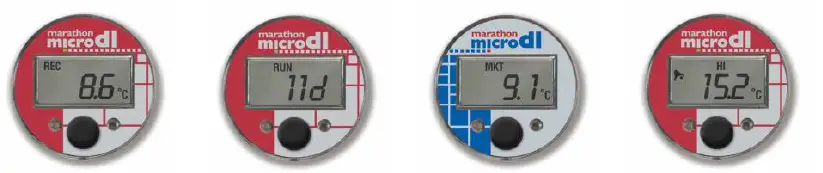
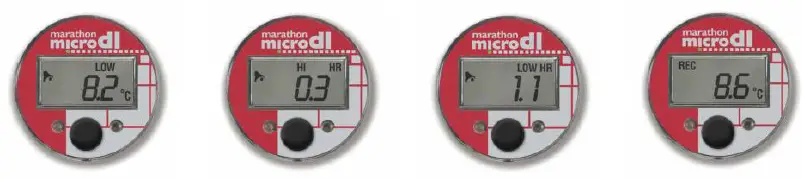
DISPLAY EXAMPLES
Press the Start button to see the following information display with each press:
- REC: 8.6°C shows recording and current temperature
- RUN: 11 D shows elapsed time in days
- MKT: 9.1°C shows mean kinetic temperature
- HI: 15.2°C shows alarm has occurred and high temperature
- LOW: 8.20C shows alarm has occurred and low temperature
- HI HR: 0.3 shows alarm time hours over highly threshold
- LOW HR: 1.1 shows alarm time hours over low threshold
- REC: 8.60C Push to return to current temperature
1295 Morningside Avenue, Unit 16-18
- Scarborough, ON MIB 4Z4 Canada
- Phone: 416-261-4865
- Fax: 416-261-7879
- www.scigiene.com
Documents / Resources
 |
Scigiene MicroDL Initializating Temperature Data Loggers [pdf] Instructions MicroDL Initializating Temperature Data Loggers, MicroDL, Initializating Temperature Data Loggers, Temperature Data Loggers, Data Loggers, Loggers |