Satel INT-KSG2R Integra Keypad with Touch Keys

Product Information
Specifications
- Model: INT-KSG2R EN
- Firmware Version: 2.03
Product Usage Instructions
Introduction
Thank you for choosing the INT-KSG2R keypad by SATEL. Before using the keypad, familiarize yourself with the manual. The keypad operates with touch keys and gestures.
Display
The display provides information on the system state and allows you to operate and program the alarm system. The display can operate in standby mode, partition state presentation mode, and screensaver mode.
Keys
Functions of keys include touch to enter digits and touch and hold for 3 seconds to check the state of zones.
Frequently Asked Questions
Q: What are the factory default codes for the INT-KSG2R keypad?
A: The factory default codes are Service code: 12345 and Object 1 master user code: 1111.
Q: How can I switch between different display modes on the keypad?
A: To switch between standby mode, partition state presentation mode, and screensaver mode, follow the instructions provided in the user manual or consult with your installer.
- IMPORTANT Changes, modifications, or repairs not authorized by the manufacturer shall void your rights under the warranty.
- Hereby, SATEL sp. z o.o. declares that the radio equipment type INT-KSG2R complies with Directive 2014/53/EU. The full text of the EU Declaration of Conformity is available at the following internet address: www.satel.pl/ce
Factory default codes:
- Service code: 12345
- Object 1 master user (administrator) code: 1111
Signs in this manual
 Caution – information on the safety of users, devices, etc.
 Note – suggestion or additional information.
Introduction
- Thank you for choosing this product by SATEL. Familiarize yourself with this manual before you start using the keypad. This manual describes the keypad components and their features.
- For a description on how to use the keypad for control panel operation, please refer to the user manual of the control panel to which the keypad is connected.
- Remember that this keypad is operated with touch keys and gestures (e.g. swiping instead of pressing the arrow keys).
- Ask the installer for instructions on how to use your individually configured keypad.
- The installer should also instruct you on how to operate the alarm system using the INT-KSG2R keypad.

LED indicators

- Information about the armed status may be hidden after a period defined by the installer.
- The trouble information is hidden after arming. The installer defines if the trouble information is hidden after just one of the partitions is armed in any mode or after all partitions are armed in full mode.
If the Grade 2 (INTEGRA) / Grade 3 (INTEGRA Plus) option is enabled by the installer:
- the
 LED indicates alarms only after entering the code,
 - flashing of the
 LED means that there is trouble in the system, some zones are bypassed, or there has been an alarm.
Display
- The display provides information on the system state and allows you to operate and program the alarm system. The installer defines the display backlight settings.
The display can operate in one of the following modes:
- standby mode (primary operating mode),
- partition state presentation mode,
- screensaver mode.
- The installer decides if the partition state presentation mode and the screensaver mode are available.
- The messages about events that occurred in the alarm system are displayed regardless of the operating mode.
- Enter the code and press
 to open the menu. The functions are presented in four lines.
 - The currently selected function is highlighted.
Standby mode
The following items are displayed:
- date and time in the format selected by the installer (upper line),
- keypad name or state of partitions selected by the installer (bottom line),
- names of macro command groups above the keys (if the installer configured macro commands).
- Hold
 for 3 seconds to switch to the partition state presentation mode.
 - Touch to start the screensaver.
Partition state presentation mode
The following items are displayed:
- symbols that indicate the state of partitions operated by the keypad,
- names of macro command groups above the keys (if the installer configured macro commands).
- Hold for 3 seconds to switch to the standby mode.
- When the keypad operates in the partition state presentation mode, the screensaver is not available (it cannot be started manually or automatically).
Screensaver mode
- When the display operates in the standby mode, the screensaver can be started.
- automatically (after 60 seconds of inactivity),
- manually (touch ).
- The installer defines the items to be displayed in the screensaver mode.
This can be:
- any text,
- state of selected partitions (symbols),
- state of selected zones (symbols or messages),
- state of selected outputs (symbols or messages),
- information on temperature from an ABAX / ABAX 2 wireless device,
- date,
- time,
- keypad name,
- information on the power consumption of the appliance connected to the ASW-200 smart plug.
- Touch to end the screensaver.
Keys


- The availability of the functions depends on the keypad settings.
- The functions of keys in the user menu are described in the INTEGRA / INTEGRA Plus control panel user manual.
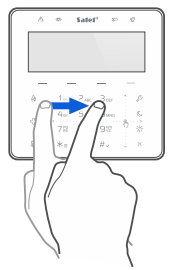
Using the touch keys
Use the gestures described below.
Touch
Touch the key with your finger.
Touch and hold
Touch the key and hold for 3 seconds.
Swipe up
- Touch the keys area and slide your finger up to it.
- scroll up the list,
- move the cursor up or left (depending on the function),
- clear the character to the left of the cursor when editing,
- and exit the graphic mode.

Swipe down
- Touch the keys area and slide your finger down.
- scroll down the list,
- move the cursor down,
- change the letter case when editing,
- exit the graphic mode.

Swipe right
- Touch the keys area and slide your finger right to it.
- enter the submenu,
- start a function,
- move the cursor right,
- enter the graphic mode.
Swipe left
- Touch the keys area and slide your finger left to.
- exit the submenu,
- move the cursor left,
- enter the graphic mode.

Using the MIFARE® proximity card
- You can use the MIFARE® proximity card to operate the alarm system. The keypad distinguishes between presenting and holding the card (the card must be presented to the keypad and held for 3 seconds).
- Ask the installer what function is started when you present the card and what function is started when you hold the card. The reader is located as shown in the figure below.

- For security reasons, we recommend using DESFire cards with encrypted card numbers. To write encrypted numbers to cards, the SO-PRG programmer and the CR SOFT program by SATEL are required.
- If the card’s factory serial number (CSN) is used as the card number, there is no need to program the card but such a card is not secured against copying.
Macro commands
- The macro command is a sequence of actions to be performed by the control panel. The macro commands make it easier to operate the alarm system. Instead of performing several operations (e.g. to arm the selected partitions) you can run a macro command, and the control panel will execute the functions assigned to the macro command. Discuss with the installer which macro commands may best help you in your daily use of the alarm system.
- The installer can configure up to 4 groups of macro commands. 16 macro commands can be assigned to each group. The keypad has 4— keys used to run macro commands. The name of the group is displayed above the key.
Running a macro command
- Touch—. The list of macro commands that belong to this group will be displayed.
- Swipe down to find the macro command you want to run. The currently selected macro command is highlighted.
- Touch
 to run the selected macro command.
- The installer can assign to the group only one macro command that will be run directly upon touching—.
Keypad lock
- Touch
 then
then to lock the touch keys. When the touch keys are locked, you can clean the keypad without the risk of accidentally starting a function.
 - Touchthemto unlock the touch keys.
Manual update history
- The manual version Introduced changes
- 04/24 • A Section on using the MIFARE cards has been added
- SATEL sp. z o.o.
- ul. Budowlanych 66
- 80-298 Gdańsk
- POLAND
- tel. +48 58 320 94 00
- www.satel.pl
Documents / Resources
 |
Satel INT-KSG2R Integra Keypad with Touch Keys [pdf] User Manual INT-KSG2R Integra Keypad with Touch Keys, INT-KSG2R, Integra Keypad with Touch Keys, Keypad with Touch Keys, Touch Keys |