Введение
This manual provides comprehensive instructions for the safe and efficient operation, maintenance, and troubleshooting of your KITCHENARM 19-in-1 HANDY Bread Machine, Model 851011. Please read this manual thoroughly before first use and retain it for future reference.

Figure 1: KITCHENARM 19-in-1 HANDY Bread Machine (Model 851011).
Содержимое упаковки
Verify that all items are present and in good condition upon opening the package. If any items are missing or damaged, contact customer service.
- 1 x KITCHENARM Bread Machine (Model KA8510)
- 1 x User Manual & Recipe Book
- 2 x Kneading Paddles (one for use, one spare)
- 1 x Metal Hook for paddle removal
- 1 x US Three-Prong Plug (integrated)
- 1 x Non-Stick Bread Pan (2LB Vertical Pan)
- 2 x Cup-Spoon Sets (measuring cups and spoons)
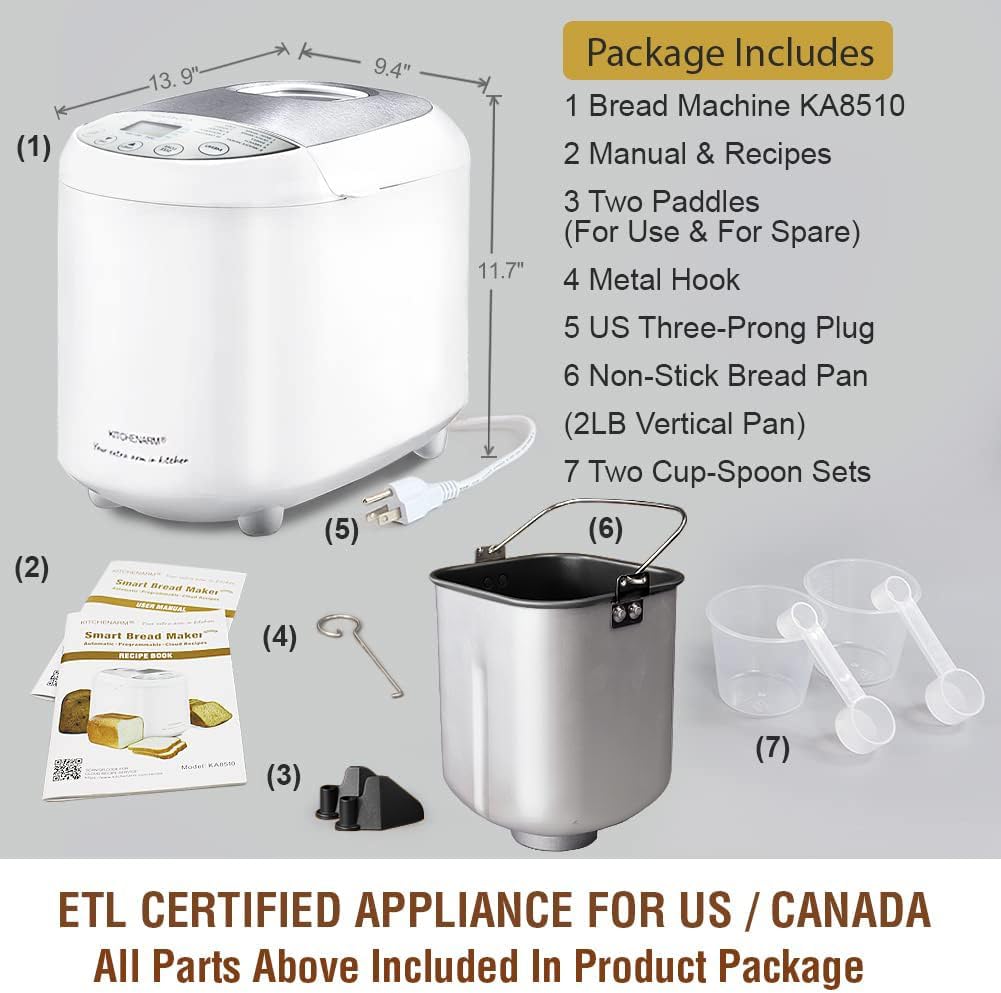
Рисунок 2: Входящие в комплект аксессуары и компоненты.
Важные инструкции по технике безопасности
При использовании электроприборов всегда следует соблюдать основные меры предосторожности, включая следующие:
- Прочитайте все инструкции.
- Не прикасайтесь к горячим поверхностям. Используйте ручки или ручки.
- Во избежание поражения электрическим током не погружайте шнур, вилки или прибор в воду или другую жидкость.
- Необходимо обеспечить строгий надзор, если какой-либо прибор используется детьми или рядом с ними.
- Отключайте от розетки, когда не используете и перед чисткой. Дайте остыть перед тем, как надевать или снимать детали.
- Не используйте прибор с поврежденным шнуром или вилкой или после того, как прибор вышел из строя или был поврежден каким-либо образом. Верните прибор в ближайший авторизованный сервисный центр для проверки, ремонта или регулировки.
- Использование дополнительных принадлежностей, не рекомендованных производителем прибора, может привести к травмам.
- Не использовать на открытом воздухе.
- Не допускайте свисания шнура с края стола или стойки, а также его соприкосновения с горячими поверхностями.
- Не ставьте на горячую газовую или электрическую плиту или рядом с ней, а также в разогретую духовку.
- При перемещении прибора, содержащего горячее масло или другие горячие жидкости, следует соблюдать особую осторожность.
- Чтобы отключить устройство, поверните любой переключатель в положение «выкл.», затем выньте вилку из розетки.
- Не используйте прибор не по назначению.
- Этот прибор имеет поляризованную вилку (один контакт шире другого). Чтобы снизить риск поражения электрическим током, эта вилка предназначена для вставки в поляризованную розетку только одним способом. Если вилка не полностью входит в розетку, переверните ее. Если она все еще не входит, обратитесь к квалифицированному электрику. Не пытайтесь каким-либо образом модифицировать вилку.
СОХРАНИТЕ ЭТИ ИНСТРУКЦИИ.
Настройка и первое использование
Before First Use: Initial Burn-Off
Before using your bread machine for the first time, it is recommended to perform an initial burn-off cycle to eliminate any manufacturing odors or residues. This process takes approximately 10 minutes.
- Remove all packaging materials and accessories from the bread machine.
- Wipe the interior and exterior of the machine with a damp cloth. Ensure the bread pan and kneading paddle are clean and dry.
- Place the empty bread pan with the kneading paddle inserted into the machine. Close the lid.
- Plug the bread machine into a grounded electrical outlet.
- Select a short baking program (e.g., "Bake" or "Home Made" with a short duration if customizable, or simply run an empty cycle for 10 minutes).
- Allow the machine to run for approximately 10 minutes. A slight odor or smoke may be present; this is normal.
- Unplug the machine and allow it to cool completely for at least 2 hours before proceeding with actual bread making.
Идентификация компонента

Figure 3: Key components of the bread machine.
- Паровые отверстия: Release steam during baking. Do not block.
- Большой Viewокно: Allows observation of the bread-making process.
- Крышка из нержавеющей стали: Прочный и простой в уходе.
- Панель управления с ЖК-дисплеем: For program selection, settings, and status display.
- Форма для хлеба: Non-stick pan where ingredients are mixed, kneaded, risen, and baked.
- Лопатка для замешивания теста: Mixes and kneads the dough.
Инструкция по эксплуатации
Основные этапы приготовления хлеба
Follow these general steps for most bread recipes. Refer to the included recipe book for specific ingredient quantities and program recommendations.
- Вставьте лопасть для замешивания: Поместите лопасть для замешивания теста на вал внутри формы для хлеба.
- Добавьте ингредиенты: Add ingredients to the bread pan in the order specified by your recipe (typically liquids first, then dry ingredients, with yeast added last, often in a small well on top of the flour).
- Поместите форму для хлеба: Insert the bread pan into the bread machine, ensuring it clicks securely into place. Close the lid.
- Выберите программу: Plug in the machine. Use the "MENU" button to select the desired program (e.g., Basic White, French, Gluten Free).
- Выберите размер буханки и цвет корочки: Use the "LOAF SIZE" button to choose 1LB, 1.5LB, or 2LB. Use the "CRUST COLOR" button to select Light, Medium, or Dark.
- Начало цикла: Press the "START/STOP" button to begin the bread-making cycle. The machine will automatically mix, knead, rise, and bake.
- Удалить хлеб: Once the cycle is complete (indicated by a beep), unplug the machine. Carefully remove the hot bread pan using oven mitts. Invert the pan to release the bread onto a wire rack to cool. Use the metal hook to remove the kneading paddle from the loaf if it remains embedded.

Figure 4: Unique 1-Press Bread Making process.
Доступные программы
Your KITCHENARM bread machine features 19 pre-programmed menus, including 12 bread menus and 7 non-bread menus. Each program is optimized for specific recipes.
| Нет. | Название программы | Description / Typical Use |
|---|---|---|
| 1 | Базовый белый | Для белого и смешанного хлеба. |
| 2 | Express White | Faster cycle for white bread. |
| 3 | Сладкий | Для хлеба с высоким содержанием сахара. |
| 4 | Французский | Для лёгкого хлеба с хрустящей корочкой. |
| 5 | Не содержит глютен | Специально для рецептов без глютена. |
| 6 | Цельнозерновой | Для хлеба из цельнозерновой пшеничной муки. |
| 7 | Dark Rye | For rye bread recipes. |
| 8 | Multigrain | Для хлеба из различных злаков. |
| 9 | SD Starter | Для приготовления закваски. |
| 10 | Закваска | For baking sourdough bread. |
| 11 | Тесто | Prepares dough for manual shaping and baking. |
| 12 | Кето | For low-carb, ketogenic bread recipes. |
| 13 | Быстрый хлеб | For quick breads using baking powder/soda. |
| 14 | Торт | Для выпечки тортов. |
| 15 | Джем | Для приготовления домашних джемов. |
| 16 | Йогурт | Для приготовления йогурта. |
| 17 | Замесить | Only performs kneading cycle. |
| 18 | Выпекать | Only performs baking cycle. |
| 19 | Home Made | Customizable program for advanced users. |
The machine supports 3 loaf sizes (1LB, 1.5LB, 2LB) and 3 crust colors (Dark, Medium, Light). It also features a 15-Hour Delay Timer and an ADD-NUTS Alarm for adding ingredients at the appropriate time.

Рисунок 5: Examples of items that can be prepared with the 19 programs.
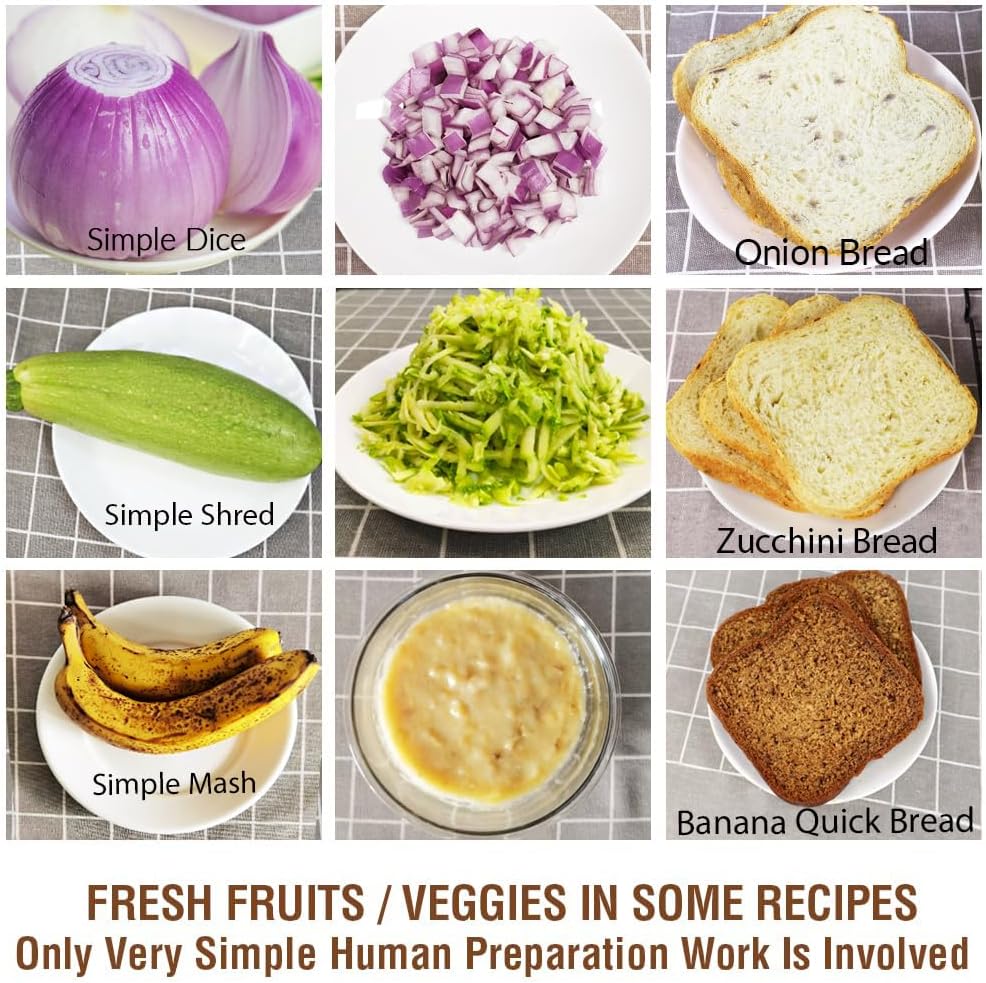
Figure 6: Preparation of fresh fruits and vegetables for recipes.
Уход и обслуживание
Уборка
Proper cleaning ensures the longevity and performance of your bread machine. Always unplug the machine and allow it to cool completely before cleaning.
- Форма для хлеба и лопасть для замешивания: The non-stick bread pan and kneading paddle should be hand washed only with warm, soapy water. Do not use abrasive cleaners or metal scouring pads, as this can damage the non-stick coating. Rinse thoroughly and dry completely.
- Экстерьер: Wipe the exterior body and control panel with a soft, damp Ткань. Не погружайте основной блок в воду или другую жидкость.
- Интерьер: Используйте мягкий, damp Протрите внутреннюю поверхность камеры для выпечки тряпкой. Удалите крошки и остатки пищи.
- Крышка: The stainless steel lid can be wiped clean with a damp ткань. Убедитесь, что viewing window is clear.
Хранилище
Store the bread machine in a cool, dry place when not in use. Ensure all components are clean and dry before storage.
Поиск неисправностей
В этом разделе рассматриваются распространенные проблемы, с которыми вы можете столкнуться. В случае проблем, не указанных здесь, пожалуйста, обратитесь в службу поддержки клиентов.
| Проблема | Возможная причина | Решение |
|---|---|---|
| Хлеб не поднимается или поднимается слишком сильно. | Incorrect yeast amount, expired yeast, incorrect water temperature, incorrect flour type, too much or too little liquid. | Ensure yeast is fresh and active. Use correct water temperature (lukewarm for active dry yeast). Measure ingredients precisely, preferably by weight. Refer to recipe book for correct flour type. |
| Хлеб слишком плотный или тяжелый. | Too much flour, too little liquid, old yeast, incorrect program. | Reduce flour slightly or increase liquid. Check yeast freshness. Ensure correct program is selected for the recipe. |
| У хлеба внизу большая дыра. | Kneading paddle left in bread during baking. | Some programs allow for removal of the kneading paddle before the final rise. Consult your recipe book or manual for specific program timings. Use the metal hook to remove the paddle after baking. |
| Аппарат не запускается и не реагирует. | Не подключено к сети, питание отключеноtage, pan not properly seated, lid not closed. | Ensure the machine is securely plugged into a working outlet. Check circuit breaker. Ensure bread pan is fully inserted and lid is closed. |
| Сильный шум во время работы. | Bread pan not seated correctly, foreign object in pan, machine on uneven surface. | Ensure bread pan is securely locked in place. Check for any foreign objects. Place machine on a stable, flat surface. |
Технические характеристики продукта
- Бренд: КУХНЯРМ
- Номер модели: 851011
- Цвет: White Body - Stainless Steel Lid & Chamber
- Размеры изделия (Д x Ш x В): 9.4" x 13.9" x 11.7"
- Вес товара: 11.97 фунта
- Ватtage: 550 Вт
- Количество программ: 19
- Размеры буханки: 1 фунт, 1.5 фунта, 2 фунта
- Цвета коры: Светлый, Средний, Темный
- Таймер задержки: До 15 часов
- Сертификации: ETL Certified for US / Canada
- Производитель: Kitchenarm LLC
- Уход за изделием: Hand Wash Only (for bread pan and paddle)
Гарантия и поддержка клиентов
KITCHENARM is committed to providing high-quality products and excellent customer service.
- Гарантия на продукцию: This product comes with a 2-YEAR Product Warranty.
- Обслуживание клиентов: LIFETIME Customer Service is provided, including access to Cloud Recipes and Recipe Customization assistance.
- Запасные части: Original replacement parts are available.
For warranty claims, technical support, or to inquire about replacement parts, please contact Kitchenarm LLC customer service through their official channels. Refer to the contact information provided in your product registration or on the official KITCHENARM webсайт.

Figure 7: KITCHENARM commitment to warranty and customer service.

