1. Введение
This manual provides essential information for the safe and efficient installation, operation, and maintenance of your Philips BVP167 10W LED Floodlight. Please read this manual thoroughly before installation and keep it for future reference.
The Philips BVP167 is a high-quality, energy-efficient LED floodlight designed for various indoor and outdoor applications. It features adjustable color temperature, a robust aluminum housing, and an IP65 rating for protection against dust and water.

Image 1.1: Philips BVP167 10W LED Floodlight, showing its compact design and integrated bracket.
2. Информация по технике безопасности
ВНИМАНИЕ: Опасность поражения электрическим током. Установка должна выполняться квалифицированным электриком в соответствии со всеми местными и национальными электротехническими нормами и правилами.
- Перед установкой, техническим обслуживанием или чисткой всегда отключайте питание.
- Обеспечьте объем поставкиtage соответствует требованиям продукта (220-240 В).
- Не вносите никаких изменений в изделие. Несанкционированные модификации могут привести к аннулированию гарантии и создать угрозу безопасности.
- Do not look directly into the operating LED light source.
- Обеспечьте правильное заземление прибора.
- Храните упаковочные материалы в недоступном для детей месте.
3. Содержимое упаковки
Аккуратно распакуйте коробку и убедитесь, что все предметы на месте и не повреждены. Если какие-либо предметы отсутствуют или повреждены, свяжитесь с продавцом.
- Philips BVP167 10W LED Floodlight
- Монтажный кронштейн (предварительно установленный или отдельный)
- Руководство по эксплуатации (данный документ)
Note: Mounting hardware (screws, anchors) may not be included and should be selected based on the mounting surface.
4. Настройка и установка
4.1. Physical Dimensions and Mounting
Refer to the diagram below for the physical dimensions of the floodlight. The integrated mounting bracket allows for versatile installation on walls, poles, or other suitable surfaces.
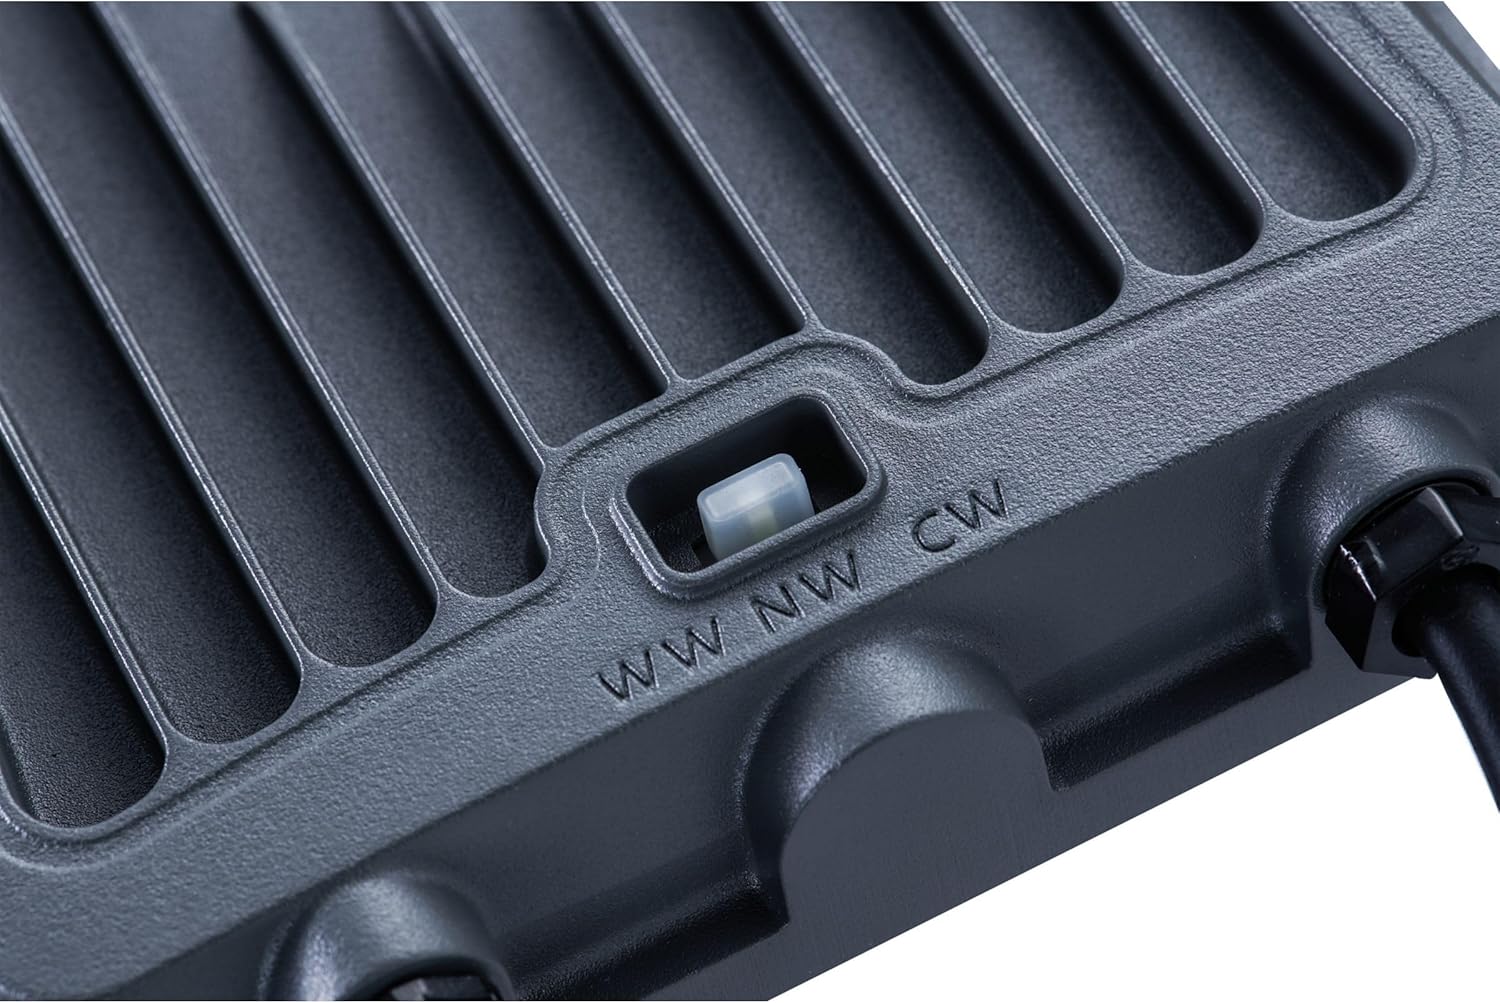
Image 4.1: Technical drawing showing the dimensions (A, B, C, D, E, a, b, c, d) of the Philips BVP167 LED Floodlight for various wattages. For the 10W model, refer to the '10W' column in the table.
Шаги монтажа:
- Выберите место: Select a stable mounting surface capable of supporting the floodlight's weight. Ensure the location provides adequate clearance for light distribution and access for maintenance.
- Отметьте точки бурения: Use the mounting bracket as a template to mark the drilling points on the surface.
- Отверстия для сверления: Drill appropriate holes for your chosen mounting hardware (not supplied).
- Надежный кронштейн: Attach the mounting bracket securely to the surface using suitable screws and anchors.
- Отрегулируйте угол: Once mounted, the floodlight's angle can be adjusted by loosening the side screws on the bracket, setting the desired angle, and then tightening the screws firmly.
4.2. Электрическое подключение
IMPORTANT: Ensure power is OFF at the circuit breaker before making any electrical connections.
- The floodlight comes with free cable ends for connection.
- Connect the live (brown), neutral (blue), and ground (green/yellow) wires from the floodlight to your main power supply wires according to local electrical codes.
- Use an appropriate IP-rated junction box or connector for outdoor installations to ensure water resistance.
- Убедитесь, что все соединения надежны и правильно изолированы.
4.3. Выбор цветовой температуры
The Philips BVP167 floodlight allows you to select between three color temperatures: 3000K (Warm White), 4000K (Neutral White), and 6500K (Cool White). This selection is made via a switch located on the back of the fixture.

Изображение 4.2: Крупный план view of the color temperature selection switch (WW, NW, CW) on the back of the floodlight.
Чтобы изменить цветовую температуру:
- Ensure the floodlight is powered off.
- Locate the switch on the back of the floodlight.
- Slide the switch to your desired setting:
- ВВ: Теплый белый (3000К)
- СЗ: Нейтральный белый (4000K)
- CW: Холодный белый (6500K)
- Restore power to the floodlight. The light will illuminate with the selected color temperature.
5. Инструкция по эксплуатации
Once properly installed and connected, the Philips BVP167 LED Floodlight operates simply by applying power. There are no complex controls for daily use.
- Включение/выключение питания: The floodlight will turn on when power is supplied to its circuit and turn off when power is removed. This is typically controlled by a wall switch or an external timer/sensor (not included).
- Регулировка яркости: The product description mentions brightness adjustment via a switch. However, the provided images and common features for this type of floodlight primarily indicate color temperature selection. If your specific model includes a separate switch for brightness (e.g., a dip switch inside a sealed compartment), consult the specific documentation provided with your unit for instructions on accessing and adjusting it. For most standard installations, the brightness is fixed at 1200 lumens.
6. Техническое обслуживание
WARNING: Always disconnect power before performing any maintenance.
- Уборка: Periodically clean the exterior of the floodlight with a soft, damp cloth. Do not use abrasive cleaners, solvents, or harsh chemicals, as these can damage the finish or optical components.
- Инспекция: Regularly inspect the floodlight for any signs of damage, such as cracked housing, frayed cables, or loose mounting. If any damage is found, disconnect power immediately and have the unit inspected by a qualified technician.
- Нет деталей, обслуживаемых пользователем: The Philips BVP167 LED Floodlight contains no user-serviceable parts. Do not attempt to open the housing or repair the internal components.
7. Поиск Неисправностей
Если у вас возникли проблемы с прожектором, ознакомьтесь со следующими распространенными проблемами и способами их решения:
| Проблема | Возможная причина | Решение |
|---|---|---|
| Свет не включается. | Нет электропитания. Неплотное соединение проводки. Faulty switch/circuit breaker. | Check power supply to the circuit. Убедитесь, что все электрические соединения надежно закреплены (при выключенном питании). Test the switch or circuit breaker. |
| Свет мерцает или тускнеет. | Нестабильное электропитание. Ослабленная проводка. | Обеспечьте стабильное электроснабжение. Проверьте соединения проводов (при выключенном питании). |
| Неправильная цветовая температура. | Переключатель цветовой температуры установлен неправильно. | Turn off power, adjust the color temperature switch to the desired setting (WW, NW, or CW), then restore power. |
| Water ingress/condensation inside fixture. | Неправильная установка или повреждение уплотнения. | Disconnect power immediately. Inspect for damage or improper sealing. Contact a qualified electrician or Philips support. |
Если проблема не исчезнет после применения этих решений, обратитесь в службу поддержки клиентов Philips или к квалифицированному электрику.
8. Технические характеристики
| Модель | BVP167 (8720169736016) |
| Потребляемая мощность | 10 Вт |
| Световой поток | 1200 люмен |
| Lumen per Watt | 120 лм/Вт |
| Цветовая температура | Selectable: 3000K (Warm White), 4000K (Neutral White), 6500K (Cool White) |
| Индекс цветопередачи (CRI) | 80-89 |
| Vol входtage | 220-240В |
| Коэффициент мощности | 0.95 |
| Угол луча | 110 degrees (Symmetric) |
| Рейтинг IP | IP65 (пыленепроницаемость и защита от струй воды) |
| ИК Рейтинг | IK07 (Protection against mechanical impacts) |
| Рабочая температура | -25°С до +40°С |
| Материал корпуса | Алюминий |
| Материал линз | Стекло |
| Lifespan (L80B50) | 50,000 часа |
| Размеры (Д x Ш x В) | Approx. 130mm x 85mm x 31mm (for 10W model, refer to diagram for exact measurements) |
| Масса | 1 кг |
9. Гарантия и поддержка
9.1. Информация о гарантии
This Philips BVP167 LED Floodlight comes with a Гарантия 3 год Гарантия действует с даты покупки. Данная гарантия распространяется на дефекты материалов и изготовления при нормальной эксплуатации. Она не распространяется на повреждения, возникшие в результате неправильной установки, неправильного использования, злоупотребления, несчастных случаев или несанкционированного ремонта.
Пожалуйста, сохраните документ, подтверждающий покупку, для претензий по гарантии.
9.2. Поддержка клиентов
For technical assistance, warranty claims, or further information, please contact Philips customer support through their official webили контактные данные, указанные в документах о покупке.
Вы можете посетить официальный сайт Philips webСайт с ресурсами поддержки: www.philips.com/support


